Managing Utility Services After DCNM Deployment

This chapter describes how to verify and manage all of the utility services that provide DC3 (Programmable Fabric) central point of management functions after the DCNM is deployed.

Table 1. Cisco DCNM Utility Services

Category

Application

Username

Password

Protocol Implemented

Network Management

Data Center Network Manager

admin

User choice 1

Network Management

1 User choice refers to the administration password entered by the user during the deployment.

This chapter contains the following sections:

Editing Network Properties Post DCNM Installation

The Cisco DCNM OVA or the ISO installation consists of 3 network interfaces:

  • dcnm-mgmt network (eth0) interface

    This network provides connectivity (SSH, SCP, HTTP, HTTPS) to the Cisco DCNM Open Virtual Appliance. Associate this network with the port group that corresponds to the subnet that is associated with the DCNM Management network.

  • enhanced-fabric-mgmt (eth1) interface

    This network provides enhanced fabric management of Nexus switches. Associate this network with the port group that corresponds to management network of leaf and spine switches.

  • enhanced-fabric-inband (eth2) interface

    This network provides in-band connection to fabric. Associate this network with the port group that corresponds to a fabric in-band connection.

The following figure shows the network diagram for the Cisco DCNM Management interfaces.
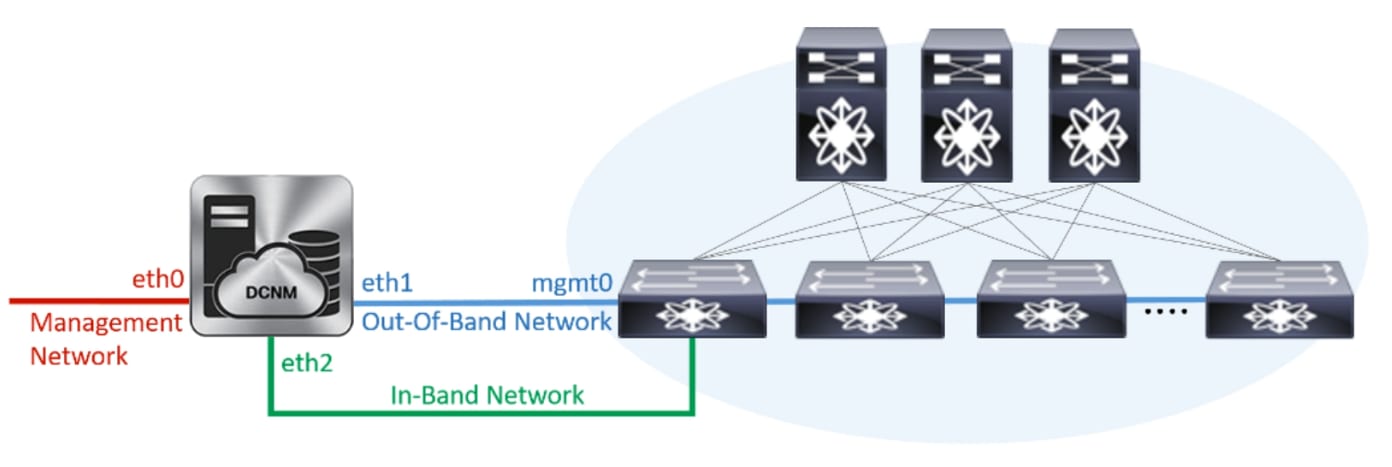
During Cisco DCNM installation for your deployment type, you can configure these interfaces. However, from Cisco DCNM Release 11.2(1), you can edit and modify the network settings post installation.

You can modify the parameters as explained in the following sections:

Modifying Network Properties on DCNM in Standalone Mode


Note

Execute the following commands on the DCNM Appliance console to avoid a premature session timeout.


To change the Network Properties on Cisco DCNM Standalone setup, perform the following steps:

Procedure


Step 1

Initiate a session on the console, using the following command:

appmgr update network-properties session start

Step 2

Update the Network Properties using the following command:

appmgr update network-properties set ipv4 {eth0|eth1|eth2} <ipv4-address> <network-mask> <gateway>

Step 3

View and verify the changes by using the following command:

appmgr update network-properties session show {config | changes | diffs}

Step 4

After you validate the changes, apply the configuration using the following command:

appmgr update network-properties session apply

Wait for a few minutes before you can logon to the Cisco DCNM Web UI using the eth0 Management Network IP address.


Sample Command Output for Modifying Network Parameters in the Cisco DCNM Standalone Setup

The following sample example shows how to modify the network parameters post installation for a Cisco DCNM Standalone setup.


dcnm# appmgr update network-properties session start

dcnm# appmgr update network-properties set ipv4 eth0 172.28.10.244 255.255.255.0 172.28.10.1
dcnm# appmgr update network-properties set ipv4 eth1 100.0.0.244 255.0.0.0
dcnm# appmgr update network-properties set ipv4 eth2 2.0.0.251 255.0.0.0 2.0.0.1
*****************************************************************
 WARNING: fabric/poap configuration may need to be changed
 manually after changes are applied.
*****************************************************************

dcnm# appmgr update network-properties session show changes
eth0 IPv4 addr  172.28.10.246/255.255.255.0  ->  172.28.10.244/255.255.255.0
eth1 IPv4 addr  1.0.0.246/255.0.0.0          ->  100.0.0.244/255.0.0.0
eth2 IPv4 addr  10.0.0.246/255.0.0.0         ->  2.0.0.251/255.0.0.0 2.0.0.1

dcnm# appmgr update network-properties session apply
*********************************************************************
                           WARNING

Applications of both nodes of the DCNM HA system need to be stopped
for the changes to be applied properly.

            PLEASE STOP ALL APPLICATIONS MANUALLY
*********************************************************************

Have applications been stopped? [y/n]: y
Applying changes
DELETE 1
Node left the swarm.
Server configuration file loaded: /usr/local/cisco/dcm/fm//conf/server.properties
log4j:WARN No appenders could be found for logger (fms.db).
log4j:WARN Please initialize the log4j system properly.
log4j:WARN See http://logging.apache.org/log4j/1.2/faq.html#noconfig for more info.
UPDATE 1
UPDATE 1
DELETE 1
server signaled
INFO      : [ipv6_wait_tentative] Waiting for interface eth0 IPv6 address(es) to leave the 'tentative' state
**********************************************************************
Please run 'appmgr start afw; appmgr start all' to restart your nodes.
**********************************************************************

dcnm# appmgr start afw; appmgr start all
Started AFW Server Processes
Started AFW Agent Processes
Started AFW Server Processes
Started AFW Agent Processes
Started applications managed by heartbeat..
Check the status using 'appmgr status all'
Starting High-Availability services: INFO:  Resource is stopped
Done.

Warning: PID file not written; -detached was passed.
AMQP User Check
Started AFW Server Processes
Started AFW Agent Processes
dcnm#

Changing the DCNM Server Password Post DCNM Installation

The password to access Cisco DCNM Web UI is configured while installing the Cisco DCNM for your deployment type. However, you can modify this password post installation also, if required.

To change the password post installation, perform the following steps:

Procedure


Step 1

Stop the applications using the appmgr stop all command.

Wait until all the applications stop running.

Step 2

Change the password for the management interface by using the appmgr change_pwd ssh {root|poap|sysadmin} [password command.

Ensure that the new password adheres to the following password requirements. If you do not comply with the requirements, the DCNM application might not function properly:

  • It must be at least 8 characters long and contain at least one alphabet and one numeral.

  • It can contain a combination of alphabets, numerals, and special characters.

  • Do not use any of these special characters in the DCNM password: <SPACE> " & $ % ' ^ = < > ; : ` \ | / , .*

Step 3

Start the application using the appmgr start all command.


Changing the DCNM Database Password on Standalone Setup

To change the Postgres database password on Cisco DCNM Standalone setup, perform the following steps:

Procedure


Step 1

Stop all the applications using the appmgr stop all command.

Ensure that all the applications have stopped using the appmgr status all command.

Step 2

Change the Postgres password by using the appmgr change_pwd db command.

Provide the new password at the prompt.

Step 3

Start the application using the appmgr start all command.

Ensure that all the applications have started using the appmgr status all command.


Example

dcnm# appmgr stop all
dcnm# appmgr change_pwd db <<new-password>>
dcnm# appmgr start all

Utility Services Details

This section describes the details of all the utility services within the functions they provide in Cisco DCNM. The functions are as follows:

Network Management

The data center network management function is provided by the Cisco Data Center Network Manager (DCNM) server. Cisco DCNM provides the setup, visualization, management, and monitoring of the data center infrastructure. Cisco DCNM can be accessed from your browser: http://<<hostname/IP address>>.


Note

For more information about Cisco DCNM, see http://cisco.com/go/dcnm.

Orchestration

RabbitMQ

Rabbit MQ is the message broker that provides the Advanced Messaging Queuing Protocol (AMQP). The RabbitMQ message broker sends events from the vCloud Director/vShield Manager to the Python script for parsing. You can configure this protocol by using certain CLI commands from the Secure Shell (SSH) console of the firmware.


Note

You need to stop and restart AMQP on both DCNM's server in HA within 30 seconds, otherwise AMQP may not start. For more information about RabbitMQ, go to https://www.rabbitmq.com/documentation.html.

Device Power On Auto Provisioning

Power On Auto Provisioning (POAP) occurs when a switch boots without any startup configuration. It is accomplished by two components that were installed:

  • DHCP Server

    The DHCP server parcels out IP addresses to switches in the fabric and points to the location of the POAP database, which provides the Python script and associates the devices with images and configurations.

    During the Cisco DCNM installation, you define the IP Address for the inside fabric management address or OOB management network and the subnets associated with the Cisco Programmable Fabric management.


    Note

    You should always configure DHCP through Cisco DCNM web UI by choosing: Configure > POAP > DHCP Scopes. Editing the /etc/dhcp/dhcp.conf file from an SSH terminal might lead to unexpected behavior.
  • Repositories

    The TFTP server hosts boot scripts that are used for POAP.

    The SCP server downloads the database files, configuration files, and the software images.

Managing Applications and Utility Services

You can manage the applications and utility services for Cisco Programmable Fabric in the Cisco DCNM through commands in an SSH terminal.

Enter the appmgr command from the SSH terminal by using the following credentials:

  • Username: root

  • Password: Administrative password provided during deployment


Note

For your reference, context sensitive help is available for the appmgr command. Use the appmgr command to display help.

Use the appmgr tech_support command to produce a dump of the log files. You can then provide this information to the TAC team for troubleshooting and analysis of your setup.


Note

This section does not describe commands for Network Services using Cisco Prime Network Services Controller.

This section includes the following:

Verifying the Application and Utility Services Status after Deployment

After you deploy the OVA/ISO file, you can determine the status of various applications and utility services that were deployed in the file. You can use the appmgr status command in an SSH session to perform this procedure.


Note

Context-sensitive help is available for the appmgr status command. Use the appmgr status ? command to display help.

Procedure


Step 1

Open up an SSH session:

  1. Enter the ssh root DCNM network IP address command.

  2. Enter the administrative password to login.

Step 2

Check the status by using the following command:

appmgr status all

Example:

DCNM Status
 PID  USER      PR   NI VIRT RES  SHR  S  %CPU %MEM  TIME+   COMMAND
 ===  =====    ===   == ==== ===  ===  =  ==== ===== ======  =======
 1891 root 20 02635m 815m  15m S  0.0 21.3   	1:32.09 	java
 
LDAP Status 
 PID  USER      PR   NI VIRT RES  SHR  S  %CPU %MEM  TIME+   COMMAND
 ===  =====    ===   == ==== ===  ===  =  ==== ===== ======  =======
 1470 ldap      20   0  692m  12m 4508 S  0.0  0.3   0:00.02 slapd
 
AMQP Status
 PID  USER      PR   NI VIRT RES  SHR  S  %CPU %MEM  TIME+   COMMAND
 ===  =====    ===   == ==== ===  ===  =  ==== ===== ======  =======
1504 root      20   0 52068  772  268 S  0.0  0.0   0:00.00 rabbitmq 
 
TFTP Status 
 PID  USER      PR   NI VIRT RES  SHR  S  %CPU %MEM  TIME+   COMMAND
 ===  =====    ===   == ==== ===  ===  =  ==== ===== ======  =======
 1493 root      20   0 22088 1012  780 S  0.0  0.0   0:00.00 xinetd

DHCP Status 
 PID  USER      PR   NI VIRT RES  SHR  S  %CPU %MEM  TIME+   COMMAND
 ===  =====    ===   == ==== ===  ===  =  ==== ===== ======  =======
 1668 dhcpd 20   0 46356 3724 408 S  0.0  0.0   0:05.23 dhcp 

Stopping, Starting, and Resetting Utility Services

Use the following CLI commands for stopping, starting, and resetting utility services:

  • To stop an application, use the appmgr stop command.

    dcnm# appmgr stop dhcp
    Shutting down dhcpd:     [  OK  ]
  • To start an application, use the appmgr start command.

    dcnm# appmgr start amqp
    Starting vsftpd for amqp:     [  OK  ]
  • To restart an application use the appmgr restart command.

    
    # appmgr restart tftp
    Restarting TFTP...
    Stopping xinetd:     [  OK  ]
    Starting xinetd:     [  OK  ]
    

Note

From Cisco DCNM Release 7.1.x, when you stop an application by using the appmgr stop app_name command, the application will not start during successive reboots.

For example, if DHCP is stopped by using the appmgr stop dhcp command, and the OS is rebooted, the DHCP application will still be down after the OS is up and running.

To start again, use the command appmgr start dhcp . The DHCP application will be started after reboots also. This is to ensure that when an environment uses an application that is not packaged as part of the virtual appliance (like CPNR instead of DHCP), the application locally packaged with the virtual appliance will not interfere with its function after any OS reboots.


Note

When a DCNM appliance (ISO/OVA) is deployed, the Cisco SMIS component will not get started by default. However, this component can be managed using the appmgr CLI: appmgr start/stop dcnm-smis

appmgr start/stop dcnm will start or stop only the DCNM web component.


Updating the SFTP Server Address for IPv6

After deploying the DCNM OVA/ISO successfully with EFM IPv4 and IPv6, by default the SFTP address is pointed to IPv4 only. You need to change the IPv6 address manually in the following two places:

  • In the DCNM Web Client, choose Administration > Server Properties and then update the below fields to IPv6 and click the Apply Changes button.

    #_____________________________________________________________________
    # GENERAL>xFTP CREDENTIAL
    #
    # xFTP server's ip address for copying switch files:
    server.FileServerAddress
    
  • Log in to the DCNM through ssh and update the SFTP address with IPv6 manually in the server.properties file (/usr/local/cisco/dcm/fm/conf/server.properties).

    
    # xFTP server's ip address for copying switch files:
    server.FileServerAddress=2001:420:5446:2006::224:19