Applications

Cisco DCNM uses the Applications Framework to build and deploy its various functions.

The applications framework provides the following features:

  • An infrastructure for hosting applications that require more system resources as the network scale increases.

  • An independent application development, deployment, and management lifecycle for applications.

In this release, Cisco DCNM uses the following applications:

  • Compliance(0.1): This application helps in fabric building for the Easy Fabric installation. The Compliance application runs as one instance per fabric. It is enabled when a fabric is created. Similarly, it is disabled when a fabric is deleted.

  • ElasticCluster(5.6): This application is used for storing various database information.

  • Kibana(1.0): Kibana is an open source data visualization plug-in for Elasticsearch, which provides visualization capabilities. Cisco DCNM uses the Kibana application for the media controller functionality. Kibana is used for Endpoint Locator (EPL) and Telemetry.

  • UTR(1.0): The Universal Telemetry Receiver (UTR) receives and decodes the streaming data from the switches, and feeds the data to a Kafka storage. The UTR can dynamically scale and instantiate multiple instances of UTR. It is a containerized application, which is instantiated using the Application Hosting Framework of Cisco DCNM.

  • vmmplugin(2.0): The VMM plug-in stores all the Computes and the virtual machine information that is connected to the fabric or the switch groups that are loaded into Cisco DCNM.


Note

In this release, the applications are view-only in the Cisco DCNM Web UI. You cannot control these applications from the user interface. For example, you cannot start or stop these applications from the Catalog tab of the Applications window.


Using the Applications Framework

To use the Applications Framework feature, from the left pane, click Applications.

The Applications window displays the following tabs:

  • Catalog: This tab lists the applications that are used by Cisco DCNM. These applications are used for performing various functions within Cisco DCNM. For example, the Elasticsearch application is used as a database by the Telemetry feature. In this release, you will not be able to add new third-party applications, and hence the Add applications button is disabled.


    Note

    The green icon on top of the application page indicates that the application is deployed in Cisco DCNM. If you see an amber icon within an application icon, it indicates a problem. If you see an amber icon within the Compliance application icon, it indicates that one of the deployed fabrics has some issues.


  • Compute: This tab displays the existing compute nodes. The tab shows nodes that are part of the hosting infrastructure. The uptime indicates how long they have been part of the infrastructure. In a High Availability setup, both the active and the standby nodes appear as Joined. In a cluster mode, the compute nodes are also displayed indicating if they are joined or discovered.


    Note

    In cluster mode, the Cisco DCNM servers will not appear in the computes tab.


  • Health: This tab displays all the instances of an application; certain applications may have multiple instances to extend scale. The health parameter indicates how much memory is available to applications. The uptime indicates how long the instances have been up for.

  • Preferences: This tab is relevant to the cluster mode of deployment, where the application instances are placed. In this tab, you can enable compute cluster connectivity and configure the preferences.

Enabling the Cisco DCNM Cluster

The Compute cluster feature provides scale mechanism to serve larger fabric, more advanced features (Telemetry, Advisories, and so on). The default status of the Cisco DCNM in any of the install modes does not support having computes as a cluster.


Note

Compute cluster is supported only on the LAN Fabric mode. The Classic LAN and the IP Fabric for Media (IPFM) installations will not support the Compute cluster functionality.


The values you specify in the preferences tab are not actually subnets with their gateway, rather they are IP prefix pools of addresses that can be used within the services that run inside a container. Hovering your mouse over the “?” button explains what is an acceptable input. Cisco DCNM Computes constantly communicates with DCNM Controllers; this ensures that the required applications are properly running on only the computes that are properly functioning. In a Native-HA environment only the active DCNM initiates the compute cluster, and standby DCNM is ready to take over in case the active fails. In Cisco DCNM 11.1(1) a maximum of three computes are supported per DCNM Servers installation.

To enable the Compute Cluster Connectivity, perform the following steps:

Procedure


Step 1

In the left pane, click Applications.

Step 2

Click the Preferences tab.

Step 3

In the InBand Fabric field, specify the IP prefix pool to connect applications through the inband path.

InBand Fabric is required for applications that connect with switches over the Underlay or Front Panel network. For example, EPL and Telemetry over In-Band. These IP addresses are visible outside of the compute. The InBand subnet mask should be /24 to /28.

Step 4

In the Out-Of-Band field, specify the IP prefix pool to connect applications with the fabric management network.

Out-Of-Band is required for applications that connect with switches over the Management network of the switches, e.g, Telemetry. These IP addresses are visible outside of the compute. The Out-Of-Band subnet mask should be /24 to /28.

Step 5

In the Inter Application field, specify the IP prefix pool for inter-application communication.

You can specify a pool that does not fall in either of the above subnets. Inter Application Network is not visible outside of the DCNM cluster, it is an internal network for communication between multiple services. But, the network should not conflict with the endpoints that the services try to reach. The Inter-Application subnet mask should be /20 to /24.

Step 6

Click Enable.


Adding Computes into the Cluster Mode

Compute is an additional installation mode with Cisco DCNM 11.1(1). It is supported with both small and large installations. Cisco DCNM supports a maximum of three Computes.

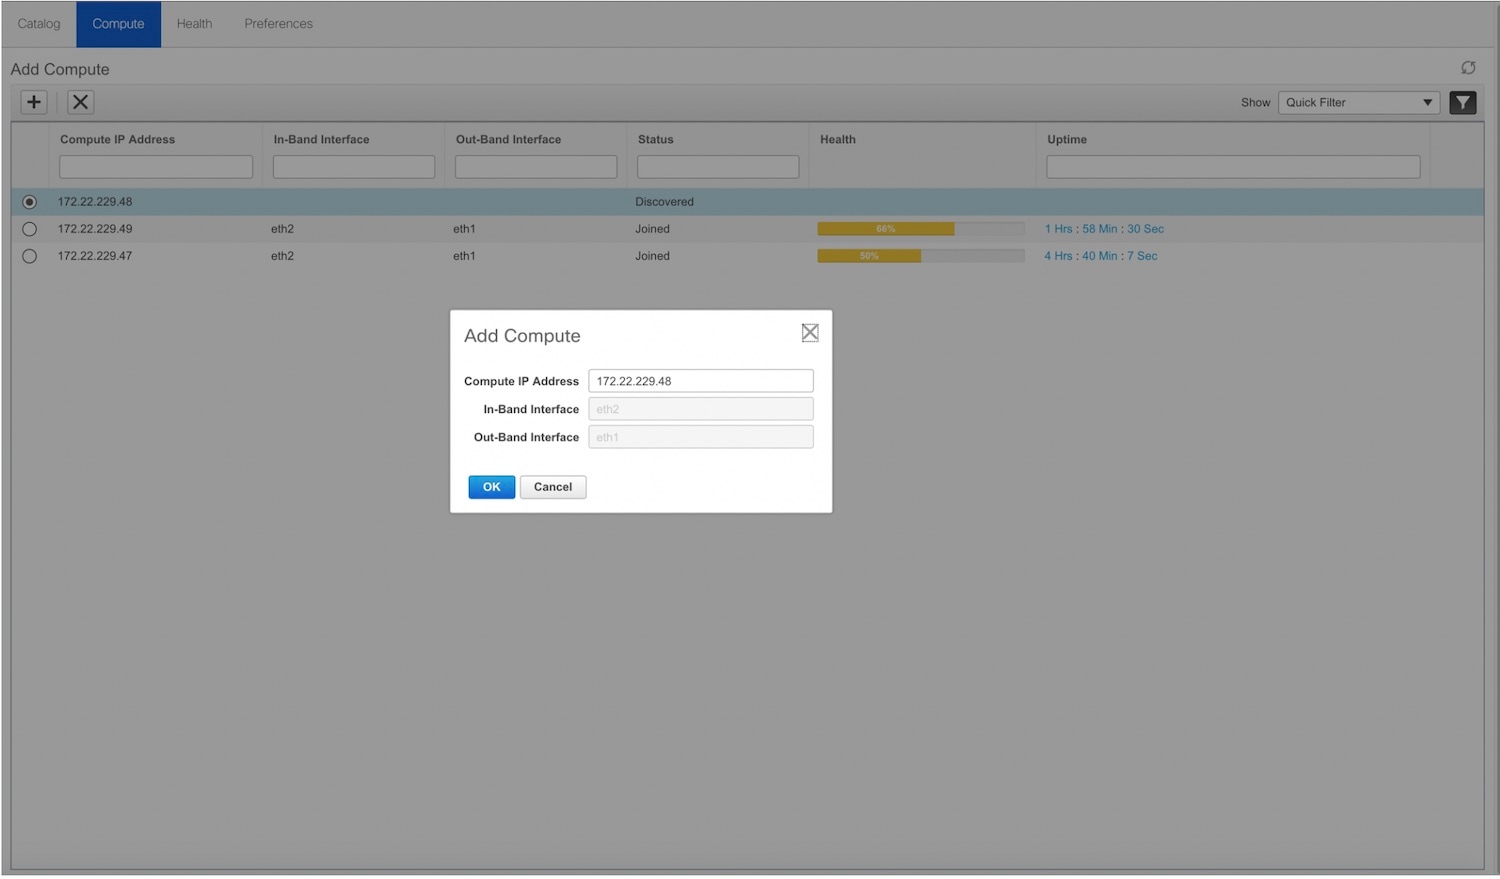
When a Compute is installed with correct parameters, it appears as Discovered.

To add computes into the cluster mode, perform the following steps:

Procedure


Step 1

In the left pane, click Applications.

Step 2

Click the Compute tab.

Step 3

Click the Add Compute (+) button.

  • While using Compute, ensure that Cisco DCNM GUI shows nodes as Joined.

  • Offline indicates that some connectivity issues between Nodes (on Eth0).

  • Health only indicates the amount of Memory left (Just like UnClustered mode).

The Compute window can also be used to monitor the health of computes. In Cisco DCNM 11.1(1), the health essentially indicates the amount of memory left in the compute, this is based on applications that are enabled. If a Compute is not properly communicating with the DCNM Server, the status of the Compute appears as Offline, and no applications will be running on Offline Computes. Most applications do not function properly if there are less than three computes, while a short loss of a single Compute node is mostly fine. In such cases, refer to the requirements of the individual applications.

Step 4

In the Add Compute dialog box, verify the Compute IP Address, In-Band Interface, and the Out-Band Interface fields.

Step 5

Click OK.


Deleting a Compute

To delete a compute, perform the following steps:

Procedure


Step 1

In the left pane, click Applications.

Step 2

Click the Compute tab.

Step 3

Click the Remove (X) button.

Caution 

When you delete a Compute, you will lose all the data that is stored in the Compute. You need to be cautious while deleting a Compute, since it can cause a cluster failure, for any data stored on Elasticsearch. If you are trying to restore a Compute, follow disaster recovery methods.


Installing a DCNM Compute


Note

With Native HA installations, the HA status s be Ok before DCNM can be converted to cluster mode.


A Cisco DCNM Compute can be installed using an ISO or OVA of a regular Cisco DCNM image. It can be deployed directly on a bare metal using an ISO or a VM using the OVA. After you deploy Cisco DCNM, using the DCNM web installer, choose Compute as the install mode for Cisco DCNM. On a Compute VM, you will not find DCNM processes or postgres database; it runs a minimum set of services required to provision and monitor applications.

Follow the instructions on the Web installer to install the compute. After the compute installation is complete, it appears as Discovered in the Applications > Compute tab. Compute will not join the cluster unless a user with admin privileges logs into the DCNM, and adds the compute to the cluster. After it is added, the status of the compute changes to Joined.

Disaster Recovery

The appmpgr backup operation on a compute gathers all the data that is required to re-install the compute. Also, this operation preserves all the application data. Using the tar ball generated by the backup command, the appmgr restore command restores all the data into the compute. This is similar to how you restore Cisco DCNM from a backup data.

When a compute needs to be reinstalled in a disaster recovery mode, you need to restore the application data into a new installation. It is also possible that the Cisco DCNM servers need to be restored into a new server. You may find the following scenarios:

  • Cisco DCNM Controllers need to be recovered

  • Cisco DCNM Computes need to recovered

  • Cisco DCNM Controllers and Computes need to be recovered

Scenario 1

You can use SSH to access the computes as root, and enter the appmgr stop afw command on each of the compute nodes. Now, the DCNM controllers can be powered off and restored onto a new DCNM Installation.

After the restore of the DCNM controllers is complete, verify that DCNM controller is completely up and the Applications screen is loading. Verify that all computes are showing up as offline. Now, enter the appmgr start afw command on each of the computes. After a while ensure all the applications are running and Computes are showing as “Joined”.

Scenario 2

In this case, enter the appmgr stop afw command on the compute that is being restored, after the compute shows offline in the Compute tab. Restore the compute on a new installation.

Perform one restore after the other.

Scenario 3

In this case, first perform scenario 1, and then perform scenario 2.

Converting from Un-Cluster to Cluster Mode with Existing Elasticsearch Data


Note

Every time Cisco DCNM is converted from un-clustered to clustered, run the steps mentioned below to rebuild the database schema and preserve the Elasticsearch data.


Read through the complete procedure before proceeding with the Cluster mode conversion.

To convert from un-cluster to cluster mode, perform the following steps.

Procedure


Step 1

From the left pane, choosePreferences, and then click the Preferences tab.

Step 2

Take backup of the Elasticsearch data by executing the appmgr afw backup-es command.

  • If the setup is HA, repeat the step on DCNM Standby.
Step 3

Copy the tarball file produced from Step 2 to Compute 1.

  • If the setup is HA, copy the tarball file on DCNM Standby to Compute 2.
Step 4

Restore the Elasticsearch data by executing the appmgr afw restore-es $tarball command on the Compute node, where $tarball is the location of the tarball file copied in Step 3.

  • If the setup is HA, repeat the step on Compute 2.
Step 5

Proceed with adding the Compute nodes. Ensure that Compute 1 is added before Compute 2.

  • If the setup is HA, ensure that Compute 2 is added before the rest of the computes (except for Compute 1).