Common Issues and Resolutions

This chapter contains the following sections:

Connectivity Refresher

This section serves a simple review of how communication between the pods and the nodes works. This is useful to troubleshoot cluster issues. The following example shows a 2-node Kubernetes deployment and how coredns traffic is reaching the kube-api:

Figure 1. 2-node Kubernetes deployment

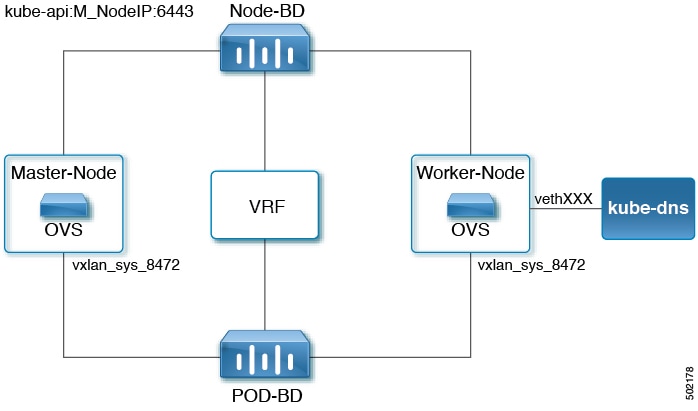
After the coredns pod comes up, the pod tries to initialize services and endpoints from the API server. The API server runs on the master nodes, listen on port 6443, and is accessible by the Node-BD subnet.

You can have multiple masters. By default Kubernetes creates a service IP address to load balance sessions between multiple masters. For example, in a 2-master configuration, you can see the following information:

root@k8s-01:~# kubectl --namespace=default describe service kubernetes
Name:             kubernetes
Namespace:        default
Labels:           component=apiserver provider=kubernetes
Annotations:      <none>
Selector:         <none>
Type:             ClusterIP
IP:               10.37.0.1
Port:             https 443/TCP
Endpoints:        10.32.0.11:6443,10.32.0.12:6443
Session Affinity: ClientIP
Events:           <none>

When coredns tries to connect to the master, coredns tries to connect to kubernetes-service-ip on port 443 (10.37.0.1 is used in the example above). A sniffer trace collected on the coredns vethID would show flows initiated with the KubeDNS IP address directed to the kubernetes-service-ip on port 443.

After the traffic hits the Open vSwitch (OVS), the traffic will be destination network address translated to one of the master node API addresses. A sniffer trace collected on the vxlan_sys_8472 interface shows that the destination IP address has been changed from "kubernetes-service-ip:443" to "Master-IP:6443."

This procedure can be used to troubleshoot most services on the cluster.

CoreDNS Crash Loopback

This issue is caused most of the time by a connectivity issue between the coredns pods and Kube-API. For information on how to investigate this issue, see the Connectivity Refresher section.

ARP Is Not Resolving

If Address Resolution Protocol (ARP) is not resolving perform the following actions:

  • Verify Layer 1 connectivity and that the bridge domains are configured as shown in the Basic Checks section.

  • If you are using virtual machines (VMs), you should use Nested mode. Manual creation of the port group is not supported. However, if you do configure the PortGroup manually the following requirements must be met or the traffic will be dropped, either VM traffic or Opflex Control plane packets:

    • MTU of 9000 (Set this at the Virtual Switch level)

    • Forged Transmit: Accept

    • MAC Address change: Accept

    • Promiscuous Mode

      • ACI 3.2 or above: Reject

      • Before ACI 3.2: Accept

  • Verify there is a static route for the 224.0.0.0 subnet pointing to the ACI Infrastructure sub-interface.

    cisco@k8s-03:~$ route -n | grep 224
    224.0.0.0   0.0.0.0    240.0.0.0       U     0      0     0 ens192.3456

    Note

    If you are running multiple Kubernetes cluster on the same ACI fabric, you must configure different Multicast Fabric Wide address. The mcast_fabric parameter is located in the acc-provision config file.


  • Verify if the mcast-daemon logs contain the following message:

    Could not join group IP: No buffer space available

    If you see this message, see the "Tune the igmp_max_memberships kernel parameter" step of the "Preparing the Kubernetes Nodes" procedure in the Cisco ACI and Kubernetes Integration document.

Traffic is not Reaching the Kubernetes Master Node

  • Verify the node interface configuration is correct:

    • All interfaces should be configured with at least 1600 MTU.

    • All the subnets used for the clusters needs to point to the ACI NODE-BD as default GW.

  • Verify that destination network address translation (DNAT) is happening by taking a sniffer trace on vxlan_sys_8472 shows. If not, see DNAT Is Not Happening.

DNAT Is Not Happening

A trace collected on vxlan_sys_8472 shows that destination network address translation (DNAT) is not happening. This is generally cause by the following misconfiguration:

  • The acc-provision config points to a VRF in Tenant X.

  • The ACI fabric is configured to use the VRF in Tenant Common.

If the VRF information is not correct, Opflex can’t retrieve the EndPoints IP, and won’t be able to program OVS NAT correctly.

Currently this issue is a silent failure and no error messages nor faults are raised.

DNS Resolution Is Not Working (kubeadm)

This issue occurs on cluster installed with the kubeadm command. If you modify the cluster IP subnet from 10.96.0.0/16 to something else, the kubeadm command will not update the configuration of kubelet. This results in the container trying to resolve DNS names with the 10.96.0.10 IP address regardless if this is actually the coredns service IP address.

To check if you are hitting this issue:

  1. Get the coredns service IP address:

    cisco@k8s-01:~$ kubectl get svc -n kube-system  | grep dns
    coredns                   ClusterIP   10.37.0.3     <none>        53/UDP,53/TCP         141d
  2. Verify that the cluster DNS IP address matches with 10.37.0.3:

    Before Kubernetes 11.1:

    cat /etc/systemd/system/kubelet.service.d/10-kubeadm.conf | grep KUBELET_DNS_ARGS
    Environment="KUBELET_DNS_ARGS=--cluster-dns=10.37.0.3 --cluster-domain=cluster.local"

    Kubernetes 1.11 or newer:

    cat /var/lib/kubelet/config.yaml | grep -A1 clusterDNS
    clusterDNS: - 10.96.0.10
  3. If there is a mismatch, you must edit the /etc/systemd/system/kubelet.service.d/10-kubeadm.conf file on all of the nodes (workers and master nodes) and enter the correct IP address. Then, restart kubelet:

    systemctl daemon-reload
    systemctl restart kubelet

This issue might be resolved in a newer kubeadm version: https://github.com/kubernetes/kubeadm/issues/28

External Services Are Not Working

The following issues are the most common that you can expect to have:

  • Verify that you HAVE NOT created a sub-interface for the service_vlan.

  • Ensure that the service VLAN is trunked all the way to the host or virtual machine.

  • If you are running a version earlier than Cisco APIC release 3.2, and the node is a VM behind a virtual switch, make sure that promiscuous mode is enabled on the virtual switch port group.

  • Make sure that node_svc_subnet value in acc-provision is not the same as the kubernetes service-cidr (10.97.0.0 is the default value in kubeadm). These subnets must be different.

  • Make sure that your client IP address is not part of the same subnet used for the L3Out interfaces. This configuration is unsupported and will not work.


    Note

    If you did not configure Cisco APIC to dynamically advertise your extern_dynamic and extern_static subnets you should configure your external router with static routes for those subnets pointing to your Cisco ACI border leaf switches.
  • Verify the interfaces configured in the Layer 4 to Layer 7 service devices are configured with the correct physical interfaces. As of Cisco APIC release 4.2, port channel is not supported and will result in no concrete interface being programmed. vPC and single uplink are the only supported options.

Source NAT is Not Working

Source NAT replies on the same policy-based redirect configuration that is deployed for the external services, and so some of the verification steps will be the same.

Procedure


Step 1

Verify that you have not created a sub-interface for the service_vlan.

Step 2

Ensure the service VLAN is trunked all the way to the host or virtual machine.

Step 3

Verify that the interfaces configured in the Layer 4 to Layer 7 service devices are configured with the correct physical interfaces. As of Cisco APIC release 4.2, port channel is not supported and will result in no concrete interface being programmed. vPC and single uplink are the only supported options.

Step 4

Verify that the SNAT policy "State" is "Ready" with either of the following commands:

  • kubectl describe snatpolicy name
  • oc describe snatpolicy name

Example:

kubectl describe snatpolicy cluster-snat
Name:         cluster-snat
Namespace:
Labels:       <none>
Annotations:  kubectl.kubernetes.io/last-applied-configuration:

{"apiVersion":"aci.snat/v1","kind":"SnatPolicy","metadata":{"annotations":{},
  "name":"cluster-snat"},"spec":{"snatIp":["10.20.30.1"]}}
API Version:  aci.snat/v1
Kind:         SnatPolicy
Metadata:
  Creation Timestamp:  2019-11-04T01:59:38Z
  Finalizers:
    finalizer.snatpolicy.aci.snat
  Generation:        2
  Resource Version:  29789719
  Self Link:         /apis/aci.snat/v1/snatpolicies/cluster-snat
  UID:               c1dfdb27-fea6-11e9-b10f-005056aa4c92
Spec:
  Selector:
  Snat Ip:
    10.20.30.1. <= This is the IP configured for SNAT
Status:
  Snat Ports Allocated: <= This show the per-node port allocation for SNAT
    10 . 20 . 30 . 1:
      Nodename:  fab2-k8s-5
      Portrange:
        End:     7999
        Start:   5000
      Nodename:  fab2-k8s-4
      Portrange:
        End:     10999
        Start:   8000
      Nodename:  fab2-k8s-3
      Portrange:
        End:     13999
        Start:   11000
      Nodename:  fab2-k8s-1
      Portrange:
        End:     16999
        Start:   14000
      Nodename:  fab2-k8s-2
      Portrange:
        End:    19999
        Start:  17000
  State:        Ready <= Anything different from Ready is an issue
Events:         <none>
Step 5

If the SNAT policy state is not "Ready," check the snat-operator logs for error messages. A common issue is a typo in the snatpolicy configuration.


opflex-agent ELOCATION Errors

These opflex-agent ELOCATION errors generally point to unsupported connectivity models. If you configure the leaves in a vPC pair, but the host are not dual homed (single/PC uplink) you will see the following errors

kubectl -n kube-system logs aci-containers-host-tkcp9 opflex-agent
===== SNIP ====
[info] [active_connection.cpp:54:create] 10.1.16.68:8009 ç “Wrong” leaf
[info] [active_connection.cpp:54:create] 10.1.16.65:8009 ç Correct leaf
[info] [OpflexPEHandler.cpp:130:ready] [10.1.16.65:8009] Handshake succeeded
[error] [OpflexHandler.cpp:77:handleError] [10.1.16.68:8009] Remote peer returned error with message (1,Send Identity): ELOCATION: ELOCATION
===== SNIP ====

Connectivity Issues When Adding A New Cluster

By default ACC provision uses 225.1.2.3 as Fabric Wide Multicast Address. If you deploy multiple cluster on the same fabric, you must change this to a unique value per cluster.

You can verify this in the acc-provision configuration file. For example:

  vmm_domain:                # Kubernetes VMM domain configuration
  encap_type: vxlan          # Encap mode: vxlan or vlan
 mcast_range:                # Every opflex VMM must use a distinct range
       start: 225.22.1.1
         end: 225.22.255.255
mcast_fabric: 225.1.2.4      # Every opflex VMM must use a unique address

Note

This issue can also be present if you deploy any other solution (AVE/AVE/OpenStack) that uses a Fabric Wide Multicast Address.


Not Getting An IP Address On The Infra Interface

dhcp-client-identifier is configured as per Opflex specifications:

01:[Interfaec Mac address]

If you are running Ubuntu the location of the file is /etc/dhcp/dhclient.conf.

If you run RedHat or Centos the location of the file is /etc/dhcp/dhclient-[ifname].conf.

For example:

/etc/dhcp/dhclient-ens224.3456.conf

In the example below replace [IF_MAC] with the actual mac of your interface that connects to the ACI fabric:

send dhcp-client-identifier 01:[IF_MAC];
request subnet-mask, domain-name, domain-name-servers, host-name;
send host-name = gethostname();
option rfc3442-classless-static-routes code 121 = array of unsigned integer 8;
option ms-classless-static-routes code 249 = array of unsigned integer 8;
option wpad code 252 = string;
also request rfc3442-classless-static-routes;
also request ms-classless-static-routes;
also request static-routes;
also request wpad;
also request ntp-servers;

Cannot Access the Kubernetes Dashboard

Access to the Kubernetes dashboard is denied by default. Even when an account is enabled, you can access the dashboard only if you access it directly from the master. Complete the steps in this procedure to access the dashboard from the master.

Procedure


Step 1

Create the service user:

Example:

cat <<EOF | kubectl create -f -
apiVersion: v1
kind: ServiceAccount
metadata:
  name: admin-user
  namespace: kube-system
EOF
Step 2

Create ClusterRoleBinding:

Example:

cat <<EOF | kubectl create -f -
apiVersion: rbac.authorization.k8s.io/v1
kind: ClusterRoleBinding
metadata:
  name: admin-user
roleRef:
  apiGroup: rbac.authorization.k8s.io
  kind: ClusterRole
  name: cluster-admin
subjects:
- kind: ServiceAccount
  name: admin-user
  namespace: kube-system
EOF
Step 3

Copy and save a Bearer Token, which you need to authenticate to the dashboard:

Example:

kubectl -n kube-system describe secret $(kubectl -n kube-system get secret | grep admin-user | awk '{print $1}')
Step 4

Access the dashboard.

It is a Kubernetes best practice to expose the dashboard only on the master node on the local host address. If you do not have a GUI installed on the master node, you can use an SSH tunnel to access the master node, as in the following example:

k8s-master# kubectl proxy
Starting to serve on 127.0.0.1:8001

remote-host# ssh -L 9000:localhost:8001 <user>@<kubernetes_master>

After you complete the previous command, you can access the dashboard at the following URL:

http://localhost:9000/api/v1/namespaces/kube-system/services/https:kubernetes-dashboard:/proxy/

What to do next