Captive Portals and Proximity Rules
This chapter describes how to create a captive portal using the CMX Engage, the various portal modules, and the proximity rules.
Captive Portals
A captive portal is the user interface that appears when a Wi-Fi user is connected to an SSID. The CMX Engage enables you create captive portals. You can enhance the portals using the various portal modules provided by the CMX Engage.
Creating the Portals
To create a portal, perform the following steps:
Step 1 In the CMX Engage dashboard, choose Portal , and click Create New .
Step 2 In the Portal window that appears, enter a name for portal in the Na me field.
Step 3 If you want the portal to be available for all the locations, select the “Enable this portal for all locations” check box. Else, select the locations for which the portal must be available.

Note You can select the location only if you unselect the “Enable this portal for all locations” check box.
Step 5 From the Authentication Type drop-down list, choose the authentication type that you want apply for the portal.
Based on the authentication type selected additional fields appear. For more information on various authentication types, refer to Cisco CMX Engage with CUWN Configuration Guide.
Step 6 After specifying the details for the authentication type, click Next .
Step 7 Adjust the Expiry slide bar and define the expiry date for the Terms and Conditions.
Step 8 In the Terms & Condition Message text field, enter the Terms and Conditions for the portal.
Step 9 Based on your authentication type, a button appears at the bottom of the screen.
- For authentication types other than “SMS with password verification” and “Email “, click Save and Configure Portal .
- If you have selected “SMS with password verification” or “Email” as the authentication type, click Next . The screen for configuring the Data Capture form appears. Configure the Data Capture form by specifying the following details:
a. If you want to enable the Data Capture option for this portal, swap the Data Capture button to enable it.
Note By default, the Data Capture swap button appears as disabled. After enabling, the button turns green.
b. Add the fields required for the Data Capture form using the Add Field Element button. For more information on adding fields to the Data Capture form, refer to Cisco CMX Engage with CUWN Configuration Guide.
c. Click Save and Configure Portal .
A message “Portal saved successfully” appears and the portal page opens with the portal modules on the left and portal preview on the right.
Step 10 Add features to the portal using the Portal Modules.
Step 11 Click Save to save the changes made to each module.
Note When creating the portal, you can save the portal after specifying the name for the portal. The new portal gets listed in the Portals page. You can configure authentication type, Terms and Conditions, Data Capture form, and so on at any time later using the Edit button for that portal.
Note To capture the customer details such as name, phone number, and so on, ensure that you add a Data Capture module in the captive portals. Before provisioning the internet, the data capture form is displayed to the customer. The captured customer details are stored in the CMX Engage database. The Data Capture module is available for the SMS with password verification and E-mail authentication types.
Note A portal becomes live when you associate it with a Captive Portal Rule, and publish that rule.
Portal Modules
A portal is the user interface that appears when a Wi-Fi user is connected to an SSID. You can enhance the portals using the various portal modules provided by the CMX Engage.
The following are the portal modules available in the CMX Engage:
- Authentication—Set the authentication mode for your portal using this module. You can provide access to a portal without authentication or with authentication through SMS, e-mail, and Social Sign In.
- Data Capture—Add an option to register to the CMX Engage through the portal using this module. This module is available only if you choose the authentication type as “SMS with password verification” or “Email”.
- Brand Name—Define the brand name for your portal using this module. You can add the brand name as text or a logo image.
- Notice—Add a notice in the portal using this module. This helps you display notices to the portal users whenever required. You can set to provide the notice in the thicker text, text, or text with an image format.
- Welcome Message—Add a welcome message in the portal using this module..
- Venue Map— Add a label and icon for the Venue Map using this module. The venue map is uploaded in the portal from the CUWN based on the location.
- Videos—Add videos in the portal using this module. You can also add an appropriate caption and icon for the video section in the portal. You can also view the preview of the video when uploading.
- Feedback—Add the feedback questions in the portal using this module. You can add multiple-choice and rating questions. This module also lets you customize the labels for the Submit button, Thank You message, and Post Submission button. It has an option to set whether the customers are provided a text box to add the comments. It also lets you specify the e-mail addresses and subject for feedback.
- Help—Add a help line number that the customer can contact for assistance using this module. You can customize the caption and icon for Help.
- Get Apps—Add apps to the portal using this module. You can add appropriate caption and icon for each app using this module.
- Get Internet—Add the external URL to which the customer can navigate from the Get Internet section in the portal. To navigate to this URL, the customer has to complete the authentication process configured.
- Add Menu Item—Add customized menu items to the portal using this module. All the modules mentioned earlier are the default modules provided by the CMX Engage. You can add additional items to a portal based on your requirements using the Add Menu Item module.
- Promos & Offers—Add the promotions and offers to display through the portal using this module. You can modify the title of the promotion. For each module you can add appropriate captions and images, and specify the URL to the promotion details. Promos are displayed as carousels.
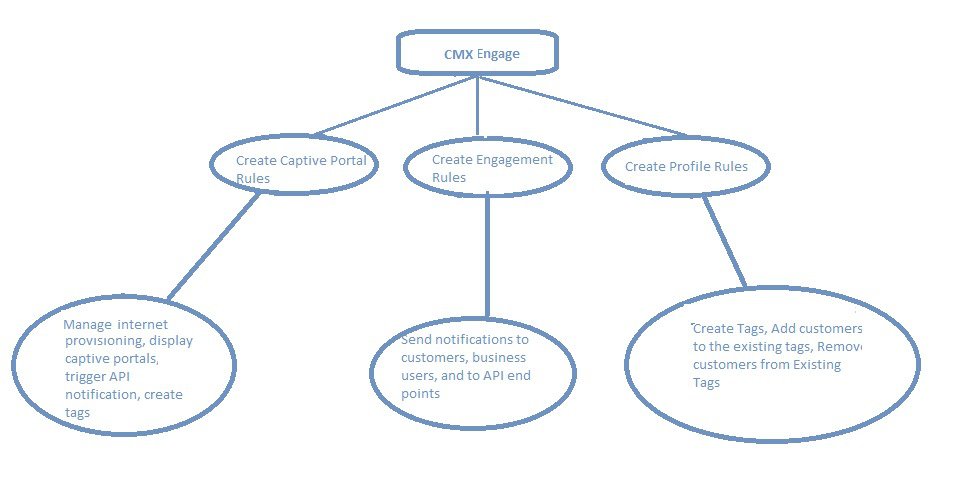
Proximity Rules
The CMX Engage enables you to create the following three types of proximity rules:
- Captive Portal Rule - To configure the captive portal that is to display to the customers who are connecting to a particular SSID from a particular location during a particular time. You can also configure to provide direct internet access or deny internet access to the customers on your business premises based on a Captive Portal Rule.This rule can also be used to create tags and sending customer details to an external API.
- Engagement Rule - To send notifications to the customers or business users when the customer is in your business premises.
- Profile Rule - To create tags that are used to group the customers. You can also use this rule to add additional customers to an existing tag or remove certain customers from an existing tag.
Figure 1 Proximity Rules in the CMX Engage
Note The Proximity Rules can be created only if the location hierarchy configuration is complete. For more information on creating the location hierarchy, see the “Defining the Location Hierarchy” section.
Captive Portal Rule
The Captive Portal Rule refers to the conditions based on which a captive portal is displayed to the customers who are connecting to a particular SSID.
Before defining the captive portal rule, you must first create the location hierarchy, import the SSIDs, create the tags, and create the portal that is to display for the captive portal rule. For more information on creating the location hierarchy, see the “Defining the Location Hierarchy” section. For more information, see the Cisco CMX Engage with CUWN Configuration Guide.
Note You must do certain configurations in the WLC such as creating ACLs, creating SSIDs, configuring the mode for access points, and so on. For more information, see the Cisco CMX Engage with CUWN Configuration Guide.
Creating a Captive Portal Rule
To create a captive portal rule to show a portal, perform the following steps:
Step 1 In the CMX Engage dashboard, choose Proximity Rules > Captive Portal Rule .
Step 2 Click Create a new rule .
Step 3 In the Rule Name text field, enter a name for the captive portal rule.
Step 4 In the Sense area, perform the following steps:
a. From the drop-down list after “When a user is on”, choose WiFi .
b. From the drop-down list after “and connected to”, choose the SSID for which you want to apply the rule.
Note The SSIDs are available for selection only if you have manually imported the SSIDs from the CMX.
Step 5 In the Locations area, specify the locations for which you want to apply the rule.
You can configure to show the portal for the entire location hierarchy, or a single or multiple locations such as CMX node, campus, group, building, floor, or zone. For more information on creating the location hierarchy, see the “Defining the Location Hierarchy” section.
You can also filter the locations using the location metadata.
Step 6 In the IDENTIFY area, specify the type of customers for whom you want to apply the rule.
You can filter the customers based on whether the customer is an opted in or not opted in user, the tags the customers belong to, the number of visits made by the customer, and the status of the app in the customer’s device. You can apply all these filters or any of them based on your requirement.
Step 7 In the Schedule area, specify the period for which you want to apply the rule.
a. Select the Set a time range for the rule check box and in the fields that appear, specify the time range for which you want to apply the captive portal rule.
b. Select the Set a date range for the rule check box, and in the fields that appear, specify the start date and end date for the period for which you want to apply the captive portal rule.
c. If you want to apply the rule only on particular days, select the Filter by days of the week check box, and from the list of days that appears, click the days on which you want to apply the rule.
Step 8 In the Actions area, choose the action to be performed when the conditions defined in the rule are met.
You can configure to show a captive portal, provide direct access to internet, or deny access to the internet when the conditions defined in the rule are met. You can also create tags based on the rule, and send the customer details captured to an external API using the rule.
Step 9 Click Save and Publish .
The captive portal rule is published. The rule gets listed in Captive Portal Rules page.
Note For detailed information on creating a captive portal rule see the Cisco CMX Engage with CUWN Configuration Guide.
Engagement Rule
The Engagement Rule refers to the conditions based on which the notifications are sent to the target customers. You can create the engagement rule for your customers and business users such as employees.
You can set the frequency at which the notification is to send. You can also define the criteria that must match to send the notification. You can configure to send the notification to a single customer or a group of customers in multiple locations.
For customers, you can send the notifications through SMS, e-mail, BLE, or app. For business users, you can send the notifications through SMS, e-mail, or an external API. For both customers and business users, you can configure to send the notifications based on the proximity of the customer to a BLE beacon or connectivity of the customer to an SSID. You can configure more than one notification type for a proximity rule, so that the customer gets notification in more than one format. This increases the probability of notifications to be noticed by the customer.
Before creating the engagement rule, you must define the location hierarchy and create the required tags that group the customers. You must also configure the BLE beacon and app, if required
Creating an Engagement Rule for a Consumer
You can send the notifications to the customer as SMS, e-mail, app, or BLE notifications.
To define an engagement rule to send notifications to the customers, perform the following steps:
Step 1 In the CMX Engage dashboard, choose Proximity Rules > Engagement Rule .
Step 2 Click Create a New Rule .
Step 3 In the Rule Name text field, enter a name for the engagement rule.
Step 4 In the Sense area, from the “When a user is on drop-down list, choose whether you want to send notifications based on the customer’s connectivity to the Wi-Fi or proximity to the BLE Beacon.
a. If you choose “WiFi”, you can configure to send the notification during any of the following scenarios: when a customer connected to the Wi-Fi enters the location, when a customer connected to the Wi-Fi leaves the location, or when the customer connected to the Wi-Fi is present at the location for a specified duration or at a particular time.
b. If you choose “Beacon”, you can configure to send the notification during any of the following scenarios: when a customer enters the beacon premises, when the customer leaves the beacon premises, when the customer is with in the beacon premises for a specified duration or at a particular time.
Note If you choose “Beacon”, the notification is sent only if the customer’s bluetooth is ON.
Step 5 In the Locations area, specify the locations for which you want to send the notifications.
You can configure to send notifications for the entire location hierarchy or a single or multiple locations such as CMX node, campus, group, building, floor, or zone. For more information on creating the location hierarchy, see the “Defining the Location Hierarchy” section.
You can also filter the locations for the rule using the location metadata.
Step 6 In the IDENTIFY area, specify the type of customers for whom you want to send the notifications.
You can filter the customers based on whether the customer is an opted in or not opted in user, the tags the customers belong to, the number of visits made by the customer, and the status of the app in the customer’s device. You can apply all these filters or any of them based on your requirement.
Step 7 In the Schedule area, specify the period for which you want to apply the rule.
a. Select the Set a time range for the rule check box, and in the fields that appear, specify the time range for which you want to apply the engagement rule.
b. Select the Set a date range for the rule check box, and in the fields that appear, specify the start date and end date for the period for which you want to apply the engagement rule.
c. If you want to apply the engagement rule only on particular days, select the Filter by days of the week check box, and from the list of days that appears, click the days on which you want to send the notifications.
Step 8 In the Actions area, perform the following steps:
a. From the Notify drop-down list, choose Notify Consumer , and from the adjacent drop-down list choose any of the following:
– Only Once- The notification is sent only once to a customer.
– Once In- The notification is sent more than once to a customer based on the notification frequency specified. In the additional fields that appear when you choose this option, specify the notification frequency.
b. Select the Via App Push Notification check box, if you want to send the notification to the customers through the app as push notifications. From the drop-down list following the check box, choose the app through which the notification is to send. Also, include smart links in the following text using the variables provided.
Note To use the BLE beacons in the CMX Engage or to send the push notifications, you must integrate the BLE Beacon or the app from which you want to send the notifications with the CMX Engage SDK. For more information on how to integrate BLE Beacon or app with the CMX Engage SDK, see the CMX Engage SDK documentation.
c. Select the BLE Notification check box, if you want to send the notifications as BLE notification. Also, include smart links in the following text using the variables provided.
d. Select the Via SMS check box, if you want to send the notification through SMS. From the SMS Gateway drop-down list, choose the SMS gateway through you want to send the notification. In the Link field, enter the engagement URL that must appear in the notification. You can enhance your URL using the smart link option. Enter”$” to view the parameters that you can add. You can also edit the content in the following text box to match your business requirements.
e. Select the Via Email check box, if you want to send the notification through e-mail. In the From Name field, specify the name that must appear in the e-mail, in the From E-mail ID field, specify the From e-mail ID that must appear in the e-mail, and in the Subject field, enter the subject for the notification e-mail. In the Link field, enter the engagement URL that must appear in the notification. You can enhance your URL using the smart link option. Enter”$” to view the parameters that you can add. You can also edit the content in the following text box.
Note The notifications by default contain the welcome back message with the First Name, and Last Name of the customer. You can edit the text in the message to match your business requirements. To view the parameters that you can add, enter “$” in the message box or click the Add Variable button. For more information on the parameters that you can add see the Cisco CMX Engage with CUWN Configuration Guide.
Note If you opt for app notification, the SMS and e-mail notifications are not sent even if they are configured. In any case if the app notification fails, the SMS or e-mail notifications are sent, if configured.
Step 9 Click Save and Publish .
The engagement rule is published. The rule gets listed in the Engagement Rules page.
Note For detailed information on creating an engagement rule for a consumer see the Cisco CMX Engage with CUWN Configuration Guide
Creating an Engagement Rule for a Business User
You can send the notifications to the business users such as employees through SMS, and e-mail. You can also send notifications to an external API.
To define an engagement rule to send notifications to the business users, perform the following steps:
Step 1 In the CMX Engage dashboard, click the drop-down arrow for Proximity Rules > Engagement Rule .
Step 2 Click Create a New Rule .
Step 3 In the Rule Name text field, enter a name for the engagement rule.
Step 4 In the Sense area, from the “When a user is on drop-down list, choose whether you want to send notifications to the business user based on the customer’s connectivity to the Wi-Fi or access to the BLE Beacon.
a. If you choose “WiFi”, you can configure to send the notification during any of the following scenarios: when a customer connected to the Wi-Fi enters the location, when a customer connected to the Wi-Fi leaves the location, or when the customer connected to the Wi-Fi is present at the location for a specified duration or at a particular time.
b. If you choose “Beacon”, you can configure to send the notification during any of the following scenarios: when a customer enters the beacon premises, when the customer leaves the beacon premises, when the customer is with in the beacon premises for a specified duration or at a particular time.
Note If you choose Beacon, the notification is sent to the business user only if the customer’s blue tooth is ON.
Step 5 In the Locations area, specify the locations for which you want to send the notifications.
You can configure to send notifications for the entire customer name or a single or multiple locations such as CMX node, campus, group, building, floor, or zone. For more information on creating the location hierarchy, see the “Defining the Location Hierarchy” section.
You can also filter the locations for the rule using the location metadata.
Step 6 In the IDENTIFY area, specify the type of customers for whom you want to send the notifications to the business users.
You can filter the customers based on whether the customer is an opted in or not opted in user, the tags the customers belong to, the number of visits made by the customer, and the status of the app in the customer’s device. You can apply all these filters or any of them based on your requirement
Step 7 In the Schedule area, specify the period for which you want to apply the engagement rule.
a. Select the Set a time range for the rule check box, and in the fields that appear specify the time range for which you want to apply the engagement rule.
b. Select the Set a date range for the rule check box, and in the fields that appear specify the start date and end date for the period for which you want to apply the engagement rule.
c. If you want to apply the rule only on particular days, select the Filter by days of the week check box, and from the list of days that appears, click the days on which you want to apply the engagement rule.
Step 8 In the Actions area, perform the following steps:
a. From the Notify drop-down list, choose Notify Business User , and from the adjacent drop-down list choose any of the following:
– Only Once- The notification is sent only once to a business user.
– Once In- The notification is sent more than once to a business user based on the notification frequency specified. In the additional fields that appear when you choose this option, specify the notification frequency.
Note To use the BLE beacon, you must integrate the BLE Beacon with the CMX Engage SDK. For more information on how to integrate the BLE Beacon with the CMX Engage SDK, see the CMX Engage SDK documentation.
b. If you want to send the notification through SMS, select the Via SMS check box. From the SMS Gateway drop-down list, choose the SMS gateways through which you want to send the notifications. In the To field that appears, enter the mobile number of the business user to whom you want to send the notifications. In the Link field, enter the engagement URL that must appear in the notification. You can enhance your URL using the smart link option. Enter”$” to view the parameters that you can add. You can also edit the content in the following text box to match your business requirements.
c. If you want to send the notification through e-mail, select the Via Email check box. In the From field, specify the From e-mail ID that must appear in the e-mail, in the “To” text field, enter the e-mail ID of the business user to whom you want to send the notification, and in the Subject field, enter a subject for the notification e-mail. You can also edit the content in the following text box to match your business requirements.
d. If you want to send the notification to an external API, select the Trigger API check box. From the Method drop-down list, choose the method for triggering API, and mention the required parameters.You can enhance the parameter values by adding variables using the corresponding Add Variable button.
– Get- If you choose this method, a Request Parameters text box appears where you can mention the request parameters.
– Post Form- If you choose this method, a Form Parameters text box appears where you can mention the form parameters.
– Post Json- If you choose this method, a Json Data text box appears where you can mention the json data.
– Post Body Data-If you choose this method, a Post Body Data text field appears where you can mention the post body data.
In the URI text field, enter the URI for the API. You can enhance your URI using the smart link option. Enter”$” or click the Add Variable button to view the parameters that you can add.
Note The notifications by default contain the welcome back message with the First Name, and Last Name of the customer. You can edit the text in the message to match your business requirements. To view the parameters that you can add, enter “$” in the message box or click the corresponding Add Variable button. For more information on the parameters that you can add see the Cisco CMX Engage with CUWN Configuration Guide.
Step 9 Click Save and Publish .
The engagement rule is published. The rule gets listed in the Engagement Rules page.
Note For detailed information on creating an engagement rule for a business user see the Cisco CMX Engage with CUWN Configuration Guide
Profile Rule
You can use the profile rule to create tags, add more customers to the existing tags, or to remove certain customers from an existing tag.
Before you create the Profile Rule, you must first define the location hierarchy, and configure the BLE beacon, if required.
Creating a Profile Rule
To create a profile rule, perform the following steps:
Step 1 In the CMX Engage dashboard, choose Proximity Rule> Profile Rule .
Step 2 Click Create a new rule .
Step 3 In the Rule Name text field, enter a name for the profile rule.
Step 4 In the Sense area, from the “When a user is on drop-down list, choose whether you want to add the customers to the tag based on the customer’s connectivity to the Wi-Fi or access to the BLE Beacon.
a. If you choose “WiFi”, you can configure to filter the customers for the tag based on any of the following scenarios: when a customer connected to the Wi-Fi enters the location, when a customer connected to the Wi-Fi leaves the location, or when the customer connected to the Wi-Fi is present at the location for a specified duration or at a particular time.
b. If you choose “Beacon”, you can configure to filter the customers for the tag based on any of the following scenarios: when a customer enters the beacon premises, when the customer leaves the beacon premises, when the customer is with in the beacon premises for a specified duration or at a particular time.
Step 5 In the Locations area, specify the locations at which you want to apply the rule.
You can configure to apply the rule for the entire customer name or a single or multiple locations such as CMX node, campus, group, building, floor, or zone. For more information on creating the location hierarchy, see the “Defining the Location Hierarchy” section.
You can also filter the locations for the rule using the location metadata.
Step 6 In the IDENTIFY area, specify the type of customers that you want to add to the tag.
Note You can filter the customers to be included in the tag based on whether the customer is an opted in or not opted in user, the tags the customers belong to, the number of visits made by the customer, and the status of the app in the customer’s device. You can apply all these filters or any of them based on your requirement.
Step 7 In the Schedule area, specify the period for which you want to apply the rule.
a. Select the Set a time range for the rule check box and in the fields that appear, specify the time range for which you want to apply the profile rule.
b. Select the Set a date range for the rule check box, and in the fields that appear, specify the start date and end date for the period for which you want to apply the profile rule.
c. If you want to the rule to be executed only on particular days, select the Filter by days of the week check box, and from the list of days that appears, click the days on which you want to apply the rule.
Step 8 In the Actions area, specify whether you want to create a new tag or include customers to an existing tag, or exclude customers from an existing tag.
- If you want to add or remove the filtered customers from the existing tags, mention the tags to which you want to include the filtered customers and the tags from which you want exclude the filtered customers.
– To add the customers that are filtered based on this profile rule to an existing tag, choose the Add radio button for the tags to which you want to add the customers.
– To remove the customers that are filtered based on this profile rule from an existing tag, choose the Remove radio button for the tags from which you want to remove the customers.
- You can create a new tag either by adding the filtered customers or by removing the filtered customers. In the New Tag field that appears, enter a name for the tag. Choose the Add radio button if you want to create a tag by adding the customers filtered based on the profile rule or choose the Remove radio button to create a tag excluding the customers filtered based on the profile rule. Click Save .
b. After mentioning all the required tags, click Done .
Step 9 In the Create Profile Rule page, click Save and Publish .
The profile rule is published, and the rule gets listed in the Profile Rules page.
Note For detailed information on creating a profile rule see the Cisco CMX Engage with CUWN Configuration Guide
 Feedback