Getting Started
This chapter provides information on the architecture, prerequisites, and deployment models of the Cisco Smart+Connected Spaces (Smart+Connected Spaces) application.
Overview
The Smart+Connected Spaces is a solution that leverages the Cisco Service Delivery Platform (SDP). The solution allows you to easily access information about conference/TelePresence (TP) rooms, workspaces, people, and the enterprise by using digital signage/IEC, kiosks, room panels, IP phones, smartphones, Smart Spaces Outlook Plug-in, and the web portals. For example, you can easily view information, such as meeting details, room and workspace availability, people who have checked into workspaces, news, energy consumption data, energy saving tips, and so on.
The solution also allows you to book conference or TP rooms and check into workspaces instantly using touchscreen signage, kiosks, room panels, IP phones, and smartphones, manage conference room resources, and report the issues, if any, in the conference rooms. The automatic energy saving settings lead to reduced power consumption and contribute to the eco-friendly policies of the organization. In case of any mishaps, emergency notifications are sent out to the users through IP phones and signage.
The Smart+Connected Spaces leads to enhanced enterprise communication as the updated meeting room, and workspace occupancy information is widely available and easily accessible to employees. It also leads to better resource management and energy savings which translate to reduced energy bills and more environment-friendly corporate practices.
The Smart+Connected Spaces application allows the end user to access the following features/solutions:
–![]() Book conference rooms and TP rooms.
Book conference rooms and TP rooms.
–![]() Check into any available workspace.
Check into any available workspace.
–![]() View the availability and check-in status of your Jabber contacts.
View the availability and check-in status of your Jabber contacts.
–![]() View the route to locate a workspace, office, or conference/TP room on a floor.
View the route to locate a workspace, office, or conference/TP room on a floor.
–![]() View the overall conference/TP room and workspace availability on all of the floors of all of the buildings in the organization and book/check into any of these spaces.
View the overall conference/TP room and workspace availability on all of the floors of all of the buildings in the organization and book/check into any of these spaces.
–![]() View the neighborhoods/zones on a floor.
View the neighborhoods/zones on a floor.
–![]() View the building, floor, and name of the workspace or office that you have checked into.
View the building, floor, and name of the workspace or office that you have checked into.
–![]() Access the floor plans for any building in the enterprise to view the locations and availability of the conference room/TP rooms and workspaces.
Access the floor plans for any building in the enterprise to view the locations and availability of the conference room/TP rooms and workspaces.
–![]() Search for the available conference rooms and TP rooms based on your requirements such as the features available, seating capacity, location, and time and book them.
Search for the available conference rooms and TP rooms based on your requirements such as the features available, seating capacity, location, and time and book them.
–![]() Search for the people within the enterprise.
Search for the people within the enterprise.

Note![]() You can also perform all these tasks by using the web portal.
You can also perform all these tasks by using the web portal.
–![]() Reset the PIN by using the Forgot PIN option. The new PIN will be sent on your email ID and get updated in the kiosk web portal.
Reset the PIN by using the Forgot PIN option. The new PIN will be sent on your email ID and get updated in the kiosk web portal.
- Using the kiosk web portal (In addition to the above mentioned features that you can access using kiosks)
–![]() Locate the workspace you have checked into.
Locate the workspace you have checked into.
–![]() View the building, floor, and name of the workspace you have checked into.
View the building, floor, and name of the workspace you have checked into.
–![]() Choose not to display your current check in location.
Choose not to display your current check in location.
Note![]() This option is available only if it is configured by the administrator.
This option is available only if it is configured by the administrator.
–![]() Change the kiosk PIN that you use for authentication while checking in, booking rooms, and viewing the list of your Jabber contacts.
Change the kiosk PIN that you use for authentication while checking in, booking rooms, and viewing the list of your Jabber contacts.
–![]() Check out from the workspace that you have occupied.
Check out from the workspace that you have occupied.
–![]() Login and logout of the kiosk web portal.
Login and logout of the kiosk web portal.
–![]() View your upcoming meeting and workspace reservation details.
View your upcoming meeting and workspace reservation details.
–![]() Check into and checking out of a reserved workspace using your mobile device.
Check into and checking out of a reserved workspace using your mobile device.
–![]() Search for the required conference/TP room.
Search for the required conference/TP room.
–![]() View the availability status of all of the rooms on any floor in any building within the enterprise.
View the availability status of all of the rooms on any floor in any building within the enterprise.
–![]() Book conference/TP rooms using your mobile device based on your requirements such as the features available, seating capacity, location, and time.
Book conference/TP rooms using your mobile device based on your requirements such as the features available, seating capacity, location, and time.
–![]() Invite people in your enterprise to participate in meetings (during the room booking process).
Invite people in your enterprise to participate in meetings (during the room booking process).
–![]() Ad-Hoc checking in from the list of available workspaces and checking out using the QR code scanning feature.
Ad-Hoc checking in from the list of available workspaces and checking out using the QR code scanning feature.
–![]() Mark workspaces and people within an enterprise as favorites.
Mark workspaces and people within an enterprise as favorites.
–![]() Set your preferences for building and floor.
Set your preferences for building and floor.
–![]() Search for people within the enterprise.
Search for people within the enterprise.
–![]() Initiate either a call or sending text messages and emails using the mobile device.
Initiate either a call or sending text messages and emails using the mobile device.
–![]() Quickly book the conference room wherever the IP phone is located based on the room availability.
Quickly book the conference room wherever the IP phone is located based on the room availability.
–![]() Control the meeting room devices and equipment.
Control the meeting room devices and equipment.
–![]() Save energy by manually releasing a room for the duration that it is unoccupied, in addition to the energy savings made when the solution automatically switches off devices.
Save energy by manually releasing a room for the duration that it is unoccupied, in addition to the energy savings made when the solution automatically switches off devices.
–![]() Configure multiple devices to suit your meeting and presentation needs using a single menu option.
Configure multiple devices to suit your meeting and presentation needs using a single menu option.
–![]() Create a case to notify the facilities team of any issues/problems that might be present in the conference room, and convey the same to the others in the organization by sending messages to the Cisco IP phone in the conference room. Once the case is created, the facilities team of the building can try to resolve the fault.
Create a case to notify the facilities team of any issues/problems that might be present in the conference room, and convey the same to the others in the organization by sending messages to the Cisco IP phone in the conference room. Once the case is created, the facilities team of the building can try to resolve the fault.
–![]() Send preconfigured messages and emergency notifications to signages.
Send preconfigured messages and emergency notifications to signages.
–![]() Search for the available conference/TP rooms based on your requirements such as room setup, room size, location, and so on and book them. Rooms that closely meet your search criteria are displayed if no exact match is found.
Search for the available conference/TP rooms based on your requirements such as room setup, room size, location, and so on and book them. Rooms that closely meet your search criteria are displayed if no exact match is found.
–![]() Search for the available workspaces based on your requirements such as date, time, location, workspace type and so on and reserve them.
Search for the available workspaces based on your requirements such as date, time, location, workspace type and so on and reserve them.
–![]() View the current and upcoming meetings that you are part of or have organized.
View the current and upcoming meetings that you are part of or have organized.
–![]() View the current and upcoming workspace bookings
View the current and upcoming workspace bookings
–![]() Accept, decline, or tentatively accept meeting invites.
Accept, decline, or tentatively accept meeting invites.
–![]() View all the scheduled meetings as a day, week, or month based calendar view.
View all the scheduled meetings as a day, week, or month based calendar view.
–![]() Book conference rooms easily by holding down the mouse key and dragging across the required time slot in the calendar view.
Book conference rooms easily by holding down the mouse key and dragging across the required time slot in the calendar view.
–![]() Book conference rooms instantly using the Quick Booking option. Reservation is made simpler as you can key in the number of participants. Booking duration options range from 30 (the default duration) to 60 minutes. Location is by default the one specified in your Preferences.
Book conference rooms instantly using the Quick Booking option. Reservation is made simpler as you can key in the number of participants. Booking duration options range from 30 (the default duration) to 60 minutes. Location is by default the one specified in your Preferences.
–![]() Book the room on behalf of other users by using the Proxy Booking option. For example, an executive administrator can book a workspace for a visiting executive.
Book the room on behalf of other users by using the Proxy Booking option. For example, an executive administrator can book a workspace for a visiting executive.
–![]() Use the detailed booking option where you can request for change in the room setup, book equipment, add meeting agenda, and so on.
Use the detailed booking option where you can request for change in the room setup, book equipment, add meeting agenda, and so on.
–![]() Edit the details of and reschedule the meetings that you have organized.
Edit the details of and reschedule the meetings that you have organized.
–![]() Save drafts of the bookings and edit them later.
Save drafts of the bookings and edit them later.
–![]() Personalize your workspace by setting preference for lights, blinds, dimmers, air conditioner, and digital signage. You can activate the personalized settings when you check into a workspace.
Personalize your workspace by setting preference for lights, blinds, dimmers, air conditioner, and digital signage. You can activate the personalized settings when you check into a workspace.
–![]() Check in and check out of a reserved workspace.
Check in and check out of a reserved workspace.
–![]() Manage configurations for all the devices located at a workspace.
Manage configurations for all the devices located at a workspace.
–![]() Generate and view reports for usage trends, user statistics, and so on.
Generate and view reports for usage trends, user statistics, and so on.
–![]() Save your preferred settings such as favorite rooms, location, and time zone.
Save your preferred settings such as favorite rooms, location, and time zone.
–![]() Create messages for the various fault cases, such as a non-functioning air conditioner in the workspace or faulty projector in a conference room.
Create messages for the various fault cases, such as a non-functioning air conditioner in the workspace or faulty projector in a conference room.
–![]() View the conference/TelePresence room schedule and availability/occupancy status.
View the conference/TelePresence room schedule and availability/occupancy status.
–![]() Book conference/TelePresence rooms.
Book conference/TelePresence rooms.
–![]() Confirm conference/TelePresence room occupancy.
Confirm conference/TelePresence room occupancy.
–![]() Release conference/TelePresence rooms.
Release conference/TelePresence rooms.
–![]() View detailed floor plans with the locations of the conference rooms.
View detailed floor plans with the locations of the conference rooms.
–![]() View the conference room schedule in different views—Building level, Floor level, and Conference Room level.
View the conference room schedule in different views—Building level, Floor level, and Conference Room level.
–![]() Cisco Smart+Connected Emergency Notifications™ (Smart+Connected EN)—Displays the notifications and exit routes on the digital signage in times of an emergency and sends audio and visual notifications on the Cisco IP phones during a crisis.
Cisco Smart+Connected Emergency Notifications™ (Smart+Connected EN)—Displays the notifications and exit routes on the digital signage in times of an emergency and sends audio and visual notifications on the Cisco IP phones during a crisis.
–![]() Cisco Smart+Connected Information Signage™ (Smart+Connected IS)—Displays the general information and news on the digital signage.
Cisco Smart+Connected Information Signage™ (Smart+Connected IS)—Displays the general information and news on the digital signage.
–![]() Cisco Smart+Connected Green Advisor™ (Smart+Connected GA)—Displays energy consumption data, energy saving tips, and green information.
Cisco Smart+Connected Green Advisor™ (Smart+Connected GA)—Displays energy consumption data, energy saving tips, and green information.
–![]() Schedule a meeting and reserve resources, such as conference rooms with A/V Control, Digital Signage, TelePresence, and WebEx for face-to-face or online meetings.
Schedule a meeting and reserve resources, such as conference rooms with A/V Control, Digital Signage, TelePresence, and WebEx for face-to-face or online meetings.
–![]() View the organizer, attendee, and room availability status.
View the organizer, attendee, and room availability status.
–![]() View the current and upcoming meetings that you are part of or have organized.
View the current and upcoming meetings that you are part of or have organized.
–![]() Accept, decline, or tentatively accept meeting invites.
Accept, decline, or tentatively accept meeting invites.
–![]() Set your preferred meeting location.
Set your preferred meeting location.
In addition, the solution can help in energy savings by automatically switching devices to a standby mode when the meeting room is unoccupied and based on the configuration, turn them back on before the actual occupancy.
As an administrator, you have to manage the overall configuration, maintenance, and content creation for the Smart+Connected Spaces solution through a web portal. You have to add locations and devices, create users, and associate devices to locations for the solution in the SDP. For more information on performing these tasks, see the Cisco Service Delivery Platform User Guide and Cisco Service Delivery Platform Installation Guide. After the locations are added, and the devices are associated to them in the SDP, they are available in the Smart+Connected Spaces portal. You can select a location and associate a configuration to it. The features such as fault messages, device control options, signage menu messaging, and room booking that are added to the configuration can be accessed by the end user from the Cisco IP phones at the location.
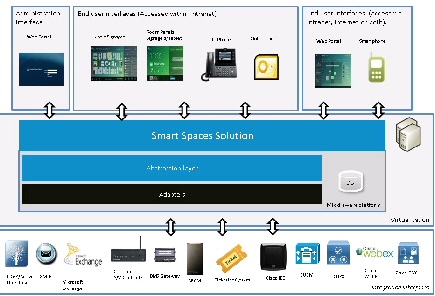
System Architecture
The Smart+Connected Spaces solution communicates with the following:
- Microsoft Exchange—To book meetings and retrieve meeting details.
- Building Management System (BMS)—To control and monitor devices, such as lights, blinds, and air conditioners.
- Content Management System (CMS)—To store the application data.
- Crestron Controller—To control projectors and projector screens.
- Digital Media Player (DMP) and Cisco Interactive Experience Client (IEC)—To display meeting details, notifications, general information, news, energy consumption data, energy saving tips, and so on, on the signages.
- Remedy—To raise trouble tickets for the conference room issues.
- Cisco Jabber—To fetch the list of your contacts who are checked into a workspace or office.
- Cisco TelePresence Management Suite—To book TP meetings and retrieve the TP meeting details.
- Call Manager—For Cisco IP Phone interface integration with Smart+Connected Spaces.
- Cisco Physical Access Manager (CPAM)—To fetch user IDs and verify the check-in by users.
The Smart+Connected Spaces solution leverages the SDP. For more information on the SDP, see the Cisco Service Delivery Platform User Guide.
Figure 1-1 Smart+Connected Spaces– System Architecture
List of Acronyms and Abbreviations
|
|
|
|---|---|
System Requirements
Before installing the Smart+Connected Spaces solution, ensure that all of the following system requirements are met.
|
|
|
|---|---|
|
– – – |
|
PostgreSQL 9.0 with character set configured to UTF8. For more information on how to install the PostgreSQL database, see the PostgreSQL documentation. |
|
Exchange Web Services (EWS) integration is supported using only the BasicAuth authentication scheme. This needs to be configured in the Microsoft Internet Information Services.
Impersonation rights are required on the conference room mailboxes and user mailboxes for the service account. This allows the service account to connect to the Exchange server and retrieve meeting details from the conference room mailboxes and the user mailboxes. For more information on Exchange impersonation, see: http://msdn.microsoft.com/en-us/library/bb204095(v=exchg.80).aspx http://msdn.microsoft.com/en-us/library/bb204095.aspx http://technet.microsoft.com/en-us/library/dd776119%28v=exchg.150%29.aspx |
|
The certified Crestron controllers that have been tested with the.NET SDK are: However, the Crestron Control System with Ethernet port supports the Crestron.NET SDK, and therefore can be integrated with the solution. |
|
Ensure that the aspect ratio of the signage screens is 16:9 (Resolutions: 1920 x 1080 and 1366 x 768). |
|
The Smart+Connected Spaces application is certified on the eLO Touchscreen APR technology model. For information about the touchscreen models supported for IEC, see: http://www.cisco.com/c/en/us/products/video/interactive-experience-clients/datasheet-listing.html |
|
Supported Software/Hardware
Though the following software/hardware versions that are supported for the Smart+Connected Spaces 2.2 release even though they are not certified.
|
|
|
|---|---|
|
The audio notification feature does not work with Cisco Call Manager 7.1. |
|
Deployment Model
You can install and deploy the Smart+Connected Spaces solution in the non-cluster server setup model.
Note![]() This document describes the installation process in a collocated/non-cluster setup.
This document describes the installation process in a collocated/non-cluster setup.
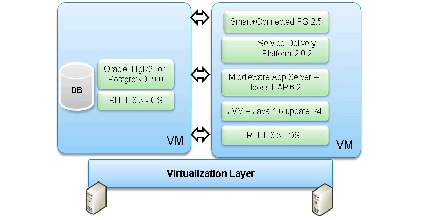
Non-cluster Server Setup
In this setup, the database and application server are installed on two different instances—either on a physical or a virtual machine. This is a common server setup method for the enterprise installations. The database is set up on one instance, and the application server, SDP, and Smart+Connected Spaces application are installed and set up on another instance.
Figure 1-2 Non-Cluster Server Setup
 Feedback