- Using the IP Phones
- Features Available in IP Phones
- Managing the Conference Room Resources
Managing the Conference Room Resources
This chapter describes how to control the various devices and equipment in a conference room using the IP phones at that location. It also describes how to achieve energy savings and send preconfigured messages to the signage outside of a conference room, from inside the conference room.
•![]() Features Available in IP Phones
Features Available in IP Phones
•![]() Managing the Conference Room Resources
Managing the Conference Room Resources
•![]() Releasing the Conference Rooms
Releasing the Conference Rooms
•![]() Sending Messages to the Signage Using the IP Phones
Sending Messages to the Signage Using the IP Phones
Using the IP Phones
You can use the touchscreen and non-touchscreen IP phones that are located in a conference room to control the devices that are available in that room, to report faults in the devices, and to send messages to the signage.
Touchscreen IP Phones
Figure 5-1 displays sample output from a touchscreen IP phone located in a conference room.
Figure 5-1 Touchscreen IP Phone
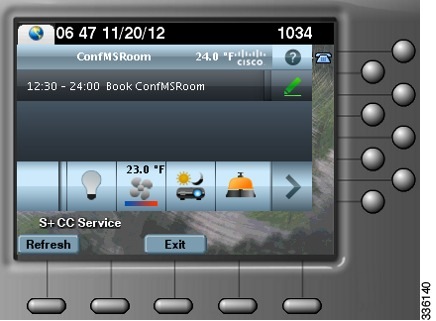
Figure 5-1 displays details, such as the temperature of the room where the IP phone is located, the current date and time, and the meeting room schedule. Tap any of the icons displayed at the bottom of the screen to control the various devices in that room. In Figure 5-1, the icons for the lights, airconditioner, room mode, and reporting faults are seen. You can tap the left and right arrow icons to scroll to the other options. You can also press the keys located on the phone to navigate up and down in a list, or to choose and activate an option.
Non-Touchscreen IP Phones
Figure 5-2 displays sample output from a non-touchscreen IP phone that is located in a conference room.
Figure 5-2
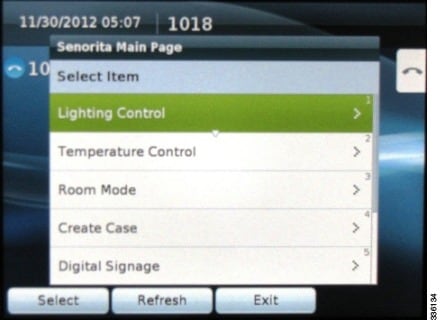
Non-Touchscreen IP Phone
The Figure 5-2 displays the name of the conference room, `Senorita', on the top followed by the list of the options that help you control the conference room devices. You can select the required option from the list by pressing the number displayed against the menu item using the number pad of the phone. Alternately, you can use the phone navigation keys to navigate up and down the list and select a specific item.
Features Available in IP Phones
Table 5-1 lists the features that are available/can be accessed using the following devices:
•![]() Touchscreen IP phones
Touchscreen IP phones
•![]() Non-Touchscreen IP phones
Non-Touchscreen IP phones
Y=Yes, N=No
Managing the Conference Room Resources
This section explains how to control the resources that are in a conference room using an IP phone. You can change the settings of lights, window blinds, the airconditioner, and audio and visual equipment. Multiple devices can be simultaneously controlled using the room mode options. You can use the IP phone to report the problems that occur in the conference room, so that a case is created in the trouble ticketing system.
•![]() Controlling the Window Blinds
Controlling the Window Blinds
•![]() Controlling the Airconditioner Settings
Controlling the Airconditioner Settings
•![]() Controlling the Audio & Video Equipment
Controlling the Audio & Video Equipment
•![]() Reporting Faults for the Location
Reporting Faults for the Location
Controlling the Lights
The Light Control feature allows you to control the lights and/or the dimmer at a particular location through the IP phone that is available at that location. You can control the lights by switching them on or off, and by adjusting the brightness using a predefined list of brightness options that are available.
The light dimmer option will be available only if a dimmer is added to the configuration for the location.

Note ![]() If the Light Control feature is not available for a location, the "Light controls are not available for this location" message appears.
If the Light Control feature is not available for a location, the "Light controls are not available for this location" message appears.
The following default light control options are available:
•![]() Lights Off—Turns off the lights.
Lights Off—Turns off the lights.
•![]() Lights On—Turns on the lights.
Lights On—Turns on the lights.
The following dimmer control options are available:
•![]() 3% Brightness—Adjusts the brightness to 3%.
3% Brightness—Adjusts the brightness to 3%.
•![]() 30% Brightness—Adjusts the brightness to 30%.
30% Brightness—Adjusts the brightness to 30%.
•![]() 50% Brightness—Adjusts the brightness to 50%.
50% Brightness—Adjusts the brightness to 50%.
•![]() 75% Brightness—Adjusts the brightness to 75%.
75% Brightness—Adjusts the brightness to 75%.
•![]() 100% Brightness—Adjusts the brightness to 100%.
100% Brightness—Adjusts the brightness to 100%.
Note ![]() The icons displayed on the touchscreen IP phones represent the actual state of the device. For example, when a light is on, you see the light icon as yellow. When you turn off a light or it is already off, the light icon appears grey.
The icons displayed on the touchscreen IP phones represent the actual state of the device. For example, when a light is on, you see the light icon as yellow. When you turn off a light or it is already off, the light icon appears grey.
•![]() Using the Touchscreen IP Phone
Using the Touchscreen IP Phone
•![]() Using the Non-Touchscreen IP Phone
Using the Non-Touchscreen IP Phone
Using the Touchscreen IP Phone
To control the lights using a touchscreen IP phone, perform the following steps:
Step 1 ![]() On the IP phone, press the Services button.
On the IP phone, press the Services button.
The list of services that are available for the IP phone appears.
Step 2 ![]() Tap S+CC Service.
Tap S+CC Service.
The S+CC Service screen appears.
Note ![]() For this guide, it is assumed that the name of the Smart+Connected MS service configured in CUCM is `S+CC Service'.
For this guide, it is assumed that the name of the Smart+Connected MS service configured in CUCM is `S+CC Service'.
Step 3 ![]() Tap the lights
Tap the lights  icon.
icon.
Multiple light icons with numbers, such as 1, 2, and so on appear. You also have an icon to control all the lights together.
Note ![]() Similar text-based options appear for the non-touchscreen IP phones.
Similar text-based options appear for the non-touchscreen IP phones.
Step 4 ![]() Tap the icon for the required light.
Tap the icon for the required light.
The various light control icons appear.
Step 5 ![]() Tap the required light control icon to activate it.
Tap the required light control icon to activate it.
Step 6 ![]() Tap Back to go back to the previous screen.
Tap Back to go back to the previous screen.
Using the Non-Touchscreen IP Phone
To control lights using a non-touchscreen IP phone, perform the following steps:
Step 1 ![]() On the IP phone, press the Services button.
On the IP phone, press the Services button.
The list of services that are available for the IP phone appears.
Step 2 ![]() Choose S+CC Service.
Choose S+CC Service.
The S+CC Service screen appears.
Step 3 ![]() Choose Lights Control from the list using the navigation keys on the IP phone.
Choose Lights Control from the list using the navigation keys on the IP phone.
The list of available lights, such Light1, Light2, and so on appears. You also have the Lights All option to control all the lights at a time.
Step 4 ![]() Select the required light option.
Select the required light option.
The list of light control options appears.
Step 5 ![]() Navigate to the desired light option using the navigation keys.
Navigate to the desired light option using the navigation keys.
Step 6 ![]() Press the Select button to activate the light control option.
Press the Select button to activate the light control option.
Step 7 ![]() Press the Back button to go back to the previous screen, or press Exit to return to the S+CC Service screen.
Press the Back button to go back to the previous screen, or press Exit to return to the S+CC Service screen.
Controlling the Window Blinds
The Blinds Control feature allows you to control the window blinds in a conference room. You can select either one blind or all of the blinds to open or close them.
If there is more than one blind, additional options, such as Blind1, Blind2, and so on appear. You also have the option to control all the blinds at a time.
The default window blinds options are as follows:
•![]() Blinds Open—Opens the window blinds.
Blinds Open—Opens the window blinds.
•![]() Blinds Close—Closes the window blinds.
Blinds Close—Closes the window blinds.
•![]() Blinds Stop—Stops the window blinds.
Blinds Stop—Stops the window blinds.
•![]() Using the Touchscreen IP Phone
Using the Touchscreen IP Phone
•![]() Using the Non-Touchscreen IP Phone
Using the Non-Touchscreen IP Phone
Using the Touchscreen IP Phone
To control the window blinds using a touchscreen IP phone, perform the following steps:
Step 1 ![]() On the IP phone, press the Services button.
On the IP phone, press the Services button.
The list of services that are available for the IP phone appears.
Step 2 ![]() Tap S+CC Service.
Tap S+CC Service.
The S+CC Service screen appears.
Step 3 ![]() Tap the blinds
Tap the blinds  icon.
icon.
Multiple blind icons with numbers, such as 1, 2, and so on appear. You also have an icon to control all the blinds together.
Step 4 ![]() Tap the icon for the required blind.
Tap the icon for the required blind.
The various blind control icons appear.
Step 5 ![]() Tap the required blind control icon to activate it.
Tap the required blind control icon to activate it.
The blind is set to the selected state.
Step 6 ![]() Tap Back to go back to the previous screen.
Tap Back to go back to the previous screen.
Using the Non-Touchscreen IP Phone
To control blinds using a non-touchscreen IP phone, perform the following steps:
Step 1 ![]() On the IP phone, press the Services button.
On the IP phone, press the Services button.
The list of services that are available for the IP phone appears.
Step 2 ![]() Choose S+CC Service.
Choose S+CC Service.
The S+CC Service screen appears.
Step 3 ![]() Choose Blinds Control from the list using the navigation keys on the IP phone.
Choose Blinds Control from the list using the navigation keys on the IP phone.
The list of available blinds, such as Blind1, Blind2, and so on appears. You also have the Blinds All option to control all the blinds at a time.
Step 4 ![]() Choose the required blind.
Choose the required blind.
The list of blind control options appears.
Step 5 ![]() Navigate to the required blind control option using the navigation key.
Navigate to the required blind control option using the navigation key.
Step 6 ![]() Press the Select button to activate the selected blind control option.
Press the Select button to activate the selected blind control option.
Step 7 ![]() Press the Back button to go back to the previous screen, or press Exit to return to the S+CC Service screen.
Press the Back button to go back to the previous screen, or press Exit to return to the S+CC Service screen.
Controlling the Airconditioner Settings
The airconditioner control feature allows you to set the temperature of the conference room as per your preference.
Note ![]() If a thermostat is not associated to the location, a warning message appears informing you that the thermostat control (set points) is not available for the location.
If a thermostat is not associated to the location, a warning message appears informing you that the thermostat control (set points) is not available for the location.
The default temperature control options are as follows:
•![]() Air-con On—Changes the airconditioner settings to the Occupied mode.
Air-con On—Changes the airconditioner settings to the Occupied mode.
•![]() Air-con Off—Changes the airconditioner settings to the Energy Savings mode.
Air-con Off—Changes the airconditioner settings to the Energy Savings mode.
•![]() Temperature Range—The list of temperature set options that are available for the location.
Temperature Range—The list of temperature set options that are available for the location.
The temperature set options are based on the minimum and maximum values that are entered when associating the VAV device for the location.
For example, if the minimum temperature value is 21 and the maximum temperature is 25, the temperature set points will be in increments of 1, that is from 21 to 25. The unit of temperature may be Fahrenheit (°F) or Celsius (°C) depending on the unit that is selected when associating the VAV/VRV device for the location.
•![]() Using the Touchscreen IP Phone
Using the Touchscreen IP Phone
•![]() Using the Non-Touchscreen IP Phone
Using the Non-Touchscreen IP Phone
Using the Touchscreen IP Phone
To control the temperature using a touchscreen IP phone, perform the following steps:
Step 1 ![]() On the IP phone, press the Services button.
On the IP phone, press the Services button.
The list of services that are available for the IP phone appears.
Step 2 ![]() Tap S+CC Service.
Tap S+CC Service.
The S+CC Service screen appears.
Step 3 ![]() Tap the air conditioner
Tap the air conditioner  icon.
icon.
The various temperature control icons  appear.
Step 4 ![]() Tap the required temperature control icon.
Tap the required temperature control icon.
Note ![]() The value that you provide here will be used to set the temperature set point value. Once this is done, the occupancy status of the conference room will be set as "Occupied".
The value that you provide here will be used to set the temperature set point value. Once this is done, the occupancy status of the conference room will be set as "Occupied".
Step 5 ![]() Tap Back to go back to the previous screen.
Tap Back to go back to the previous screen.
Using the Non-Touchscreen IP Phone
To control the temperature using a non-touchscreen IP phone, perform the following steps:
Step 1 ![]() On the IP phone, press the Services button.
On the IP phone, press the Services button.
The list of services that are available for the IP Phone appears.
Step 2 ![]() Choose S+CC Service.
Choose S+CC Service.
The S+CC Service screen appears.
Step 3 ![]() Choose Aircon from the list using the navigation keys on the IP phone.
Choose Aircon from the list using the navigation keys on the IP phone.
The list of temperature control options that are available for the location appears. For example: 16 degree, 20 degree and so on.
Step 4 ![]() Choose the required temperature control feature.
Choose the required temperature control feature.
Step 5 ![]() Press the Back button to go back to the previous screen, or press Exit to return to the S+CC Service screen.
Press the Back button to go back to the previous screen, or press Exit to return to the S+CC Service screen.
Controlling the Audio & Video Equipment
The A/V Control feature allows you to control the projector equipment using the IP phone at the location. You can configure a room for a personal computer presentation or a meeting using the IP phone.
If the A/V Control feature is enabled for a location and the A/V devices are not added/configured correctly, the "Controls are not available for this location" warning message appears.
The A/V Control options that are available are as follows:
•![]() Projector On—Allows you to switch on the projector and bring down the projector screen.
Projector On—Allows you to switch on the projector and bring down the projector screen.
•![]() Projector Off—Allows you to switch off the projector and roll up the projector screen.
Projector Off—Allows you to switch off the projector and roll up the projector screen.
•![]() Using the Touchscreen IP Phone
Using the Touchscreen IP Phone
•![]() Using the Non-Touchscreen IP Phone
Using the Non-Touchscreen IP Phone
Using the Touchscreen IP Phone
To control the audio and video equipment using a touchscreen IP phone, perform the following steps:
Step 1 ![]() On the IP phone, press the Services button.
On the IP phone, press the Services button.
The list of services that are available for the IP phone appears.
Step 2 ![]() Tap S+CC Service.
Tap S+CC Service.
The S+CC Service screen appears.
Step 3 ![]() Tap the A/V controls
Tap the A/V controls  icon.
icon.
The icons for switching on  and switching off
  the projector appear. Tap the required icon.
Step 4 ![]() Tap Back to go back to the previous screen.
Tap Back to go back to the previous screen.
Using the Non-Touchscreen IP Phone
To control the audio and video equipment using a non-touchscreen IP phone, perform the following steps:
Step 1 ![]() On the IP phone, press the Services button.
On the IP phone, press the Services button.
The list of services that are available for the IP phone appears.
Step 2 ![]() Choose S+CC Service.
Choose S+CC Service.
The S+CC Service screen appears.
Step 3 ![]() Choose A/V Control from the list using the navigation keys.
Choose A/V Control from the list using the navigation keys.
The projector on and off controls are listed.
Step 4 ![]() Navigate to the required A/V control option.
Navigate to the required A/V control option.
Step 5 ![]() Press the Select button to activate the selected option.
Press the Select button to activate the selected option.
Step 6 ![]() Press the Back button to go back to the previous screen, or press Exit to return to the S+CC Service screen.
Press the Back button to go back to the previous screen, or press Exit to return to the S+CC Service screen.
Reporting Faults for the Location
The Fault Reporting feature allows you to report the faults at the location to the case management system. You can select a fault from a predefined list for the meeting room. After you select a fault and enter your employee ID, a case is created in the case management system. After you report a fault, you receive a confirmation message with a unique case number. The case is routed to the appropriate team for resolution in the case management system.
In the absence of a case management system like Remedy, the Smart+Connected MS solution can be configured to use email as a mechanism to raise the cases. In this scenario, when a case is raised from the IP phone, an email will be sent to the configured email ID with the fault item details.
•![]() Using the Touchscreen IP Phone
Using the Touchscreen IP Phone
•![]() Using the Non-Touchscreen IP Phone
Using the Non-Touchscreen IP Phone
Using the Touchscreen IP Phone
To report a fault using a touchscreen IP phone, perform the following steps:
Step 1 ![]() On the IP phone, press the Services button.
On the IP phone, press the Services button.
The list of services that are available for the IP phone appears.
Step 2 ![]() Tap S+CC Service.
Tap S+CC Service.
The S+CC Service screen appears.
Step 3 ![]() Tap the create case
Tap the create case  icon.
icon.
The list of available faults appears.
Step 4 ![]() Choose a fault.
Choose a fault.
Step 5 ![]() Enter your User ID using the keypad.
Enter your User ID using the keypad.
Step 6 ![]() Tap Submit. A case is created in the case management system for the selected fault and:
Tap Submit. A case is created in the case management system for the selected fault and:
•![]() A confirmation message is displayed on the IP phone with the case ID, in case the Remedy case management tool is used.
A confirmation message is displayed on the IP phone with the case ID, in case the Remedy case management tool is used.
•![]() A confirmation email is sent, in case the an email-based case management option is used.
A confirmation email is sent, in case the an email-based case management option is used.
Step 7 ![]() Tap Back to go back to the previous screen.
Tap Back to go back to the previous screen.
Using the Non-Touchscreen IP Phone
To report a fault using a non-touchscreen IP phone, perform the following steps:
Step 1 ![]() On the IP Phone, press the Services button.
On the IP Phone, press the Services button.
The list of services that are available for the IP phone appears.
Step 2 ![]() Choose S+CC Service.
Choose S+CC Service.
The S+CC Service screen appears.
Step 3 ![]() Choose Create Case from the list using the navigation keys on the IP phone.
Choose Create Case from the list using the navigation keys on the IP phone.
The list of available faults appears.
Step 4 ![]() Choose a fault.
Choose a fault.
The Fault Reporting screen appears.
Step 5 ![]() Enter your User ID using the keypad.
Enter your User ID using the keypad.
Step 6 ![]() Press the Submit button. A case is created in the case management system for the selected fault and:
Press the Submit button. A case is created in the case management system for the selected fault and:
•![]() A confirmation message is displayed on the IP phone with the case ID if the Remedy case management tool is used.
A confirmation message is displayed on the IP phone with the case ID if the Remedy case management tool is used.
•![]() A confirmation email is sent if an email based case management tool is used.
A confirmation email is sent if an email based case management tool is used.
Step 7 ![]() Press the Back button to go back to the previous screen, or press Exit to return to the S+CC Service screen.
Press the Back button to go back to the previous screen, or press Exit to return to the S+CC Service screen.
Note ![]() The case is not created if the Product Category1, Product Category2, and Facilities do not match the categories that are specified in the case management system.
The case is not created if the Product Category1, Product Category2, and Facilities do not match the categories that are specified in the case management system.
Activating the Room Modes
The Room Mode feature allows you to configure various devices in a conference room for presentations and meetings by choosing a single option from the IP phone. This feature controls the lights, blinds, projector, and projector screen at the location of the IP phone. There are three different room modes with predefined settings for the devices. You can choose either a presentation mode for the night or a presentation mode for the day. After the presentation is over, you can opt for the normal mode to return the devices to the non-presentation state.
After a Room Mode is applied, you can change the status of any device by going back to the S+CC Service screen. The change made does not affect the status of other equipment.
•![]() Using the Touchscreen IP Phone
Using the Touchscreen IP Phone
•![]() Using the Non-Touchscreen IP Phone
Using the Non-Touchscreen IP Phone
Using the Touchscreen IP Phone
To activate room modes for a conference room using a touchscreen IP phone, perform the following steps:
Step 1 ![]() On the IP phone, press the Services button.
On the IP phone, press the Services button.
The list of services that are available for the IP phone appears.
Step 2 ![]() Choose S+CC Service.
Choose S+CC Service.
The S+CC Service screen appears.
Step 3 ![]() Tap the room modes
Tap the room modes  icon.
icon.
The room mode icons that appear are as follows:
a. ![]() Presentation Mode-Day: Lights 3%, blinds closed, projector on, and the projector screen is down.
Presentation Mode-Day: Lights 3%, blinds closed, projector on, and the projector screen is down.
b. ![]() Presentation Mode-Night: Lights dimmed to 3% if they are on (or not turned on if they are already off), projector on, and the projector screen is down.
Presentation Mode-Night: Lights dimmed to 3% if they are on (or not turned on if they are already off), projector on, and the projector screen is down.
The Normal Mode is available as a toggle option in the touchscreen IP phones. You can tap the icon for the selected mode to change the settings to Normal Mode (Lights off, projector off, and the projector screen is up).
Step 4 ![]() Choose a room mode.
Choose a room mode.
Step 5 ![]() Tap Back to return to the previous screen.
Tap Back to return to the previous screen.
Using the Non-Touchscreen IP Phone
To activate the room modes for a conference room using a non-touchscreen IP phone, perform the following steps:
Step 1 ![]() On the IP phone, press the Services button.
On the IP phone, press the Services button.
The list of services that are available for the IP phone appears.
Step 2 ![]() Choose S+CC Service.
Choose S+CC Service.
The S+CC Service screen appears.
Step 3 ![]() Choose the Room Modes option from the list by using the navigation keys on the IP phone.
Choose the Room Modes option from the list by using the navigation keys on the IP phone.
The room mode options that appear are as follows:
a. ![]() Presentation Mode-Day: Lights 3%, projector on, and the projector screen is down
Presentation Mode-Day: Lights 3%, projector on, and the projector screen is down
b. ![]() Presentation Mode-Night: Lights dimmed to 3% if they are on (or not turned on if they are already off), projector on, and the projector screen is down
Presentation Mode-Night: Lights dimmed to 3% if they are on (or not turned on if they are already off), projector on, and the projector screen is down
c. ![]() Normal Mode-Lights Off, projector off, and the projector screen is up
Normal Mode-Lights Off, projector off, and the projector screen is up
Step 4 ![]() Navigate to the required room mode option, and press Select to activate it.
Navigate to the required room mode option, and press Select to activate it.
Step 5 ![]() Press the Back button to return to the previous screen, or press Exit to return to the S+CC Service screen.
Press the Back button to return to the previous screen, or press Exit to return to the S+CC Service screen.
Releasing the Conference Rooms
If you do not want to use the room for the entire duration of the reservation, you can release the room on completion of the meeting using the IP phone in the conference room. The room is shown in a different color on the IP phone and signage display so that other users know that it is available. They cannot reserve the conference room till the duration of your booking ends but can use the room without actually booking it. After a room is manually released, the following settings are automatically applied:
•![]() The projector is switched off (if it was switched on).
The projector is switched off (if it was switched on).
•![]() The projector screen is rolled up (if it was rolled down).
The projector screen is rolled up (if it was rolled down).
•![]() The airconditioner reverts to the Energy Saving mode.
The airconditioner reverts to the Energy Saving mode.
Using the Touchscreen IP Phone
To release a room early using a touchscreen IP phone, perform the following steps:
Step 1 ![]() On the IP phone, press the Services button.
On the IP phone, press the Services button.
The list of services that are available for the IP phone appears.
Step 2 ![]() Tap S+CC Service.
Tap S+CC Service.
The S+CC Service screen appears.
Step 3 ![]() Tap the release room
Tap the release room  icon that is displayed next to the meeting details.
The "Please confirm that your meeting has ended and you are releasing the room" message appears.
Step 4 ![]() Tap Confirm to release the room, or tap Cancel to go back to the S+CC Service screen.
Tap Confirm to release the room, or tap Cancel to go back to the S+CC Service screen.
Note ![]() The release room icon is displayed only after the meeting time starts.
The release room icon is displayed only after the meeting time starts.
Note ![]() This feature is not available in non-touchscreen IP phones.
This feature is not available in non-touchscreen IP phones.
Sending Messages to the Signage Using the IP Phones
The Signage Message feature allows you to send messages to the signage that is associated to a room.
The messages that are added to the location using the Smart+Connected Meeting Spaces solution are displayed in the IP phone.

•![]() Using the Touchscreen IP Phone
Using the Touchscreen IP Phone
•![]() Using the Non-Touchscreen IP Phone
Using the Non-Touchscreen IP Phone
Using the Touchscreen IP Phone
To send a message using a touchscreen IP phone, perform the following steps:
Step 1 ![]() On the IP phone, press the Services button.
On the IP phone, press the Services button.
The list of services that are available for the IP phone appears.
Step 2 ![]() Tap S+CC Services.
Tap S+CC Services.
The S+CC Services screen appears.
Step 3 ![]() Tap the signage
Tap the signage  icon.
icon.
The list of messages that are available for the location appears.
Step 4 ![]() Tap the required message.
Tap the required message.
The selected message is displayed on the signage associated to the room.
Step 5 ![]() Tap Back to return to the home page.
Tap Back to return to the home page.
Using the Non-Touchscreen IP Phone
To send a message using a non-touchscreen IP phone, perform the following steps:
Step 1 ![]() On the IP phone, press the Services button.
On the IP phone, press the Services button.
The list of services that are available for the IP phone appears.
Step 2 ![]() Choose S+CC Service.
Choose S+CC Service.
The S+CC Service screen appears.
Step 3 ![]() Choose Signage from the list by using the navigation keys on the IP phone.
Choose Signage from the list by using the navigation keys on the IP phone.
The list of messages that are available for the location appears.
Step 4 ![]() Select the required message.
Select the required message.
The selected message is displayed on the signage that is associated to the location.
Step 5 ![]() Press Back to return to the previous screen, or press Exit to return to the S+CC Service screen.
Press Back to return to the previous screen, or press Exit to return to the S+CC Service screen.
 Feedback