Installation and Setup

This chapter covers the following sections:

Introduction

The Cisco Cisco Advanced Web Security Reporting application provides filters and dashboards that are designed to give insight into very large volumes of data from multiple Web Security Appliances, and Cisco Umbrella. The Cisco Advanced Web Security Reporting application includes a data collection-and-display application, and a related server that forwards log data collected from Web Security Appliances (WSAs), and an Umbrella host.

The Cisco Advanced Web Security Reporting application receives log data and stores it in data models. You can view these data using searches, or “filters,” that you define.

What’s New

New in Release 7.5.2

Feature

Description

Splunk Engine Upgrade

The Splunk engine is upgraded to version 8.2.5.

Python Upgrade

The Python version is upgraded from 2.7 to 3.7.

UI Updates

You can now access the Access Control page using the following navigation paths for 7.5.2:

  • Settings > Users and Authentication > Access Controls Users

  • Settings > Users and Authentication > Access Controls Roles.

  • Settings > Users and Authentication > Access Controls Password Management.

Summary Index

Summary Index has been enabled in the Overview page to improve the performance.

New in Release 7.5.1

Feature

Description

Splunk Engine Upgrade

The Splunk engine is upgraded to version 7.3.5.

Syslog Parser Update

Syslog parser update for Web Security Appliance 12.0.1-334.

New in Release 7.5

Feature

Description

Splunk Engine Upgrade

The Splunk engine is upgraded to version 7.3.3.

User Drilldown page displays report of AD group details.

In the User Analysis > User Drilldown page, a new filter is added to search by AD Group name. The AD group details are displayed in the search results. It displays the following details: AD Group, User ID, Destination Domain, Bandwidth Used, and Time Spent.

New in Release 7.0

Feature

Description

AWSR proxy services display events with no WBRS Score in search results

New filter for no WBRS score (Show WBRS: No Score) is added in the Web Tracking > Proxy Services dashboard. With this filter, you can view the search results for AWSR proxy services with no WBRS score.

Department Membership Reporting displays detailed results for AD Group report

You can now view the following results for AD group reports under User Analysis > Overview:

  • Top Groups by Transactions Blocked

  • Transactions Blocked Summary

  • Top Groups by Bandwidth Used

  • Bandwidth Used Summary

  • Top Groups by User

  • Bandwidth Used Summary

  • AD Group Summary

  • AD Group per User Details

New in Release 6.6

Feature

Description

Search in Custom Dashboards

Searching for data in Custom Dashboards is supported.

  • You can search for data using the main search field with the submit button.

  • You can filter the search results using the secondary search field in the results pane.

Export from any page

You can export data (non graphical data) from any dashboard as a comma-separated values (csv) file, an XML file, or a JavaScript Object Notation (json) file. You must hover over the dashboard data display pane to view this option to download.

New in Release 6.4

Feature

Description

Web Tracking Dashboard Updates

  • New filters—User, Client IP, WBRS minimum and maximum score ranges, and SNI are added in the Web Tracking > Proxy Services dashboard.

  • You can view and export 10000 transactions from the Proxy Services dashboard.

New in Release 6.3

Feature

Description

Splunk Engine Upgrade

The Splunk engine is upgraded to version 6.6.6.

New in Release 6.2

Feature

Description

Cisco Umbrella reports support

You can point the Cisco Advanced Web Security Reporting application to the private AWS S3 bucket containing logs provided by Umbrella. You can view the reports in the Consolidated Web Security Reports dashboards.

Splunk Engine Upgrade

The Splunk engine is upgraded to the latest version.


Note

Role based reporting works only on the data models that are not accelerated. Since disabling acceleration increases the time to load reports, enable data model acceleration if role based reporting is not used. See Configuration Best Practices and Restrict Access to Department Reports by Role.


New in Release 6.1

Feature

Description

CEF Extractor

The Common Event Format (CEF) Extractor service lets you transform access logs received from one or more WSAs into CEF-formatted output data.

Web Security appliance AsyncOS 10.1 support

Support for changes to Archive Scan access logs, included in the AsyncOS 10.1 for Web Security Appliances release.

New in Release 6.0

Feature

Description

Custom Filters

Define custom searches of the available access, SOCKS and AMP log data, in a process known as “filtering.”

Web Security appliance AsyncOS 10.0 changes

AMP enhancements and Referrer header-related support.

Supported and Unsupported Features

Component

Supported

Not Supported

Server

Single-server deployments

Multiple-server deployments

Transport Methods

FTP (files and directories)

TCP (syslogs)

PDF

Integrated PDF generation

Scheduled PDF Reporting

Custom Dashboards

For each predefined report, use Save As Dashboard to create a custom dashboard for selected time range, source type and host (limited). For each custom filter, use Save As Dashboard to create a custom dashboard for selected Filter fields from access, SOCKS or AMP logs.

System Requirements and Sizing and Scaling Recommendations

System requirements, as well as sizing and scaling recommendations, are detailed in the Cisco Advanced Web Security Reporting Release Notes, available from http://www.cisco.com/c/en/us/support/security/web-security-appliance/products-release-notes-list.html

The following ports that are used by AWSR must be open. Ensure that these ports are not blocked in the enterprise firewall.

  • 8887/TCP - port number(s) for the python-based application server to listen. This port is called as app server ports.

  • 8888/TCP - port to access Cisco Advanced Web Security Reporting GUI. This port is also called as web port.

  • 8889/TCP - port that Cisco Advanced Web Security Reporting web use to communicate with the daemon process. This port is called as management port.

  • 8886/TCP - mongodb - port that daemon uses to connect to the KV Store server.

  • 22/TCP - SSH/SCP/WGET

  • 514/TCP - Syslog

  • 21/TCP - FTP


Note

You can also enable nmap/netstat/iptables to control and verify the system configuration, and RDP on windows.


Installing Cisco Advanced Web security Reporting 7.5.2


Note

Make sure that you clear the cookies and cache in the browser before installing/upgrading.


Note

For AWSR 7.5.2, login credentials are created during installation. Credentials created during installation will have ‘administrator’ roles and capabilities/privileges.


Follow the steps in this section to install Cisco Advanced Web Security Reporting.

On Linux

Perform the following tasks in order.

Procedure


Step 1

Download the installer for the version of the Cisco Advanced Web Security Reporting required:

https://software.cisco.com/download/home/286290962/type/283998384/release/7.5.2

Step 2

Extract the installer software at /opt using the below command.

tar -zxvf CiscoAdvancedWebSecurityReporting-Linux_7-5-2-0-124.tgz -C /opt
Step 3

Change directory to /opt/cisco_wsa_reporting/ and run the set-up script:

cd /opt/cisco_wsa_reporting./setup.sh
  • If the result of this command is:

    ./setup.sh: Permission denied
    1. Change the permission level of the script setup.sh by using the following command:

      chmod 777 setup.sh
    2. Re-run the script.

The progress, and milestone statements are displayed during set-up.

Step 4

Create the administrator username and password and confirm password.

Step 5

Enter the username and password created above in the previous step to login.

Step 6

Launch Cisco Advanced Web Security Reporting, and log in with the credentials created during installation:

  1. Navigate to https://<hostname>:8888 in a browser window.

    Note 

    Earlier versions used port 8000; since version 4.0, the port 8888 is used.

Note 

If the username and password is provided incorrectly twice during Splunk login, during the execution of setup.sh command, the license does not get added.

To add the license file manually, follow the below steps:

From the <INSTALL_HOME> directory, for example, /opt/cisco_wsa_reporting:

  • Copy the content of the file 'Splunk-eval-120d-500GB.License' and login to AWSR GUI as administrator.

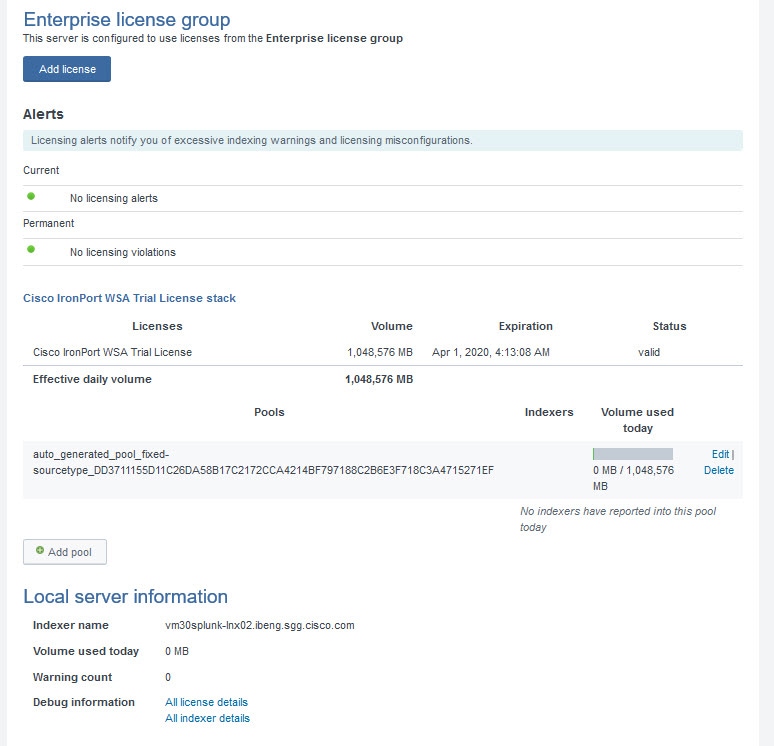
  • Navigate to Settings > SYSTEM > Licensing > Add license > click Copy & paste the license XML directly and paste the content of 'Splunk-eval-120d-500GB.License' > Install and then restart.


On Windows

Before you begin

Windows allows only one installed version of Cisco Advanced Web Security Reporting. If you have an earlier version installed, you must back-up your existing data and uninstall the previous version before installing the new version.

Procedure


Step 1

Download the installer for the version of the Cisco Advanced Web Security Reporting required:

https://software.cisco.com/download/home/286290962/type/283998384/release/7.5.2

Step 2

Extract the installer. You can use applications such as 7-Zip, WinZip, etc.

Note 

Files related to digital signature can be seen in the directory where the package was extracted. For example, C:\Users\<UserDirectory>\Downloads\CiscoAdvancedWebSecurityReporting-Windows_7-5-2-0-124.tgz

Step 3

Launch a command-line shell (PowerShell) as Administrator, and change the directory to which you extracted the installer.

Step 4

Run the installation command ./install.bat.

Step 5

Create the administrator username and password and then confirm password.

Note 

In case of an invalid length of password, you might get an error message “Password must contain at least 8 total printable ASCII characters”. Ensure that the password contains minimum of 8 ASCII characters for successful user creation.

Step 6

Enter the username and password created above in the previous step to login.

The application is installed in the folder C:\Program Files\Cisco\CiscoWSAReporting.

Step 7

Reboot the Cisco Advanced Web Security Reporting server.

Step 8

Launch the Cisco Advanced Web Security Reporting application and log in:

  1. Navigate to https://<hostname>:8888 in a browser window.

  2. Log in with the username and password created during installation.

    Note 

    Earlier versions used port 8000; since version 4.0, the port 8888 is used.


What to do next

Handling Errors During Installation

The following error might appear during installation. This section describes the common errors that can occur during installation and the steps that you need to be perform to resolve these errors.

Security Error: PSSecurityException

The PSSecurityException error occurs in some cases when you install Cisco Advanced Web Security Reporting on a fresh appliance.

Perform the following steps to resolve this error.

Procedure

Step 1

Run the following command in the prompt:

set-executionpolicy remotesigned

Step 2

Select [Y] yes for any prompt that appear.

Step 3

Re-run the installation command ./install.bat


Import Module Error: posh-docker

Perform the following steps to resolve this error.

Procedure

Step 1

Run the following command in the prompt:

Install-Module -Scope CurrentUser posh-docker

Step 2

Select [Y] yes for any prompt that appear.

Step 3

Re-run the installation command ./install.bat


ObjectNotFound: Cannot find path

Perform the following steps to resolve this error.

Procedure

Step 1

Run the following command in the prompt:

New-Item -Path HKLM:\System\CurrentControlSet\services\splunkd -Force | Out-Null

New-Item -Path HKLM:\System\CurrentControlSet\services\splunkweb -Force | Out-Null

Step 2

Re-run the installation command ./install.bat


Upgrading to Cisco Advanced Web Security Reporting 7.5.2

On Linux

These tasks must be performed in order:

Procedure


Step 1

Navigate to the directory of previous version of installed Cisco Advanced Web Security Reporting.

Step 2

Shutdown the previous session using the chmod 777 ./shutdown command.

Step 3

Check if the AWSR is still running through the browser by navigating to https://<hostname>:8888.

Step 4

Download new installer for the version of the Cisco Advanced Web Security Reporting in /opt/ directory from:

https://software.cisco.com/download/home/286290962/type/283998384/release/7.5.2

Step 5

Copy the downloaded installer file into the base directory for the cisco_wsa_reporting directory.

For example, if the earlier version of Cisco Advanced Web Security Reporting is installed in /opt/cisco_wsa_reporting/, then place the file in the /opt/ directory.

Step 6

Change directory to the installation’s base directory (for example, /opt/).

Step 7

Use the command below to extract the installer. Use appropriate version number.

tar -zxvf CiscoAdvancedWebSecurityReporting-Linux_7-5-2-0-124.tgz cisco_wsa_reporting/SeamlessUpgrade.sh; cp -f cisco_wsa_reporting/SeamlessUpgrade.sh./

Step 8

Run the upgrade script. Use appropriate version number.

./SeamlessUpgrade.shCiscoAdvancedWebSecurityReporting-Linux_7-5-2-0-124.tgz

  • If the result of this command is:

    ./SeamlessUpgrade.sh: Permission denied

    1. Change the permission level of the script SeamlessUpgrade.sh by issuing the following command:

      chmod 777 cisco_wsa_reporting/SeamlessUpgrade.sh

    2. Re-run the script

Step 9

In a browser, open https://<wsa_reporting_server_host_name>:8888 and log in with the username and password.


On Windows

These tasks must be performed in order:

Procedure


Step 1

Download the installer for the version of the Cisco Advanced Web Security Reporting required:

https://software.cisco.com/download/home/286290962/type/283998384/release/7.5.2

Step 2

Extract the installer; you can use applications such as 7-Zip, WinZip, etc.

Step 3

Launch a command-line shell (PowerShell) as Administrator and change directory to the directory to which you extracted the installer.

Step 4

Use the command .\WinSeamlessUpgrade.ps1 to upgrade Cisco Advanced Web Security Reporting.

Step 5

In a browser, open https://<wsa_reporting_server_host_name>:8888 and log in with the username and password.


Users

The Cisco Advanced Web Security Reporting application provides two administrative users. You can also create users and assign roles already available or create a new role. See Restrict Access to Department Reports by Role.

Administrative Users

The Cisco Advanced Web Security Reporting application provides two administrative users:

  • The “default admin” (user name: admin and password: Cisco@dmin) will have access to all administration functionality.

    The admin user can install licenses and configure the distributed environment. Use this account to configure, test, and troubleshoot.

  • The second administrative user (name: wsa_admin and password: Ironp0rt) has access to a subset of administration functionality.

We recommend that you change both passwords immediately after installation (Settings > Users and Authentication > Access Controls Users).

Creating New Users

Apart from administrative users, you can also create new users:

Procedure

Step 1

Choose Settings > Users and Authentication > Access Controls Users.

Step 2

Click New.

Step 3

Enter a Username, and assign a role. See Restrict Access to Department Reports by Role.

Step 4

Set a password.

Step 5

Click Save.


Configuration Best Practices

  • Set time zones consistently across Web Security appliances, and the Umbrella host.

    The time displayed in the search results reflects the ‘local’ time of the Cisco Advanced Web Security Reporting instance. By default, all inputs for the appliance logs are set to TZ = GMT.

  • Document the local admin account password (regardless of the chosen authentication method).

  • Enable data model acceleration if role based reporting is not used.

    1. Choose Settings > Data > Data Acceleration.

    2. Click Edit.

    3. Select Edit Acceleration.

    4. Check the Accelerate check box, and select 3 months as Summary Range.

    5. Click Save.

Commands To Start and Stop the Cisco Advanced Web Security Reporting Application

On Linux

To stop the Cisco Advanced Web Security Reporting application:

Change directory to /cisco_wsa_reporting/ and issue this command:

./shutdown.sh

To start the Cisco Advanced Web Security Reporting application:

Change directory to /cisco_wsa_reporting/ and issue this command:

/startup.sh

On Windows

To stop the Cisco Advanced Web Security Reporting application:

Change directory to <install_home>\ and issue this command:

shutdown.bat

To start the Cisco Advanced Web Security Reporting application:

Change directory to <install_home>\ and issue this command:

startup.bat


Note

On Windows, <install_home>\ is C:\Program Files\Cisco\CiscoWSAReporting.


Post Installation Tasks

Enable HTTPS with AWSR

Procedure


Step 1

In Cisco Advanced Web Security Reporting application, choose Settings > System > Server Settings.

Step 2

Click General Settings.

Step 3

Click Yes for Enable SSL (HTTPS) in Cisco Advanced Web Security Reporting application.

By default, AWSR deployments point to the default certificates when encryption is turned on. See Generate and Sign Certificates to sign the certificates.

Step 4

Log into the CLI as root user and navigate to $AWSR_Home/etc/system/local/

Step 5

Edit web.conf file and make sure that the entry enableSplunkWebSSL = 1 is present in it.

Step 6

Navigate to the $AWSR_HOME directory and run the shutdown.sh command to stop the AWSR process.

Step 7

Start the AWSR process by executing the startup.sh command.

Step 8

You must now add https:// before the URL you use to access Cisco Advanced Web Security Reporting application.


Disable Client-Initiated Renegotiation

Procedure


Step 1

Log into the CLI as root user and navigate to $AWSR_Home/etc/system/local/

Step 2

Open the web.conf file and append the text allowSslRenegotiation = false at the end.

Step 3

Navigate to the $AWSR_HOME directory and run the shutdown.sh command to stop the AWSR process.

Step 4

Start the AWSR process by executing the startup.sh command.


Send Strict Transport Security Header

Procedure


Step 1

Log into the CLI as root user and navigate to $AWSR_Home/etc/system/local/

Step 2

Open the server.conf file and append the following text:

[httpServer]
replyHeader.X-XSS-Protection= 1; mode=block
replyHeader.Content-Security-Policy = script-src 'self'; object-src 'self'
[sslConfig]
sendStrictTransportSecurityHeader = true
Step 3

Open the web.conf file and append the following text:

sendStrictTransportSecurityHeader = true
replyHeader.X-XSS-Protection= 1; mode=block
Step 4

Navigate to the $AWSR_HOME directory and run the shutdown.sh command to stop the AWSR process.

Step 5

Start the AWSR process by executing the startup.sh command.


Restrict Password Length

This topic describes how to configure minimum permitted password length in characters when passwords are set or modified.

Procedure


Step 1

Log into the CLI as root user and navigate to $AWSR_Home/etc/system/local/

Step 2

Open the authentication.conf file and append the following text at the end:

[splunk_auth]
minPasswordLength = <positive integer>

where, positive integer can be a positive number such as 12, 127, 256 etc.

Note 

If the authentication.conf file is not present in $AWSR_HOME/etc/system/local path, then copy the file from $AWSR_HOME/etc/system/default path to $AWSR_HOME/etc/system/local path and make the changes specified in step 2 above.

Step 3

Navigate to the $AWSR_HOME directory and run the shutdown.sh command to stop the AWSR process.

Step 4

Start the AWSR process by executing the startup.sh command.


Disable Compression Algorithms

The following steps address the SSL/TLS Compression Algorithm Information Leakage Vulnerability.

Procedure


Step 1

Log into the CLI as root user and navigate to $AWSR_Home/etc/system/local/

Step 2

Open the server.conf file and append allowSslCompression = false under [sslConfig] section.

Step 3

Navigate to the $AWSR_HOME directory and run the shutdown.sh command to stop the AWSR process.

Step 4

Start the AWSR process by executing the startup.sh command.


Licensing and Migration

The three AMP reports added in version 4.5 are supported for Web Security appliance AMP logs only.

Since version 4.0, the Advanced Web Security Reporting application provides support for WSA which is referred to as “hybrid reporting.” To use hybrid reporting, you must install a new license. You can continue to use Web Security appliance-only reporting with your existing license. The various licensing and migration scenarios are:

Migration from v3.0 (Web Security Appliance) to v4.0 (Web Security Appliance-only) Reporting

You can install the version 4.0 or later software and your previously installed license will continue to provide Web Security appliance reporting. Further, an evaluation license is embedded in the version 4.0 and later software; this license includes the additional reporting source types that will let you evaluate hybrid reporting.

Migration from v3.0 (Web Security Appliance-only) to v4.0 Hybrid Reporting

As mentioned in the previous section, you can install the version 4.0 or later software and your previously installed license will continue to provide Web Security appliance reporting. In addition, the embedded evaluation license will let you evaluate the hybrid reporting feature.

In order to migrate from Web Security appliance-only to hybrid reporting, you must open a Cisco Technical Assistance Center (TAC) support case to remove your existing license and install a new hybrid-reporting license that includes the complete list of source types including ciscoumbrella. https://tools.cisco.com/ServiceRequestTool/scm/mgmt/case


Note

Contacting TAC is necessary only if you are upgrading from version 3.0 Web Security appliance-only reporting to version 4.0 or later hybrid reporting.


New Hybrid Reporting License

After installing the version 4.0 or later software as a new Cisco Advanced Web Security Reporting user, to utilize Web Security appliance and Hybrid Web Security reporting, you can use the embedded evaluation license with no limitations during the term of the evaluation. To continue after the evaluation term, or to provide reporting beyond the evaluation limits, you must acquire a master hybrid license. With a new installation, utilize the infodoc supplied with your order to request the license.

Hybrid Reporting License Issues

If you encounter hybrid-reporting issues, before contacting Cisco, verify that you have purchased the appropriate Umbrella package.

In addition, ensure that the reporting-application license (issued with purchase of SMA-WSPL-LIC=, SMA-WSPL-LOW-LIC=, or SMA-WSPL-HIGH-LIC=) includes only the following source types: wsa_trafmonlogs, wsa_accesslogs, wsa_w3clogs, wsa_syslog, and wsa_amplogs.

Using Cisco’s Cisco Advanced Web Security Reporting application to process logs of any other source type, for example ps, will produce a license-violation error. This can happen if you install other applications which produce logs with alternate source types.

Licensing Considerations for Version 4.0 and Later Upgrades

Initially, you will need at least an evaluation license good for a large volume of data to handle the historical data transfer. After that, you will need an Cisco Advanced Web Security Reporting license.

  1. Consider the quantity of data to be indexed both during initial historical data upload, and on an on-going daily basis.

  2. Acquire and upload an evaluation license sufficient for the historical data transfer.

  3. Acquire and upload an Cisco Advanced Web Security Reporting license sufficient for the anticipated data of the applicable source type to be indexed.

  4. Change the license type from Trial to Evaluation or Cisco Advanced Web Security Reporting.

  5. Ensure that indexes are reported to the correct pool:

    1. Navigate to Settings > System > Licensing and find the “Pools Indexers Volume used today” row under the appropriate license stack.

    2. If necessary, you can click Edit to change the maximum daily volume allocation, and the indexers assigned.

    3. Click Cancel if you made no changes, or Submit if you made changes.

License Installation

To obtain licenses, please refer to the information provided when you placed your order. Follow these steps to install Cisco Advanced Web Security Reporting license(s):

Procedure


Step 1

Launch the Cisco Advanced Web Security Reporting application (enter https://<hostname>:8888 in abrowser window) and log in as the default admin user.

Step 2

Navigate to Settings > System > Licensing.

Step 3

Click Add license.

Step 4

Browse to your XML license file.

Step 5

Click Install.


Create the Folder Structure for Access and Traffic Monitor Log Files

Log

Default Path

Variables

Traffic Monitor

/$Input_base/wsa_hostname/trafmonlogs/

$Input_base=path of root FTP folder host_name=Web Security appliance

Access

/$Input_base/wsa_hostname/accesslogs/

$Input_base=deployment host_name=Web Security appliance

AMP

/$Input_base/wsa_hostname/amplogs/

$Input_base=deployment host_name=Web Security appliance

Import and Index Historical Data

Before you begin

Procedure


Step 1

Copy the historical log files into the folder structure for log files.

Step 2

In the Cisco Advanced Web Security Reporting application, log in as admin.

Step 3

Verify that data is being imported:

  1. Select Settings > Data > Indexes.

  2. Scroll down to the summary row.

  3. Verify that the Earliest event and Latest event columns display reasonable dates. If the historical data import was run under an evaluation license, install the default license downloaded for the account, and remove any non-production licenses.

Tip 

If you find that the application is not indexing files for any type of configured input because of a checksum error, add the line crcSalt = <source> to each input stanza in the inputs.conf file. (The following section, (Optional) Configure the Application to Delete Log Files After Indexing, describes editing the inputs.conf file.)


What to do next

(Optional) Configure the Application to Delete Log Files After Indexing

Before you begin

If the file inputs.conf does not exist in the directory <install_home>/cisco_wsa_reporting/etc/apps/cisco_wsa_reporting/local/, create the input-configuration file: <install_home>/cisco_wsa_reporting/etc/apps/cisco_wsa_reporting/local/inputs.conf.

Procedure


Step 1

Using a text editor, open

<install_home>/cisco_wsa_reporting/etc/apps/cisco_wsa_reporting/local/inputs.conf.

Step 2

Add a segment as below:-

[batch:///home/logger/incoming/wsa176.wga/accesslogs/*]
host_segment = 4
disabled = false
sourcetype = wsa_accesslogs
move_policy = sinkhole

Where the first line is the FTP directory path where Web Security appliance logs are sent. The second line is the part of the FTP path containing the host name. The third line enables this FTP input. The fourth line specifies the source of this input. The final line, move_policy = sinkhole, enables deletion of the original data once it is indexed.

Step 3

Save the inputs.conf file and then restart the Cisco Advanced Web Security Reporting application by navigating to Settings > System > Server controls and clicking Restart.


Set Up On-going Data Transfers

Before You Begin

Configure Data Inputs for Web Security Appliance Logs


Note

To configure data input from multiple WSAs, repeat the following steps for each host.


Procedure


Step 1

In the Cisco Advanced Web Security Reporting application:

  • Choose Settings > Data > Data inputs > Files & directories.

Step 2

Disable any inputs labeled CiscoWSA.

Step 3

Click New.

Step 4

Enter the full path to the FTP directory to which Web Security appliance logs will be sent.

This path, and the FTP path provided on the Web Security appliance’s Log Subscription page must match.

Step 5

Click Next.

Step 6

Click New.

Step 7

Enter the Source Type, select the Source Type Category, and enter the Source Type Description.

wsa_accesslogs - These are used for all reports except layer 4 traffic monitor & Advanced Malware Protection reports.

wsa_trafmonlogs - These are used for layer 4 traffic monitor reports.

wsa_amplogs - These are used for Advanced Malware Protection reports.

Step 8

Choose Advanced Web Security Reporting 7.5.2 from the App Context drop-down list.

Step 9

Click Constant value and enter the Web Security appliance host name in the Host field value field.

Step 10

Choose Main as the destination Index.

Step 11

Click Review and review the values you provided.

Step 12

Click Submit.

Note 

You can navigate to Settings > Data > Data inputs > Files & directories to confirm the new data input entry.


Configuration Of Data Input for Web Security Appliance Syslogs

Procedure


Step 1

In the Cisco Advanced Web Security Reporting application:

  • Choose Settings > Data > Data inputs > TCP.

Step 2

Click New.

Step 3

Click the TCP button and enter 514 in the Port field; leave the rest of the fields blank.

Step 4

Click Next.

Step 5

Click New.

Step 6

Enter wsa_syslog in the Source type field.

Step 7

Choose Advanced Web Security 7.5.2 as the App Context.

Step 8

In the Host section, click Custom as the Method, and then enter the Web Security appliance host name as the Host field value.

Step 9

Choose Main as the destination Index.

Step 10

Click Review and review the values you provided.

Step 11

Click Submit.

Step 12

Navigate to Settings > Data Inputs > TCP to confirm the new input entry.

Note 

With a multiple-appliance configuration, you must repeat these steps from the Cisco Advanced Web Security Reporting application for each appliance. You cannot use the same port for two different data inputs. However, you also can configure multiple appliances by editing the inputs.conf file.


Establish Log Transfers from A Web Security Appliance

Before you begin

Procedure


Step 1

In the Web interface for the Web Security Appliance, navigate to System Administration > Log Subscriptions.

Step 2

Click Add Log Subscription, or click the name of an existing subscription to edit it.

Step 3

Configure the subscription (this example refers specifically to access, AMP engine and traffic-monitor logs):

Setting

Log Type

Value

Log Type

Access

accesslogs

Traffic Monitor

trafmonlogs

AMP Engine

amp_logs

Log Name

Any one

Name for the log directory.

(Depending on your AsyncOS release)

Rollover by File Size

Maximum File Size

Any one

Recommend no more than 500 MB.

(Availability of this option varies by AsyncOS release)

Rollover by Time

Any one

Recommend custom rollover interval of one hour (1h) or more frequent rollovers. For AMP logs, recommend one minute (1m).

Log Style

Access

Squid

Traffic Monitor

N/A

AMP Engine

N/A

Log Level

Access

N/A

Traffic Monitor

N/A

AMP Engine

Select Debug.

Note 

It is important to change Log Level to Debug for AMP reporting, or little to no information will be reported.

(Optional) Custom Fields

Access only

%XK (Adds a web reputation threat reason.)

Retrieval Method

FTP on Remote Server

Any one

Hostname: IP address or host name of the Cisco Advanced Web Security Reporting host.

Directory: name of Cisco Advanced Web Security Reporting instance directory.

Username/Password: FTP user name and password for access to application.

Note 

If connection between Cisco Advanced Web Security Reporting and Web Security appliance is lost, logs for that period are not available until connection is restored.

Retrieval Method

Syslog Push

Either

Hostname: IP address or host name of the Cisco Advanced Web Security Reporting host.

Protocol: TCP.

Facility: choose auth.

Note 

If connection between Cisco Advanced Web Security Reporting and Web Security appliance is lost, logs for that period are not available until connection is restored.

Note 

Accessing online Help from the Add Log Subscription page brings up detailed information about all settings.


Umbrella Log Updates

Before you begin

Procedure


Step 1

In the Cisco Advanced Web Security Reporting application:

Choose Settings > Data > Data inputs > Cisco Umbrella Logs.

Step 2

Click New.

Step 3

Enter a name for this data input.

Step 4

Enter the client_id, s3_key and s3_secret that have been provided by Umbrella. The client_id is the AWS bucket name for Umbrella.

Step 5

Click the More settings check box and provide the time Interval in seconds at which Umbrella logs can be pulled; default is 3600.

Step 6

Choose Manual in the Set sourcetype drop-down list.

Step 7

Enter the Source type. Enter ciscoumbrella (for Umbrella reports).

Step 8

Click Next.

Step 9

A success screen is displayed.

Note 

Not supported on Cisco managed AWS S3 bucket.


Set Up Department Membership Query (Optional)

Perform the set-up procedure for department membership requirements under these conditions:

  • You will use AD/LDAP groups bound to roles in the Cisco Advanced Web Security Reporting application.

  • You will run reports on data that are based on organizational roles.

Set Up Department Membership Reporting

Before you begin

  • Linux users: Install ldapsearch tool using the following command:

    sudo yum install openldap-clients

Procedure


Step 1

Choose Settings > Data > Data inputs > AD/LDAP Server Details.

Step 2

Click LDAP AD Server Details.

Step 3

On the LDAP AD Server Details page, provide the following server information, and then click Save:

  • AD/LDAP Server Name

  • AD/LDAP User Name

  • AD/LDAP User Password and Confirm

  • AD/LDAP Group Name (Specify the Group DN)

Step 4

Choose Settings > Data > Data inputs > scripts to enable the membership script:

  • On Linux, the script name is discovery.py.

  • On Windows, the script name is discovery.vbs.

The membership script is set to run every day by default. The interval is set in seconds and can be changed by navigating to Settings > Data > Data inputs > scripts and editing the interval in the discovery file.

You can verify that the script populated the file departments.csv with the user data by examining the file <install_home>/etc/apps/cisco_wsa_reporting/lookups/departments.csv.

The departments.csv file is used as part of the role-based reporting. This file contains:

  • user (cs-username - Authenticated username) in the first column

  • displayname, groupname in subsequent columns, retrieved from the Active Directory or LDAP server using scripts. For the user present in access log (user_id field), the corresponding display name and group will be displayed in the displayname and department fields.

This file may be edited manually, or by configuring one of the role-discovery scripts (available in the application’s bin folder) as a scripted input. There is a script for Linux and Windows.

  • Ensure the file exists in the application’s look-up folder.

  • If the Linux version is used, ensure the CLI command ldapsearch is installed and in the application user’s path.

  • If the Windows version is used, “option explicit” may be commented out to reveal more specific information regarding why and from where an error might have originated.

  • Verify the LDAP paths are syntactically correct.

  • Verify the bind service account name is correct.

  • Verify the correct bind password is entered.

  • Test connection to the remote machine over port 389.

  • Verify the correct attribute was configured for the member name.

  • Verify the correct attribute was used for group membership.

  • Verify the correct attribute was configured for group name.

Note 

On Windows, if the departments.csv file is not populated with data at this point, change directory to <install_home>\etc\apps\cisco_wsa_reporting\bin, and run cscript discovery.vbs, where <install_home> is C:\Program Files\Cisco\CiscoWSAReporting.


Restrict Access to Department Reports by Role

Before you begin

  • Understand that if users are restricted to viewing data from specific departments or groups, Layer 4 Transport Monitor (L4TM) data will only be available to administrators because L4TM data is not linked to a department or role.

  • Log into the Cisco Advanced Web Security Reporting application as admin.

Procedure


Step 1

Choose Settings > Users and authentication > Access Controls Roles.

Step 2

Click New or edit an existing role.

Step 3

Define search restrictions for the role.

Example:

To restrict a role to viewing data for the Sales Department, in the Restrict search terms field, enter department=sales.
Step 4

Click Save.

Step 5

Choose Settings > Data > Data Acceleration.

Step 6

Click Edit.

Step 7

Select Edit Acceleration.

Step 8

Uncheck the Accelerate check box, and click Save.

To verify the new role’s search restrictions, you can create a new user and run searches. See Creating New Users. Search results for a user, assigned to the role created in Step 4, will only show events that match the search strings specified in the role.

Note 

Enable data model acceleration if role based reporting is not used. This will enhance reporting performance. See Configuration Best Practices.


Troubleshooting Department Membership Reporting


Tip

  • Linux users: Verify that ldapsearch tool is in the Cisco Advanced Web Security Reporting user’s path.

  • Verify that the departments.csv file exists in the application’s lookup folder.

  • Windows users: Comment out option explicit to reveal more specific information the origin and cause of an error.

  • Verify the LDAP paths are syntactically correct.

  • Verify the bind service account name is correct.

  • Verify the correct bind password is entered.

  • Test connection to the remote machine over port 389.

  • Verify the correct attribute was configured for the member name.

  • Verify the correct attribute was used for group membership.

  • Verify the correct attribute was configured for group name.


Set Up Scheduled PDF Reporting (Optional)

Cisco Advanced Web Security Reporting application users can schedule PDF output generation from any dashboard, view, search or report. Follow these configuration steps to set up scheduled PDF reporting:

Configure Email Alerts

You can configure the Cisco Advanced Web Security Reporting application to send email alerts following PDF report generation.

Before you begin

  • Log into the Cisco Advanced Web Security Reporting application as admin.

Procedure


Step 1

In the Cisco Advanced Web Security Reporting application:

  • Choose Settings > System > Server Settings > Email Settings.

Step 2

Enter or update the necessary Mail Server Settings in order to send alert emails:

  1. Mail host—Enter the SMTP server host name.

  2. Email security (Optional)—Select an email security option. The application can use SSL or TLS when it communicates with the SMTP server.

  3. Username—Enter the name to use during SMTP server authentication.

  4. Password—The password configured for the specified user name.

  5. Confirm password—Re-enter the password.

Step 3

Provide the necessary Email Format information:

  1. Link hostname—Host name of the server used to create outgoing results.

  2. Send email as—Sender name displayed as email originator.

  3. Email footer—The note presented as a footer in sent emails.

Step 4

Change the PDF Report Settings if necessary: choose a Report Paper Size and a Report Paper Orientation.

Step 5

Click Save.


Schedule PDF Report Generation

You can schedule regular generation and emailing of a PDF report for any custom dashboard. See Save As Dashboard for information about creating custom dashboards.

Before you begin

  • Log into the Cisco Advanced Web Security Reporting application as admin.

Procedure


Step 1

Choose the desired dashboard from the Custom Dashboards menu.

Step 2

Choose Edit > Schedule PDF Delivery.

Step 3

In the Edit PDF Schedule dialog box, check Schedule PDF and provide schedule, email and page options.

Step 4

(Optional) Click Send Test Email to confirm that the generated PDF is sent as an attachment to the specified email address.

Step 5

(Optional) Click Preview PDF to preview the generated PDF.


Schedule Summary Index Generation

Before you begin

rpt_awsr_top_malware_categories will run everyday 0:00 hours for last 24 hours.


Note

You can change the schedule based on the requirement.


  • Log into the Cisco Advanced Web Security Reporting application as admin.

Procedure


Step 1

Go to https://<host>:8888/en-US/manager/search/saved/searches?app=cisco_wsa_reporting.

Step 2

Change the owner as All.

Step 3

Choose rpt_awsr_top_malware_categories.

Step 4

Choose Edit > Edit Schedule.

Step 5

Change the Schdule Time and Time Range based on the requirement.

Step 6

Click Save.


Create or Modify Users

To create a new user

Procedure


Step 1

Login to Cisco Advanced Web Security Reporting application as an admin user.

Step 2

Choose Settings > USERS AND AUTHENTICATION > Access Controls Users- Add New

Step 3

Enter the following details

  1. Username: Enter a unique username (mandatory)

  2. Full Name: Enter the first name and last name

  3. email address: Enter the email address

  4. Time zone: Choose the time zone

  5. Default app: cisco_wsa_reporting (Advanced Web Security Reporting 7.5.2)

  6. Assign to roles or Create a role for this user: To create a new user role, see Create or Modify Roles (mandatory).

  7. Password (mandatory): Enter a password.

  8. Confirm Password (mandatory): Retype the password

Step 4

Click Save.


Delete Users

To delete an existing user:

Procedure


Step 1

Login to Cisco Advanced Web Security Reporting application as an admin user.

Step 2

Choose Settings > USERS AND AUTHENTICATION > Access Controls Users

Step 3

Click Delete next to each user to remove that user.

Note 

You cannot delete the admin user.


Create or Modify Roles

To create or modify a user role

Procedure


Step 1

Login to Cisco Advanced Web Security Reporting application as an admin user.

Step 2

Choose Settings > USERS AND AUTHENTICATION > Access Controls Users- Add New

Step 3

Enter following details to create a new role

  1. Role Name: Enter a unique name for the role.

  2. Default app: cisco_wsa_reporting

  3. Search Restrictions: Restrict the scope of searches run by this role. Search results for this role will only display events that matches this search string.

    – Restrict search terms (Can include source, host, index (can be set below), eventtype, sourcetype, search fields, *, and OR and AND). For example, “host=web* OR source=/var/log/*”

    – Restrict search time range (Set a maximum time window (in seconds) for searches for this role. For example, set this to '60' to restrict this role's searches to 1 minute before the most recent time specified in the search. You can also set this to '0' to explicitly make the window infinite, or '-1' to unset the window for this role (can be overridden by imported roles).)

    – User-level concurrent search jobs limit (Enter the maximum number of concurrent search jobs for each user of this role).

    – Real-time search jobs for each user of this role. (This count is independent from the normal search jobs limit).

    – Role-level concurrent search jobs limit (Enter the maximum number of cumulative concurrent search jobs for this role).

    – Role-level concurrent real-time search jobs limit (Enter the maximum number of cumulative concurrent real-time search jobs for this role. This count is independent from the normal search jobs limit).

    – Limit total jobs disk quota (Enter the total disk space in MB that can be used by a user's search jobs. For example, '100' would limit this role to 100 MB total).

  4. Inheritance: Specify roles from which this role inherits capabilities and indexes. Inherited capabilities and indexes cannot be disabled. If multiple roles are specified, this role inherits capabilities from the parent with broadest permissions. Below are the list of predefined roles that varies depending on the capabilities:

    – admin

    – can_delete

    – power

    – splunk_system_role

    – user

    – wsa_admin

  5. Capabilities: See the List of Capabilities table below for the available list of capability names.

  6. Indexes searched by default: Set the index(es) that searches default to when no index is specified. User with this role can search other indexes using index= (For example, “index=special_index”).

  7. Indexes: Restrict this role's searches to the specified index(es).

  8. Click Save.


List of Capabilities

Capability name

What it lets you do

accelerate_datamodel

Enable or disable acceleration for data models. Set acceleration to true to enable automatic acceleration of this data model. Additional space is required depending on the number of events, fields, and distinct field values in the data. See the Knowledge Manager Manual for more information.

accelerate_search

Lets the user enable or disable acceleration for reports. The user must also have the schedule_search capability assigned. Works for searches that use transforming commands. See the Knowledge Manager Manual for more information.

admin_all_objects

Lets the user access and modify any object in the system regardless of any restrictions set in the objects. For example user objects, search jobs, reports, and knowledge objects. Allows the user to bypasses any ACL restrictions, much the way root access in a Linux environment does.

change_authentication

Lets the user change authentication settings and reload authentication. See the Securing Splunk Enterprise Manual for more about authentication.

change_own_password

Lets the user change their own password.

delete_by_keyword

Lets the user use the "delete" operator. The "delete" command marks all of the events returned by the search as deleted. This masks the data from showing up in search results but does not actually delete the raw data on disk. See the Search Manual for more information.

dispatch_rest_to_indexers

Lets a user dispatch the REST search command to indexers.

edit_deployment_client

Lets the user change deployment client settings. See the Managing Indexers and Clusters of Indexers Manual for more about the deployment client.

edit_deployment_server

Lets the user change deployment server settings. User can change or create remote inputs that are pushed to the forwarders and other deployment clients. See the Managing Indexers and Clusters of Indexers manual for more about the deployment server.

edit_dist_peer

Lets the user add and edit peers for distributed search. See the Managing Indexers and Clusters of Indexers Manual for more information.

edit_forwarders

Lets the user change forwarder settings, including settings for SSL, backoff schemes, etc. Also used by TCP and Syslog output admin handlers.

edit_httpauths

Lets the user edit and end user sessions through the httpauth-tokens endpoint.

edit_indexer_cluster

Lets the user edit indexer clusters. See the Managing Indexers and Clusters of Indexers Manual for more about indexers.

edit_input_defaults

Lets the user use the server settings endpoint to change default hostnames for input data.

edit_monitor

Lets the user add inputs and edit settings for monitoring files. Also used by the standard inputs endpoint and the one-shot input endpoint.

edit_roles

Lets the user edit roles and change user/role mappings. Used by both the user and role endpoint.

edit_roles_grantable

Lets the user edit roles and change user/role mappings for a limited set of roles. Can assign any role to other users. To limit this ability, configure grantableRoles in authorize.conf. For example: grantableRoles = role1;role2;role3

edit_scripted

Lets the user create and edit scripted inputs.

edit_search_head_clustering

Lets the user edit search head clustering settings.

edit_search_schedule_priority

Lets the user assign a search a higher-than-normal schedule priority. For information about the search scheduler, see the Knowledge Manager Manual.

edit_search_schedule_window

Lets the user assign schedule windows to scheduled reports. Requires the schedule_search capability. For more about the search scheduler, see the Knowledge Manager Manual.

edit_search_scheduler

Lets the user enable and disable the search scheduler. See the Knowledge Manager Manual.

edit_search_server

Lets the user edit general distributed search settings like timeouts, heartbeats, and blacklists.

edit_server

Lets the user edit general server settings like server name, log levels, etc.

edit_server_crl

Lets the user edit general server settings like server name, log levels, etc. Inherits the ability to read general server and introspection settings.

edit_sourcetypes

Lets the user edit sourcetypes. See the Knowledge Manager manual for more information about sourcetypes.

edit_splunktcp

Lets the user change settings for receiving TCP inputs from another Splunk instance.

edit_splunktcp_ssl

Lets the user view or edit any SSL-specific settings for Splunk TCP input.

edit_splunktcp_token

Lets the user edit the Splunktcp token.

edit_tcp

Lets the user change settings for receiving general TCP inputs.

edit_tcp_token

Lets the user change TCP tokens. This is an admin capability and should only be assigned to system administrators.

edit_telemetry_settings

Opt in or out of product instrumentation.

edit_token_http

Lets the user create, edit, display, and remove settings for HTTP token input. Also enables the HTTP Event Collector feature.

edit_udp

Lets the user change settings for UDP inputs.

edit_user

Lets the user create, edit, or remove users. A role with the edit_user capability can assign any role to other users. To limit this ability, configure grantableRoles in authorize.conf. For example, grantableRoles = role1;role2;role3. Also lets a user manage certificates for distributed search.

edit_view_html

Lets the user create, edit, or modify HTML-based views.

edit_web_settings

Lets the user change settings for web.conf through the system settings endpoint.

embed_report

Lets the user embed reports and disable embedding for embedded reports.

export_results_is_visible

Lets the user display or hide the Export Results button in Splunk Web. The default value is to display the button.

extra_x509_validation

Lets the user add additional x509 validation.

get_diag

Lets the user get a remote diag from a Splunk instance using the /streams/diag endpoint.

get_metadata

Lets the user use the "metadata" search processor.

get_typeahead

Lets the user use typeahead in the endpoint and the typeahead search field.

indexes_edit

Lets the user change any index settings such as file size and memory limits.

input_file

Lets the user add a file as an input through inputcsv (except for dispatch=t mode) and inputlookup.

license_edit

Lets the user edit the license.

license_tab

Lets the user access and change the license. This attribute is deprecated.

license_view_warnings

Lets the user see a warning message when they are exceeding data limits or reaching the expiration date of their license. These warnings appear on the system banner.

list_accelerate_search

Lets the user view accelerated reports. User cannot accelerate reports.

list_deployment_client

Lets the user view deployment client settings.

list_deployment_server

View deployment server settings.

list_forwarders

Lets a user list and view settings for data forwarding. Can be used by TCP and Syslog output admin handlers.

list_httpauths

Lets the user view user sessions through the httpauth-tokens endpoint.

list_indexer_cluster

Lets the user view the list of indexer clusters as well as indexer cluster objects such as buckets, peers, etc.

list_indexerdiscovery

Lets the user view settings for indexer discovery. Also used by indexer discovery handlers.

list_inputs

Lets the user view lists of various inputs, including input from files, TCP, UDP, scripts, etc.

list_introspection

Lets the user read introspection settings and statistics for indexers, search, processors, queues, etc.

list_search_head_clustering

Lets the user list and view search head clustering objects like artifacts, delegated jobs, members, captain, etc.

list_search_scheduler

Lets the user view lists of search scheduler jobs.

list_settings

Lets the user list and view server and introspection settings such as the server name, log levels, etc.

list_storage_passwords

Lets the user list and view the /storage/passwords endpoint, lets the user perform GETs. The admin_all_objects capability must added to the role for the user to perform POSTs to the /storage/passwords endpoint.

output_file

Lets the user create file outputs, including outputcsv (except for dispatch=t mode) and outputlookup.

pattern_detect

Lets the user see and use the Patterns tab in the Search view.

request_remote_tok

Lets the user obtain a remote authentication token, which lets the user perform some distributed peer management and bundle replication and distribute searches to old 4.0.x Splunk instances.

rest_apps_management

Lets the user edit settings for entries and categories in the python remote apps handler. See restmap.conf for more information.

rest_apps_view

Lets the user list and view various properties in the Python remote apps handler. See restmap.conf for more information.

rest_properties_get

Lets the user get information from the services/properties endpoint.

rest_properties_set

Lets the user edit the services/properties endpoint.

restart_splunkd

Lets the user restart Splunk Enterprise through the server control handler.

rtsearch

Lets the user run real-time searches.

run_debug_commands

Lets the user run debug commands. For example "Summarize".

run_multi_phased_searches

Lets the user run searches with the redistribute command, which invokes parallel reduce search processing in distributed search environments. This capability is not assigned to any role by default.

schedule_search

Lets the user schedule saved searches, create and update alerts, and review triggered alert information.

search

Lets the user run a search. See the Search Manual for more information.

search_process_config_refresh

Lets the user use the "refresh search-process-config" CLI command to manually flush idle search processes.

srchFilter

Lets the user manage search filters. See the Search Manual for more information.

srchIndexesAllowed

Lets the user run search indexes. See the Search Manual for more information.

srchIndexesDefault

Lets the user set default search indexes.

srchJobsQuota

Lets the user set search job quotas.

srchMaxTime

Lets the user set the maximum time for a search.

use_file_operator

Lets the user use the "file" search operator. The "file" search operator is deprecated.

web_debug

Lets the user debug Web files.

Table 1. Windows Specific Capabilities

Capability name

What it lets you do

edit_modinput_admon

Edit modular inputs in admon.conf.

edit_modinput_perfmon

Edit modular inputs in perfmon.conf.

edit_modinput_winhostmon

Add and edit inputs for monitoring Windows host data

edit_modinput_winnetmon

Add and edit inputs for monitoring Windows network data.

edit_modinput_winprintmon

Required to add and edit inputs for monitoring Windows printer data.

edit_win_admon

(Deprecated)

edit_win_eventlogs

Edit windows eventlogs.

edit_win_perfmon

(Deprecated)

edit_win_regmon

(Deprecated)

edit_win_wmiconf

Edit wmi.conf.

list_pdfserver

View PDF server files

list_win_localavailablelogs

List all local Windows event logs.

srchTimeWin

Set search time limits.

write_pdfserver

Write to PDF server files.