Assess Endpoint Compliance Using Cisco Secure Client ISE Posture Module and Cisco Secure Firewall Management Center
Introduction
Cisco Secure Client’s ISE Posture module helps you to assess endpoint compliance before allowing them to connect to your network. The assessment can be for a specific version of an antivirus, an antispyware, a file, a registry key, and so on. During posture evaluation, all clients connecting to your network must meet the mandatory requirements to be compliant.
The ISE Posture module performs a client-side evaluation. The client receives the posture requirement policy from ISE, performs the posture data collection, compares the results against the policy, and sends the assessment results back to the ISE. The posture service classifies the posture states as unknown, compliant, and noncompliant.
Benefits
Using a threat defense to configure ISE Posture modules offers significant benefits such as:
-
Easily distribute and manage the ISE posture modules and profiles on each endpoint.
-
Easily assess endpoint compliance before they connect to the corporate network.
Is this Guide for You?
This use case is primarily intended for network administrators who use the management center to configure the ISE Posture module for endpoint compliance assessment.
System Requirements
The following table shows the supported platforms for this feature.
|
Product |
Version |
Version used in this document |
|---|---|---|
|
Cisco Secure Firewall Threat Defense (formerly Firepower Threat Defense/FTD) |
6.3 and later |
7.3 |
|
Cisco Secure Firewall Management Center (formerly Firepower Management Center/FMC) |
6.7 and later |
7.3 |
|
Cisco Secure Client (formerly AnyConnect) |
4.0 and later |
5.0 |
|
Cisco ISE |
2.0 and later |
3.1 |
Prerequisites
Ensure that you have:
-
Access to a Cisco ISE server with admin privileges.
-
Downloaded the Secure Client package and the Secure Client profile editor from Cisco Software Download Center to your local host.
-
Installed the Secure Client profile editor to your local host.
-
Downloaded the ISE Compliance Module from Cisco Software Download Center to your local host.
-
Configured ISE server details in the managed threat defense. See Configure ISE in the Management Center.
-
Configured a remote access VPN in the management center.
Licenses
-
ISE Premier license.
-
One of the following Secure Client licenses:
Secure Client Premier, Secure Client Advantage, or Secure Client VPN Only.
-
Management center Essentials (formerly Base) license must allow export-controlled functionality.
Choose to verify this functionality in the management center.
Configure ISE in the Management Center
You must configure the ISE server in the management center to:
-
Allow AAA requests from the threat defense for remote access VPN.
-
Receive the posture requirement policy from ISE.
-
Send the assessment results to ISE.
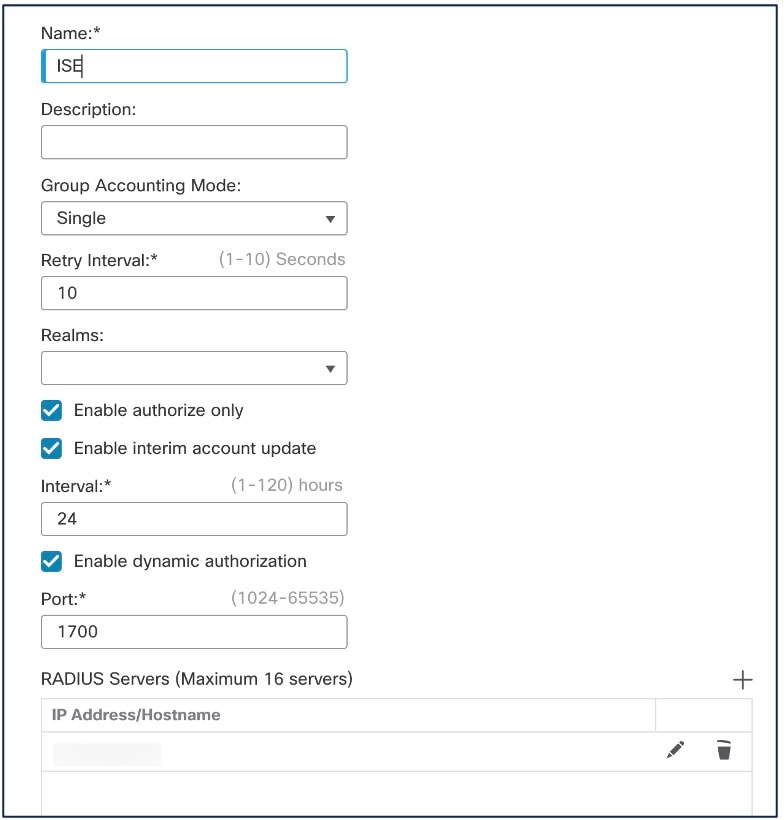
You must create a RADIUS Server object and configure it with the ISE server details.
Procedure
|
Step 1 |
Choose . |
|
Step 2 |
Click Add RADIUS Server Group. |
|
Step 3 |
Enter a name and a retry interval.
|
|
Step 4 |
Configure the port as 1700. |
|
Step 5 |
Click + to add the ISE server. |
|
Step 6 |
Enter the IP address of the ISE server. |
|
Step 7 |
Leave the Authentication Port as 1812. |
|
Step 8 |
Configure the key. Enter the shared secret to encrypt data between the managed device (client) and the ISE server. |
|
Step 9 |
Enter the key again in the Confirm Key field. You need this key when you add the threat defense in ISE. |
|
Step 10 |
Use the default values for the remaining parameters. |
|
Step 11 |
Click Save. |
End-to-End Process for Configuring ISE Posture Module Using Management Center
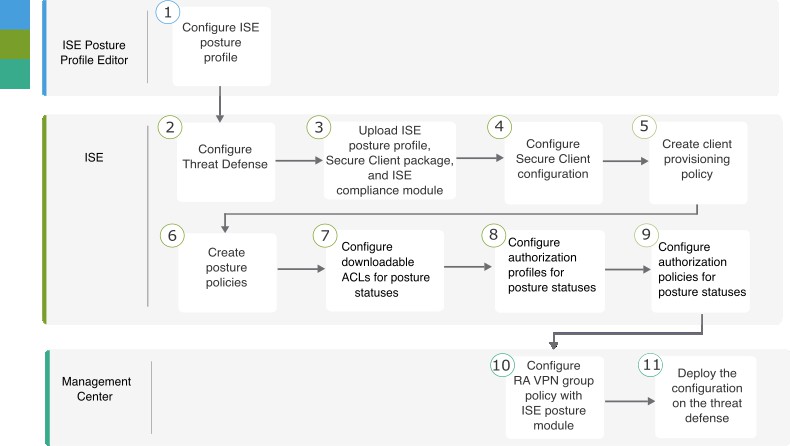
The following flowchart illustrates the workflow for configuring Secure Client ISE posture module using management center.
|
Step |
Application |
Description |
|---|---|---|
|
|
ISE Posture Profile Editor |
Configure the Posture Profile using the ISE Posture Profile Editor |
|
|
ISE |
|
|
|
ISE |
Upload ISE Posture Profile, Secure Client Package, and ISE Compliance Module to ISE |
|
|
ISE |
|
|
|
ISE |
|
|
|
ISE |
|
|
|
ISE |
|
|
|
ISE |
Configure Authorization Profiles for the Posture Statuses in ISE |
|
|
ISE |
Configure Authorization Policies for the Posture Statuses in ISE |
|
|
Management Center |
Configure a Remote Access VPN Group Policy with ISE Posture Module in the Management Center |
|
|
Management Center |
On the management center menu bar, click Deploy and then select Deployment. |
Configure the Posture Profile using the ISE Posture Profile Editor
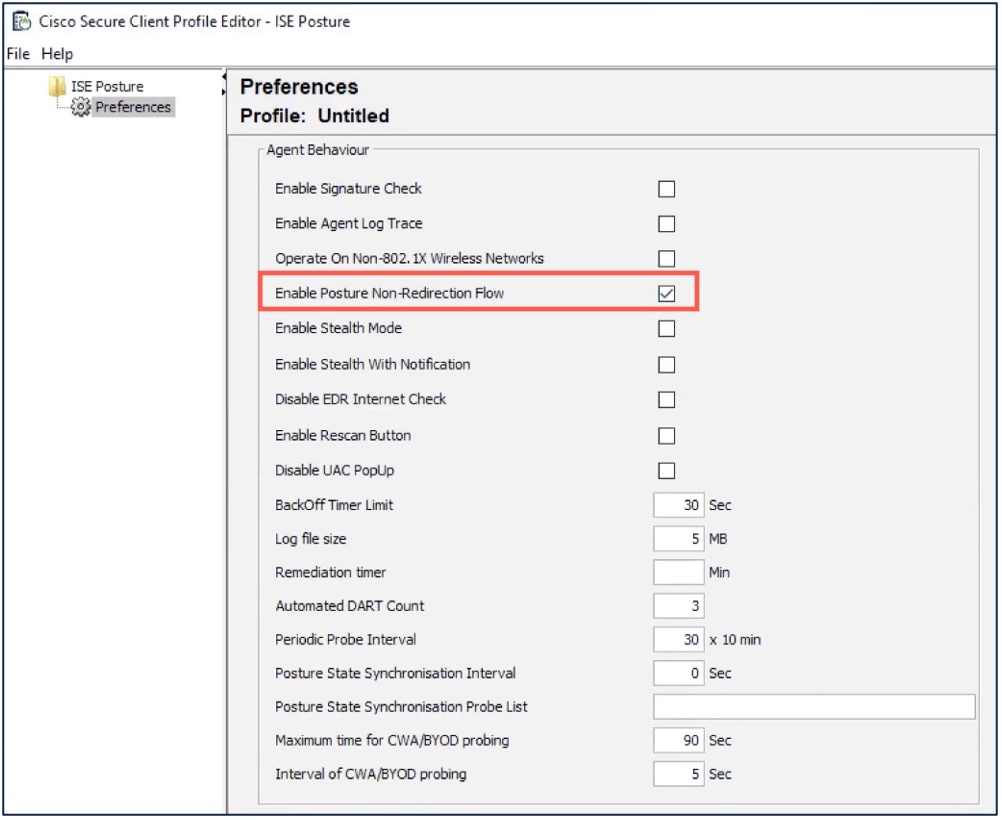
The standalone Secure Client profile editor package contains the ISE posture profile editor. Use this editor to create the ISE posture profile and then upload it to ISE and the management center.
Configure the following parameters:
-
Check the Enable posture non-redirection flow check box.
-
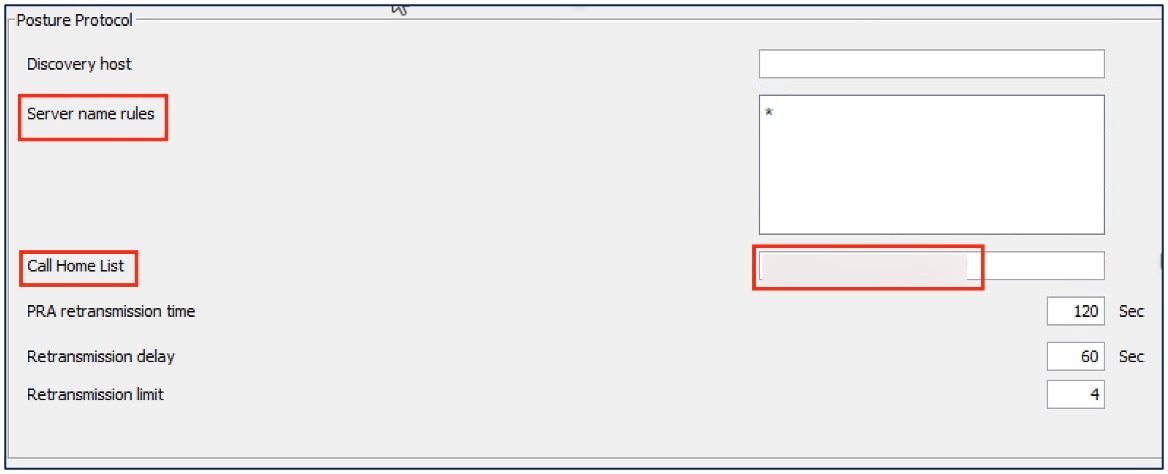
Enter the Server name rules as *.
-
Configure Call Homes List with the FQDN or the IP address of the ISE.
Configure Threat Defense in ISE
Procedure
|
Step 1 |
Log in to ISE. |
|
Step 2 |
Choose . |
|
Step 3 |
Click Add. |
|
Step 4 |
Enter the name, description, and IP address of the threat defense. |
|
Step 5 |
Choose Cisco from the Device Profile drop-down list. |
|
Step 6 |
Expand RADIUS Authentication Settings. |
|
Step 7 |
Configure the Shared Secret and the CoA Port. You need this secret and the port when you configure ISE in the threat defense. For more information, see Configure ISE in the Management Center. |
|
Step 8 |
Click Save. |
Upload ISE Posture Profile, Secure Client Package, and ISE Compliance Module to ISE
Procedure
|
Step 1 |
Choose . |
|
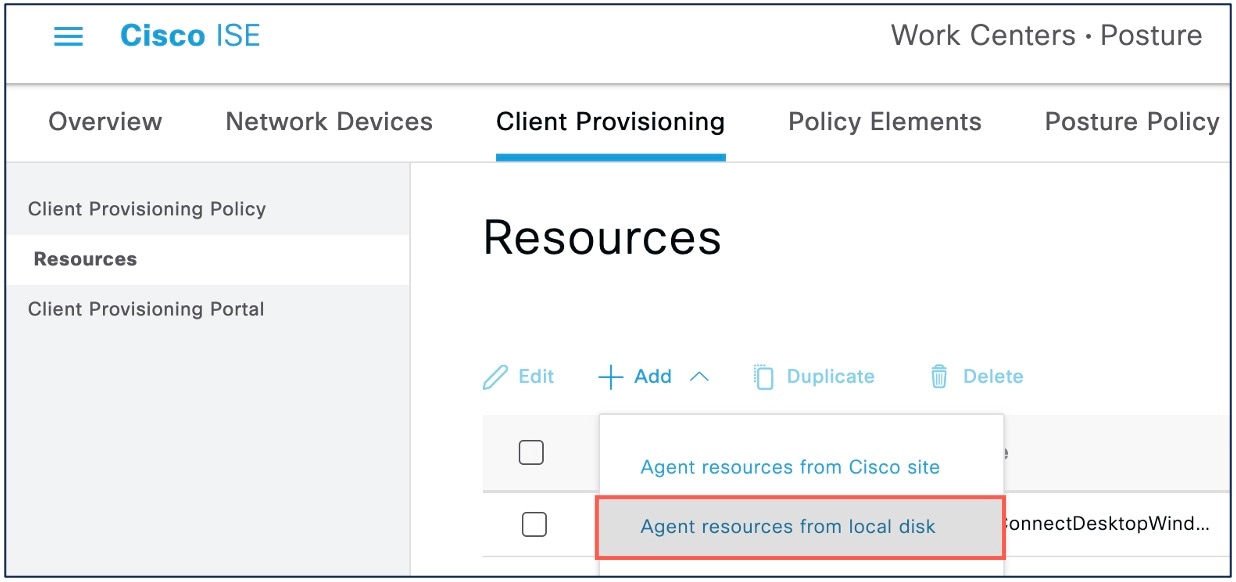
Step 2 |
Click Add and choose Agent resources from local disk.
|
|
Step 3 |
Choose Cisco Provided Packages from the Category drop-down list. |
|
Step 4 |
Click Choose File and select one of the following from the local host:
|
|
Step 5 |
Click Submit. |
|
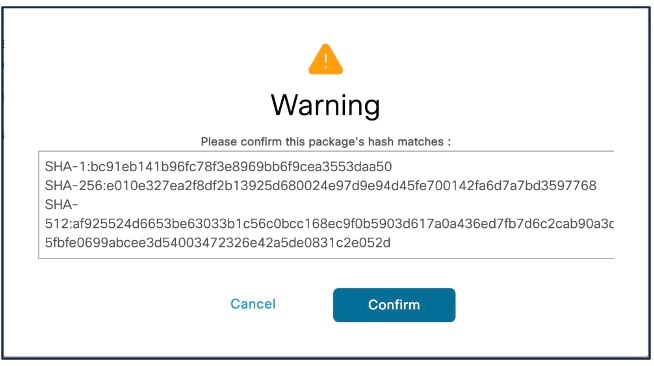
Step 6 |
Click Confirm to validate the checksum.
|
|
Step 7 |
Repeat steps 2 to 6 to upload the remaining two files.
|

Configure a Secure Client Configuration in ISE
Secure Client Configuration (AnyConnect Configuration in ISE) is the Secure Client software and its different configuration files like the Secure Client binary packages for clients, ISE compliance module, ISE module profiles, customization, and language packages for AnyConnect.
Procedure
|
Step 1 |
Choose . |
|
Step 2 |
Click Add and choose AnyConnect Configuration. |
|
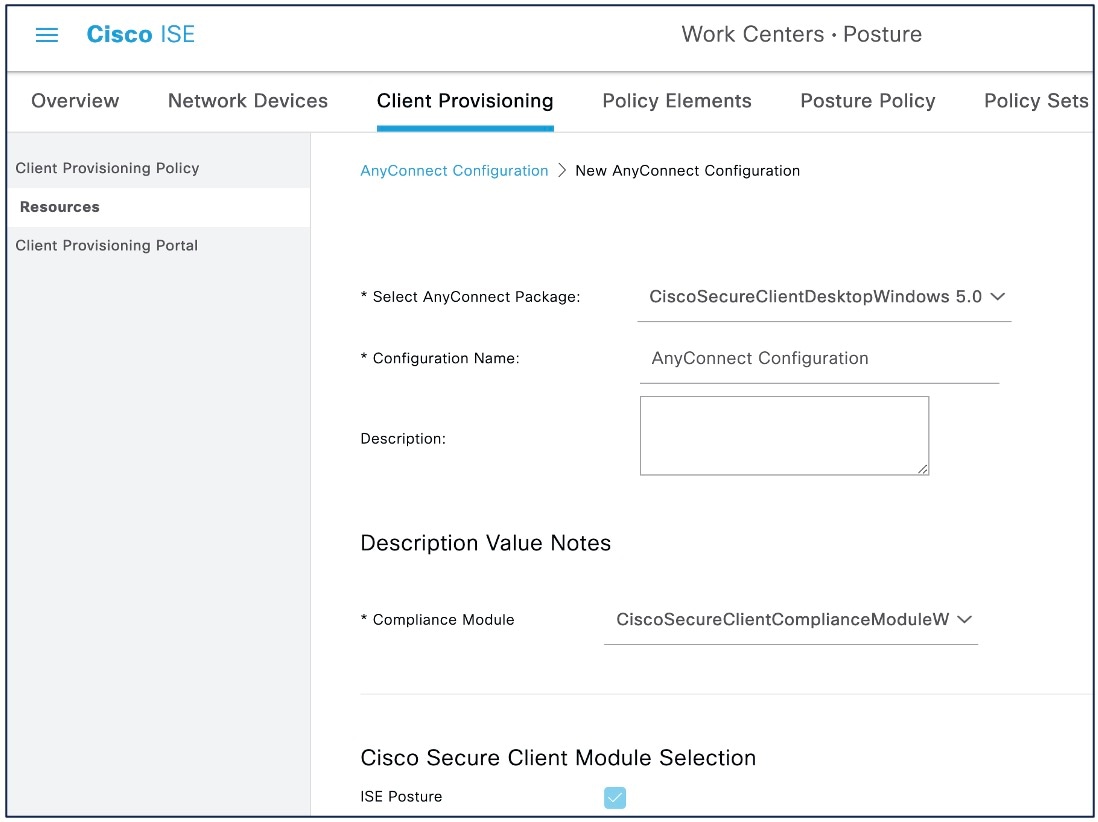
Step 3 |
Choose the Secure Client package from the Select AnyConnect Package drop-down list. |
|
Step 4 |
Choose the ISE Compliance Module from the Compliance Module drop-down list.
|
|
Step 5 |
Under Cisco Secure Client Module Selection, by default, ISE Posture is enabled. |
|
Step 6 |
Under Profile Selection, choose the ISE Posture file from the ISE Posture drop-down list. |
|
Step 7 |
Click Submit. |
Create a Client Provisioning Policy in ISE
A user receives specific versions of resources such as agents, agent compliance modules, or agent customization profiles from ISE based on the client provisioning policy.
Procedure
|
Step 1 |
Choose . |
|
Step 2 |
Click Edit, and choose Insert new policy above. |
|
Step 3 |
Enter the policy name, and choose an operating system. |
|
Step 4 |
Click + under Results, and choose the AnyConnect Configuration from the Agent drop-down list.
|
|
Step 5 |
Click Save. |

Configure Posture Policy in ISE
The posture policies, posture requirements, and the posture conditions determine the compliance status of the endpoint.
Procedure
|
Step 1 |
Configure posture conditions.
|
|
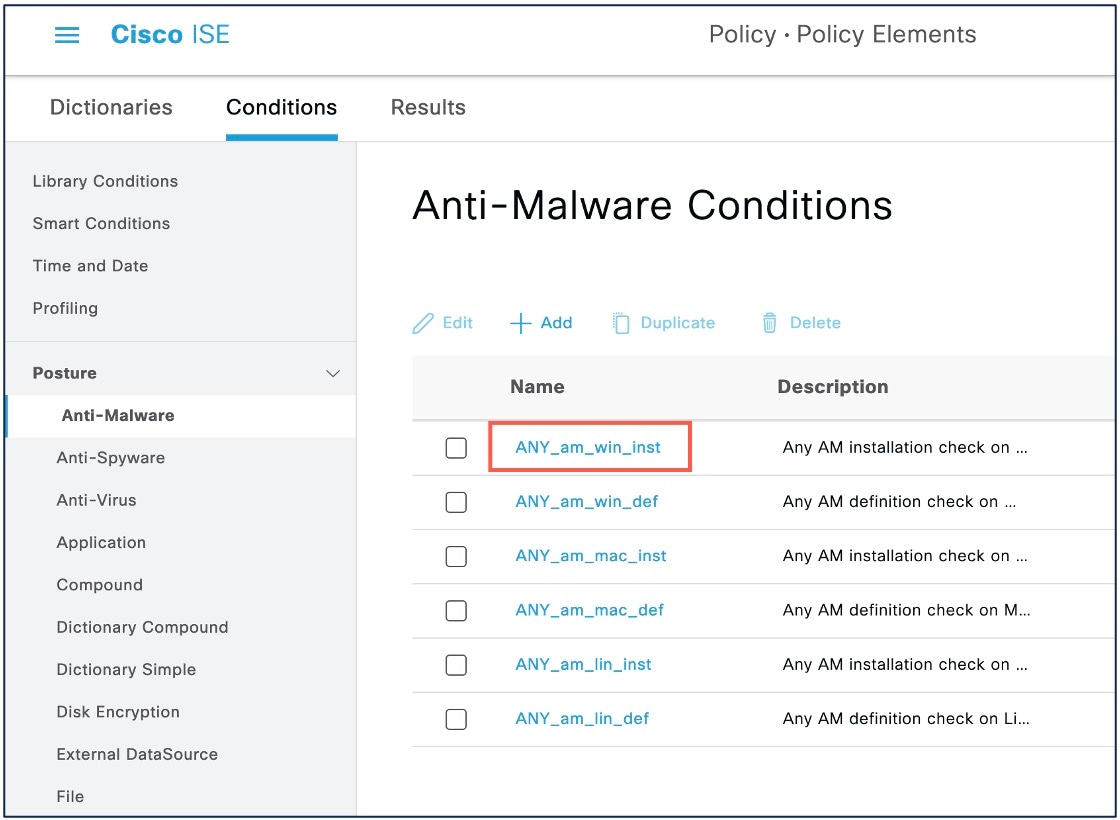
Step 2 |
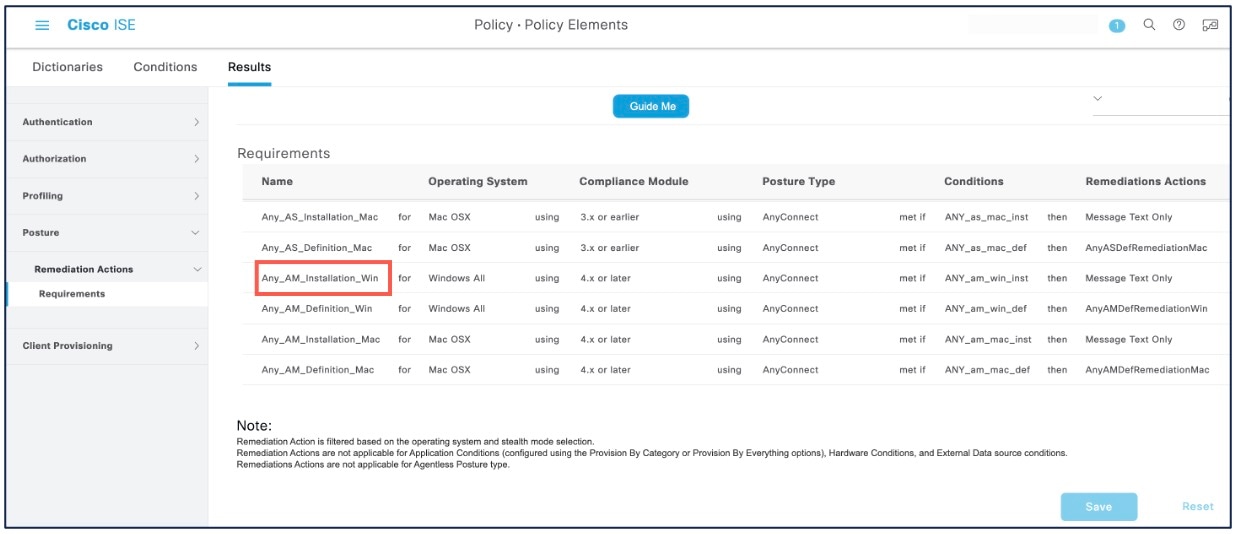
Configure posture requirements. Choose . A posture requirement is a set of posture conditions associated with a remediation action. You can choose one of the multiple default or predefined posture requirements, or create a new one. For Windows, you can select the ‘Any_AM_Installation_Win’ anti-malware posture requirement.
|
|
Step 3 |
Configure posture policy.
|

Configure Downloadable ACLs for the Posture Statuses in ISE
You must configure downloadable ACLs (DACL) for the Unknown, Noncompliant, and Compliant posture statuses. Default authorization DACLs are also available.
Procedure
|
Step 1 |
Choose . |
||||||||||||
|
Step 2 |
Click Add. |
||||||||||||
|
Step 3 |
Enter a name and description. |
||||||||||||
|
Step 4 |
Click the radio button for the required IP version. |
||||||||||||
|
Step 5 |
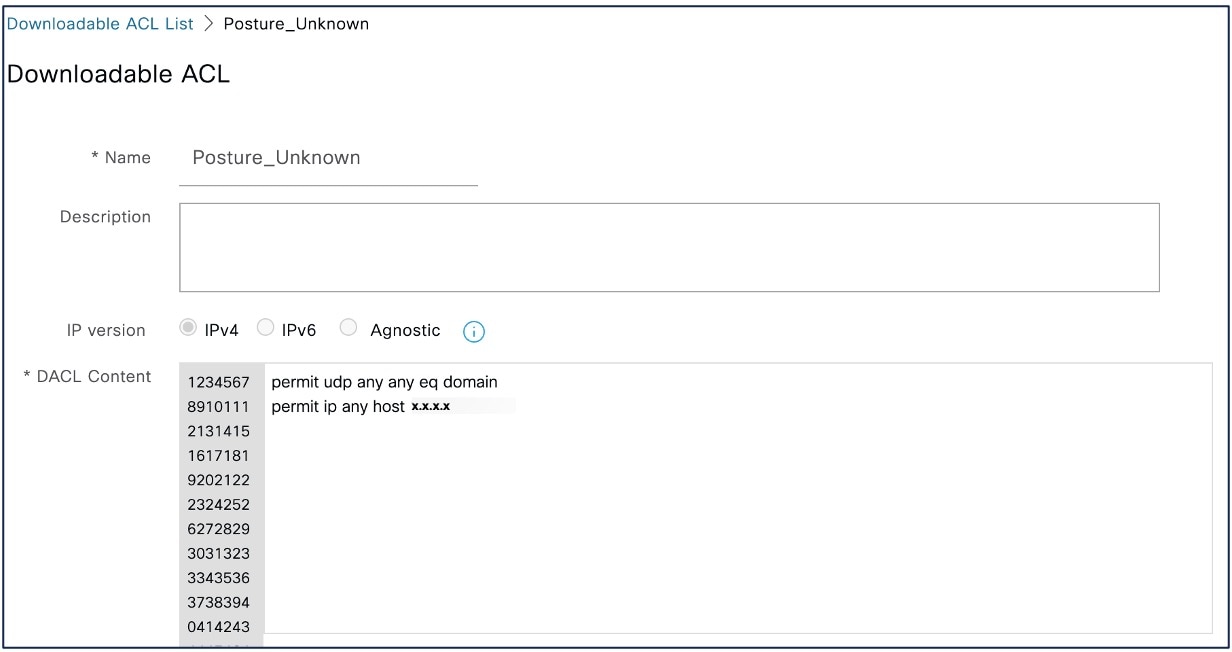
Enter the values for the DACL.
|
||||||||||||
|
Step 6 |
Click Submit. |
||||||||||||
|
Step 7 |
Repeat steps 2 to 6 to create DACLs for the remaining posture statuses. Examples of DACLs for Unknown, Noncompliant, and Compliant posture statuses:
|
What to do next
Configure authorization profiles using these DACLs. For more information, see Configure Authorization Profiles for the Posture Statuses in ISE.
Configure Authorization Profiles for the Posture Statuses in ISE
You must create three authorization profiles for the Unknown, Noncompliant, and Compliant posture statuses.
Procedure
|
Step 1 |
Choose . |
|
Step 2 |
Create an authorization profile for each posture status. |
|
Step 3 |
Click Add. |
|
Step 4 |
Enter a name. |
|
Step 5 |
From the Access Type drop-down list, choose ACCESS_ACCEPT. |
|
Step 6 |
From the Network Device Profile drop-down list, choose Cisco. |
|
Step 7 |
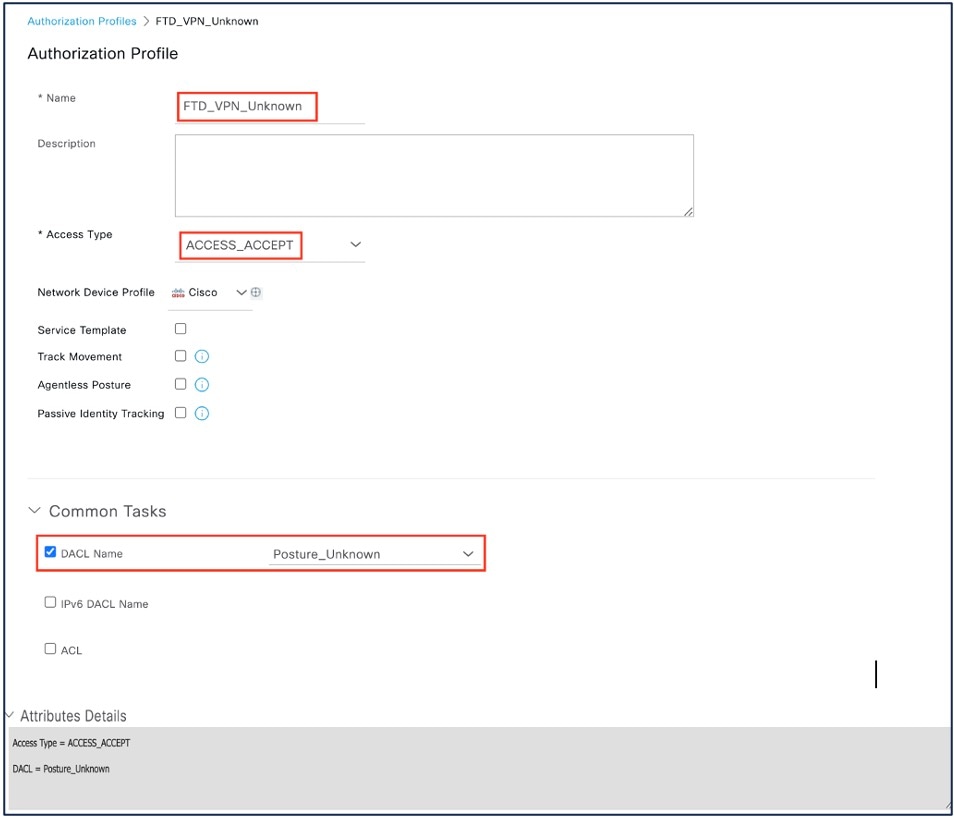
Under Common Tasks, check the DACL Name check box and choose the DACL for the posture state from the drop-down list. You can view the configured attributes under Attributes Details. The example below shows the authorization profile for the Unknown status.
|
|
Step 8 |
Click Submit. |
|
Step 9 |
Repeat steps 3 to 8 to create authorization profiles for the remaining posture statuses. |
What to do next
Configure authorization policies using these authorization profiles. For more information, see Configure Authorization Policies for the Posture Statuses in ISE.
Configure Authorization Policies for the Posture Statuses in ISE
You must create an authorization policy for each posture status.
Procedure
|
Step 1 |
Choose . |
|
Step 2 |
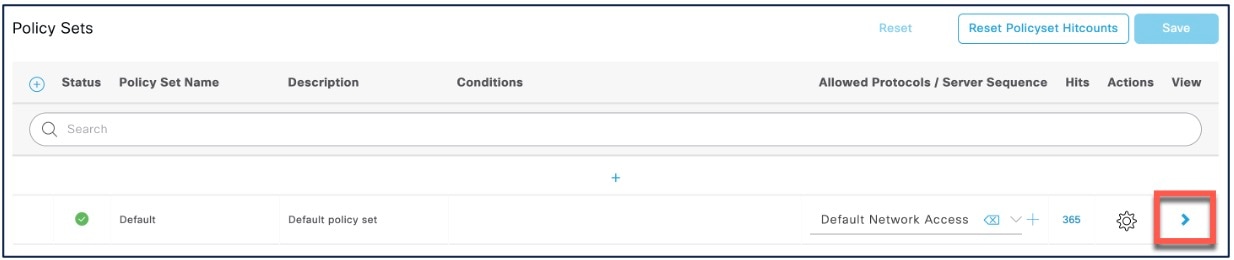
In the View column, click the arrow icon adjacent to the Default policy.
|
|
Step 3 |
Expand Authorization Policy. |
|
Step 4 |
Click + adjacent to the Status column. |
|
Step 5 |
Use Posture Status and Identity Group as conditions of the policy. |
|
Step 6 |
Choose the appropriate authorization profile from the drop-down list for the posture status. |
|
Step 7 |
Click Save. |
|
Step 8 |
Repeat steps 4 to 7 for the remaining authorization policies. The image below shows the authorization policies for the posture statuses.
|

Configure a Remote Access VPN Group Policy with ISE Posture Module in the Management Center
Before you begin
Configure a remote access VPN policy in the management center.
Procedure
|
Step 1 |
Log in to your management center web interface. |
|
Step 2 |
Choose . |
|
Step 3 |
Select a remote access VPN policy, and click Edit. |
|
Step 4 |
Select a connection profile, and click Edit. |
|
Step 5 |
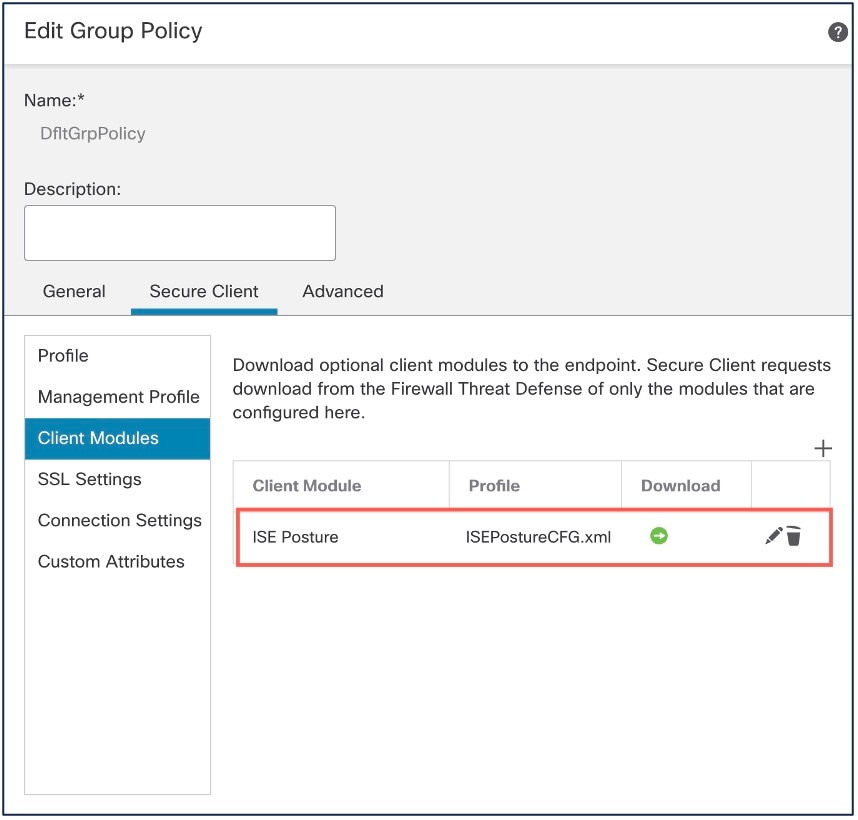
Click Edit Group Policy. |
|
Step 6 |
Click the Secure Client tab. |
|
Step 7 |
Click Client Modules, and click +. |
|
Step 8 |
Choose the ISE Posture module from the Client Module drop-down list. |
|
Step 9 |
Choose the ISE profile from the Profile to download drop-down list. |
|
Step 10 |
Check the Enable module download check box. |
|
Step 11 |
Click Add.
|
|
Step 12 |
Click Save. |
What to do next
-
Deploy the configuration on the threat defense. On the management center menu bar, click Deploy and then select Deployment.
-
Establish a VPN connection to the threat defense using the Secure Client.
-
Verify ISE posture module configuration.
Verify ISE Posture Module Configuration
On the Threat Defense
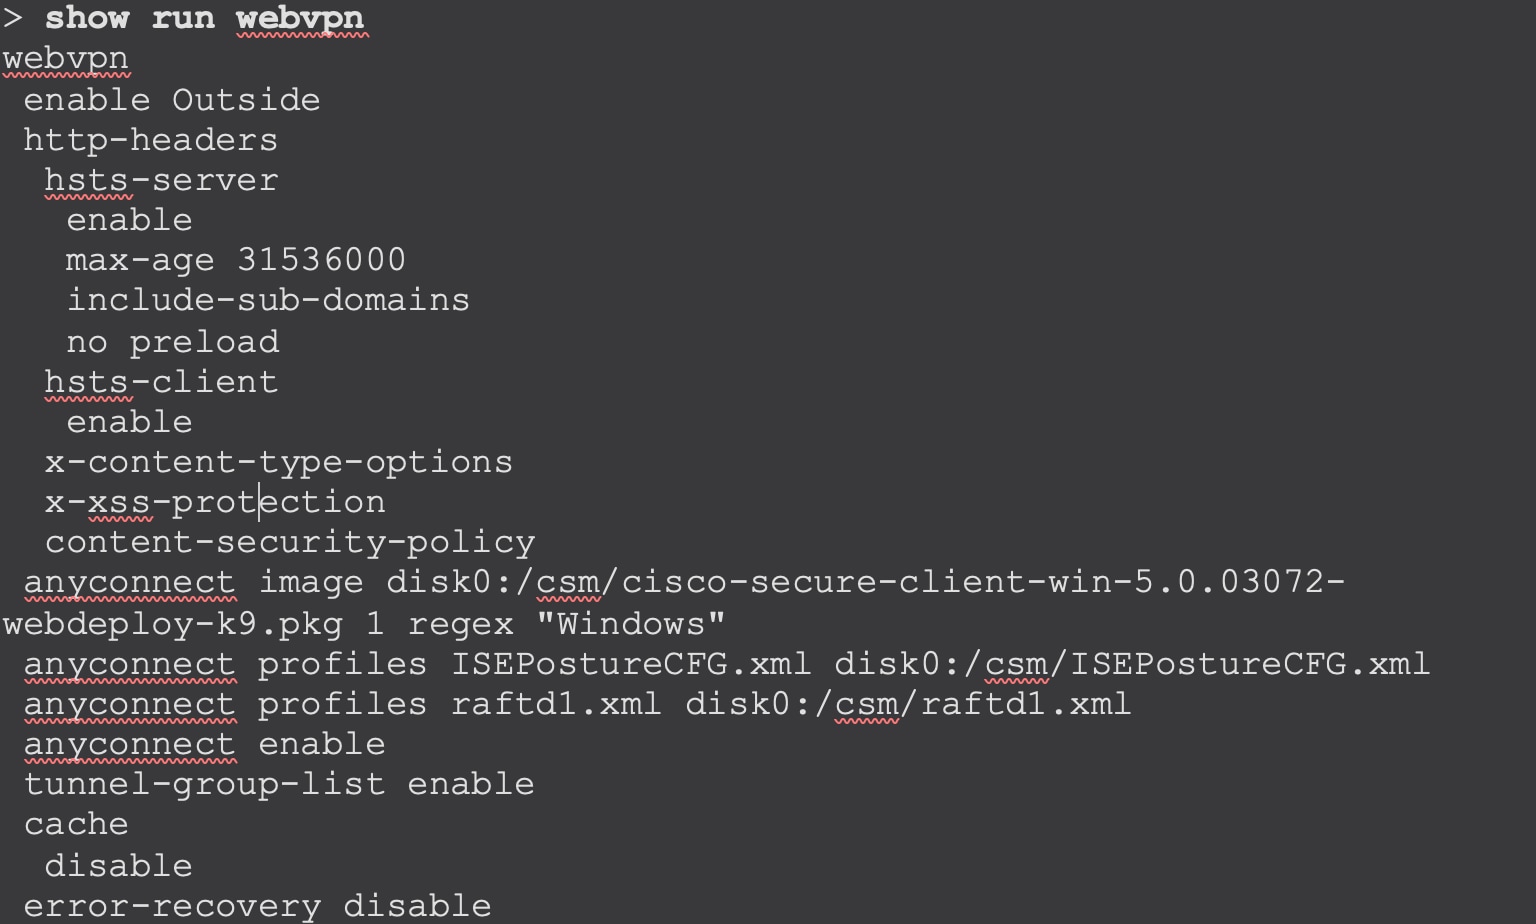
Use the following commands on the threat defense CLI to verify the ISE posture module configuration:
show run webvpn: View details of the Secure Client configurations.
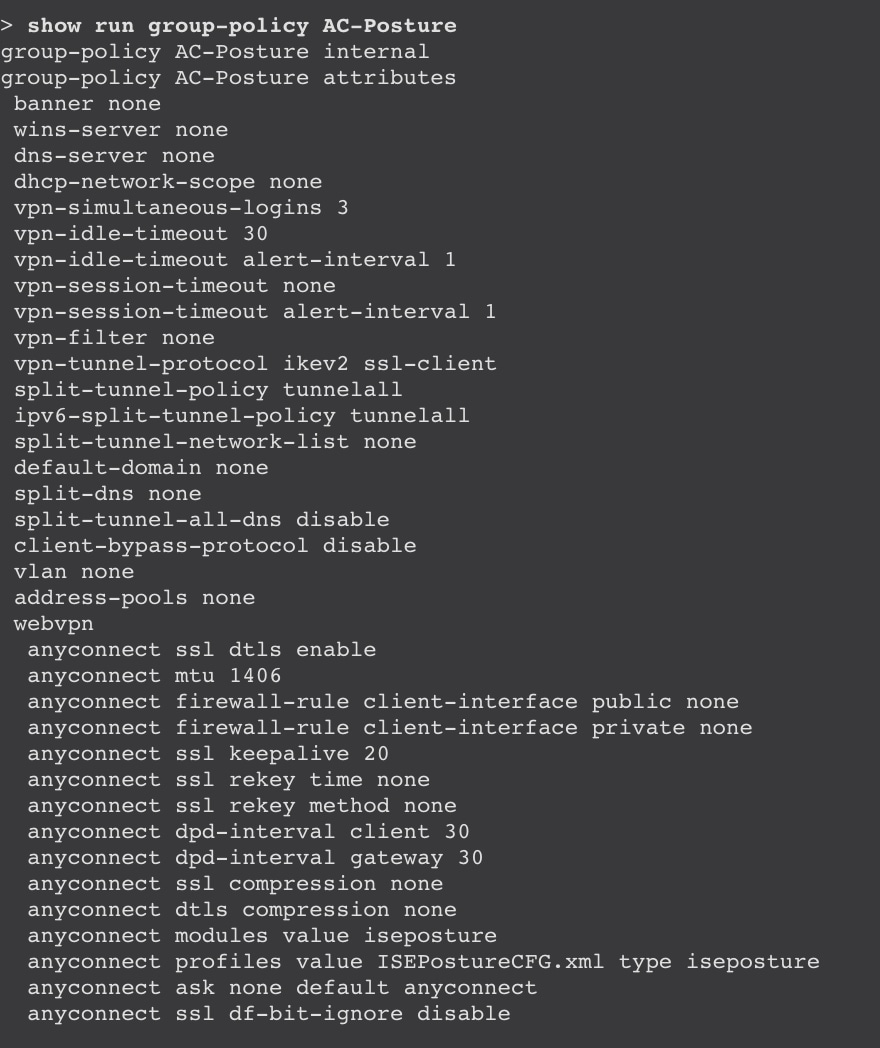
show run group-policy <ravpn_group_policy_name>: View details of the RA VPN group policy for Secure Client.
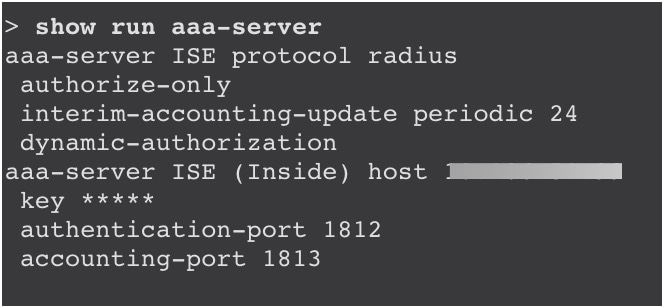
show run aaa-server: View details of the ISE server.
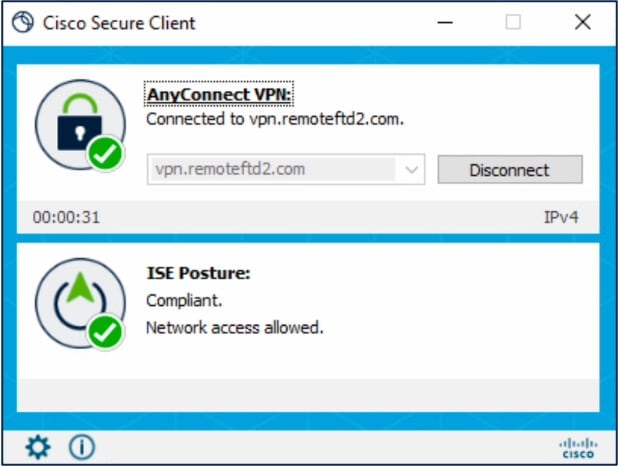
On the Endpoint
Establish a VPN connection to the threat defense using the Secure Client and verify the ISE posture module installation.
 Feedback