Upgrade Cisco ISE-PIC

Cisco ISE-PIC Upgrade Overview

This chapter describes how to upgrade Cisco ISE-PIC software on virtual machines from Release 2.6 or 2.7 to Release 3.1.

Upgrading a Cisco ISE-PIC deployment is a multi-step process and must be performed in the order specified in this document. Upgrade is expected to take approximately 240 minutes + 60 minutes for every 15 GB of data.

Factors that may affect upgrade time include the number of:

  • Endpoints and users in your network

  • Logs in the primary node


Note


You must use the Cisco ISE upgrade bundle to upgrade Cisco ISE-PIC. You can download the upgrade bundle from the Cisco ISE Download Software Center.


In order to upgrade your deployment with minimum-possible downtime while providing maximum resiliency and ability to roll back, and minimum errors, perform the upgrade in the following order:

  1. Back up all configuration data before beginning upgrade in order to ensure you can easily roll back manually if necessary.

  2. Choose the upgrade process based on your deployment:

    • Standalone deployment

      1. Upgrade the node. Refer to Upgrade a standalone node.

      2. Run upgrade verification and network tests after you upgrade the node. Refer to

        Verify the upgrade process.


      Note


      For details about the parts of this step, refer to:


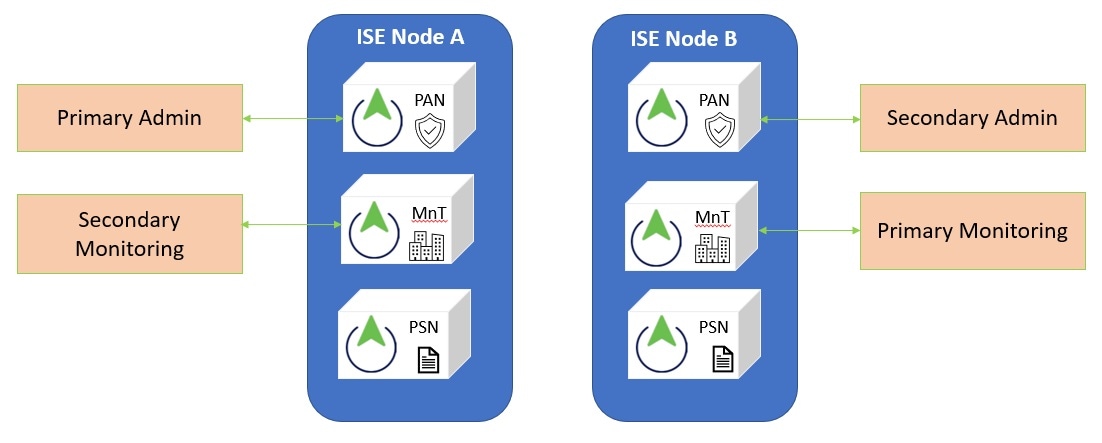
    • High Availability (two nodes) Deployment

      1. Upgrade the secondary node first, keeping the PAN at the previous version until the secondary node upgrade is confirmed, in order to use the PAN for rollback if the initial upgrade fails.

      2. Run upgrade verification and network tests after you upgrade the seconary node.

      3. Upgrade the PAN.

        After upgrading both nodes, the Secondary Administration Node is now the Primary Administration Node, installed with the upgraded version, and the original Primary Administration Node is now the Secondary Administration Node, also installed with the upgraded version.

      4. Re-run the upgrade verification and network tests after you upgrade the Primary Administration Node.

      5. When you finish upgrading the original primary node (the second upgrade), in the Edit Node window from the currently secondary node, click Promote to Primary to promote it to become the Primary Administration Node (as was in your old deployment), if required.

Validate data to prevent upgrade failures

Cisco ISE-PIC offers an Upgrade Readiness Tool (URT) that you can run to detect and fix any data upgrade issues before you start the upgrade process.

Most upgrade failures happen due to data upgrade issues. Use the URT to validate your data before an upgrade, identify and report issues, and fix issues when possible.

The URT is available as a separate downloadable bundle. Run the URT on a Secondary Administration Node for high availability, or on the Standalone Node for a single-node deployment.


Warning


In multiple-node deployments, do not run the URT on the Primary Administration Node.


You can run the URT from the Command-Line Interface (CLI) of the Cisco ISE-PIC node. The URT:

  1. Verifies that the URT is run on either a standalone Cisco ISE-PIC node or a Secondary Administration Node.

  2. Checks if the URT bundle is less than 45 days old. This check ensures that you use the most recent URT bundle.

  3. Checks whether all these prerequisites are met.

    • Version compatibility

    • Disk space


      Note


      Verify the available disk size with Disk Requirement Size. If you need to increase the disk size, reinstall Cisco ISE and restore a configuration backup.


    • NTP server

    • Memory

    • System and trusted certificate validation

  4. Clones the configuration database

  5. Copies the latest upgrade files to the upgrade bundle


    Note


    If there are no patches in the URT bundle, the output will return N/A. This is expected behavior during the installation of a hot patch.


  6. Performs a schema and data upgrade on the cloned database

    • If the upgrade on the cloned database is successful, the tool provides an estimate of the time required for the upgrade to complete.

    • If the upgrade is successful, the tool removes the cloned database.

    • If the upgrade on the cloned database fails, the tool collects the required logs, prompts for an encryption password, generates a log bundle, and stores the bundle on the local disk.

Download and run the Upgrade Readiness Tool

The URT checks the configuration data before the upgrade to identify issues that could cause an upgrade failure.

Procedure


Step 1

Create a repository and copy the URT bundle

Step 2

Run the URT


Create a repository and copy the URT bundle

Create a repository, then copy the URT bundle. For more information about creating a repository, see “Create Repositories” in the Chapter “Maintain and Monitor” in the Cisco ISE Administrator Guide.

To improve performance and reliability, use File Transfer Protocol (FTP). Avoid using repositories located across slow WAN links. Choose a local repository near your nodes.

Before you begin

Make sure your connection to the repository has enough bandwidth.

Procedure

Step 1

Download the URT bundle from the Cisco ISE Download Software Center to begin. Use the Cisco ISE URT bundle for Cisco ISE-PIC.

Step 2

Optionally, to save time, copy the URT bundle to the local disk on the Cisco ISE-PIC node.

copy repository_url/path/ise-urtbundle-3.0.xxx-1.0.0.SPA.x86_64.tar.gz disk:/

To copy the upgrade bundle using SFTP, perform these steps:

(Add the host key if it does not exist) crypto host_key add host mySftpserver
copy sftp://aaa.bbb.ccc.ddd/ ise-urtbundle-3.0.xxx-1.0.0.SPA.x86_64.tar.gz disk:/

The value "aaa.bbb.ccc.ddd" represents the IP address or hostname of the SFTP server; "ise-urtbundle-3.0.xxx-1.0.0.SPA.x86_64.tar.gz" is the name of the URT bundle.


Run the URT

The URT identifies data issues that might cause an upgrade failure. It reports or fixes these issues where possible. To run the URT:

Before you begin

Storing the URT bundle on the local disk allows the installation process to complete more quickly.

Procedure

Enter the application install command to install the URT.

application install ise-urtbundle-filename reponame

Note


If the application is not installed successfully, URT provides the reason for the upgrade failure. Fix any reported issues, then run the URT again.

Before upgrading to Cisco ISE release 3.2, you must remove the 5G attribute. For more information, see the "Configure Cisco Private 5G as a Service" section in the "Secure Access" chapter in the Cisco ISE Administrator Guide.

Note


If you do not remove the 5G attribute, you will see this error:

Error Occurred while adding 5G field to access service

Error while applying changes in version: 3.2.0.100 class: com.cisco.cpm.acs.nsf.im.NetworkAccessUpgrade

com.cisco.cpm.infrastructure.upgrade.api.UpgradeFailureException: com.cisco.cpm.nsf.api.exceptions.NSFEntityAttributeException: AccessService FIVEG DuplicateAttributeException~AttributeName : FIVEG already exists as FIVEG

        at com.cisco.cpm.acs.nsf.im.NetworkAccessUpgrade.upgradeAllowFiveG(NetworkAccessUpgrade.java:2671)

        at com.cisco.cpm.acs.nsf.im.NetworkAccessUpgrade.upgrade(NetworkAccessUpgrade.java:585)

        at com.cisco.cpm.infrastructure.upgrade.impl.UpgradeServiceRegistrar.UpgradeServices(UpgradeServiceRegistrar.java:132)

        at com.cisco.cpm.infrastructure.upgrade.impl.UpgradeServiceRegistrar.main(UpgradeServiceRegistrar.java:185)

Caused by: com.cisco.cpm.nsf.api.exceptions.NSFEntityAttributeException: AccessService FIVEG DuplicateAttributeException~AttributeName : FIVEG already exists as FIVEG

Key firewall ports to enable for communication

If you have a firewall deployed between your Primary Administration Node (PAN) including the secondary node, you must open these ports before upgrading:

  • TCP 1521: For communication between the PAN.

  • TCP 443: For communication between the PAN and secondary nodes.

  • TCP 7800 and 7802: Required for Policy Service Node (PSN) group clustering when policy service nodes are part of a node group.

For a full list of ports that Cisco ISE-PIC uses, see the chapter "Cisco ISE Ports Reference" in the .

Back up Cisco ISE-PIC configuration and operational data from the PAN

Obtain a backup of the Cisco ISE-PIC configuration and operational data from either the Command Line Interface (CLI). To back up the configuration and operational data using the CLI, enter this command:

backup backup-name repository repository-name {ise-config | ise-operational} encryption-key {hash | plain} encryption-keyname


Note


When Cisco ISE-PIC runs on VMware, VMware snapshots are not supported for backing up ISE-PIC data.

A VMware snapshot saves the status of a VM at a specific point in time. In a multi-node Cisco ISE-PIC deployment, all nodes continuously synchronize data with the current database. Restoring a snapshot might cause database replication and synchronization issues. Use the Cisco ISE-PIC backup functionality for data archival and restoration.

If you use VMware snapshots to back up Cisco ISE-PIC data, Cisco ISE-PIC services stop. To restore the ISE-PIC node, reboot it.


You can also obtain the configuration and operational data backup from the Cisco ISE-PIC Admin Portal. Ensure that you have created repositories that store the backup file. Do not use a local repository to back up data. Do not use CD-ROM, HTTP, HTTPS, or TFTP repositories, because they are read-only or do not support file listing.

After backup, verify the backup file exists in the specified repository. Cisco ISE-PIC appends the backup filename with a timestamp, and adds a CFG tag for configuration backups and an OPS tag for operational backups.


Note


Cisco ISE-PIC allows you to obtain a backup from an ISE-PIC node (A) and restore it on another ISE-PIC node (B), both having the same hostnames (but different IP addresses). However, after you restore the backup on node B, do not change the hostname of node B because it might cause issues with certificates.


Back up system logs from the PAN

Obtain a backup of the system logs from the PAN using the Command Line Interface (CLI). Use this CLI command:

backup-logs backup-name repository repository-name encryption-key { hash | plain} encryption-key name

Check certificate validity

If any certificate in the Cisco ISE-PIC Trusted Certificates or System Certificates store has expired, the upgrade fails. Ensure that you check the validity in the Expiration Date field of the Trusted Certificates and System Certificates windows (To view this window, click the Menu icon () and choose Administration > System > Certificates > Certificate Management), and renew them before you upgrade.

Check the validity in the Expiration Date field of the certificates in the CA Certificates window (To view this window, click the Menu icon () and choose Administration > System > Certificates > Certificate Authority > Certificate Authority Certificates). Renew any expired certificates before you upgrade.

Export Certificates and Private Keys

We recommend that you export:

  • All local certificates (from all the nodes in your deployment) along with their private keys to a secure location. Record the certificate configuration (what service the certificate was used for).

  • All certificates from the Trusted Certificates Store of the Primary Administration Node. Record the certificate configuration (what service the certificate was used for).

scheduled backups for upgrade

You cannot perform deployment changes when running a backup in Cisco ISE-PIC. Disable automatic configurations to ensure your upgrade goes smoothly. You should disable these configurations before you upgrade Cisco ISE:

  • Scheduled backups: Disable all backup schedules before upgrading. After the upgrade, reschedule and recreate the backup schedules.

    Backups scheduled to run once are triggered every time the Cisco ISE-PIC application restarts. If you have a backup schedule set to run only once, disable it before upgrading.

Configure NTP server and verify availability

During upgrade, the Cisco ISE-PIC nodes reboot, migrate, and replicate data from the PAN to the secondary administration node. For these operations, it is important that the NTP server in your network is configured correctly and is reachable. If the NTP server is not set up correctly or is unreachable, the upgrade process fails.

Ensure that the NTP servers in your network are reachable, responsive, and synchronized throughout the upgrade process.

Earlier versions of Cisco ISE use chrony instead of the Network Time Protocol daemon (ntpd). Ntpd synchronizes with servers having a root dispersion up to 10 seconds, whereas chrony synchronizes with servers having a root dispersion of less than 3 seconds. Therefore, we recommend that you use an NTP server with low root dispersion before upgrading to required Cisco ISE version to avoid NTP service disruption. For more information, see Troubleshoot ISE and NTP Server Synchronization Failures on Microsoft Windows.

Upgrade a two-node deployment

Use the application upgrade prepare <upgrade bundle name> <repository name> and proceed commands to upgrade a two-node deployment. The upgrade software automatically deregisters the node and moves it to the new deployment. When you upgrade a two-node deployment, you should initially upgrade only the Secondary Administration Node. When the secondary node upgrade is complete, you upgrade the primary node thereafter.

Figure 1. Cisco ISE Two-Node Administrative Deployment

Before you begin

  • Perform an on-demand backup (manually) of the configuration and operational data from the Primary Administration Node.

Procedure


Step 1

Upgrade the secondary node from the CLI.

The upgrade process automatically removes the original secondary node from the deployment and upgrades it. The original secondary node becomes the upgraded primary node when it restarts.

Step 2

Upgrade the original primary node.

The upgrade process automatically registers the original primary node to the deployment and makes it the secondary node in the upgraded environment.

Step 3

Promote the secondary node, to be the primary node in the new deployment.

After the upgrade is completeensure that you run the application configure ise command and choose 5 (Refresh Database Statistics) on the nodes.


What to do next

Verify the upgrade process

Upgrade a standalone node

You can use the application upgrade <upgrade bundle name> <repository name> command directly, or the application upgrade prepare <upgrade bundle name> <repository name> and application upgrade proceed commands in the specified sequence to upgrade a standalone node.

If you choose to run this command directly, we recommend that you copy the upgrade bundle from the remote repository to the Cisco ISE-PIC node's local disk before you run the command to save time during upgrade.

Alternatively, you can use the application upgrade prepare <upgrade bundle name> <repository name> and application upgrade proceed commands. The application upgrade prepare <upgrade bundle name> <repository name> command downloads the upgrade bundle and extracts it locally. This command copies the upgrade bundle from the remote repository to the Cisco ISE-PIC node's local disk. After you have prepared a node for upgrade, run the application upgrade proceed command to complete the upgrade successfully.

We recommend that you run the application upgrade prepare <upgrade bundle name> <repository name> and application upgrade proceed commands as described below.

Before you begin

Ensure that you have read the instructions in the Prepare for Upgrade section.

Procedure


Step 1

Create a repository on the local disk. For example, you can create a repository called "upgrade."

Example:

ise/admin# conf t 
Enter configuration commands, one per line.  End with CNTL/Z.
ise/admin(config)# repository upgrade 
ise/admin(config-Repository)# url disk: 
% Warning: Repositories configured from CLI cannot be used from the ISE web UI and are not replicated to other ISE nodes.
If this repository is not created in the ISE web UI, it will be deleted when ISE services restart.
ise/admin(config-Repository)# exit 
ise/admin(config)# exit 

Step 2

From the Cisco ISE-PIC CLI, enter application upgrade prepare <upgrade bundle name> <repository name> command.

This command copies the upgrade bundle to the local repository "upgrade" that you created in the previous step and lists the MD5 and SHA256 checksum.

Step 3

From the Cisco ISE-PIC CLI, enter the application upgrade proceed command.

Note


After beginning the upgrade, you can view the progress of the upgrade by logging in via SSH and using the show application status ise command. The following message appears: % NOTICE: Identity Services Engine upgrade is in progress...


What to do next

Verify the upgrade process

Verify the upgrade process

We recommend that you run some network tests to ensure that the deployment functions as expected and that users are able to access resources on your network.

If an upgrade fails because of configuration database issues, the changes are rolled back automatically.

Procedure


Perform any of the following options in order to verify whether the upgrade was successful.

  • Check the ade.log file for the upgrade process. To display the ade.log file, enter the following command from the Cisco ISE-PIC CLI: show logging system ade/ADE.log.?

You can grep for STEP to view the progress of the upgrade:

  • info:[application:install:upgrade:preinstall.sh] STEP 0: Running pre-checks
  • info:[application:operation:preinstall.sh] STEP 1: Stopping ISE application...
  • info:[application:operation:preinstall.sh] STEP 2: Verifying files in bundle...
  • info:[application:operation:isedbupgrade-newmodel.sh] STEP 3: Validating data before upgrade...
  • info:[application:operation:isedbupgrade-newmodel.sh] STEP 4: De-registering node from current deployment.
  • info:[application:operation:isedbupgrade-newmodel.sh] STEP 5: Taking backup of the configuration data...
  • info:[application:operation:isedbupgrade-newmodel.sh] STEP 6: Registering this node to primary  of new deployment...
  • info:[application:operation:isedbupgrade-newmodel.sh] STEP 7: Downloading configuration data from primary  of new deployment...
  • info:[application:operation:isedbupgrade-newmodel.sh] STEP 8: Importing configuration data...
  • info:[application:operation:isedbupgrade-newmodel.sh] STEP 9: Running ISE configuration data upgrade for node specific data...
  • info:[application:operation:isedbupgrade-newmodel.sh] STEP 10: Running ISE M&T database upgrade...
  • info:[application:install:upgrade:post-osupgrade.sh] POST ADEOS UPGRADE STEP 1: Upgrading Identity Services Engine software... 
  • info:[application:operation:post-osupgrade.sh] POST ADEOS UPGRADE STEP 2: Importing upgraded data to 64 bit database...
  • Search for this string to ensure that the upgrade is successful:
    Upgrade of Identity Services Engine completed
          successfully.
  • Enter the show version command to verify the build version.
  • Enter the show application status ise command to verify that all the services are running.

Recover from Upgrade Failures

This section describes what you need to do in order to recover if the upgrade fails.

In rare cases, you might have to reimage, perform a fresh install, and restore data. So it is important that you have a backup of Cisco ISE-PIC configuration data before you start the upgrade. It is important that you back up the configuration data although we automatically try to roll back the changes in case of configuration database failures.

Upgrade Failures

Configuration and Data Upgrade Errors

This section describes some of the known upgrade errors and what you must do to recover from them.


Note


You can check the upgrade logs from the CLI or the status of the upgrade from the console. Log in to the CLI or view the console of the Cisco ISE-PIC node to view the upgrade progress. You can use the show logging application command from the Cisco ISE-PIC CLI to view the following logs (example filenames are given in parenthesis):

  • DB Data Upgrade Log (dbupgrade-data-global-20160308-154724.log)

  • DB Schema Log (dbupgrade-schema-20160308-151626.log)

  • Post OS Upgrade Log (upgrade-postosupgrade-20160308-170605.log)


During upgrade, the configuration database schema and data upgrade failures are rolled back automatically. Your system returns to the last known good state. If this is encountered, the following message appears on the console and in the logs:

% Warning: The node has been reverted back to its pre-upgrade state.
error: %post(CSCOcpm-os-1.4.0-205.i386) scriptlet failed, exit status 1
% Application upgrade failed. Please check logs for more details or contact Cisco Technical Assistance Center for support.

If you need to remediate an upgrade failure to get the node back to the original state, the following message appears on the console. Check the logs for more information.

% Warning: Do the following steps to revert node to its pre-upgrade state."
error: %post(CSCOcpm-os-1.4.0-205.i386) scriptlet failed, exit status 1
% Application upgrade failed. Please check logs for more details or contact Cisco Technical Assistance Center for support.

Validation errors are not an actual upgrade failure. Validations errors may occur. For example, you might see this error if the system does not meet the specified requirements. The system returns to the last known good state. If you encounter this error, ensure that you perform the upgrade as described in this document.

STEP 1: Stopping ISE application...
% Warning: Cannot upgrade this node until the standby PAP node is upgraded and running. If standbyPAP is already upgraded 
and reachable ensure that this node is in SYNC from current Primary UI.
Starting application after rollback...
 
% Warning: The node has been reverted back to its pre-upgrade state.
error: %post(CSCOcpm-os-1.4.0-205.i386) scriptlet failed, exit status 1
% Application upgrade failed. Please check logs for more details or contact Cisco Technical Assistance Center for support.

If the ADE-OS or application binary upgrade fails, the following message appears when you run the show application status ise command from the CLI following a reboot. You should reimage and restore the configuration and operational backups.

% WARNING: An Identity Services Engine upgrade had failed. Please consult logs. You have to reimage and restore to previous version.

For any other types of failures (including cancellation of the upgrade, disconnection of the console session, power failure, and so on), you must reimage and restore the backup.

The term, reimage, refers to a fresh installation of Cisco ISE-PIC. Before you reimage, ensure that you generate a support bundle by running the backup-logs CLI command and place the support bundle in a remote repository in order to help ascertain the cause of failure. You must reimage to the old or new version, as follows:

  • Secondary Administration Node—Reimage to the old version and restore the configuration and operational backup.

  • Primary Administration Node—If there are upgrade failures on the PAN, the system usually returns to the last known good state. If the system does not roll back to the old version, you can reimage to the new version, and register with the new deployment.

In case of upgrade failures, before you try to upgrade again:

  • Analyze the logs. Check the support bundle for errors.

  • Identify and resolve the problem by submitting the support bundle that you generated to the Cisco Technical Assistance Center (TAC).


    Note


    You can view the progress of the upgrade by logging in via SSH and using the show application status ise command. The following message appears: % NOTICE: Identity Services Engine upgrade is in progress...


Upgrade Failures during Binary Install

Problem An application binary upgrade occurs after the database upgrade. If a binary upgrade failure happens, the following message appears on the console and ADE.log:
% Application install/upgrade failed with system removing the corrupted install

Solution Before you attempt any roll back or recovery, generate a support bundle by using the backup-logs command and place the support bundle in a remote repository.

To roll back, reimage the Cisco ISE-PIC appliance by using the previous ISO image and restore the data from the backup file. You need a new upgrade bundle each time you retry an upgrade.

  • Analyze the logs. Check the support bundle for errors.

  • Identify and resolve the problem by submitting the support bundle that you generated to the Cisco Technical Assistance Center (TAC).

Roll back to the previous version

In rare cases, you might need to reimage your Cisco ISE-PIC appliance. Use the previous ISO image. Restore the data from the backup file. After restoring the data, you can register with the earlier deployment. Back up the Cisco ISE-PIC configuration data before starting the upgrade process.

Upgrade failures sometimes occur due to issues in the configuration database. In these cases, you must manually restore your system, as the system does not roll back automatically. If this happens, the system displays a notification that the database was not rolled back and provides an upgrade failure message. In these scenarios, you must manually reimage your system, install Cisco ISE, and restore the configuration data .

Before rollback or recovery, generate a support bundle using the backup-logs command and save it in a remote repository.

Post-Upgrade Tasks

See the Identity Services Engine Passive Identity Connector (ISE-PIC) Administrator Guide for additional details about each of these tasks.

Clear Browser Cache

After upgrade, ensure that you clear the browser cache, close the browser, and open a new browser session before you access the Cisco ISE-PIC Admin portal.

Reconfigure Active Directory Join Points

The Active Directory join point may be lost during upgrade. Log in to the Admin portal and navigate to check if you need to re-configure a join point.

Configure Active Directory Identity Search Attributes

Cisco ISE-PIC identifies users using the attributes SAM, CN, or both with the sAMAccountName attribute as the default attribute.

You can configure Cisco ISE-PIC to use SAM, CN, or both, if your environment requires it. When SAM and CN are used, and the value of the SAMAccountName attribute is not unique, Cisco ISE-PIC also compares the CN attribute value.

To configure attributes for Active Directory identity search:

  1. Choose Providers > Active Directory. In the Active Directory window, click Advanced Tools, and choose Advanced Tuning. Enter the following details:

    • ISE Node—Choose the ISE node that is connecting to Active Directory.

    • Name—Enter the registry key that you are changing. To change the Active Directory search attributes, enter: REGISTRY.Services\lsass\Parameters\Providers\ActiveDirectory\IdentityLookupField

    • Value—Enter the attributes that ISE uses to identify a user:

      • SAM—To use only SAM in the query (this option is the default).

      • CN—To use only CN in the query.

      • SAMCN—To use CN and SAM in the query.

    • Comment—Describe what you are changing, for example: Changing the default behavior to SAM and CN

  2. Click Update Value to update the registry.

    A pop-up window appears. Read the message and accept the change. The AD connector service in ISE restarts.

Configure Reverse DNS Lookup

Ensure that you have Reverse DNS lookup configured for all Cisco ISE-PIC nodes in your two-node deployment from the DNS server(s). Otherwise, you may run into deployment-related issues after upgrade.

Restore Cisco CA Certificates and Keys

Obtain a backup of the Cisco ISE-PIC CA certificates and keys from the Primary Administration Node and restore it on the Secondary Administration Node. This ensures that the Secondary Administration Node can function as the root CA or subordinate CA of an external PKI in case of a PAN failure and you promote the Secondary Administration Node to be the Primary Administration Node.

Reconfigure Mandatory ISE-PIC System Settings

  • Reconfigure e-mail settings, favorite reports, and data purge settings.

  • Check the threshold and/or filters for specific alarms that you need. All the alarms are enabled by default after an upgrade.

Communications, services, and additional information

  • To receive timely, relevant information from Cisco, sign up at Cisco Profile Manager.

  • To get the business impact you’re looking for with the technologies that matter, visit Cisco Services.

  • To submit a service request, visit Cisco Support.

  • To discover and browse secure, validated enterprise-class apps, products, solutions, and services, visit Cisco DevNet.

  • To obtain general networking, training, and certification titles, visit Cisco Press.

  • To find warranty information for a specific product or product family, access Cisco Warranty Finder.

Cisco Bug Search Tool

Cisco Bug Search Tool (BST) is a gateway to the Cisco bug-tracking system, which maintains a comprehensive list of defects and vulnerabilities in Cisco products and software. The BST provides you with detailed defect information about your products and software.

Documentation feedback

To provide feedback about Cisco technical documentation, use the feedback form available in the right pane of every online document.