Compliance
Posture Service
Posture is a service in Cisco Identity Services Engine (Cisco ISE) that allows you to check the compliance, also known as posture, of endpoints, before allowing them to connect to your network. A posture agent, such as the AnyConnect ISE Posture Agent, runs on the endpoint. Client Provisioning ensures that the endpoints receive the appropriate Posture Agent.
The ISE Posture Agent for Cisco ISE does not support Windows Fast User Switching when using the native supplicant, because there is no clear disconnect of the previous user. When a new user is sent, the Agent is hung on the old user process and session ID, so a new posture session cannot start. As per the Microsoft Security policies, it is recommended to disable Fast User Switching.
 Note |
In ISE, session control is done on multiple nodes. On an MnT node, sessions are removed:
On a PSN node, sessions are removed:
If posture without redirection is used in multinode deployment, and sessions are not properly managed, it may impact the posture functionality. |
|
Configure ISE 2.1 and AnyConnect 4.3 Posture USB Check How To Configure Posture with AnyConnect Compliance Module and ISE 2.0 |
Components of Posture Services
Cisco ISE posture service primarily includes the posture administration services and the posture run-time services.
Posture Administration Services
If you have not installed the Apex license in Cisco ISE, then the posture administration services option is not available from the Admin portal.
Administration services provide the back-end support for posture-specific custom conditions and remediation actions that are associated with the requirements and authorization policies that are configured for posture service.
Posture Run-Time Services
The posture run-time services encapsulate all the interactions that happen between the client agent and the Cisco ISE server for posture assessment and remediation of clients.
Posture run-time services begin with the Discovery Phase. An endpoint session is created after the endpoint passes 802.1x authentication. The client agent then attempts to connect to a Cisco ISE node by sending discovery packets through different methods in the following order:
- via HTTP to Port 80 on a Cisco ISE server (if configured)
- via HTTPS to Port 8905 on a Cisco ISE server (if configured)
- via HTTP to Port 80 on the default gateway
- via HTTPS to Port 8905 to each previously contact server
- via HTTP to Port 80 on enroll.cisco.com
The Posture Phase begins when the Acceptable User Policy (if any) is accepted. The Cisco ISE node issues a posture token for the Posture Domain to the client agent. The posture token allows the endpoint to reconnect to the network without going through the posture process again. It contains information such as the Agent GUID, the Acceptable User Policy status, and endpoint operating system information.
The messages used in the Posture Phase are in the NEA PB/PA format (RFC5792).
Posture Types
There are three posture types that can be used monitor and enforce Cisco ISE posture policies:
-
AnyConnect—Deploys the AnyConnect agent to monitor and enforce Cisco ISE posture policies that require client interaction.
-
AnyConnect Stealth— Runs posture as a service without any user interaction.
-
Temporal Agent—A temporary executable file that you can configure in the Cisco ISE GUI to run on the client. When a client attempts to access the trusted network, Cisco ISE pushes the executable file that the user has to run on the client. The temporal agent checks the compliance status again and sends the status to Cisco ISE, which in turn takes the required action based on the results. The temporal agent is removed from the client when compliance processing is completed. The temporal agent does not support custom remediation. The default remediaton supports only message text.
Note
-
You can configure posture policies using the Posture Types as Temporal Agent and Compliance Module as 4.x or later. While creating the remediation and requirements for such policies, ensure that you do not change the compliance module to “3.x or earlier” or “Any Version”.
-
For the Temporal Agent, you can only view Patch Management conditions containing the Installation check type in the Requirements page.
-
Cisco ISE does not support VLAN-controlled posture environment using the Temporal Agent for Mac OSX. This is because when you change the network access from an existing VLAN to a new VLAN, the user’s IP address must be released before the VLAN change, and a new IP address must be requested through DHCP when the user connects to the new VLAN. This requires root privileges but the Temporal Agent runs as a user process.
Cisco ISE supports ACL-controlled posture environment, which does not require the refreshing of endpoint IP addresses.
-
Conditions Unsupported by the Temporal Agent:
-
Service Condition MAC—System Daemon check
-
Service Condition-MAC—Daemon or User Agent check
-
PM—Up To Date check
-
PM—Enabled check
-
DE—Encryption check
The Client Provisioning page (Policy > Policy Elements > Results > Client Provisioning > Resources) and the Posture Requirements page (Policy > Policy Elements > Results > Posture > Requirements) contains the posture types, and the recommended best practice is to provision the posture profile in the Client Provisioning page.
When you choose the AnyConnect Stealth posture type in the posture requirement, some of the conditions, remediations, or attributes in a condition are disabled (grayed out). For example, when you enable AnyConnect Stealth requirement, the Manual Remediation Type is disabled (grayed out) because this action requires client-side interaction.
Mapping the posture profile to the AnyConnect configuration, and then mapping the Anyconnect configuration to the Client Provisioning page for AnyConnect stealth mode deployment supports:
-
AnyConnect to read the posture profile and set it to the intended mode.
-
AnyConnect to send information related to the selected mode to Cisco ISE during initial posture request.
-
Cisco ISE to match the right policy, based on the mode and other factors, such as identity group, OS, and compliance module.
Note |
AnyConnect version 4.4 and later support Cisco ISE posture in Stealth mode. |
Cisco ISE Posture Agents
Posture agents are applications that reside on client machines logging into the Cisco ISE network. Agents can be persistent (like the AnyConnect for Windows and Mac OS X) and remain on the client machine after installation, even when the client is not logged into the network. Agents can also be temporal (like the Cisco Temporal Agent for Windows and Mac OS), removing themselves from the client machine after the login session has terminated. In either case, the Agent helps the user to log in to the network, receive the appropriate access profile, and even perform posture assessment on the client machine to ensure it complies with network security guidelines before accessing the core of the network.
Note |
The Cisco Temporal Agent for Windows supports the Client Provisioning Portal and uses URL redirection. |
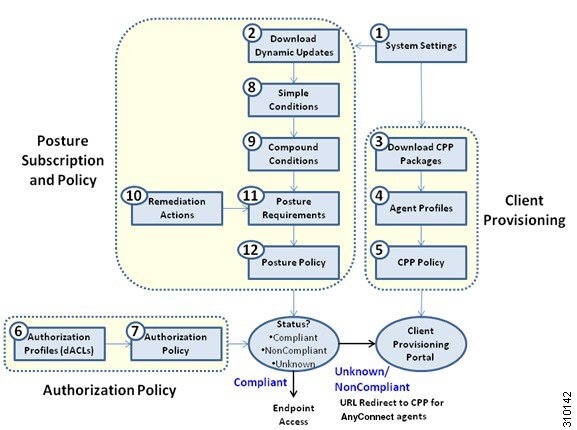
Posture and Client-Provisioning Policies Workflow
Posture Service Licenses
Cisco ISE provides you with three types of licenses, the Base license, the Plus license, and the Apex license. If you have not installed the Apex license on the Primary PAN, then the posture requests will not be served in Cisco ISE. The posture service of Cisco ISE can run on a single node or on multiple nodes.
Posture Service Deployment
You can deploy Cisco ISE in a standalone environment (on a single node) or in a distributed environment (on multiple nodes).
In a standalone Cisco ISE deployment, you can configure a single node for all the administration services, the monitoring and troubleshooting services, and the policy run-time services.
In a distributed Cisco ISE deployment, you can configure each node as a Cisco ISE node for administration services, monitoring and troubleshooting services, and policy run-time services. A node that runs the administration services is the primary node in that Cisco ISE deployment. The other nodes that run other services are the secondary nodes which can be configured for backup services for one another.
Enable Posture Session Service in Cisco ISE
Before you begin
- You must enable session services in Cisco ISE and install the advanced license package to serve all the posture requests received from the clients.
-
If you have more than one node that is registered in a distributed deployment, all the nodes that you have registered appear in the Deployment Nodes page, apart from the primary node. You can configure each node as a Cisco ISE node (Administration, Policy Service, and Monitoring personas).
-
The posture service only runs on Cisco ISE nodes that assume the Policy Service persona and does not run on Cisco ISE nodes that assume the administration and monitoring personas in a distributed deployment.
Procedure
| Step 1 |
Choose . |
| Step 2 |
Choose a Cisco ISE node from the Deployment Nodes window. |
| Step 3 |
Click Edit. |
| Step 4 |
Under the General Settings tab, check the Policy Service check box, If the Policy Service check box is unchecked, both the session services and the profiling service check boxes are disabled. |
| Step 5 |
Check the Enable Session Services check box, for the Policy Service persona to run the Network Access, Posture, Guest, and Client Provisioning session services. To stop the session services, uncheck the check box. |
| Step 6 |
Click Save. |
Run the Posture Assessment Report
You can run the Posture Detail Assessment report to generate a detailed status of compliance of the clients against the posture policies that are used during posture assessment.
Procedure
| Step 1 |
Choose . |
| Step 2 |
From the Time Range drop-down list, choose the specific time period. |
| Step 3 |
Click Run to view the summary of all the end points that were active during the selected time period. |
Posture Administration Settings
You can globally configure the Admin portal for posture services. You can download updates automatically to the Cisco ISE server through the web from Cisco. You can also update Cisco ISE manually offline later. In addition, having an agent like AnyConnect, the NAC Agent, or the Web Agent installed on the clients provides posture assessment and remediation services to clients. The client agent periodically updates the compliance status of clients to Cisco ISE. After login and successful requirement assessment for posture, the client agent displays a dialog with a link that requires end users to comply with terms and conditions of network usage. You can use this link to define network usage information for your enterprise network that end users accept before they can gain access to your network.
Client Posture Requirements
The following table describes the fields in the Posture Requirements page. The navigation path is: .
|
Fields |
Usage Guidelines |
|---|---|
|
Name |
Enter a name for the requirement. |
|
Operating Systems |
Choose an operating system. Click plus [+] to associate more than one operating system to the policy. Click minus [-] to remove the operating system from the policy. |
|
Conditions |
Choose a Condition from the list. You can also create any user defined condition by clicking the Action Icon and associate it with the requirement. You cannot edit the associated parent operating system while creating user defined conditions. The pr_WSUSRule is a dummy compound condition, which is used in a posture requirement with an associated Windows Server Update Services (WSUS) remediation. The associated WSUS remediation action must be configured to validate Windows updates by using the severity level option. When this requirement fails, the NAC Agent that is installed on the Windows client enforces the WSUS remediation action based on the severity level that you define in the WSUS remediation. The pr_WSUSRule cannot be viewed in the Compound conditions list page. You can only select the pr_WSUSRule from the Conditions widget. |
|
Remediation Actions |
Choose a Remediation from the list. You can also create a remediation action and associate it with the requirement. You have a text box for all the remediation types that can be used to communicate to the Agent users. In addition to remediation actions, you can communicate to Agent users about the non compliance of clients with messages. The Message Text Only option informs Agent users about the noncompliance. It also provides optional instructions to the user to contact the Help desk for more information, or to remediate the client manually. In this scenario, the NAC Agent does not trigger any remediation action. |
Timer Settings for Clients
You can set up timers for users to remediate, to transition from one state to another, and to control the login success screen.
We recommend configuring agent profiles with remediation timers and network transition delay timers as well as the timer used to control the login success screen on client machines so that these settings are policy based. You can configure all these timers for agents in client provisioning resources in the NAC or AnyConnect Posture Profile window ().
However, when there are no agent profiles configured to match the client provisioning policies, you can use the settings in the General Settings configuration window ().
Set Remediation Timer for Clients to Remediate Within Specified Time
You can configure the timer for client remediation within a specified time. When clients fail to satisfy configured posture policies during an initial assessment, the agent waits for the clients to remediate within the time configured in the remediation timer. If the client fails to remediate within this specified time, then the client agent sends a report to the posture run-time services after which the clients are moved to the noncompliance state.
Procedure
| Step 1 |
Choose . |
| Step 2 |
In the Remediation Timer field, enter a time value in minutes. The default value is 4 minutes. The valid range is 1 to 300 minutes. |
| Step 3 |
Click Save. |
Set Network Transition Delay Timer for Clients to Transition
You can configure the timer for clients to transition from one state to the other state within a specified time using the network transition delay timer, which is required for Change of Authorization (CoA) to complete. It may require a longer delay time when clients need time to get a new VLAN IP address during success and failure of posture. When successfully postured, Cisco ISE allows clients to transition from unknown to compliant mode within the time specified in the network transition delay timer. Upon failure of posture, Cisco ISE allows clients to transition from unknown to noncompliant mode within the time specified in the timer.
Procedure
| Step 1 |
Choose . |
| Step 2 |
Enter a time value in seconds, in the Network Transition Delay field. The default value is 3 seconds. The valid range is 2 to 30 seconds. |
| Step 3 |
Click Save. |
Set Login Success Window to Close Automatically
After successful posture assessment, the client agent displays a temporary network access screen. The user needs to click the OK button in the login window to close it. You can set up a timer to close this login screen automatically after specified time.
Procedure
| Step 1 |
Choose . |
| Step 2 |
Check the Automatically Close Login Success Screen After check box. |
| Step 3 |
Enter a time value in seconds, in the field next to Automatically Close Login Success Screen After check box. The valid range is 0 to 300 seconds. If the time is set to zero, then AnyConnect does not display the login success screen. |
| Step 4 |
Click Save. |
Set Posture Status for Nonagent Devices
You can configure the posture status of endpoints that run on non-agent devices like Linux or iDevices. When Android devices and Apple iDevices such as an iPod, iPhone, or iPad connect to a Cisco ISE enabled network, these devices assume the Default Posture Status settings.
These settings can also be applied to endpoints that run on Windows and Macintosh operating systems when a matching policy is not found during posture runtime.
Before you begin
In order to enforce policy on an endpoint, you must configure a corresponding Client Provisioning policy (Agent installation package). Otherwise, the posture status of the endpoint automatically reflects the default setting.
Procedure
| Step 1 |
Choose . |
| Step 2 |
From the Default Posture Status drop-down list, choose the option as Compliant or Noncompliant. |
| Step 3 |
Click Save. |
Posture Lease
You can configure Cisco ISE to perform posture assessment every time a user logs into your network or perform posture assessment in specified intervals. The valid range is 1 to 365 days.
This configuration applies only for those who use AnyConnect agent for posture assessment.
When the posture lease is active, Cisco ISE will use the last known posture state and will not reach out to the endpoint to check for compliance. But when the posture lease expires, Cisco ISE does not automatically trigger a re-authentication or a posture reassessment for the endpoint. The endpoint will stay in the same compliance state since the same session is being used. When the endpoint re-authenticates, posture will be run and the posture lease time will be reset.
Example Use Case Scenario:
-
The user logs on to the endpoint and gets it posture compliant with the posture lease set to one day.
-
Four hours later the user logs off from the endpoint (the posture lease now has 20 hours left).
-
One hour later the user logs on again. Now the posture lease has 19 hours left. The last know posture state was compliant. Hence the user is provided access without posture being run on the endpoint.
-
Four hours later the user logs off (the posture lease now has 15 hours left).
-
14 hours later, the user logs on. The posture lease has one hour left. The last known posture state was compliant. The user is provided access without posture being run on the endpoint.
-
One hour later, the posture lease expires. The user is still connected to the network as the same user session is being used.
-
One hour later, user logs off (the session is tied to the user but not to the machine, so the machine can stay on the network).
-
One hour later the user logs on. Since the posture lease has expired and a new user session is launched, the machine performs a posture assessment, the results are sent to the Cisco ISE and the posture lease timer is reset to one day in case of this use case.
Periodic Reassessments
Periodic reassessment (PRA) can be done only for clients that are already successfully postured for compliance. PRA cannot occur if clients are not compliant on your network.
A PRA is valid and applicable only if the endpoints are in a compliant state. The policy service node checks the relevant policies, and compiles the requirements depending on the client role that is defined in the configuration to enforce a PRA. If a PRA configuration match is found, the policy service node responds to the client agent with the PRA attributes that are defined in the PRA configuration for the client before issuing a CoA request. The client agent periodically sends the PRA requests based on the interval specified in the configuration. The client remains in the compliant state if the PRA succeeds, or the action configured in the PRA configuration is to continue. If the client fails to meet PRA, then the client is moved from the compliant state to the noncompliant state.
The PostureStatus attribute shows the current posture status as compliant in a PRA request instead of unknown even though it is a posture reassessment request. The PostureStatus is updated in the Monitoring reports as well.
When the posture lease has not expired, an endpoint becomes compliant based on the Access Control List (ACL), and PRA is initiated. If PRA fails, the endpoint is deemed noncompliant and the posture lease is reset.
Configure Periodic Reassessments
You can configure periodic reassessments only for clients that are already successfully postured for compliance. You can configure each PRA to a user identity group that is defined in the system.
Before you begin
-
Ensure that each PRA configuration has a unique group or a unique combination of user identity groups assigned to the configuration.
-
You can assign a role_test_1 and a role_test_2, which are the two unique roles to a PRA configuration. You can combine these two roles with a logical operator and assign the PRA configuration as a unique combination of two roles. For example, role_test_1 OR role_test_2.
-
Ensure that two PRA configurations do not have a user identity group in common.
-
If a PRA configuration already exists with a user identity group “Any”, you cannot create other PRA configurations unless you perform one of the following:
-
Update the existing PRA configuration with the Any user identity group to reflect a user identity group other than Any.
-
Delete the existing PRA configuration with a user identity group “Any”.
-
Procedure
| Step 1 |
Choose . |
| Step 2 |
Click Add. |
| Step 3 |
Modify the values in the New Reassessment Configuration page to create a new PRA. |
| Step 4 |
Click Submit to create a PRA configuration. |
Posture Troubleshooting Settings
The following table describes the fields on the Posture troubleshooting page, which you use to find and resolve posture problems on the network. The navigation path for this page is: .
|
Option |
Usage Guidelines |
|---|---|
|
Search and Select a Posture event for troubleshooting |
|
|
Username |
Enter the username to filter on. |
|
MAC Address |
Enter the MAC address to filter on, using format: xx-xx-xx-xx-xx-xx |
|
Posture Status |
Select the authentication status to filter on: |
|
Failure Reason |
Enter the failure reason or click Select to choose a failure reason from a list. Click Clear to clear the failure reason. |
|
Time Range |
Select a time range. The RADIUS authentication records that are created during this time range are used. |
|
Start Date-Time: |
(Available only when you choose Custom Time Range) Enter the start date and time, or click the calendar icon to select the start date and time. The date should be in the mm/dd/yyyy format and time in the hh:mm format. |
|
End Date-Time: |
(Available only when you choose Custom Time Range) Enter the end date and time, or click the calendar icon to select the start date and time. The date should be in the mm/dd/yyyy format and time in the hh:mm format. |
|
Fetch Number of Records |
Select the number of records to display: 10, 20, 50, 100, 200, 500 |
|
Search Result |
|
|
Time |
Time of the event |
|
Status |
Posture status |
|
Username |
User name associated with the event |
|
MAC Address |
MAC address of the system |
|
Failure Reason |
Failure reason for the event |
Posture General Settings
The following table describes the fields on the Posture General Settings page, which you can use to configure general posture settings such as remediation time and posture status. The navigation path for this page is:.
|
Fields |
Usage Guidelines |
|---|---|
|
Remediation Timer |
Enter a time value in minutes. The default value is 4 minutes. The valid range is 1 to 300 minutes. |
|
Network Transition Delay |
Enter a time value in seconds. The default value is 3 seconds. The valid range is 2 to 30 seconds. |
|
Default Posture Status |
Choose Compliant or Noncompliant. The non-agent devices like Linux assumes this status while connecting to the network. |
|
Automatically Close Login Success Screen After |
Check the check box to close the login success screen automatically after the specified time. Enter a time value in seconds, in the field next to the check box. You can configure the timer to close the login screen automatically between 0 to 300 seconds. If the time is set to zero, then the NAC Agents and Web Agents do not display the login success screen. |
|
Continuous Monitoring Interval |
Specify the time interval after which AnyConnect should start sending monitoring data. For application conditon For application and hardware conditions, the default value is 5 minutes. |
|
Acceptable Use Policy in Stealth Mode |
Choose Block in stealth mode to move a client to noncompliant posture status, if your company's network-usage terms and conditions are not met. |
|
Posture Lease |
|
| Perform posture assessment every time a user connects to the network |
Select this option to initiate posture assessment every time the user connects to network |
| Perform posture assessment every n days |
Select this option to initiate posture assessment after the specified number of days although the client is already postured Compliant. |
| Cache Last Known Good State |
Check this check box for Cisco ISE to cache the result of posture assessment. By default, this field is disabled. |
| Last Known Good State |
(Applicable only when you check the Cache Last Known Good State check box) Cisco ISE caches the result of posture assessment for the amount of time specified in this field. Valid values are 1 to 30 days, or 1 to 720 hours, or 1 to 43200 minutes. |
Download Posture Updates to Cisco ISE
Posture updates include a set of predefined checks, rules, and support charts for antivirus and antispyware for both Windows and Macintosh operating systems, and operating systems information that are supported by Cisco. You can also update Cisco ISE offline from a file on your local system, which contains the latest archives of updates.
When you deploy Cisco ISE on your network for the first time, you can download posture updates from the web. This process usually takes approximately 20 minutes. After the initial download, you can configure Cisco ISE to verify and download incremental updates to occur automatically.
Cisco ISE creates default posture policies, requirements, and remediations only once during an initial posture updates. If you delete them, Cisco ISE does not create them again during subsequent manual or scheduled updates.
Before you begin
To ensure that you are able to access the appropriate remote location from which you can download posture resources to Cisco ISE, you may be required to verify that you have the correct proxy settings configured for your network as described in Specifying Proxy Settings in Cisco ISE, page 5-2.
You can use the Posture Update page to download updates dynamically from the web.
Procedure
| Step 1 |
Choose . |
| Step 2 |
Choose the Web option to download updates dynamically. |
| Step 3 |
Click Set to Default to set the Cisco default value for the Update Feed URL field. If your network restricts URL-redirection functions (via a proxy server, for example) and you are experiencing difficulty accessing the above URL, try also pointing your Cisco ISE to the alternative URL in the related topics. |
| Step 4 |
Modify the values in the Posture Updates page. |
| Step 5 |
Click Update Now to download updates from Cisco. |
| Step 6 |
Click OK to continue with other tasks on Cisco ISE. After being updated, the Posture Updates page displays the current Cisco updates version information as a verification of an update under Update Information section in the Posture Updates page. |
Download Posture Updates Automatically
After an initial update, you can configure Cisco ISE to check for the updates and download them automatically.
Before you begin
-
You should have initially downloaded the posture updates to configure Cisco ISE to check for the updates and download them automatically.
Procedure
| Step 1 |
Choose . |
| Step 2 |
In the Posture Updates page, check the Automatically check for updates starting from initial delay check box. |
| Step 3 |
Enter the initial delay time in hh:mm:ss format. Cisco ISE starts checking for updates after the initial delay time is over. |
| Step 4 |
Enter the time interval in hours. Cisco ISE downloads the updates to your deployment at specified intervals from the initial delay time. |
| Step 5 |
Click Yes to continue. |
| Step 6 |
Click Save. |
Posture Acceptable Use Policy Configuration Settings
The following table describes the fields in the Posture Acceptable Use Policy Configurations Page, which you can use to configure an acceptable use policy for posture. The navigation path for this page is: .
|
Fields |
Usage Guidelines |
|---|---|
|
Configuration Name |
Enter the name of the AUP configuration that you want to create. |
|
Configuration Description |
Enter the description of the AUP configuration that you want to create. |
|
Show AUP to Agent users (for NAC Agent and Web Agent on Windows only) |
If checked, the Show AUP to Agent users check box displays users (for NAC Agents, and Web Agents on Windows only) the link to network usage terms and conditions for your network and click it to view the AUP upon successful authentication and posture assessment. |
|
Use URL for AUP message radio button |
When selected, you must enter the URL to the AUP message in the AUP URL, which clients must access upon successful authentication and posture assessment. |
|
Use file for AUP message radio button |
When selected, you must browse to the location and upload a file in a zipped format in the AUP File, which contains the index.html at the top level. The .zip file can include other files and subdirectories in addition to the index.html file. These files can reference each other using HTML tags. |
|
AUP URL |
Enter the URL to the AUP, which clients must access upon successful authentication and posture assessment. |
|
AUP File |
In the AUP File, browse to the file and upload it to the Cisco ISE server. It should be a zipped file and the zipped file should contain the index.html file at the top level. |
|
Select User Identity Groups |
In the Select User Identity Groups drop-down list, choose a unique user identity group, or a unique combination of user identity groups, for your AUP configuration. Note the following while creating an AUP configuration:
|
|
Acceptable use policy configurations—Configurations list |
Lists existing AUP configurations and end user identity groups associated with AUP configurations. |
Configure Acceptable Use Policies for Posture Assessment
After login and successful posture assessment of clients, the client agent displays a temporary network access screen. This screen contains a link to an acceptable use policy (AUP). When users click the link, they are redirected to a page that displays the network-usage terms and conditions, which they must read and accept.
Each Acceptable Use Policy configuration must have a unique user identity group, or a unique combination of user identity groups. Cisco ISE finds the AUP for the first matched user identity group, and then it communicates to the client agent that displays the AUP.
Procedure
| Step 1 |
Choose > . |
| Step 2 |
Click Add. |
| Step 3 |
Modify the values in the New Acceptable Use Policy Configuration page. |
| Step 4 |
Click Submit. |
Posture Conditions
A posture condition can be any one of the following simple conditions: a file, a registry, an application, a service, or a dictionary condition. One or more conditions from these simple conditions form a compound condition, which can be associated to a posture requirement.
When you deploy Cisco ISE on your network for the first time, you can download posture updates from the web for the first time. This process is called the initial posture update.
After an initial posture update, Cisco ISE also creates Cisco defined simple and compound conditions. Cisco defined simple conditions have pc_ as their prefixes and compound conditions have pr_ as their prefixes.
You can also configure Cisco ISE to download the Cisco-defined conditions periodically as a result of dynamic posture updates through the web. You cannot delete or edit Cisco defined posture conditions.
A user defined condition or a Cisco defined condition includes both simple conditions and compound conditions.
Simple Posture Conditions
You can use the Posture Navigation pane to manage the following simple conditions:
-
File Conditions—A condition that checks the existence of a file, the date of a file, and the versions of a file on the client.
-
Registry Conditions—A condition that checks for the existence of a registry key or the value of the registry key on the client.
-
Application Conditions—A condition that checks if an application or process is running or not running on the client.
Note
If a process is installed and running, user is compliant. However, the Application condition works in reverse logic; If an application is not installed and not running, the end user is complaint. If an application is installed and running, the end user is non-complaint.
-
Service Conditions—A condition that checks if a service is running or not running on the client.
-
Dictionary Conditions—A condition that checks a dictionary attribute with a value.
-
USB Conditions— A condition that checks for the presence of USB mass storage device.
Create Simple Posture Conditions
You can create file, registry, application, service, and dictionary simple conditions that can be used in posture policies or in other compound conditions.
Before you begin
To perform the following task, you must be a Super Admin or Policy Admin.
Procedure
| Step 1 |
Choose . |
| Step 2 |
Choose any one of the following: File, Registry, Application, Service, or Dictionary Simple Condition. |
| Step 3 |
Click Add. |
| Step 4 |
Enter the appropriate values in the fields. |
| Step 5 |
Click Submit. |
Compound Posture Conditions
Compound conditions are made up of one or more simple conditions, or compound conditions. You can make use of the following compound conditions while defining a Posture policy.
-
Compound Conditions—Contains one or more simple conditions, or compound conditions of the type File, Registry, Application, or Service condition
-
Antivirus Compound Conditions—Contains one or more AV conditions, or AV compound conditions
-
Antispyware Compound Conditions—Contains one or more AS conditions, or AS compound conditions
-
Dictionary Compound Conditions—Contains one or more dictionary simple conditions or dictionary compound conditions
-
Antimalware Conditions—Contains one or more AM conditions.
Dictionary Compound Condition Settings
The following table describes the fields in the Dictionary Compound Conditions page. The navigation path for this page is: .
|
Fields |
Usage Guidelines |
|---|---|
|
Name |
Enter the name of the dictionary compound condition that you want to create. |
|
Description |
Enter the description of the dictionary compound condition that you want to create. |
|
Select Existing Condition from Library |
Define an expression by selecting pre-defined conditions from the policy elements library or add ad-hoc attribute/value pairs to your expression in the subsequent steps. |
|
Condition Name |
Choose dictionary simple conditions that you have already created from the policy elements library. |
|
Expression |
The Expression is updated based on your selection from the Condition Name drop-down list. |
|
AND or OR operator |
Choose an AND, or an OR operator to logically combine dictionary simple conditions, which can be added from the library. Click the Action icon to do the following:
|
|
Create New Condition (Advance Option) |
Select attributes from various system or user-defined dictionaries. You can also add predefined conditions from the policy elements library in the subsequent steps. |
|
Condition Name |
Choose a dictionary simple condition that you have already created. |
|
Expression |
From the Expression drop-down list, you can create a dictionary simple condition. |
|
Operator |
Choose an operator to associate a value to an attribute. |
|
Value |
Enter a value that you want to associate to the dictionary attribute, or choose a value from the drop-down list. |
Predefined Condition for Enabling Automatic Updates in Windows Clients
The pr_AutoUpdateCheck_Rule is a Cisco predefined condition, which is downloaded to the Compound Conditions page. This condition allows you to check whether the automatic updates feature is enabled on Windows clients. If a Windows client fails to meet this requirement, then the Network Access Control (NAC) Agents enforce the Windows client to enable (remediate) the automatic updates feature. After this remediation is done, the Windows client becomes posture compliant. The Windows update remediation that you associate in the posture policy overrides the Windows administrator setting, if the automatic updates feature is not enabled on the Windows client.
Preconfigured Antivirus and Antispyware Conditions
Cisco ISE loads preconfigured antivirus and antispyware compound conditions in the AV and AS Compound Condition pages, which are defined in the antivirus and antispyware support charts for Windows and Macintosh operating systems. These compound conditions can check if the specified antivirus and antispyware products exist on all the clients. You can also create new antivirus and antispyware compound conditions in Cisco ISE.
Antivirus and Antispyware Support Chart
Cisco ISE uses an antivirus and antispyware support chart, which provides the latest version and date in the definition files for each vendor product. Users must frequently poll antivirus and antispyware support charts for updates. The antivirus and antispyware vendors frequently update antivirus and antispyware definition files, look for the latest version and date in the definition files for each vendor product.
Each time the antivirus and antispyware support chart is updated to reflect support for new antivirus and antispyware vendors, products, and their releases, the NAC Agents receive a new antivirus and antispyware library. It helps NAC Agents to support newer additions. Once the NAC Agents retrieve this support information, they check the latest definition information from the periodically updated se-checks.xml file (which is published along with the se-rules.xml file in the se-templates.tar.gz archive), and determine whether clients are compliant with the posture policies. Depending upon what is supported by the antivirus and antispyware library for a particular antivirus, or antispyware product, the appropriate requirements will be sent to the NAC Agents for validating their existence, and the status of particular antivirus and antispyware products on the clients during posture validation.
The antivirus and antispyware support chart is available on Cisco.com.
Inline Posture Node
An Inline Posture node is a gatekeeping node that is positioned behind network access devices such as Wireless LAN Controllers (WLC) and VPN concentrators on the network. The Inline Posture node enforces access policies after a user has been authenticated and granted access, and handles change of authorization (CoA) requests that a WLC or VPN are unable to accommodate. Cisco ISE allows you to have two Inline Posture nodes that can take on primary or secondary roles for high availability.
The Inline Posture node must be a dedicated node. It must be dedicated solely for inline posture service, and cannot operate concurrently with other Cisco ISE services. Likewise, due to the specialized nature of its service, an Inline Posture node cannot assume any persona. For example, it cannot act as an Administration node that offers administration service, or a Policy Service node that offers network access, posture, profile, and guest services, or a Monitoring node that offers monitoring and troubleshooting services for a Cisco ISE network.
The Inline Posture persona is not supported on the Cisco ISE 3495 platform. Ensure that you install the Inline Posture persona on any one of the following supported platforms: Cisco ISE 3315, Cisco ISE 3355, Cisco ISE 3395, or Cisco ISE 3415.
You cannot access the web-based user interface of the Inline Posture nodes. You can configure them only from the PAN.
Inline Posture Node Installation
You must download the Inline Posture ISO (IPN ISO) image from Cisco.com and install it on any of the supported platforms. You must then configure certificates through the Command Line Interface (CLI). You can then register this node from the Admin portal.
Note |
There is no separate Inline Posture ISO image for Release 1.31.4. Use the 1.2 IPN ISO image to install and set up an inline posture node. |
After you install and set up the Inline Posture application, you must configure certificates before you can register the Inline Posture nodes. See the Cisco Identity Services Engine Hardware Installation Guide for more information.
Register an Inline Posture Node
We recommend that you decide on the type of node (Cisco ISE or Inline Posture) at the time of registration. If you want to change the node type later, you have to deregister the node from the deployment, restart Cisco ISE on the standalone node, and then reregister it.
Before you begin
-
Ensure that the primary node’s Certificate Trust List (CTL) has the appropriate certificate authority (CA) certificates to validate the HTTPS certificate of the secondary node that you are going to register.
-
After you register the secondary node to the primary node, if you change the HTTPS certificate on the secondary node, you must import the appropriate CA certificates into the CTL of the primary node.
Procedure
| Step 1 |
Log in to the PAN. |
| Step 2 |
Choose . |
| Step 3 |
Click Deployment from the navigation pane on the left. |
| Step 4 |
Choose to register a secondary Inline Posture node. |
Compliance Module
The compliance module contains a list of fields, such as vendor name, product version, product name, and attributes provided by OPSWAT that supports Cisco ISE posture conditions.
Vendors frequently update the product version and date in the definition files, therefore, you must look for the latest version and date in the definition files for each vendor product by frequently polling the compliance module for updates. Each time the compliance module is updated to reflect the support for new vendors, products, and their releases, the AnyConnect agents receives a new library. It helps AnyConnect agent to support newer additions. Once the AnyConnect agents retrieve this support information, they check the latest definition information from the periodically updated se-checks.xml file (which is published along with the se-rules.xml file in the se-templates.tar.gz archive), and determine whether clients are compliant with the posture policies. Depending upon what is supported by the library for a particular antivirus, antispyware, antimalware, disk encryption, or patch management product, the appropriate requirements will be sent to the AnyConnect agents for validating their existence, and the status of the particular products on the clients during posture validation.
The compliance module is available on Cisco.com.
Table given below lists the OPSWAT API versions that support and do not support the ISE posture policy. There are different policy rules for agents that support versions 3 and 4.
|
Posture Condition |
Compliance Module Version |
|---|---|
|
OPSWAT |
|
|
Antivirus |
3.x or earlier |
|
Antispyware |
3.x or earlier |
|
Antimalware |
4.x or later |
|
Disk Encryption |
3.x or earlier and 4.x or later |
|
Patch Management |
3.x or earlier and 4.x or later |
|
USB |
4.x or later |
|
Non-OPSWAT |
|
|
File |
Any version |
|
Application |
Any version |
|
Compound |
Any version |
|
Registry |
Any version |
|
Service |
Any version |
Note |
|
Check Posture Compliance
Procedure
| Step 1 |
Log in to Cisco ISE and access the dashboard. |
||
| Step 2 |
In the Posture Compliance dashlet, hover your cursor over a stack bar or sparkline. A tooltip provides detailed information. |
||
| Step 3 |
Expand the data categories for more information. |
||
| Step 4 |
Expand the Posture Compliance dashlet. A detailed real-time report appearsis displayed.
|
Create Compound Posture Conditions
You can create compound conditions that can be used in posture policies for posture assessment and validation.
Before you begin
To perform the following task, you must be a Super Admin or Policy Admin.
Procedure
| Step 1 |
Choose . |
| Step 2 |
Enter appropriate values for the fields. |
| Step 3 |
Click Validate Expression to validate the condition. |
| Step 4 |
Click Submit. |
Create Patch Management Conditions
You can create a policy to check the status of a selected vendor's patch management product.
For example, you can create a condition to check if Microsoft System Center Configuration Manager (SCCM), Client Version 4.x software product is installed at an endpoint.
Note |
Supported versions of Cisco ISE and AnyConnect:
|
Before you begin
To perform the following task, you must be a Super Admin or Policy Admin.
Procedure
| Step 1 |
Choose . |
| Step 2 |
Click Add. |
| Step 3 |
Enter the condition name and description in the Name and Description fields. |
| Step 4 |
Choose the appropriate operating system from the Operating System drop-down field. |
| Step 5 |
Choose the Compliance Module from the drop-down list. |
| Step 6 |
Choose the Vendor Name from the drop-down list. |
| Step 7 |
Choose the Check Type. |
| Step 8 |
Choose the appropriate patch from the Check patches installed drop-down list. |
| Step 9 |
Click Submit. |
Create Disk Encryption Conditions
You can create a policy to check if an end point is compliant with the specified data encryption software.
For example, you can create a condition to check if the C: drive is encrypted in an end point. If the C: drive is not encrypted then the end point receives a non-compliance notification and ISE logs a message.
Before you begin
To perform the following task, you must be a Super Admin or Policy Admin. You can associate a Disk Encryption condition with a posture requirement only when you use the AnyConnect ISE posture agent.
Procedure
| Step 1 |
Choose . |
| Step 2 |
Click Add. |
| Step 3 |
In the Disk Encryption Condition page, enter the appropriate values in the fields. |
| Step 4 |
Click Submit. |
Posture Condition Settings
This section describes simple and compound conditions used for posture.
File Condition Settings
The following table describes the fields in the File Conditions page. The navigation path for this page is: .
|
Fields |
Usage Guidelines for Windows OS |
Usage Guidelines for Mac OSX |
|---|---|---|
|
Name |
Enter the name of the file condition. |
Enter the name of the file condition. |
|
Description |
Enter a description for the file condition. |
Enter a description for the file condition. |
|
Operating System |
Select any Windows operating system to which the file condition should be applied. |
Select any Mac OSX to which the file condition should be applied. |
|
File Type |
Choose one of the predefined settings:
|
Choose one of the predefined settings:
|
|
Data Type & Operator |
NA |
(Available only if you select PropertyList as the File Type) Choose the data type or value of the key to be searched in the plist files. Each data type contains a set of operators.
|
|
Property Name |
NA |
(Available only if you select PropertyList as the File Type) Enter a name of the key, for example, BuildVersionStampAsNumber |
|
File Path |
Choose one of the predefined settings:
|
Choose one of the predefined settings:
|
|
File Date Type |
(Available only if you select FileDate as the File Type) Choose Creation Date or Modification Date. |
(Available only if you select FileDate as the File Type) Choose Creation Date or Modification Date. |
|
File Operator/Operator |
The File Operator options change according to the settings you select in the File Type. Choose the settings appropriately: FileDate
FileExistence
FileVersion
|
The File Operator options change according to the settings you select in the File Type. Choose the settings appropriately: FileDate
FileExistence
|
|
File CRC Data |
(Available only if you select CRC32 as the File Type) You can enter a checksum value, for example, 0x3c37fec3 to check file integrity. The checksum value should start with 0x, a hexadecimal integer. |
(Available only if you select CRC32 as the File Type) You can enter a checksum value, for example, 0x3c37fec3 to check file integrity. The checksum value should start with 0x, a hexadecimal integer. |
|
File SHA-256 Data |
(Available only if you select SHA-256 as the File Type) You can enter a 64-byte hexadecimal hash value to check file integrity. |
(Available only if you select SHA-256 as the File Type) You can enter a 64-byte hexadecimal hash value to check file integrity. |
|
Date and Time |
(Available only if you select FileDate as the File Type) Enter the date and time of the client system in mm/dd/yyyy and hh:mm:ss format. |
(Available only if you select FileDate as the File Type) Enter the date and time of the client system in mm/dd/yyyy and hh:mm:ss format. |
Firewall Condition Settings
The Firewall condition checks if a specific Firewall product is running on an endpoint. The list of supported Firewall products is based on the OPSWAT support charts. You can enforce policies during initial posture and Periodic Reassessment (PRA).
Cisco ISE provides default Firewall conditions for Windows and Mac OS. These conditions are disabled by default.
|
Fields |
Usage Guidelines |
|---|---|
|
Name |
Enter the name of the Firewall condition. |
|
Description |
Enter a description for the Firewall condition. |
|
Compliance Module |
Choose the required compliance module.
|
|
Operating System |
Checks If the required Firewall product is installed on an endpoint. You can select the Windows OS or Mac OSX. |
|
Vendor |
Choose a vendor name from the drop-down list. The Firewall products of a vendor and their check type are retrieved and displayed in the Products for Selected Vendor table. The list in the table changes according to the selected operating system. |
|
Check Type |
Enabled: To check if a specific Firewall is running on an endpoint. Verify if the vendor's product supports the chosen check type by referring to the Products for Selected Vendor list. |
Registry Condition Settings
The following table describes the fields in the Registry Conditions page. The navigation path for this page is: .
|
Fields |
Usage Guidelines |
|---|---|
|
Name |
Enter the name of the registry condition. |
|
Description |
Enter a description for the registry condition. |
|
Registry Type |
Choose one of the predefined settings as the registry type. |
|
Registry Root Key |
Choose one of the predefined settings as the registry root key. |
|
Sub Key |
Enter the sub key without the backslash (“\”) to check the registry key in the path specified in the Registry Root Key. For example, SOFTWARE\Symantec\Norton AntiVirus\version will check the key in the following path: HKLM\SOFTWARE\Symantec\NortonAntiVirus\version |
|
Value Name |
(Available only if you select RegistryValue or RegistryValueDefault as the Registry Type) Enter the name of the registry key value to be checked for RegistryValue. This is the default field for RegistryValueDefault. |
|
Value Data Type |
(Available only if you select RegistryValue or RegistryValueDefault as the Registry Type) Choose one of the following settings:
|
|
Value Operator |
Choose the settings appropriately. |
|
Value Data |
(Available only if you select RegistryValue or RegistryValueDefault as the Registry Type) Enter the value of the registry key according to the data type you have selected in Value Data Type. |
|
Operating System |
Select the operating system to which the registry condition should be applied. |
Application Condition Settings
The following table describes the fields in the Application Conditions page. The navigation path for this page is: .
|
Fields |
Usage Guidelines |
|---|---|
|
Name |
Enter the name of the application condition. |
|
Description |
Enter a description of the application condition. |
|
Operating System |
Select the Windows OS or the MAC OSX to which the application condition should be applied. |
|
Process Name |
Enter the name of the application to be checked. |
|
Application Operator |
Choose the status to be checked. |
Continuous Endpoint Attribute Monitoring
You can use the AnyConnect agent to continuously monitor different endpoint attributes to ensure that dynamic changes are observed during posture assessment. This improves the overall visibility of an endpoint and helps you create posture policies based on their behavior. The AnyConnect agent monitors applications that are installed and running on an endpoint. You can turn on and off the feature and configure how often the data should be monitored. By default, data is collected every 5 minutes and is stored in the database. During initial posture, AnyConnect reports a complete list of running and installed applications. After initial posture, the AnyConnect agent scans the applications every X minute and sends the differences from the last scan to the server. The server displays the complete list of running and installed applications.
Application Condition Settings
The application condition queries for applications that are installed on an endpoint. This helps you get an aggregate visibility of the software distributed on your endpoints. For example, based on the information, you can create polices and work with the Desktop team to reduce software licenses.
The following list describes the fields in the Application Conditions page. The navigation path to this page is: .
|
Fields |
Usage Guidelines |
||
|---|---|---|---|
|
Name |
Enter a name for the application condition. |
||
|
Description |
Enter the description for the application condition. |
||
|
Operating System |
Select the Windows OS or MAC OSX to which the application condition should be applied. |
||
|
Compliance Module |
Support for OESIS version 4.x or later, 3.x or earlier, or Any Version. |
||
|
Check By |
Choose one of the following:
|
||
|
Process Name |
(Available when you select Process as the Check By option) Enter the required process name. | ||
|
Application Operator |
(Available when you select Process as the Check By option) Choose one of the following:
|
||
|
Application State |
(Available when you select Application as the Check By option) Choose one of the following:
|
||
|
Provision By |
(Available when you select Application as the Check By option) Choose one of the following:
|
You can view the number of installed and running applications for each endpoint in the page.
The page displays the percentage of endpoints that are subject to posture assessment and are compliant.
Service Condition Settings
The following table describes the fields in the Service Conditions page. The navigation path for this page is: .
|
Fields |
Usage Guidelines |
|---|---|
|
Name |
Enter a name for the service condition. |
|
Description |
Enter a description of the service condition. |
|
Operating Systems |
Select the operating system to which the service condition should be applied. You can select different versions of the Windows OS or Mac OSX. |
|
Service Name |
Enter the name of the Daemon or User Agent service, for example, com.apple.geod, running as root. The AnyConnect agent uses the command sudo launchctl list to validate the service condition. |
|
Service Type |
Choose the
type of service that AnyConnect should check for to ensure client compliance:
|
|
Service Operator |
Choose the service status
that you want to check in the client:
|
Posture Compound Condition Settings
The following table describes the fields in the Compound Conditions page. The navigation path for this page is: .
|
Fields |
Usage Guidelines |
|---|---|
|
Name |
Enter the name of the compound condition that you want to create. |
|
Description |
Enter the description of the compound condition that you want to create. |
|
Operating System |
Select one or more Windows operating systems. This allow you to associate Windows operating systems to which the condition is applied. |
|
Parentheses ( ) |
Click the parentheses to combine two simple conditions from the following simple condition types: file, registry, application, and service conditions. |
|
( & )—AND operator (use “&” for an AND operator, without the quotes) |
You can use the AND operator (ampersand [ & ]) in a compound condition. For example, enter Condition1 & Condition2. |
|
( | )—OR operator (use “|” for an OR operator, without the quotes) |
You can use the OR operator (horizontal bar [ | ]) in a compound condition. For example, enter Condition1 & Condition2. |
|
( ! )—NOT operator (use “!” for a NOT operator, without the quotes) |
You can use the NOT operator (exclamation point [ ! ]) in a compound conditions. For example, enter Condition1 & Condition2. |
|
Simple Conditions |
Choose from a list of simple conditions of the following types: file, registry, application, and service conditions. You can also create simple conditions of file, registry, application and service conditions from the object selector. Click the quick picker (down arrow) on the Action button to create simple conditions of file, registry, application, and service conditions. |
AntiVirus Condition Settings
The following table describes the fields in the Anti-Virus Condition page. The navigation path for this page is: .
|
Fields |
Usage Guidelines |
|---|---|
|
Name |
Enter the name of the antivirus condition that you want to create. |
|
Description |
Enter the description of the antivirus condition that you want to create. |
|
Operating System |
Select an operating system to check the installation of an antivirus programs on your client, or check the latest antivirus definition file updates to which the condition is applied. |
|
Vendor |
Choose a vendor from the drop-down list. The selection of Vendor retrieves their antivirus products and versions, which are displayed in the Products for Selected Vendor table. |
|
Check Type |
Choose whether to check an installation or check the latest definition file update on the client. |
|
Installation |
Choose to check only the installation of an antivirus program on the client. |
|
Definition |
Choose to check only the latest definition file update of an antivirus product on the client. |
|
Check against latest AV definition file version, if available. (Otherwise check against latest definition file date). |
(Available only when you choose Definition check type) Choose to check the antivirus definition file version on the client against the latest antivirus definition file version, if available as a result of posture updates in Cisco ISE. Otherwise, this option allows you to check the definition file date on the client against the latest definition file date in Cisco ISE. |
|
Allow virus definition file to be (Enabled) |
(Available only when you choose Definition check type) Choose to check the antivirus definition file version and the latest antivirus definition file date on the client. The latest definition file date cannot be older than that you define in the next field (days older than field) from the latest antivirus definition file date of the product or the current system date. If unchecked, Cisco ISE allows you to check only the version of the antivirus definition file using the Check against latest AV definition file version, if available option. |
|
days older than |
Define the number of days that the latest antivirus definition file date on the client can be older from the latest antivirus definition file date of the product or the current system date. The default value is zero (0). |
|
latest file date |
Choose to check the antivirus definition file date on the client, which can be older by the number of days that you define in the days older than field. If you set the number of days to the default value (0), then the antivirus definition file date on the client should not be older than the latest antivirus definition file date of the product. |
|
current system date |
Choose to check the antivirus definition file date on the client, which can be older by the number of days that you define in the days older than field. If you set the number of days to the default value (0), then the antivirus definition file date on the client should not be older than the current system date. |
|
Products for Selected Vendor |
Choose an antivirus product from the table. Based on the vendor that you select in the New Anti-virus Condition page, the table retrieves information on their antivirus products and their version, remediation support that they provide, latest definition file date and its version. The selection of a product from the table allows you to check for the installation of an antivirus program, or check for the latest antivirus definition file date, and its latest version. |
Antispyware Compound Condition Settings
The following table describes the fields in the AS Compound Conditions page. The navigation path for this page is: .
|
Fields |
Usage Guidelines |
|---|---|
|
Name |
Enter the name of the antispyware compound condition that you want to create. |
|
Description |
Enter the description of the antispyware compound condition that you want to create. |
|
Operating System |
Selecting an operating system allows you to check the installation of an antispyware programs on your client, or check the latest antispyware definition file updates to which the condition is applied. |
|
Vendor |
Choose a vendor from the drop-down list. The selection of Vendor retrieves their antispyware products and versions, which are displayed in the Products for Selected Vendor table. |
|
Check Type |
Choose if you want to choose a type whether to check an installation, or check the latest definition file update on the client. |
|
Installation |
Choose if you want to check only the installation of an antispyware program on the client. |
|
Definition |
Choose if you want to check only the latest definition file update of an antispyware product on the client. |
|
Allow virus definition file to be (Enabled) |
Check this check box when you are creating antispyware definition check types, and disabled when creating antispyware installation check types. If checked, the selection allows you to check antispyware definition file version and the latest antispyware definition file date on the client. The latest definition file date cannot be older than that you define in the days older than field from the current system date. If unchecked, the selection allows you to check only the version of the antispyware definition file as the Allow virus definition file to be check box is not checked. |
|
days older than |
Define the number of days that the latest antispyware definition file date on the client can be older from the current system date. The default value is zero (0). |
|
The current system date |
Choose to check the antispyware definition file date on the client, which can be older by the number of days that you define in the days older than field. If you set the number of days to the default value (0), then the antispyware definition file date on the client should not be older than the current system date. |
|
Products for Selected Vendor |
Choose an antispyware product from the table. Based on the vendor that you select in the New Anti-spyware Compound Condition page, the table retrieves information on their antispyware products and their version, remediation support that they provide, latest definition file date and its version. The selection of a product from the table allows you to check for the installation of an antispyware program, or check for the latest antispyware definition file date, and its latest version. |
Antimalware Condition Settings
The antimalware condition is a combination of the antispyware and antivirus conditions and is supported by OESIS version 4.x or later compliance module. The following table describes the fields in the Antimalware Conditions page. The navigation path is: . You can also access the option in the page.
Note |
It is recommended that you manually update the installed Antimalware products to have the latest definitions at least once. Otherwise, the posture checks using AnyConnect for Antimalware definitions will fail. |
|
Field |
Usage Guidelines |
|---|---|
|
Name |
Enter the name of the antimalware condition. |
|
Description |
Enter a description of the antimalware condition. |
|
Compliance Module |
Support for OESIS version 4.x or later. |
|
Operating System |
Select an operating system to check the installation of antimalware programs on your client, or check the latest antimalware definition file updates to which the condition is applied. It supports both MAC and Windows OS. |
|
Vendor |
Choose a vendor from the drop-down list. The selected vendor's antimalware products, versions, latest definition dates, latest definition versions, and the minimum compliance module versions, are displayed in the Products for Selected Vendor table. |
|
Check Type |
Choose whether to check an installation or check the latest definition file update on the client. |
|
Installation |
Choose to check only the installation of an antimalware program on the client. |
|
Definition |
Choose to check only the latest definition file update of an antimalware product on the client. |
|
Check against latest AV definition file version, if available. (Otherwise check against latest definition file date). |
(Available only when you choose Definition check type) Choose to check the antimalware definition file version on the client against the latest antimalware definition file version, if available as a result of posture updates in Cisco ISE. Otherwise, this option allows you to check the definition file date on the client against the latest definition file date in Cisco ISE. This check will only work if there is a value listed in Cisco ISE for the Latest Definition Date or Latest Definition Version field for the selected product. Otherwise, the Current System Date field must be used. |
|
Allow Virus Definition File to be (Enabled) |
(Available only when you choose Definition check type) Choose to check the antimalware definition file version and the latest antimalware definition file date on the client. The latest definition file date cannot be older than that you define in the next field (days older than field) from the latest antimalware definition file date of the product or the current system date. If unchecked, Cisco ISE allows you to check only the version of the antimalware definition file using the Check against latest AV definition file version, if available option. |
|
Days Older Than |
Define the number of days that the latest antimalware definition file date on the client can be older from the latest antimalware definition file date of the product or the current system date. The default value is zero (0). |
|
Latest File Date |
Choose to check the antimalware definition file date on the client, which can be older by the number of days that you define in the days older than field. If you set the number of days to the default value (0), then the antimalware definition file date on the client should not be older than the latest antimalware definition file date of the product. This check will work only if there is a value listed in Cisco ISE for the Latest Definition Date field for the selected product. Otherwise, the Current System Date field must be used. |
|
Current System Date |
Choose to check the antimalware definition file date on the client, which can be older by the number of days that you define in the days older than field. If you set the number of days to the default value (0), then the antimalware definition file date on the client should not be older than the current system date. |
|
Products for Selected Vendor |
Choose an antimalware product from the table. Based on the vendor that you select in the New Antimalware Condition page, the table retrieves information on their antimalware products and their version, remediation support that they provide, latest definition file date and its version. The selection of a product from the table allows you to check for the installation of an antimalware program, or check for the latest antimalware definition file date, and its latest version. |
Dictionary Simple Condition Settings
The following table describes the fields in the Dictionary Simple Conditions page. The navigation path for this page is: .
|
Fields |
Usage Guideline |
|---|---|
|
Name |
Enter the name of the dictionary simple condition that you want to create. |
|
Description |
Enter the description of the dictionary simple condition that you want to create. |
|
Attribute |
Choose an attribute from the dictionary. |
|
Operator |
Choose an operator to associate a value to the attribute that you have selected. |
|
Value |
Enter a value that you want to associate to the dictionary attribute, or choose a predefined value from the drop-down list. |
Dictionary Compound Condition Settings
The following table describes the fields in the Dictionary Compound Conditions page. The navigation path for this page is: .
|
Fields |
Usage Guidelines |
|---|---|
|
Name |
Enter the name of the dictionary compound condition that you want to create. |
|
Description |
Enter the description of the dictionary compound condition that you want to create. |
|
Select Existing Condition from Library |
Define an expression by selecting pre-defined conditions from the policy elements library or add ad-hoc attribute/value pairs to your expression in the subsequent steps. |
|
Condition Name |
Choose dictionary simple conditions that you have already created from the policy elements library. |
|
Expression |
The Expression is updated based on your selection from the Condition Name drop-down list. |
|
AND or OR operator |
Choose an AND, or an OR operator to logically combine dictionary simple conditions, which can be added from the library. Click the Action icon to do the following:
|
|
Create New Condition (Advance Option) |
Select attributes from various system or user-defined dictionaries. You can also add predefined conditions from the policy elements library in the subsequent steps. |
|
Condition Name |
Choose a dictionary simple condition that you have already created. |
|
Expression |
From the Expression drop-down list, you can create a dictionary simple condition. |
|
Operator |
Choose an operator to associate a value to an attribute. |
|
Value |
Enter a value that you want to associate to the dictionary attribute, or choose a value from the drop-down list. |
Patch Management Condition Settings
The following table describes the fields in the Patch Management Conditions page. The navigation path is: .
|
Fields |
Usage Guidelines |
||||
|---|---|---|---|---|---|
|
Name |
Enter a name for the patch management condition. |
||||
|
Description |
Enter a description for the patch management condition. |
||||
|
Operating System |
Select an operating system to check the installation of a patch management software on the endpoint, or check the latest patch management definition file updates to which the condition is applied. You can select the Windows OS or Mac OSX. You can also select more than one version of an operating system to create the patch management condition. |
||||
|
Vendor Name |
Choose a vendor name from the drop-down list. The patch management products of a vendor, and their supported version, check type, and minimum compliant module support are retrieved and displayed in the Products for Selected Vendor table. The list in the table changes according to the selected operating system. |
||||
|
Check Type |
Select any one of the following options:
Click the Products for Selected Vendor drop-down arrow, to view the list of products that the vendor you have specified in the Vendor Name supports. For example, if you have selected Vendor A, that has two products, namely Product 1 and Product 2. Product 1 may support the Enabled option, whereas Product 2 might not. Or, if Product 1 does not support any of the check types, it is grayed out.
|
||||
|
Check Patches Installed |
(Available only when you select the Up To Date check type.) You can configure severity levels for missing patches, which are
then deployed based on the severity. Select any one of the severity levels:
|
Disk Encryption Condition Settings
The following table describes the fields in the Disk Encryption Condition page. The navigation path is: Policy > Policy Elements > Conditions > Posture > Disk Encryption Condition.
|
Fields |
Usage Guidelines |
||
|---|---|---|---|
|
Name |
Enter the name of the disk encryption condition that you want to create. |
||
|
Description |
Enter a description for the disk encryption condition. |
||
|
Operating System |
Select an operating system of the end point, whose disk is to be checked for encryption. You can select the Windows OS or Mac OSX. You can also select more than one version of an operating system to create the disk encryption condition. |
||
|
Vendor Name |
Choose a vendor name from the drop-down list. The data encryption products of a vendor, and their supported version, the encryption state check, and the minimum compliant module support are retrieved and displayed in the Products for Selected Vendor table. The list in the table changes according to the selected operating system. |
||
|
Location |
Enabled only when an option is checked in the Products for Selected Vendor section. Select any one of the following options:
|
||
|
Encryption State |
The Encryption State checkbox is disabled when the selected product does not support encryption state check. The repeater is displayed only when the checkbox is checked. You can select the Fully Encrypted option to check if the client's disk drive is wholly encrypted. If you create a condition, for example for TrendMicro, and select two vendors—one with the Encryption State "Yes" and another with the Encryption State "No", then the Encryption State will be disabled because one of the Vendor Encryption State is "No".
|
USB Condition Settings
The following table describes the fields in the USB Condition page. The navigation path is: . You can also navigate to the page.
The USB check is a pre-defined condition and supports only Windows OS.
|
Fields |
Usage Guidelines |
|---|---|
|
Name |
USB_Check |
|
Description |
Cisco pre-defined check |
|
Operating System |
Windows |
|
Compliance Module |
A display-only field for ISE posture compliance module support for version 4.x (and later). |
Hardware Attributes Condition Settings
Choose to access the Hardware Attributes Condition page. The following table describes the fields in the Hardware Attributes Condition page.
|
Fields |
Usage Guidelines |
|---|---|
|
Name |
Hardware_Attributes_Check-The default name assigned to the condition. |
|
Description |
Cisco pre-defined check that collects hardware attributes from clients. |
|
Operating System |
Windows All or Mac OS |
|
Compliance Module |
4.x or later |
Configure Posture Policies
A posture policy is a collection of posture requirements that are associated with one or more identity groups and operating systems. The Dictionary Attributes are optional conditions that can be used along with the identity groups and the operating systems to define different policies for the devices.
Cisco ISE provides an option to configure the grace time for the devices that are noncompliant. If a device is found to be noncompliant, Cisco ISE looks for the previously known good state in the posture assessment result cache and provides grace time for the device accordingly. The device is granted access to the network during the grace period. You can configure the grace time period in minutes, hours, or days (up to a maximum of 30 days).
See Posture Services on the Cisco ISE Configuration Guide for more information.
Note |
|
Before you begin
-
You must understand the AUP.
-
You must understand periodic reassessments (PRA).
Procedure
| Step 1 |
Choose or . |
||
| Step 2 |
Use the drop-down arrow to add a new policy. |
||
| Step 3 |
From the Rule Status drop-down list, choose Enabled or Disabled. |
||
| Step 4 |
Choose the drop-down under Policy Options, and specify the Grace Period Settings in minutes, hours, or days. The valid values are:
|
||
| Step 5 |
(Optional) Drag the slider named Delayed Notification to delay the grace period prompt from being displayed to the user until a specific percentage of grace period has elapsed. For example, if the notification delay period is set to 50% and the configured grace period is 10 minutes, Cisco ISE checks the posture status after 5 minutes and displays the grace period notification if the endpoint is found to be noncompliant. Grace period notification is not displayed if the endpoint status is compliant. If the notification delay period is set to 0%, the user is prompted immediately at the beginning of the grace period to remediate the problem. However, the endpoint is granted access until the grace period expires. The default value for this field is 0%. The valid range is from 0 to 95%. |
||
| Step 6 |
In the Rule Name field, enter the name of the policy.
|
||
| Step 7 |
From the Identity Groups column, select the desired identity group. You can create posture policies based on user or end-point identity groups. |
||
| Step 8 |
From the Operating Systems column, select the operating system. |
||
| Step 9 |
From the Compliance Module column, select the required compliance module:
|
||
| Step 10 |
From the Posture Type column, select the Posture Type.
|
||
| Step 11 |
In Other Conditions, you can add one or more dictionary attributes and save them as simple or compound conditions to a dictionary.
|
||
| Step 12 |
Specify the requirements in the Requirements field. |
||
| Step 13 |
Click Save. |
Prerequisite for Certificate-Based Conditions
Client Provisioning and Posture Policy rules may include conditions based on certificate attributes. A prerequisite for certificate-based conditions in either the Client Provisioning or Posture Policy is to ensure that there is a matching Authorization Policy rule based on the same certificate attribute.
For example, you should use the same attribute as shown in the figures, the Issuer – Common Name attribute is used in both Client Provisioning or posture and authorization policies.
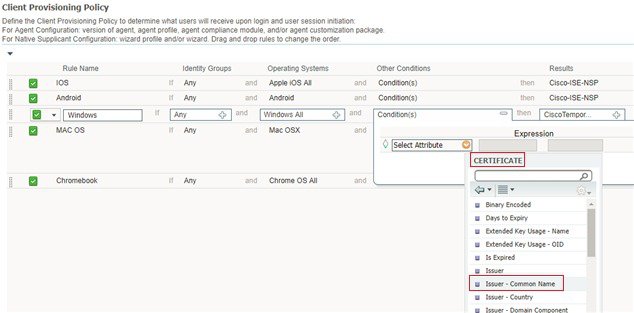
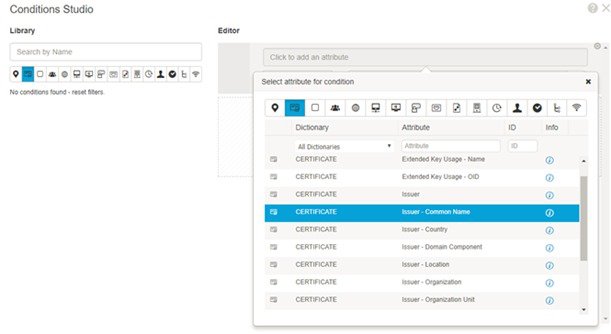
Note |
ISE server certificate must be trusted in the System Certificate store for AnyConnect 4.6 MR2 and above. Any posture check or remediation that requires elevated privileges will not work if the server is untrusted.
|
Default Posture Policies
The Cisco ISE software comes with a number of pre-configured posture policies (Policy > Posture) that make it easier for you to create the posture policies and profiles. These policies are disabled by default. You can enable these policies based on your requirements. Listed below are some of the default posture policies.
|
Rule Name |
Description |
Requirements |
|---|---|---|
|
Default_Antimalware_Policy_Mac |
Checks if endpoints have any of the supported vendor’s antimalware software (that is recognized by AnyConnect) installed and running in their devices. |
Any_AM_Installation |
|
Default_Antimalware_Policy_Win |
Checks if endpoints have any of the supported vendor’s antimalware software (that is recognized by AnyConnect) installed and running in their devices. |
Any_AM_Installation_Win |
|
Default_AppVis_Policy_Mac |
Gathers information and reports all the applications that are installed on a given endpoint. |
Default_AppVis_Requirement_Mac |
|
Default_AppVis_Policy_Win |
Gathers information and reports all the applications that are installed on a given endpoint. |
Default_AppVis_Requirement_Win |
|
Default_Firewall_Policy_Mac |
Checks if endpoints have any of the supported vendor’s Firewall program (that is recognized by AnyConnect) installed. |
Default_Firewall_Requirement_Mac |
|
Default_Firewall_Policy_Win |
Checks if endpoints have any of the supported vendor’s Firewall program (that is recognized by AnyConnect) installed. |
Default_Firewall_Requirement_Win |
|
Default_USB_Block_Win |
Ensures that the endpoint device does not have any USB storage devices connected. |
USB_Block |
Client Posture Assessment
To ensure that the imposed network security measures remain relevant and effective, Cisco ISE enables you to validate and maintain security capabilities on any client machine that accesses the protected network. By employing posture policies that are designed to ensure that the most up-to-date security settings or applications are available on client machines, the Cisco ISE administrator can ensure that any client machine that accesses the network meets, and continues to meet, the defined security standards for enterprise network access. Posture compliance reports provide Cisco ISE with a snapshot of the compliance level of the client machine at the time of user login, as well as any time a periodic reassessment occurs.
Posture assessment and compliance occurs using one of the following agent types available in Cisco ISE:
-
AnyConnect ISE Agent—A persistent agent that can be installed on Windows or Mac OS X client to perform posture compliance functions.
-
Cisco Temporal Agent—A temporary executable file that is run on the client to check the compliance status. The agent is removed from the client machine after the login session is terminated. By default, the agent resides in the Cisco ISE ISO image, and is uploaded to Cisco ISE during installation.
Posture Assessment Options
The following table provides a list of posture assessment (posture conditions) options that are supported by the ISE Posture Agents for Windows and Macintosh, and the Web Agent for Windows.
|
ISE Posture Agent for Windows |
Cisco Temporal Agent for Windows |
ISE Posture Agent for Macintosh OS X |
Cisco Temporal Agent for Macintosh OS X |
|---|---|---|---|
|
Operating System/Service Packs/Hotfixes |
— |
— |
— |
|
Service Check |
Service Check (Temporal agent 4.5 and ISE 2.3) |
Service Check (AC 4.1 and ISE 1.4) |
Daemon checks are not supported |
|
Registry Check |
Registry Check (Temporal agent 4.5 and ISE 2.3) |
— |
— |
|
File Check |
File Check (Temporal agent 4.5 and ISE 2.3) |
File Check (AC 4.1 and ISE 1.4) |
File Check (Temporal agent 4.5 and ISE 2.3) |
|
Application Check |
Application Check (Temporal agent 4.5 and ISE 2.3) |
Application Check (AC 4.1 and ISE 1.4) |
Application Check (Temporal agent 4.5 and ISE 2.3) |
|
Antivirus Installation |
Antimalware Installation |
Antivirus Installation |
Antimalware Installation |
|
Antivirus Version/ Antivirus Definition Date |
OPSWAT version 4 is used, hence no Antivirus/Antispyware support; only Antimalware is supported |
Antivirus Version/ Antivirus Definition Date |
OPSWAT version 4 is used, hence no Antivirus/Antispyware support; only Antimalware is supported |
|
Antispyware Installation |
OPSWAT version 4 is used, hence no Antivirus/Antispyware support; only Antimalware is supported |
Antispyware Installation |
OPSWAT version 4 is used, hence no Antivirus/Antispyware support; only Antimalware is supported |
|
Antispyware Version/ Antispyware Definition Date |
OPSWAT version 4 is used, hence no Antivirus/Antispyware support; only Antimalware is supported |
Antispyware Version/ Antispyware Definition Date |
OPSWAT version 4 is used, hence no Antivirus/Antispyware support; only Antimalware is supported |
|
Patch Management Check (AC 4.1 and ISE 1.4) |
Only Patch Management installation check |
Patch Management Check (AC 4.1 and ISE 1.4) |
— |
|
Windows Update Running |
— |
— |
— |
|
Windows Update Configuration |
— |
— |
— |
|
WSUS Compliance Settings |
— |
— |
— |
Posture Remediation Options
The following table provides a list of posture remediation options that are supported by the ISE Posture Agents for Windows and Macintosh, and the Web Agent for Windows.
|
ISE Posture Agent for Windows |
ISE Posture Agent for Macintosh OS X |
|---|---|
|
Message Text (Local Check) |
Message Text (Local Check) |
|
URL Link (Link Distribution) |
URL Link (Link Distribution) |
|
File Distribution |
— |
|
Launch Program |
— |
|
Antivirus Definition Update |
Antivirus Live Update |
|
Antispyware Definition Update |
Antispyware Live Update |
|
Patch Management Remediation (AC 4.1 - and ISE 1.4) |
— |
|
Windows Update |
— |
|
WSUS |
— |
Custom Conditions for Posture
A posture condition can be any one of the following simple conditions: a file, a registry, an application, a service, or a dictionary condition. One or more conditions from these simple conditions form a compound condition, which can be associated with a posture requirement.
After an initial posture update, Cisco ISE also creates Cisco-defined simple and compound conditions. Cisco-defined simple conditions use the pc_ as and compound conditions use pr_ as.
A user-defined condition or a Cisco-defined condition includes both simple and compound conditions.
Posture service makes use of internal checks based on antivirus and antispyware (AV/AS) compound conditions. Hence, posture reports do not reflect the exact AV/AS compound-condition names that you have created. The reports display only the internal check names of AV/AS compound conditions.
For example, if you have created an AV compound condition named "MyCondition_AV_Check" to check any Vendor and any Product, the posture reports will display the internal check, that is “av_def_ANY”, as the condition name, instead of "MyCondition_AV_Check".
Posture End-Point Custom Attributes
You can use the posture endpoint custom attributes to create client provisioning and posture policies. You can create a maximum of 100 endpoint custom attributes. The following types of endpoint custom attributes are supported: Int, String, Long, Boolean, Float, IP, and Date.
Endpoint custom attributes can be used to white list or black list devices based on certain attributes or to assign certain privileges based on the posture or client provisioning polices.
Create Posture Policy Using End-Point Custom Attributes
To create a posture policy using endpoint custom attributes:
Procedure
| Step 1 |
Create the endpoint custom attributes.
|
| Step 2 |
Assign values to the custom attributes. |
| Step 3 |
Create a posture policy using the custom attributes and values.
|
To create a client provisioning policy using endpoint custom attributes:
-
Choose Work Centers > Posture > Client Provisioning > Client Provisioning Policy.
-
Create the required policy.
-
Create the required rule (for example, Rule Name=WindowsAll, if Identity Groups=Any and Operating Systems=Windows All and Other Conditions=Conditions, then Results=AC_Win_44117).
-
Choose the custom attributes by clicking Other Conditions and selecting the required dictionary.
-
Custom Posture Remediation Actions
A custom posture remediation action is a file, a link, an antivirus or antispyware definition updates, launching programs, Windows updates, or Windows Server Update Services (WSUS) remediation types.
Add a File Remediation
A file remediation allows clients to download the required file version for compliance. The client agent remediates an endpoint with a file that is required by the client for compliance.
You can filter, view, add, or delete file remediations in the File Remediations page, but you cannot edit file remediations. The File Remediations page displays all the file remediations along with their name and description and the files that are required for remediation.
Procedure
| Step 1 |
Choose > Posture. |
| Step 2 |
Click Remediation Actions. |
| Step 3 |
Click File Remediation. |
| Step 4 |
Click Add. |
| Step 5 |
Enter the name and description of the file remediation in the Name and Description fields. |
| Step 6 |
Modify the values in the New File Remediation page. |
| Step 7 |
Click Submit. |
Add a Link Remediation
A link remediation allows clients to click a URL to access a remediation page or resource. The client agent opens a browser with the link and allow the clients to remediate themselves for compliance.
The Link Remediation page displays all the link remediations along with their name and description and their modes of remediation.
Procedure
| Step 1 |
Choose > Posture. |
| Step 2 |
Click Remediation Actions. |
| Step 3 |
Click Link Remediation. |
| Step 4 |
Click Add. |
| Step 5 |
Modify the values in the New Link Remediation page. |
| Step 6 |
Click Submit. |
Add a Patch Management Remediation
You can create a patch management remediation, which updates clients with up-to-date file definitions for compliance after remediation.
The Patch Management Remediation page displays the remediation type, patch management vendor names, and various remediation options.
Procedure
| Step 1 |
Choose > Posture. |
| Step 2 |
Click Remediation Actions. |
| Step 3 |
Click Patch Mangement Remediation. |
| Step 4 |
Click Add. |
| Step 5 |
Modify the values in the Patch Management Remediation page. |
| Step 6 |
Click Submit to add the remediation action to the Patch Management Remediations page. |
Add an Antivirus Remediation
You can create an antivirus remediation, which updates clients with up-to-date file definitions for compliance after remediation.
The AV Remediations page displays all the antivirus remediations along with their name and description and their modes of remediation.
Procedure
| Step 1 |
Choose > Posture. |
| Step 2 |
Click Remediation Actions. |
| Step 3 |
Click AV Remediation. |
| Step 4 |
Click Add. |
| Step 5 |
Modify the values in the New AV Remediation page. |
| Step 6 |
Click Submit. |
Add an Antispyware Remediation
You can create an antispyware remediation, which updates clients with up-to-date file definitions for compliance after remediation.
The AS Remediations page displays all the antivirus remediations along with their name and description and their modes of remediation.
Procedure
| Step 1 |
Choose > Posture. |
| Step 2 |
Click Remediation Actions. |
| Step 3 |
Click AS Remediation. |
| Step 4 |
Click Add. |
| Step 5 |
Modify the values in the New AS Remediations page. |
| Step 6 |
Click Submit. |
Add a Launch Program Remediation
You can create a launch program remediation, where the client agent remediates clients by launching one or more applications for compliance.
The Launch Program Remediations page displays all the launch program remediations along with their name and description and their modes of remediation.
Procedure
| Step 1 |
Choose > Posture. |
| Step 2 |
Click Remediation Actions. |
| Step 3 |
Click Launch Program Remediation. |
| Step 4 |
Click Add. |
| Step 5 |
Modify the values in the New Launch Program Remediation page. |
| Step 6 |
Click Submit. |
Troubleshoot Launch Program Remediation
Problem
When an application is launched as a remediation using Launch Program Remediation, the application is successfully launched (observed in the Windows Task Manager), however, the application UI is not visible.
Solution
The Launch program UI application runs with system privileges, and is visible in the Interactive Service Detection (ISD) window. To view the Launch program UI application, ISD should be enabled for the following OS:
-
Windows Vista: ISD is in stop state by default. Enable ISD by starting ISD service in services.msc.
-
Windows 7: ISD service is enabled by default.
-
Windows 8/8.1: Enable ISD by changing "NoInteractiveServices" from 1 to 0 in the registry: \HKEY_LOCAL_MACHINE \ SYSTEM \ CurrentControlSet \ Control \ Windows.
Add a Windows Update Remediation
The Windows Update Remediations page displays all the Windows update remediations along with their name and description and their modes of remediation.
Procedure
| Step 1 |
Choose |
| Step 2 |
Click Remediation Actions. |
| Step 3 |
Click Windows Update Remediation. |
| Step 4 |
Click Add. |
| Step 5 |
Modify the values in the New Windows Update Remediation page. |
| Step 6 |
Click Submit. |
Add a Windows Server Update Services Remediation
You can configure Windows clients to receive the latest WSUS updates from a locally administered or a Microsoft-managed WSUS server for compliance. A Windows Server Update Services (WSUS) remediation installs latest Windows service packs, hotfixes, and patches from a locally managed WSUS server or a Microsoft-managed WSUS server.
You can create a WSUS remediation where the client agent integrates with the local WSUS Agent to check whether the endpoint is up-to-date for WSUS updates.
Procedure
| Step 1 |
Choose > Posture. |
| Step 2 |
Click Remediation Actions. |
| Step 3 |
Click Windows Server Update Services Remediation. |
| Step 4 |
Click Add. |
| Step 5 |
Modify the values in the New Windows Server Update Services Remediation page. |
| Step 6 |
Click Submit. |
Posture Assessment Requirements
A posture requirement is a set of compound conditions with an associated remediation action that can be linked with a role and an operating system. All the clients connecting to your network must meet mandatory requirements during posture evaluation to become compliant on the network.
Posture-policy requirements can be set to mandatory, optional, or audit types in posture policies. If requirements are optional and clients fail these requirements, then the clients have an option to continue during posture evaluation of endpoints.
Posture checks are evaluated in the order of mandatory, optional, and audit. If a mandatory check fails, the related audit checks will not be carried out.
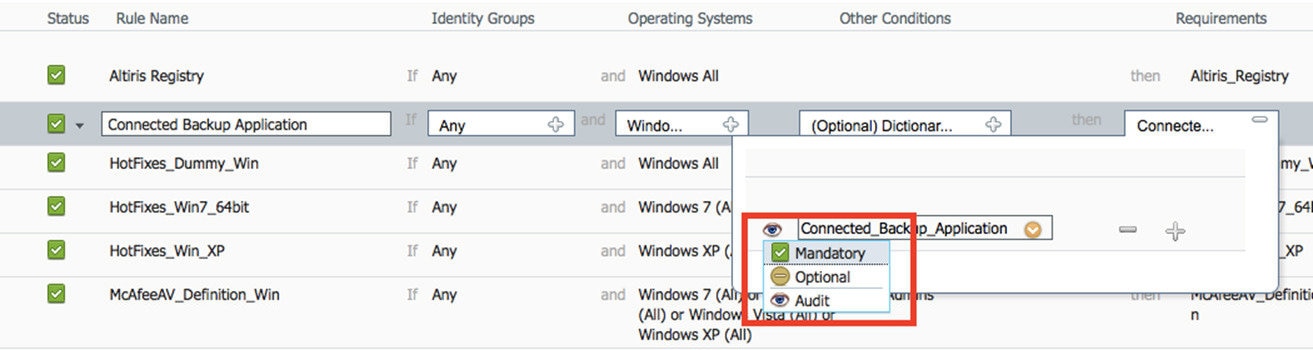
Mandatory Requirements
During policy evaluation, the agent provides remediation options to clients who fail to meet the mandatory requirements defined in the posture policy. End users must remediate to meet the requirements within the time specified in the remediation timer settings.
For example, you have specified a mandatory requirement with a user-defined condition to check the existence of C:\temp\text.file in the absolute path. If the file does not exist, the mandatory requirement fails and the user will be moved to Non-Compliant state.
Optional Requirements
During policy evaluation, the agent provides an option to clients to continue, when they fail to meet the optional requirements specified in the posture policy. End users are allowed to skip the specified optional requirements.
For example, you have specified an optional requirement with a user-defined condition to check for an application running on the client machine, such as Calc.exe. Although, the client fails to meet the condition, the agent prompts an option to continue further so that the optional requirement is skipped and the end user is moved to Compliant state.
Audit Requirements
Audit requirements are specified for internal purposes and the agent does not prompt any message or input from end users, regardless of the pass or fail status during policy evaluation.
For example, you are in the process of creating a mandatory policy condition to check if end users have the latest version of the antivirus program. If you want to find out the non-compliant end users before actually enforcing it as a policy condition, you can specify it as an audit requirement.
Visibility Requirements
During policy evaluation, the agent reports compliance data for visibility requirements, every 5 to 10 minutes.
Client System Stuck in Noncompliant State
If a client machine is unable to remediate a mandatory requirement, the posture status changes to “noncompliant” and the agent session is quarantined. To get the client machine past this “noncompliant” state, you need to restart the posture session so that the agent starts posture assessment on the client machine again. You can restart the posture session as follows:
-
In wired and wireless Change of Authorization (CoA) in an 802.1X environment:
-
You can configure the Reauthentication timer for a specific authorization policy when you create a new authorization profile in the New Authorization Profiles page.“Configuring Permissions for Downloadable ACLs” section on page 20-11 for more information.
-
Wired users can get out of the quarantine state once they disconnect and reconnect to the network. In a wireless environment, the user must disconnect from the wireless lan controller (WLC) and wait until the user idle timeout period has expired before attempting to reconnect to the network.
-
-
In a VPN environment—Disconnect and reconnect the VPN tunnel.
Create Client Posture Requirements
You can create a requirement in the Requirements page where you can associate user-defined conditions and Cisco defined conditions, and remediation actions. Once created and saved in the Requirements page, user-defined conditions and remediation actions can be viewed from their respective list pages.
Before you begin
-
You must have an understanding of acceptable use policies (AUPs) for a posture.
Procedure
| Step 1 |
Choose . |
| Step 2 |
Enter the values in the Requirements page. |
| Step 3 |
Click Done to save the posture requirement in read-only mode. |
| Step 4 |
Click Save. |
Posture Reassessment Configuration Settings
The following table describes the fields in the Posture Reassessment Configurations Page, which you can use to configure posture reassessment. The navigation path for this page is: .
|
Fields |
Usage Guidelines |
||
|---|---|---|---|
|
Configuration Name |
Enter the name of PRA configuration. |
||
|
Configuration Description |
Enter a description for PRA configuration. |
||
|
Use Reassessment Enforcement? |
Check the check box to apply the PRA configurations for the user identity groups. |
||
|
Enforcement Type |
Choose the action to be enforced:
|
||
|
Interval |
Enter a time interval in minutes to initiate PRA on the clients after the first successful login. The default value is 240 minutes. Minimum value is 60 minutes and maximum is 1440 minutes. |
||
|
Grace time |
Enter a time interval in minutes to allow the client to complete remediation. The grace time cannot be zero, and should be greater than the PRA interval. It can range between the default minimum interval (5 minutes) and the minimum PRA interval. The minimum value is 5 minutes and the maximum value is 60 minutes.
|
||
|
Select User Identity Groups |
Choose a unique group or a unique combination of groups for your PRA configuration. |
||
|
PRA configurations |
Displays existing PRA configurations and user identity groups associated to PRA configurations. |
Custom Permissions for Posture
A custom permission is a standard authorization profile that you define in Cisco ISE. Standard authorization profiles set access privileges based on the matching compliance status of the endpoints. The posture service broadly classifies the posture into unknown, compliant, and noncompliant profiles. The posture policies and the posture requirements determine the compliance status of the endpoint.
You must create three different authorization profiles for an unknown, compliant, and noncompliant posture status of endpoints that can have different set of VLANs, DACLs and other attribute value pairs. These profiles can be associated with three different authorization policies. To differentiate these authorization policies, you can use the Session:PostureStatus attribute along with other conditions.
Unknown Profile
If no matching posture policy is defined for an endpoint, then the posture compliance status of the endpoint may be set to unknown. A posture compliance status of unknown can also apply to an endpoint where a matching posture policy is enabled but posture assessment has not yet occurred for that endpoint and, therefore no compliance report has been provided by the client agent.
Compliant Profile
If a matching posture policy is defined for an endpoint, then the posture compliance status of the endpoint is set to compliant. When the posture assessment occurs, the endpoint meets all the mandatory requirements that are defined in the matching posture policy. For an endpoint that is postured compliant, it can be granted privileged network access on your network.
Noncompliant Profile
The posture compliance status of an endpoint is set to noncompliant when a matching posture policy is defined for that endpoint but it fails to meet all the mandatory requirements during posture assessment. An endpoint that is postured noncompliant matches a posture requirement with a remediation action, and it should be granted limited network access to remediation resources in order to remediate itself.
Configure Standard Authorization Policies
You can define two types of authorization policies on the Authorization Policy page, standard exceptions authorization policies. The standard authorization policies that are specific to posture are used to make policy decisions based on the compliance status of endpoints.
Procedure
| Step 1 |
Choose . |
| Step 2 |
In theView column, click the arrow icon adjacent the corresponding Default Policy. |
| Step 3 |
In the Actions column, click the cog icon, and then from the dropdown list, choose a new authorization policy A new row appears in the Policy Sets table.
|
| Step 4 |
Enter a rule name. |
| Step 5 |
From the Conditions column, click the (+) symbol. |
| Step 6 |
Create the required conditions on the Conditions Studio Page. In the Editor section, click the Click To Add an Attribute text box, and select the required Dictionary and Attribute. You can drag and drop a Library condition to the Click To Add An Attribute text box. |
| Step 7 |
Click Use to create a new standard authorization policy in read-only mode. |
| Step 8 |
Click Save. |
Best Practices for Network Drive Mapping with Posture
During posture assessment of a Windows endpoint, the endpoint user may encounter a delay in accessing the desktop. This may be due to Windows trying to restore the file server drive letter mappings before providing the user access to the desktop. The best practices to avoid the delay during posture are:
-
Endpoints should be able to reach the Active Directory server because the file server drive letter cannot be mapped without reaching the AD. When posture (with AnyConnect ISE posture agent) triggers, it blocks access to AD, causing delay in login. Use Posture Remediation ACLs to provide access to AD servers before posture is completed.
-
You should set a delay for the login script until posture completes and then you have to set the Persistence attribute to NO. Windows tries to reconnect all the network drives during login and this cannot be done until AnyConnect ISE posture agent gains full network access.
AnyConnect Stealth Mode Workflow
The process of configuring AnyConnect in the stealth mode involves a series of steps. You should perform the following steps in Cisco ISE.
Procedure
| Step 1 |
Create an AnyConnect agent profile, see Create an AnyConnect agent profile. |
| Step 2 |
Create an AnyConnect Configuration for AnyConnect Packages, see Create the AnyConnect configuration. |
| Step 3 |
Upload a Open DNS Profile in Cisco ISE, see Upload a Open DNS profile in Cisco ISE. |
| Step 4 |
Create a Client Provisioning Policy, see Create a client provisioning policy. |
| Step 5 |
Create a Posture Condition, see Create the posture condition. |
| Step 6 |
Create Posture Remediation, see Create the posture remediation. |
| Step 7 |
Create Posture Requirement in Clientless Mode, see Create the posture requirement in Clientless mode. |
| Step 8 |
Create Posture Policy, see Create the posture policy. |
Create an AnyConnect Agent Profile
Before you begin
You must upload the AnyConnect Cisco packages for MAC and Windows OS and the AnyConnect compliance modules.
Procedure
| Step 1 |
Choose page. |
| Step 2 |
From the Add drop-down list, choose Nac Agent or AnyConnect Posture Profile. |
| Step 3 |
From the Posture Agent Profile Settings drop-down list, choose AnyConnect. |
| Step 4 |
In the Name field, type the required name (for example, AC_Agent_Profile). |
| Step 5 |
In the Agent Behavior section, select the Stealth Mode parameter as Enabled . |
| Step 6 |
Click Save. |
What to do next
You should create the AnyConnect configuration for the AnyConnect packages.
Create an AnyConnect Configuration for AnyConnect Packages
Procedure
| Step 1 |
Navigate to the page. |
| Step 2 |
From the Add drop-down list, choose AnyConnect Configuration. |
| Step 3 |
From the Select AnyConnect Package drop-down list, choose the required AnyConnect package (for example, AnyConnectDesktopWindows 4.4.117.0). |
| Step 4 |
In the Configuration Name text box, type the required Name (for example, AC_Win_44117). |
| Step 5 |
In the Compliance Module drop-down list, choose the required compliance module (for example, AnyConnectComplianceModuleWindows 4.2.437.0). |
| Step 6 |
In the AnyConnect Module Selection section, check the ISE Posture and Network Access Manager check boxes. |
| Step 7 |
In the Profile Selection section, from the ISE Posture drop-down list, choose the AnyConnect agent profile (for example, AC_Agent_Profile). |
| Step 8 |
From the Network Access Manager drop-down list, choose the required AnyConnect agent profile (for example, AC_Agent_Profile). |
What to do next
You should upload the Open DNS profile to be pushed to the client.
Upload a Open DNS Profile in Cisco ISE
The Open DNS profile is pushed to the client.
Procedure
| Step 1 |
Navigate to the page. |
| Step 2 |
From the Add drop-down list, choose Agent Resources From Local Disk. |
| Step 3 |
From the Category drop-down list, choose Customer Created Packages. |
| Step 4 |
From the Type drop-down list, choose AnyConnect Profile. |
| Step 5 |
In the Name text box, type the required name (for example, OpenDNS). |
| Step 6 |
Click Browse and locate the JSON file from the local disk. |
| Step 7 |
Click Submit. |
What to do next
You should create the client provisioning policy.
Create a Client Provisioning Policy
Procedure
| Step 1 |
Navigate to the page. |
| Step 2 |
Create the required rule (for example, Rule Name=WindowsAll, if Identity Groups=Any and Operating Systems=Windows All and Other Conditions=Conditions, then Results=AC_Win_44117). |
What to do next
You should create the posture condition.
Create a Posture Condition
Procedure
| Step 1 |
Navigate to the . |
| Step 2 |
Enter the required name (for example, filechk). |
| Step 3 |
From the Operating Systems drop-down list, choose Windows 7 (All). |
| Step 4 |
From the File Type drop-down list, choose FileExistence. |
| Step 5 |
From the File Path drop-down list, choose ABSOLUTE_PATH C:\test.txt. |
| Step 6 |
From the File Operator drop-down list, choose DoesNotExist. |
What to do next
You should create the posture remediation.
Create Posture Remediation
The file condition checks if test.txt file exists on the endpoint. If it does not exist, the remediation is to block the USB port and prevent the installation of the file using a USB device.
Procedure
| Step 1 |
Navigate to the page. |
| Step 2 |
Enter the required name (for example, clientless_mode_block). |
| Step 3 |
Click Submit. |
What to do next
You should create the posture requirement.
Create Posture Requirement in Stealth Mode
When you create a Remediation action from the Requirements page, only the remediations that are applicable to stealth mode are displayed: Anti-Malware, Launch Program, Patch Management, USB, Windows Server Update Services, and Windows Update.
Procedure
| Step 1 |
Navigate to the page. |
| Step 2 |
Create the required posture requirement (for example, Name=win7Req for Operating Systems=Windows7(All) using Compliance Module=4.x or later using Posture Type=AnyConnect Stealth met if Condition=filechk then Remediation Actions=clientless_mode_block). |
What to do next
You should create the posture policy.
Create Posture Policy
Before you begin
Ensure that the posture policy requirement and the policy are created in the clientless mode.
Procedure
| Step 1 |
Choose . |
||
| Step 2 |
Create the required rule. For example, if Identity Groups=Any and Operating Systems=Windows 7(All) and Compliance Module=4.x or later and Posture Type=AnyConnect Stealth then Requirements=win7Req.
|
Enable AnyConnect Stealth Mode Notifications
Cisco ISE provides several new failure notifications for AnyConnect stealth mode deployments. Enabling failure notifications in stealth mode helps you to identify issues with wired, wireless, or VPN connections. To enable notifications in stealth mode:
Note |
AnyConnect version 4.5.0.3040 supports stealth mode notifications. |
Before you begin
Configure AnyConnect in stealth mode.
Procedure
| Step 1 |
Choose . |
| Step 2 |
Choose . |
| Step 3 |
From the Select a Category drop-down list, choose AnyConnect. |
| Step 4 |
From the Agent Behavior section, choose Enabled for the Enable notifications in stealth mode option. |
Cisco Temporal Agent Workflow
The process of configuring the Cisco temporal agent involves a series of steps. You should perform the following steps in Cisco ISE.
Procedure
| Step 1 | |
| Step 2 | |
| Step 3 | |
| Step 4 | |
| Step 5 |
Create Posture Condition
Procedure
| Step 1 |
Navigate to the . |
| Step 2 |
Enter the required name (for example, filecondwin). |
| Step 3 |
From the Operating Systems drop-down list, choose Windows 7 (All). |
| Step 4 |
From the File Type drop-down list, choose FileExistence. |
| Step 5 |
From the File Path drop-down list, choose ABSOLUTE_PATH C:\test.txt. |
| Step 6 |
From the File Operator drop-down list, choose DoesNotExist. |
Create Posture Requirements
Procedure
| Step 1 |
Choose |
||
| Step 2 |
From the Edit drop-down list, choose Insert New Requirement. |
||
| Step 3 |
Enter the Name, Operating Systems, and Compliance Module (for example, Name filereqwin, Operating Systems Windows All, Compliance Module 4.x or later). |
||
| Step 4 |
In the Posture Type drop-down, choose Temporal Agent. |
||
| Step 5 |
Select the required condition (for example, filecondwin).
|
||
| Step 6 |
Select the Message Text Only remediation action.
|
Create the Posture Policy
Procedure
| Step 1 |
Choose . |
| Step 2 |
Create the required rule (for example, Name=filepolicywin, Identity Groups=Any, Operating Systems=Windows All, Compliance Module=4.x or later, Posture Type=Temporal Agent, and Requirements=filereqwin). |
Configure the Client Provisioning Policy
Procedure
| Step 1 |
Choose . |
| Step 2 |
Create the required rule (for example, Rule Name=Win, Identity Groups=Any, Operating Systems=Windows All, Other Conditions=Conditions, Results=CiscoTemporalAgentWindows4.5). |
Download and Launch Cisco Temporal Agent
Procedure
| Step 1 |
Connect to the SSID. |
| Step 2 |
Launch a Browser and you will be redirected to the Client Provisioning Portal. |
| Step 3 |
Click Start. This checks if the Cisco Temporal agent is installed and running. |
| Step 4 |
Click This Is My First Time Here. |
| Step 5 |
Choose Click Here to Download and Launch Cisco Temporal Agent. |
| Step 6 |
Save the Cisco Temporal Agent .exe or .dmg file for Windows or Mac OSX respectively. For Windows, run the .exe file and for Mac OSX, double-click the .dmg file and run the acisetempagent app. The Cisco Temporal Agent scans the client and displays the results, such as Red cross marks for non-compliant checks.
|
Posture Troubleshooting Tool
The Posture Troubleshooting tool helps you find the cause of a posture-check failure to identify the following:
-
Which endpoints were successful in posture and which were not.
-
If an endpoint failed in posture, what steps failed in the posture process.
-
Which mandatory and optional checks passed and failed.
You determine this information by filtering requests based on parameters, such as username, MAC address, and posture status.
Configure Client Provisioning in Cisco ISE
Enable client provisioning to allow users to download client provisioning resources and configure agent profiles. You can configure agent profiles for Windows clients, Mac OS X clients, and native supplicant profiles for personal devices. If you disable client provisioning, users attempting to access the network will receive a warning message indicating that they are not able to download client provisioning resources.
Before you begin
If you are using a proxy, and hosting client provisioning resources on a remote system, verify that the proxy allows clients to access that remote location.
Procedure
| Step 1 |
Choose or . |
| Step 2 |
From the Enable Provisioning drop-down list, choose Enable or Disable . |
| Step 3 |
From the Enable Automatic Download drop-down list, choose Enable . Feed downloads include all the available client provisioning resources.Some of of these resources may not be pertinent to your deployment. Cisco recommends manually downloading resources whenever possible instead of setting this option. |
| Step 4 |
Update Feed URL—Specify the URL where Cisco ISE searches for system updates in the Update Feed URL text box. For example, the default URL for downloading client-provisioning resources is https://s3.amazonaws.com/ise-posture-artifacts/ise/provisioning-update.xml. |
| Step 5 |
Native Supplicant Provisioning Policy Unavailable—When there is no client provisioning resource for a device, decide here how to proceed in the flow:
|
| Step 6 |
Click Save . |
What to do next
Configure client provisioning resource policies.
Client Provisioning Resources
Client provisioning resources are downloaded to endpoints after the endpoint connects to the network. Client provisioning resources consist of compliance and posture agents for desktops, and native supplicant profiles for phones and tablets. Client provisioning policies assign these provisioning resources to endpoints to start a network session.
Client provisioning resources are listed on . The following resource types can be added to the list by clicking the Add button:
-
Agent resources from Cisco Site—Select the NAC, AnyConnect, and Supplicant Provisioning wizards you want to make available for client provisioning policies. Cisco periodically updates this list of resources, adding new ones and updating existing ones. You can also set up ISE to download all the Cisco resources and resource updates automatically, see Configure Client Provisioning in Cisco ISE for more information.
-
Agent resources from local disk—Select resources on your PC that you want to upload to ISE, see Add Cisco Provided Client Provisioning Resources from a Local Machine.
-
AnyConnect Configuration—Select the AnyConnect PC clients that you want to make available for client provisioning. See Create AnyConnect Configuration for more information.
-
Native Supplicant Profile—Configure a supplicant profile for phones and tablets that contains settings for your network. For more information, see Create Native Supplicant Profiles.
-
NAC Agent or AnyConnect ISE Posture Profile—Configure the NAC agent and AnyConnect ISE Posture here when you don't want to create and distribute agent XML profiles. For more information about the AnyConnect ISE Posture agent and ISE Posture Profile Editor, see the AnyConnect Administrators Guide for your version of AnyConnect https://www.cisco.com/c/en/us/support/security/anyconnect-secure-mobility-client/products-installation-and-configuration-guides-list.html.
After creating client provisioning resources, create client provisioning policies that apply the client provisioning resources to the endpoints. See Configure Client Provisioning Resource Policies.
Add Client Provisioning Resources from Cisco
You can add client provisioning resources from Cisco.com for AnyConnect and Cisco NAC Agent for Windows and MAC OS x clients, and Cisco Web agent. Depending on the resources that you select and available network bandwidth, Cisco ISE can take a few minutes, to download client provisioning resources to Cisco ISE.
Before you begin
-
Ensure that you have configured the correct proxy settings in Cisco ISE.
-
Enable client provisioning in Cisco ISE.
Procedure
| Step 1 |
Choose . |
| Step 2 |
Choose . |
| Step 3 |
Select one or more required client provisioning resources from the list available in the Download Remote Resources dialog box. |
| Step 4 |
Click Save . |
What to do next
After you have successfully added client provisioning resources to Cisco ISE, you can begin to configure client provisioning resource policies.
Add Cisco Provided Client Provisioning Resources from a Local Machine
Before you begin
Be sure to upload only current, supported resources to Cisco ISE. Older, unsupported resources (older versions of the Cisco NAC Agent, for example) will likely cause serious issues for client access.
If you are downloading the resource files manually from the Cisco.com, refer to “Cisco ISE Offline Updates” section in the Release Notes.
Procedure
| Step 1 |
Choose . |
| Step 2 |
Choose . |
| Step 3 |
Choose Cisco Provided Packages from the Category drop-down. |
| Step 4 |
Click Browse to the directory on your local machine where the resource file that you want to download to Cisco ISE resides. You can add
AnyConnect, Cisco NAC Agent, and Cisco Web Agent resources that you have
previously downloaded from Cisco site in your local machine.
|
| Step 5 |
Click Submit . |
What to do next
After you have successfully added client provisioning resources to Cisco ISE, you can begin to configure client provisioning resource policies.
Add Customer Created Resources for AnyConnect from a Local Machine
Add customer created resources like AnyConnect customization and localization packages and AnyConnect profiles from the local machine to Cisco ISE.
Before you begin
Ensure that customer created resources for AnyConnect are zipped files and available in your local disk.
Procedure
| Step 1 |
Choose . |
| Step 2 |
Click Add. |
| Step 3 |
Choose Agent Resources from local disk. |
| Step 4 |
Choose Customer Created Packages from the Category drop-down. |
| Step 5 |
Enter the name and description for AnyConnect resources. |
| Step 6 |
Click Browse to the directory on your local machine where the resource file that you want to download to Cisco ISE resides. |
| Step 7 |
Choose the following AnyConnect resources to upload to Cisco ISE:
|
| Step 8 |
Click Submit. The
Uploaded AnyConnect Resources table displays AnyConnect resources that you add
to Cisco ISE.
|
What to do next
Create AnyConnect agent profile
Create Native Supplicant Profiles
You can create native supplicant profiles to enable users to bring their own devices into the Cisco ISE network. When the user signs in, Cisco ISE uses the profile that you associated with that user’s authorization requirements to choose the necessary supplicant provisioning wizard. The wizard runs and sets up the user’s personal device to access the network.
Note |
The provisioning wizard only configures interfaces which are active. Because of this, users with Wired and Wireless connections will not be provisioned for both interfaces, unless they are both active. |
Before you begin
-
If you intend to use a TLS device protocol for remote device registration, set up at least one Simple Certificate Enrollment Protocol (SCEP) profile.
-
Open up TCP port 8909 and UDP port 8909 to enable installation of Cisco NAC Agent, Cisco NAC Web Agent, and supplicant provisioning wizard. For more information about port usage, see the “Cisco ISE Appliance Ports Reference” appendix in the Cisco Identity Services Engine Hardware Installation Guide.
Procedure
| Step 1 |
Choose . |
| Step 2 |
Choose . |
| Step 3 |
Create a profile, using the descriptions described in Native Supplicant Profile Settings |
What to do next
Enable self-provisioning capabilities that allow employees to directly connect their personal devices to the network, as described in the Support for multiple Guest Portals section.
Native Supplicant Profile Settings
When you choose , and add a Native Supplicant Profile, you will see the following settings.
-
Name—Name of the native supplicant profile that you are creating, and select which operating system(s) this profile should apply to. Each profile defines settings for a network connection that ISE will apply to the client's native supplicant.
Wireless Profile(s)
Configure one or more Wireless profiles, one for each SSID that you want to make available to the client.
-
SSID Name— Name of the SSID that the client will connect to.
-
Proxy Auto-Config File URL—If the client will connect to a proxy to get the network configuration for its supplicant, enter the URL to that proxy server.
-
Proxy Host/IP
-
Proxy Port
-
Security—Configure the client to use WPA or WPA2.
-
Allowed Procotol—Configure which protocol the client should use to connect to the authentication server; PEAP or EAP-TLS.
-
Certificate Template—For TLS, choose one of the certificate templates defined on .
Optional Settings are described in the section Optional Settings - for Windows.
iOS Settings
-
Enable if target network is hidden
Wired Profile
-
Allowed Protocol—Configure which protocol the client should use to connect to the authentication server; PEAP or EAP-TLS.
-
Certificate Template—For TLS, choose one of the certificate templates that defined on Administration System Certificates Certificate Authority Certificate Templates
Optional Settings - for Windows
If you expand Optional, the following fields are also available for Windows clients.
-
Authentication Mode—Decide whether to use User, Machine or both as credentials for authorization.
-
Automatically use logon name and password (and domain if any)—If you selected User for authentication mode, use the logon and password to without prompting the user, if that information is available.
-
Enable Fast Reconnect—Allow a PEAP session to resume without checking user credentials when the session resume feature is enabled in the PEAP protocol options, which is configured on .
-
Enable Quarantine Checks— Check if the client has been quarantined.
-
Disconnect if server does not present cryptobinding TLV—Disconnect if cryptobinding TLV is not supported for the network connection.
-
Do not prompt user to authorize new servers or trusted certification authorities—Automatically accept user certificates; do not prompt the user.
-
Connect even if the network is not broadcasting its name (SSID)—For Wireless profiles only.
Client Provisioning Without URL Redirection for Different Networks
Client provisioning without URL redirection is required when the third party NAC does not support CoA. You can perform client provisioning with and without URL redirection.
Note |
For client provisioning with URL redirection, if the client machine has proxy settings configured, ensure that you add Cisco ISE to the list of exceptions in the browser settings. This setting is applicable for all flows, BYOD, MDM, Guest, and Posture that use URL redirection. For example, on Windows machines, do the following:
|
Given below are the steps you perform to provision an endpoint without redirection for different networks.
Dot1X EAP-TLS
-
Connect the Cisco ISE network with provisioned certification.
-
Open a browser window and type in the provisioning URL: provisioning.cisco.com.
-
Log into the CP portal via internal user, AD, LDAP, or SAML.
AnyConnect performs posture. The endpoint moves to the right network based on posture compliance.
Dot1X PEAP
-
Connect the Cisco ISE network with User Name and Password through NSP
-
Open a browser window and type in the provisioning URL: provisioning.cisco.com.
-
Log into the CP portal via internal user, AD, LDAP, or SAML
AnyConnect performs posture. The endpoint moves to the right network based on posture compliance.
MAB (Wired Networks)
-
Connect the Cisco ISE network.
-
Open a browser window and type in the provisioning URL: provisioning.cisco.com.
-
Log into the CP portal via internal user, AD, LDAP, or SAML.
AnyConnect performs posture. The endpoint moves to the right network based on posture compliance.
MAB (Wireless Networks)
-
Connect the Cisco ISE network
-
Open a browser window and type in the provisioning URL: provisioning.cisco.com.
-
Log into the CP portal via internal user, AD, LDAP, or SAML.
AnyConnect performs posture. Posture starts for wireless 802.1X only.
AMP Enabler Profile Settings
The following table describes the fields in the Advanced Malware Protection (AMP) Enabler Profile page. The navigation path is: .
Click the Add drop-down arrow and select the AMP Enabler Profile.
|
Fields |
Usage Guidelines |
|---|---|
|
Name |
Enter the name of the AMP enabler profile that you want to create. |
|
Description |
Enter a description for the AMP enabler profile. |
|
Install AMP Enabler |
The Check button communicates with the server to verify if the URL is valid. If the URL is valid, a "File found" message is displayed or else an error message is displayed. |
|
Uninstall AMP Enabler |
Uninstalls the AMP for endpoint software from the endpoint. |
|
Add to Start Menu |
Adds a shortcut for the AMP for endpoint software in the Start menu of the endpoint, after the AMP for endpoint software is installed on the endpoint. |
|
Add to Desktop |
Adds an icon for the AMP for endpoint software on the desktop of the endpoint, after the AMP for endpoint software is installed on the endpoint. |
|
Add to Context Menu |
Adds the Scan Now option in the right-click context menu of the endpoint, after the AMP for endpoint software is installed on the endpoint. |
Create an AMP Enabler Profile Using the Embedded Profile Editor
You can create the AMP enabler profile using the ISE embedded profile editor or the standalone editor.
To create the AMP enable profile using the ISE embedded profile editor:
Before you begin
-
Download the AMP for Endpoint software from the SOURCEfire portal and host it on a local server.
-
Import the certificate of the server that hosts the AMP for endpoint software to the ISE certificate store by navigating to Administration > Certificates > Trusted Certificates.
-
Ensure that the AMP Enabler options are selected in the AnyConnect Module Selection and Profile Selection sections in the AnyConnect Configuration page ( Policy > Policy Elements > Results > Client provisioning > Resources > Add > AnyConnect Configuration > Select AnyConnect Package).
-
You must log in to the SOURCEfire portal, create policies for endpoint groups, and download the AMP for endpoint software. The software comes preconfigured with the policies that you have chosen. You must download two images, namely, the redistributable version of the AMP for endpoint software for Windows OS and AMP for endpoint software for Mac OSX. The downloaded software is hosted on a server that is accessible from the enterprise network.
Procedure
| Step 1 |
Choose . |
| Step 2 |
Click the Add drop-down. |
| Step 3 |
Choose AMP Enabler Profile to create a new AMP enabler profile. |
| Step 4 |
Enter the appropriate values in the fields. |
| Step 5 |
Click Submit to save the profile in the Resources page. |
Create an AMP Enabler Profile Using the Standalone Editor
To create an AMP enabler profile using the AnyConnect standalone editor.
Before you begin
You can create an AMP enabler profile by uploading the XML format of the profile using the AnyConnect 4.1 standalone editor.
-
Download the AnyConnect standalone profile editor for Windows and Mac OS from Cisco.com.
-
Launch the standalone profile editor and enter the fields as specified in the AMP Enabler Profile Settings.
-
Save the profile as an XML file in your local disk.
-
Ensure that the AMP Enabler options are selected in the AnyConnect Module Selection and Profile Selection sections in the AnyConnect Configuration page ( Policy > Policy Elements > Results > Client provisioning > Resources > Add > AnyConnect Configuration > Select AnyConnect Package).
Procedure
| Step 1 |
Choose . |
| Step 2 |
Click Add. |
| Step 3 |
Choose Agent resources from local disk. |
| Step 4 |
Choose Customer Created Packages from the Category drop-down. |
| Step 5 |
Choose AMP Enabler Profile from the Type drop-down. |
| Step 6 |
Enter a Name and Description. |
| Step 7 |
Click Browse and select the saved profile (XML file) from the local disk. The following example shows a customized install file. The following example shows a customized uninstall file.
|
| Step 8 |
Click Submit. The newly
created AMP Enabler profile is displayed in the
Resources
page.
|
Troubleshoot Common AMP Enabler Installation Errors
When you enter the SOURCEfire URL in the Windows or MAC Installer text box and click Check, you might encounter any of the following errors:
-
Error Message: The certificate for the server containing the Mac/Windows installer file is not trusted by ISE. Add a trust certificate to Administration > Certificates > Trusted Certificates.
This error message appears if you have not imported the SOURCEfire trusted certificate in to the Cisco ISE certificate store. Obtain a SOURCEfire trusted certificate and import it in to the Cisco ISE trusted certificate store (Administration > Certificates > Trusted Certificates).
-
Error Message: The installer file is not found at this location, this may be due to a connection issue. Enter a valid path in the Installer text box or check your connection.
This error message appears when the server hosting the AMP for Endpoint software is down or if there is a typographic error in the Windows Installer or MAC Installer text box.
-
Error Message: The Windows/Mac installer text box does not contain a valid URL.
This error message appears when you enter a syntactically incorrect URL format.
Cisco ISE Support for Onboarding Chromebook Devices
Chromebook devices are managed devices (managed by the Google domain), unlike other devices (Apple, Windows, Android) and have limited onboarding support. Cisco ISE supports the onboarding of Chromebook devices on a network. Onboarding refers to the process of delivering the required settings and files to an endpoint such that it is able to connect securely to a network after authenticating with Cisco ISE. This process includes certificate provisioning and/or native supplicant provisioning. However, in Chromebook devices, you can only perform certificate provisioning. Native supplicant provisioning is done via the Google Admin Console.
Unmanaged Chromebook devices cannot be onboarded to a secure network.
The entities involved in the Chromebook onboarding process are the:
-
Google Administrator
-
ISE Administrator
-
Chromebook User/Device
-
Google Admin Console (Managed by the Google Administrator)
-
Secures the following licenses:
- Google Apps Administrator license for the Google Admin Console configuration—URL: https://admin.google.com. The Google Admin Console enables an administrator to manage Google services for people in an organization.
- Chromebook device management license—URL: https://support.google.com/chrome/a/answer/2717664?hl=en. A Chromebook device management license is used to configure settings and enforce policies for a specific Chromebook device. It gives the Google Administrator access to device settings to control user access, customize features, configure network access, and more.
-
Facilitates provisioning and enrolling of Chromebook devices with a Google device license.
- Manages Chromebook devices through the Google Admin Console.
- Sets up and manages the Wi-Fi network configuration for each Chromebook user.
- Manages the Chromebook devices by configuring applications and forced extensions to be installed on the Chromebook device. Onboarding the Chromebook device requires the Cisco Network Setup Assistant extensions to be installed in the Chromebook device. This allows the Chromebook device to connect to Cisco ISE and install the ISE certificate. The extension is forcibly installed because the action of certificate installation is allowed only for managed devices.
- Ensures that the Cisco ISE
certificates are installed in the Google Admin Console to provide server
validation and secure connection. The Google administrator decides whether a
certificate should be generated for a device or a user. Cisco ISE provides
options to:
-
Generate the certificate for a single user who does not share the Chromebook device.
-
Generate a certificate for a Chromebook device that is shared by multiple users. Refer to Step 5 in the Configure the Network and Force Extensions in the Google Admin Console section for the required additional configuration.
The Google Administrator installs the ISE server certificate so that ISE is trusted to perform the certificate provisioning on the Chromebook device and also to allow EAP-TLS certificate-based authentication. Google Chrome version 37 and higher supports certificate-based authentication for Chromebook devices. The google administrator needs to load the ISE provisioning application in the Google Admin Console and make it available to the Chromebook devices to get the certificate from ISE.
-
- Ensures that the recommended Google host names are white listed in the ACL definition list configured in the WLC for SSL secure connections. Refer to the recommended host name white list in the Google Support page.
- Defines the native supplicant profile for the Chromebook OS that includes the certificate template structure.
- Creates the necessary authorization rules and client provisioning policies in Cisco ISE for Chromebook users.
- Wipes out the Chromebook device and enrolls it to the Google domain to secure the enforced policy that was defined by the Google administrator.
- Receives the Chromebook device polices and the Cisco Network Setup Assistant forced extension installed by the Google Admin Console.
- Connects to the provisioned SSID, as defined by the Google administrator, opens the browser, displays the BYOD pages, and starts the onboarding process.
- The Cisco Network Setup Assistant installs a client certificate in the Chromebook device, which allows the device to perform EAP-TLS certificate-based authentication.
The Google Admin Console:
The Google Admin Console supports Chromebook device management and allows configuring a secure network and pushing Cisco Network Setup Assistant certificate management extensions to the Chromebook. The extension sends an SCEP request to Cisco ISE and installs the client certificate to allow secure connection and access to the network.
Best Practices for Using Chromebook Device in a Shared Environment
When a Chromebook device is used in a shared environment, such as schools and libraries, the Chromebook device is shared by different users. Some of the best practices that Cisco recommends include:
-
When onboarding a Chromebook device with a specific user (student or professor) name, the user's name will be populated in the Common Name (CN) in the Subject field of the certificate. Also, the shared Chromebook is listed in the My Devices portal under that specific user. Therefore, it is recommended for shared devices to use a shared credential when onboarding, so that devices show up only under the specific user’s My Devices portal listing. The shared account can be administered by the administrator or professor as a separate account to control shared devices.
-
The ISE administrator can create a custom certificate template for shared Chromebook devices and use it in the policy. For example, instead of using the standard certificate template that matches the Subject-Common Name (CN) value, you can specify a Name (for example, chrome-shared-grp1) in the certificate and the same name can be assigned to the Chromebook device. A policy can be designed to match the name to allow or deny access to a Chromebook device.
-
The ISE administrator can create an endpoint group with all the Chromebook devices’ MAC addresses that needs to go through Chromebook onboarding (devices for which access need to be restricted). The authorization rule should call this out along with device type Chromebook—this would allow access to be redirected to the NSP.
Chromebook Onboarding Process
The Chromebook onboarding process involves a series of steps:
Procedure
Configure the Network and Force Extensions in the Google Admin Console
The Google administrator performs the following steps.
Procedure
| Step 1 |
Log in to the Google Admin Console.
|
| Step 2 |
Set up the Wi-Fi network for managed devices. |
| Step 3 |
Create the forced extensions.
|
| Step 4 |
Install the forced extensions. |
| Step 5 |
(Optional) Define the configuration file to install a certificate in a Chromebook device which is shared by multiple users. |
| Step 6 |
(Optional) Install a certificate for a single user who does not share the Chromebook.
|
What to do next
Configure ISE for Chromebook on board.
Configure ISE for Chromebook Onboarding
Before you begin
The ISE administrator must create the required policy in the Policy > Policy Sets page.
Given below is an example of an authorization policy:
Rule Name: Full_Access_After_Onboarding, Conditions: If RegisteredDevices AND Wireless_802.1x AND Endpoints:BYODRegistration EQUALS Yes AND Certificate: Subject Alternative Name Equals RadiusCalling-Station-ID AND Network Access: EAP-Authentication EQUALS EAP-TLS Then CompliantNetworkAccess.
The CompliantNetworkAccess is an authorization result configured in the page.
Procedure
| Step 1 |
Configure the Native Supplicant Profile (NSP) on Cisco ISE. |
| Step 2 |
Map the NSP in the Client Provisioning page. |
Wipe a Chromebook Device
The Chromebook device must be wiped after the Google Admin Console is configured by the Google Administrator. The Chromebook user must wipe the device, which is a one-time process, to force extensions and configure the network settings. You can refer to the following URL: https://support.google.com/chrome/a/answer/1360642 for further information.
The Chromebook user performs the following steps:
Procedure
| Step 1 |
Press Esc-Refresh-Power key combination. The screen displays a yellow exclamation point (!). |
| Step 2 |
Press Ctrl -D key combination to begin dev mode, then press Enter key. The screen displays a red exclamation point. |
| Step 3 |
Press Ctrl -D key combination. The Chromebook deletes its local data, returning to its initial state. The deletion takes approximately 15 minutes. |
| Step 4 |
When the transition completes, press the Spacebar key, then press the Enter key to return to verified mode. |
| Step 5 |
Enroll the Chromebook before signing in. |
What to do next
Enroll Chromebook to the Google Admin Console.
Enroll Chromebook to the Google Admin Console
In order to provision a Chromebook device, the Chromebook user must first enroll in the Google Admin Console page and receive device policies and forced extensions.
Procedure
| Step 1 |
Turn on the Chromebook device and follow the onscreen instructions until you see the sign on screen. Do not sign in yet. |
| Step 2 |
Before signing in to the Chromebook device, press Ctrl-Alt-E key combination. The Enterprise Enrolment screen appears. |
| Step 3 |
Enter your email address and click Next. You will
receive the following message: Your device has successfully been enrolled for
enterprise management.
|
| Step 4 |
Click Done. |
| Step 5 |
Enter the username and password from your Google admin welcome letter, or the username and password for an existing Google Apps user on your account that has eligibility to enroll. |
| Step 6 |
Click Enroll Device. You will receive a confirmation message that the device has been successfully enrolled. Note that the Chromebook enrollment is a one-time process. |
Connect Chromebook to the Cisco ISE Network for BYOD On Boarding
The procedure is for Dual SSID—To connect to a 802.x network using the EAP-TLS protocol, the Chromebook user performs the following steps:
Note |
If you are using Dual SSID—When connecting from 802.x PEAP to an EAP-TLS network, connect to the network by entering your credentials in the network supplicant, not the web browser. |
Procedure
| Step 1 |
In the Chromebook, click Settings. |
| Step 2 |
In the Internet Connection section, click Provisioning Wi-Fi Network, and then click your network. |
| Step 3 |
The credentialed guest portal opens.
|
| Step 4 |
In the BYOD Welcome page, click Start. |
| Step 5 |
In the Device Information field, enter a name and a description for your device. For example, "Personal Devices: Jane's Chromebook Used for School or Shared Devices: Library Chromebook #1 or Classroom 1 Chromebook #1". |
| Step 6 |
Click Continue. |
| Step 7 |
Click Yes in the Cisco Network Setup Assistant dialog box to install the certificate to access the secure network. If the Google Administrator configured secure Wi-Fi, the network connection should happen automatically. If it does not, choose the secure SSID from the list of available networks. Chromebook users who have already enrolled in the domain, and have the Cisco Network Setup Assistant extension, can update the extension without waiting for the auto update. Manually update the extension by performing the following steps.
|
Google Admin Console - Wi-Fi Network Settings
The Wi-Fi network configuration is used to configure an SSID in a customer network or to match the certificate using certificate attributes (for EAP-TLS). When the certificate is installed in the Chromebook, it is synchronized with the Google admin settings. Connection is established only when one of the defined certificate attributes matches the SSID configuration.
Listed below are the mandatory fields, specific to EAP-TLS, PEAP, and Open network flows, which the Google administrator configures to set up the Wi-Fi network in the Google Admin Console page (Device Management > Network > Wi-Fi > Add Wi-Fi) for each Chromebook user.
|
Field |
EAP-TLS |
PEAP |
Open |
|---|---|---|---|
|
Name |
Enter the name of the network connection. |
Enter the name of the network connection. |
Enter the name of the network connection. |
|
Service Set Identifier (SSID) |
Enter the SSID (for example, tls_ssid). |
Enter the SSID (for example, tls_ssid). |
Enter the SSID (for example, tls_ssid). |
|
This SSID Is Not Broadcast |
Select the option. |
Select the option. |
Select the option. |
|
Automatically Connect |
Select the option. |
Select the option. |
Select the option. |
|
Security Type |
WPA/WPA2 Enterprise (802.1x) |
WPA/WPA2 Enterprise (802.1x) |
Open |
|
Extensible Authentication Protocol |
EAP-TLS |
PEAP |
— |
|
Inner Protocol |
— |
|
— |
|
Outer Identity |
— |
— |
— |
|
Username |
Optional, either set a fixed value or use variables from the user login: ${LOGIN_ ID} or ${LOGIN_EMAIL}. |
Enter the PEAP credentials to authenticate against ISE (internal ISE user/AD/other ISE identities) and the Password field. |
— |
|
Server Certificate Authority |
Select the ISE certificate (imported from Device Management > Network > Certificates). |
Select the ISE certificate (imported from Device Management > Network > Certificates). |
— |
|
Restrict Access to this Wi-Fi Network by Platform |
|
|
— |
|
Client Enrollment URL |
Enter a URL to which the Chromebook device browser is redirected for users who are not enrolled. Configure ACLs on the Wireless LAN Controller for redirecting unenrolled users. |
— |
— |
|
Issuer Pattern |
An
attribute in the certificate. Select at least one attribute from either the
Issuer Pattern or Subject Pattern that should match installed certificate
attributes. Specify certificate attributes that will be matched with the
Chromebook device to accept the certificate.
|
— |
— |
|
Subject Pattern |
An
attribute in the certificate. Select at least one attribute from either the
Issuer Pattern or Subject Pattern that should match installed certificate
attributes. Specify certificate attributes that will be matched with the
Chromebook device to accept the certificate.
|
— |
— |
|
Proxy Settings |
|
|
— |
|
Apply Network |
By User |
By User |
— |
Monitor Chromebook Device Activities in Cisco ISE
Cisco ISE provides various reports and logs to view information related to the authentication and authorization of Chromebook devices. You can run these reports either on demand or on regular basis. You can view the authentication method (for example, 802.1x) and authentication protocol (for example, EAP-TLS) in the Operations > RADIUS > Live Logs page. You can also identify the number of end points that are classified as Chromebook devices by navigating to the Work Centers > Network Access > Identities > Endpoints page.
Troubleshoot Chromebook Device Onboarding
This section describes problems that you may encounter while onboarding your Chromebook device.
-
Error: Unable to install the extension from the webstore—You cannot install the extension from the webstore. It will be automatically installed on your Chromebook device by the network administrator.
-
Error: Completed the installation of the certificate, however, unable to connect to the secure network—Verify on the Admin Console that the installed certificate matches defined Issuer/Subject attribute pattern. You can get information about installed certificate from: chrome://settings/certificates
-
Error: Displays an error message "Obtain Network Certificate", when trying to manually connect to the secure network on the Chromebook—Click Get New Certificate, the browser opens and redirects you to the ISE BYOD flow to install the certificate. However, if you are unable to connect to the secure network, verify on the Admin Console that the installed certificate matches the defined Issuer/Subject attribute pattern.
-
Error: Clicked Get New Certificate but is forwarded to the www.cisco.com site—User needs to be connected to the provisioning SSID, in order to be redirected to ISE and commence the certificate installation process. Be sure that the correct access list is defined for this network.
-
Error: Displays an error message "Only managed devices can use this extension. Contact helpdesk or network administrator"—Chromebook is a managed device and the extension must be configured as a forced install to gain access to the Chrome OS APIs to install the certificate on the device. Although, the extension can be installed manually by downloading it from the Google web store, an unenrolled Chromebook user cannot install the certificate.
An unenrolled Chromebook device can secure a certificate if the user belongs to the Domain Users group. The extension tracks the domain user on any device. However, the domain user can produce user-based authentication keys for an unenrolled device.
-
Error: Unclear of the order in which SSIDs are connected in the Google Admin Console—
-
If several SSIDs (PEAP and EAP-TLS) are configured on the Google Admin Console, after the certificate is installed and the attributes are matched, the Chrome OS automatically connects to the SSID with certificate-based authentication regardless of the order in which the SSIDs are configured.
-
If two EAP-TLS SSIDs match the same attribute, the connection depends on other factors such as signal strength and other network level signals, which cannot be controlled by the user or admin.
-
If multiple EAP-TLS certificates are installed on the Chromebook device and all of them match the certificate pattern configured on the Admin Console, the newest certificate will be used for the connection.
-
AnyConnect
Note |
Cisco AnyConnect is not supported in CWA flow. It cannot be provisioned from the Guest portal using the Require guest device compliance field in the Work CentersGuest Access > Portals & Components > Guest Portals > Create, Edit or Duplicate > Portal Behavior and Flow Settings > Guest Device Compliance Settings page. Instead, AnyConnect should be provisioned from the Client Provisioning portal as a result of redirection configured in authorization permissions. |
Note |
When switching network mediums, the AnyConnect ISE posture module requires a change of the default gateway to detect a network change and reassess the client. |
To leverage Cisco ISE for integration with AnyConnect agent, Cisco ISE:
-
Serves as a staging server to deploy AnyConnect, Version 4.0 and its future releases
-
Interacts with AnyConnect posture component for Cisco ISE posture requirements
-
Supports deployment of AnyConnect profiles, customization/language packages, and OPSWAT library updates for Windows and Mac OS x operating systems
-
Supports AnyConnect and legacy agents at the same time
Create AnyConnect Configuration
AnyConnect configuration includes AnyConnect software and its associated configuration files. This configuration can be used in the client provisioning policy that allows users to download and install AnyConnect resources on the clients. If you use both ISE and an ASA to deploy AnyConnect, then the configurations must match on both headends.
Note |
To push the ISE posture module when connected to a VPN, Cisco recommends that you install the AnyConnect agent through Cisco Adaptive Security Appliance (ASA), which uses the Cisco's Adaptive Security Device Manager (ASDM) GUI tool. ASA does the installation using the VPN downloader. With the download, the ISE posture profile is pushed via ASA, and the discovery host needed for later provisioning the profile is available before the ISE posture module contacts ISE. Whereas with ISE, the ISE posture module will get the profile only after ISE is discovered, which could result in errors. Therefore, ASA is recommended to push the ISE posture module when connected to a VPN. |
Before you begin
You must upload the AnyConnect package, compliance module, profiles, and optionally any customization and localization bundles before configuring an AnyConnect Configuration object.
Procedure
| Step 1 |
Choose . |
||
| Step 2 |
Click Add to create an AnyConnect configuration. |
||
| Step 3 |
Choose AnyConnect Configuration. |
||
| Step 4 |
Choose an AnyConnect Package, which you previously uploaded. For example, AnyConnectDesktopWindows xxx.x.xxxxx.x. |
||
| Step 5 |
Enter the name for the current AnyConnect Configuration. For example, AC Config xxx.x.xxxxx.x. |
||
| Step 6 |
Choose the compliance module, which you previously uploaded. For example, AnyConnectComplianceModulewindows x.x.xxxx.x |
||
| Step 7 |
Check one or more AnyConnect modules check boxes. For example, choose one or more modules from the following: ISE Posture, VPN, Network Access Manager, Web Security, AMP Enabler, ASA Posture, Start Before Log on (only for Windows OS), and Diagnostic and Reporting Tool.
|
||
| Step 8 |
Choose AnyConnect profiles for selected AnyConnect modules. For example, ISE Posture, VPN, NAM, and Web Security. |
||
| Step 9 |
Choose AnyConnect customization and localization bundles. |
||
| Step 10 |
Click Submit. |
Create a Posture Agent Profile
Use this procedure to create an AnyConnect posture agent profile, where you can specify parameters that define the agent behavior for the posture protocol.
Procedure
| Step 1 |
Choose . |
| Step 2 |
Click Add. |
| Step 3 |
Choose NAC AnyConnect Agent Posture Profile. |
| Step 4 |
Under Posture Agent Profile Settings, choose AnyConnect . |
| Step 5 |
Configure parameters for the following:
|
| Step 6 |
Click Submit. |
Client IP Address Refresh Configuration
The following table describes the fields in the NAC AnyConnect Posture Profile page, which allows you to configure parameters for the client to renew or refresh its IP address after VLAN change. The navigation path for this page is .
|
Field |
Default Value |
Mode (Applies only to Cisco NAC Agent) |
Usage Guidelines |
|---|---|---|---|
|
VLAN detection interval |
0, 5 |
Merge |
This setting is the interval at which the agent check for the VLAN change. For the Windows NAC agent, the default value is 0. By default, the access to authentication VLAN change feature is disabled for Windows. The valid range is 0 to 5 seconds. For the Mac OS X agent, the default value is 5. By default, the access to authentication VLAN change feature is enabled with VlanDetectInteval as 5 seconds for Mac OS X. The valid range is 5 to 900 seconds. 0 —Access to Authentication VLAN change feature is disabled. 1 to 5—Agent sends an Internet Control Message Protocol (ICMP) or Address Resolution Protocol (ARP) query every 5 seconds. 6 to 900—An ICMP or ARP query is sent every x seconds. |
|
Enable VLAN detection without UI (Not applicable for a Mac OS X client) |
No |
Merge |
This setting enables or disables VLAN detection even when the user is not logged in. No—VLAN detect feature is disabled. Yes—VLAN detect feature is enabled. |
|
Retry detection count |
3 |
Merge |
If the Internet Control Message Protocol (ICMP) or Address Resolution Protocol (ARP) polling fails, this setting configures the agent to retry x times before refreshing the client IP address. |
|
Ping or ARP |
0 The valid range is 0 to 2. |
Merge |
This setting specifies the method used for detecting the client IP address change. 0—Poll using ICMP 1—Poll using ARP 2—Poll using ICMP first, then (if ICMP fails) ARP |
|
Maximum timeout for ping |
1 The valid range is 1 to 10 seconds. |
Merge |
Poll using ICMP, and if there is no response within the specified time, then declare an ICMP polling failure. |
|
Enable agent IP refresh |
Yes (Default) |
Overwrite |
This setting specifies whether or not the client machine to renew or refresh its IP address after the switch (or WLC) changes the VLAN for the login session of the client on the respective switch port. |
|
DHCP renew delay |
0 The valid range is 0 to 60 seconds. |
Overwrite |
This setting specifies that the client machine waits before attempting to request for a new IP address from the network DHCP server. |
|
DHCP release delay |
0 The valid range is 0 to 60 seconds. |
Overwrite |
The setting specifies that the client machine waits before releasing its current IP address. |
Note |
Merge parameter values with existing agent profile settings or overwrite them to appropriately configure clients on Windows and Mac OS X clients for refreshing IP addresses. |
Posture Protocol Settings
The following table describes the fields in the NAC or AnyConnect Posture Profile page, which allows you to configure posture protocol settings for AnyConnect in Cisco ISE. For information on other fields in posture protocol settings for Anyconnect, see the Cisco AnyConnect Secure Mobility Client Administrator Guide for your version of AnyConnect.
|
Field |
Default Value |
Usage Guidelines |
|---|---|---|
|
Call Home List |
— |
Enter a comma-separated list of IP addresses and ports with colon in between the IP address and the port. |
|
Back-off Timer |
30 sec |
This setting enables the Anyconnect agent to continuously to reach the discovery targets (redirection targets and previously connected PSNs) by sending the discovery packets till this max time limit is reached. The valid range is 10 to 600 seconds. |
Continuous Endpoint Attribute Monitoring
You can use the AnyConnect agent to continuously monitor different endpoint attributes to ensure that dynamic changes are observed during posture assessment. This improves the overall visibility of an endpoint and helps you create posture policies based on their behavior. The AnyConnect agent monitors applications that are installed and running on an endpoint. You can turn on and off the feature and configure how often the data should be monitored. By default, data is collected every 5 minutes and is stored in the database. During initial posture, AnyConnect reports a complete list of running and installed applications. After initial posture, the AnyConnect agent scans the applications every X minute and sends the differences from the last scan to the server. The server displays the complete list of running and installed applications.
Cisco Web Agent
The Cisco Web Agent provides temporal posture assessment for client machines.
Users can launch the Cisco Web Agent executable, which installs the Web Agent files in a temporary directory on the client machine via ActiveX control or Java applet.
After users log in to the Cisco Web Agent, the Web Agent gets the requirements that are configured for the user role and the operating system from the Cisco ISE server, checks the host registry, processes, applications, and services for required packages and sends a report back to the Cisco ISE server. If requirements are met on the client machine, the user is allowed network access. If requirements are not met, the Web Agent presents a dialog to the user for each requirement that is not satisfied. The dialog provides the user with instructions and the action to take for the client machine to meet the requirement. Alternatively, if the specified requirements are not met, users can choose to accept the restricted network access while they try to remediate the client system so that it meets requirements for the user login role.
Note |
ActiveX is supported only on the 32-bit versions of Internet Explorer. You cannot install ActiveX on a Firefox web browser or on a 64-bit version of Internet Explorer. |
Configure Client Provisioning Resource Policies
For clients, the client provisioning resource policies determine which users receive which version (or versions) of resources (agents, agent compliance modules, and/or agent customization packages/profiles) from Cisco ISE upon login and user session initiation.
For AnyConnect, resources can be selected either from the client provisioning resources page to create an AnyConnect configuration that you can use in the client provisioning policy page. AnyConnect configuration is the AnyConnect software and its association with different configuration files that includes AnyConnect binary package for Windows and Mac OS X clients, compliance module. module profiles, customization and language packages for AnyConnect.
Before you begin
-
Before you can create effective client-provisioning resource policies, ensure that you have added resources to Cisco ISE. When you download the agent compliance module, it always overwrites the existing one, if any, available in the system.
-
Check the native supplicant profile that is used in the client provisioning policy and ensure that the wireless SSID is correct. For iOS devices, if the network that you are trying to connect to is hidden, check the Enable if target network is hidden check box from the iOS Settings area.
-
Refer to the Prerequisite for Certificate-Based Conditions section for client provisioning rules that include conditions based on certificate attributes.
Procedure
| Step 1 |
Choose . |
||
| Step 2 |
Choose Enable , Disable , or Monitor from the behavior drop-down list:
|
||
| Step 3 |
Enter a name for the new resource policy in the Rule Name text box. |
||
| Step 4 |
Specify one or more Identity Groups to which a user who logs into Cisco ISE might belong. You can choose to specify the Any identity group type, or choose one or more groups from a list of existing Identity Groups that you have configured. |
||
| Step 5 |
Use the Operating Systems field to specify one or more operating systems that might be running on the client machine or device through which the user is logging into Cisco ISE. You can
choose to specify a single operating system like "Android" , "Mac iOS', and
"Mac OS X" or an umbrella operating system designation that addresses a number
of client machine operating systems like "Windows XP (All)" or "Windows 7
(All)."
|
||
| Step 6 |
In the Other Conditions field, specify a new expression that you want to create for this particular resource policy. |
||
| Step 7 |
For client machines, use Agent Configuration to specify which agent type, compliance module, agent customization package, and/or profile to make available and provision on the client machine. It is
mandatory to include the client provisioning URL in authorization policy, to
enable the NAC Agent to popup in the client machines. This prevents request
from any random clients and ensures that only clients with proper redirect URL
can request for posture assessment.
|
||
| Step 8 |
Click Save . |
What to do next
Once you have successfully configured one or more client provisioning resource policies, you can start to configure Cisco ISE to perform posture assessment on client machines during login.
Configure Cisco ISE Posture Agent in the Client Provisioning Policy
For client machines, configure which agent type, compliance module, agent customization package, and/or profile to make available and provision for users to download and install on the client machine.
Before you begin
You must have added client provisioning resources for AnyConnect and Cisco ISE NAC in Cisco ISE.
Procedure
| Step 1 |
Choose an available agent from the Agent drop-down list and specify whether the agent upgrade (download) defined here is mandatory for the client machine by enabling or disabling the Is Upgrade Mandatory option, as appropriate. The Is Upgrade Mandatory setting only applies to agent downloads. Agent profile, compliance module, and Agent customization package updates are always mandatory. |
| Step 2 |
Choose an existing agent profile from the Profile drop-down list. |
| Step 3 |
Choose an available compliance module to download to the client machine using the Compliance Module drop-down list. |
| Step 4 |
Choose an available agent customization package for the client machine from the Agent Customization Package drop-down list. |
Configure Native Supplicants for Personal Devices
Employees can connect their personal devices to the network directly using native supplicants, which are available for Windows, Mac OS, iOS, and Android devices. For personal devices, specify which Native Supplicant configuration to make available and provision on the registered personal device.
Before you begin
Create native supplicant profiles so that when user log in, based on the profile that you associate with that users authorization requirements , Cisco ISE provides the necessary supplicant provisioning wizard to set up the users personal devices to access the network.
Procedure
| Step 1 |
Choose . |
| Step 2 |
Choose Enable , Disable , or Monitor from the behavior drop-down list: |
| Step 3 |
Enter a name for the new resource policy in the Rule Name text box. |
| Step 4 |
Specify the following:
|
| Step 5 |
For personal devices, use Native Supplicant Configuration to choose the specific Configuration Wizard to distribute to these personal devices. |
| Step 6 |
Specify the applicable Wizard Profile for the given personal device type. |
| Step 7 |
Click Save. |
Client Provisioning Reports
You can access the Cisco ISE monitoring and troubleshooting functions to check on overall trends for successful or unsuccessful user login sessions, gather statistics about the number and types of client machines logging into the network during a specified time period, or check on any recent configuration changes in client provisioning resources.
Client Provisioning Requests
The ISE ReportsEndpoints and UsersClient Provisioning report displays statistics about successful and unsuccessful client provisioning requests. When you choose Run and specify one of the preset time periods, Cisco ISE combs the database and displays the resulting client provisioning data.
Supplicant Provisioning Requests
The window displays information about recent successful and unsuccessful user device registration and supplicant provisioning requests. When you choose Run and specify one of the preset time periods, Cisco ISE combs the database and displays the resulting supplicant provisioning data.
The Supplicant Provisioning report provides information about a list of endpoints that are registered through the device registration portal for a specific period of time, including data like the Logged at Date and Time, Identity (user ID), IP Address, MAC Address (endpoint ID), Server, profile, Endpoint Operating System, SPW Version, Failure Reason (if any), and the Status of the registration.
Client Provisioning Event Logs
You can search event log entries to help diagnose a possible problem with client login behavior. For example, you may need to determine the source of an issue where client machines on your network are not able to get client provisioning resource updates upon login. You can use logging entries for Posture and Client Provisioning Audit and Posture and Client Provisioning Diagnostics.
Portal Settings for Client Provisioning Portals
The navigation path for these settings is .
Portal Settings
-
HTTPS Port—Enter a port value between 8000 to 8999; the default value is 8443 for all the default portals, except the Blacklist Portal, which is 8444. If you upgraded with port values outside this range, they are honored until you make any change to this page. If you make any change to this page, you must update the port setting to comply with this restriction.
-
Allowed Interfaces—Select the PSN interfaces which can run a portal. Only a PSN with an available allowed interface on a PSN can create a portal. You can configure any combination of physical and bonded interfaces. This is a PSN-wide configuration; all portals can only run on these interfaces, this interface configuration is pushed to all the PSNs.
-
You must configure the Ethernet interfaces using IP addresses on different subnets.
-
The interfaces you enable here must be available on all your PSNs, including VM-based ones when Policy Services turned on. This is required because any of these PSNs can be used for a redirect at the start of the guest session.
-
The portal certificate Subject Name/Alternate Subject Name must resolve to the interface IP.
-
Configure ip host x.x.x.x yyy.domain.com in ISE CLI to map secondary interface IP to FQDN, which will be used to match Certificate Subject Name/Alternate Subject Name.
-
If only the bonded NIC is selected - When the PSN attempts to configure the portal it first attempts to configure the Bond interface. If that is not successful, perhaps because there was no bond set upon that PSN, then the PSN logs an error and exits. It will NOT attempt to start the portal on the physical interface.
-
NIC Teaming or bonding is an O/S configuration option that allows you to configure two individual NICs for high availability (fault tolerance). If one of the NICs fails, the other NIC that is part of the bonded connection continues the connection. A NIC is selected for a portal based on the portal settings configuration:
-
If both physical NICs and the corresponding bonded NIC are configured - When the PSN attempts to configure the portal, it first attempts to connect to the Bond interface. If that is not successful, perhaps because there was no bond setup on that PSN, then the PSN attempts to start the portal on the physical interface.
-
-
- Certificate Group Tag—Select the group tag of the certificate group to use for the portal’s HTTPS traffic.
- Authentication
Method—Choose which identity source sequence (ISS) or Identity
Provider (IdP) to use for user authentication. The ISS is a list of Identity
Stores that are searched in sequence to verify user credentials. Some examples
include: Internal Guest Users, Internal Users, Active Directory, and LDAP.
Cisco ISE includes a default client provisioning Identity Source Sequence for Client Provisioning Portals, Certificate_Request_Sequence.
-
Fully Qualified Domain Name (FQDN)—Enter at least one unique FQDN and/or hostname for your Client Provisioning portal. For example, you can enter provisionportal.yourcompany.com, so that when the user enters either of those into a browser, they will reach the Client Provisioning Portal.
-
Update DNS to ensure that the FQDN of the new URL resolves to a valid Policy Services Node (PSN) IP address. Optionally, this address could point to a load balancer virtual IP address that serves a pool of PSNs.
-
To avoid certificate warning messages due to name mismatches, include the FQDN of the customized URL, or a wildcard, in the subject alternative name (SAN) attribute of the local server certificate of the Cisco ISE PSN.
Note
For Client Provisioning without URL redirection, the portal name that is entered in the Fully Qualified Domain Name (FQDN) field must be configured in the DNS configuration. This URL must be communicated to the users to enable Client Provisioning without URL redirection.
-
- Idle Timeout— Enter the time in minutes that you want Cisco ISE to wait before it logs out the user if there is no activity in the portal. The valid range is from 1 to 30 minutes.
Note |
In the Client Provisioning Portal, you can define the port number and the certificate so that the host allows you to download the same certificate for Client Provisioning and Posture. If the portal certificate is signed by the officials certificate authority, you will not receive any security warning. If the certificate is self-signed, you will receive one security warning for both the portals and Cisco AnyConnect Posture component. |
Login Page Settings
-
Enable Login—Select this check box to enable the login step in the Client Provisioning Portal
-
Maximum failed login attempts before rate limiting —Specify the number of failed login attempts from a single browser session before Cisco ISE starts to artificially slow down the rate at which login attempts can be made, preventing additional login attempts. The time between attempts after this number of failed logins is reached is specified in Time between login attempts when rate limiting.
-
Time between login attempts when rate limiting —Set the length of time in minutes that a user must wait before attempting to log in again, after failing to log in the number of times defined in Maximum failed login attempts before rate limiting.
-
Include an AUP (on page/as link)—Display your company’s network-usage terms and conditions, either as text on the page currently being displayed for the user or as a link that opens a new tab or window with AUP text.
-
Require acceptance— Require users to accept an AUP before they can access the portal. The Login button is not enabled unless the user accepts the AUP. If users do not accept the AUP, they will not be able to access the portal.
-
Require scrolling to end of AUP—This option displays only if Include an AUP on page is enabled. Ensure that the user has read the AUP completely. The Accept button activates only after the user has scrolled to the end of the AUP.
Acceptable Use Policy (AUP) Page Settings
-
Include an AUP—Display your company’s network-usage terms and conditions on a separate page to the user.
-
Require scrolling to end of AUP—Ensure that the user has read the AUP completely. The Accept button activates only after the user has scrolled to the end of the AUP.
-
On first login only—Display an AUP when the user logs into the network or portal for the first time only.
-
On every login—Display an AUP each time the user logs into the network or portal.
-
Every ______ days (starting at first login)—Display an AUP periodically after the user first logs into the network or portal.
Post-Login Banner Page Settings
Include a Post-Login Banner page—Display additional information after the users successfully log in and before they are granted network access.
Change Password Settings
Allow internal users to change their own passwords—Allow employees to change their passwords after they log in to the Client Provisioning Portal. This only applies to employees whose accounts are stored in the Cisco ISE database and not to those stored in external databases, such as Active Directory or LDAP.
HTML Support for Client Provisioning Portals Language Files
The navigation path to this portal's Instructional Text , Content,Optional Content 1, and Optional Content 2 text boxes is . You can use the View HTML Source icon in the mini-editor of the text boxes and add HTML code in your content.
Note |
This is not a complete list of the dictionary keys in the files. |
-
key.guest.ui_client_provision_agent_installed_instructions_without_java_message
-
key.guest.ui_contact_instruction_message
-
key.guest.ui_success_message
-
key.guest.ui_client_provision_unable_to_detect_message
-
key.guest.ui_client_provision_instruction_message
-
key.guest.ui_client_provision_agent_installation_message
-
key.guest.ui_client_provision_posture_agent_check_message
-
key.guest.ui_vlan_instruction_message
-
key.guest.ui_client_provision_agent_installation_instructions_with_no_java_message
-
key.guest.ui_success_instruction_message
-
key.guest.ui_vlan_optional_content_1
-
key.guest.ui_vlan_optional_content_2
-
key.guest.ui_contact_optional_content_2
-
key.guest.ui_contact_optional_content_1
-
key.guest.ui_contact_optional_content_1
-
key.guest.ui_client_provision_posture_check_compliant_message
-
key.guest.ui_client_provision_optional_content_2
-
key.guest.ui_client_provision_optional_content_1
-
key.guest.ui_error_optional_content_2
-
key.guest.ui_error_optional_content_1
-
key.guest.ui_client_provision_posture_check_non_compliant_message
-
key.guest.ui_vlan_install_message
-
key.guest.ui_success_optional_content_1
-
key.guest.ui_success_optional_content_2
-
key.guest.ui_client_provision_posture_agent_scan_message
 Feedback