- Requirements
Installing the Cisco Context Directory Agent
The Cisco Context Directory Agent (CDA) is a software application that is packaged as an ISO image. You can download it from Cisco.com . You must install it on a dedicated X86 machine or a virtual machine on VMware ESX server and configure it with consumer devices and Active Directory domain controllers.
Requirements
This section contains the following topics:
- Supported Operating Systems
- Hardware Requirements
- Connectivity Requirements
- List of Open Ports
- Active Directory Requirements for Successful Connection with CDA
- Active Directory Requirements for Successful Connection with CDA
Supported Operating Systems
CDA is installed on the Cisco Linux OS it is bundled with.When installing the CDA ISO image on a standalone machine or on a VMWare server, Linux is installed as the OS and CDA is an application running on top of it.
Hardware Requirements
The CDA machine must be a separate, dedicated appliance or a VMWare. You can install CDA on UCSC-C220-M3S appliance, see Table 2-1 for NIC requirements.
In all cases, a CDA machine must meet the standard hardware and VMWare specifications listed in Table 2-1 .
Table 2-2 lists the minimum hardware requirements for installing CDA on a VMWare.
Connectivity Requirements
For CDA to function properly, it must be able to communicate freely with all the consumer devices, Active Directory domain controller machines from which it should receive logs, and target syslog servers that are configured with it. If log forwarding is being employed, then connectivity is required only between CDA and the aggregating domain controller machines, there is no need to provide connectivity between all domain controller machines and CDA in a centralized log forwarding deployment. CDA initiates a connection with Domain controller's RPC port 135. After establishing the connection, Domain controllers choose a higher port dynamically.
If Windows Firewall (or any other comparable third-party firewall software) is running on any of the Active Directory domain controller machines, then the firewall software on each of these endpoints must be configured with the necessary exceptions to allow this communication to flow freely.
This section uses the Windows Firewall as an example and details the exceptions that must be defined on any of the endpoints that might be running Windows Firewall.
For any other comparable third-party firewall software, refer to that vendor's documentation on how to configure the corresponding exceptions.
Windows Firewall Exceptions to be Configured on Each Separate Active Directory Domain Controller Machine
For each separate Active Directory domain controller machine that is configured on the CDA machine using the GUI, if Windows Firewall is enabled on that separate domain controller machine, then you must define a Windows Firewall exception on that particular domain controller machine that will allow the necessary Windows Management Instrumentation (WMI) related communication.
If that domain controller machine is running Windows Server 2008, Windows Server 2008 R2, Windows Server 2012, or Windows Server 2012 R2, then you can configure this WMI-related exception using the following Windows command line (written in a single line):
netsh advfirewall firewall set rule group=”Windows Management Instrumentation (WMI)" new enable=yes
If that domain controller machine is running Windows Server 2003 or Windows Server 2003 R2 (with SP1 or later installed), then you can configure this WMI-related exception using the following Windows command line (written in a single line):
List of Open Ports
Table 2-3 lists some of the Transmission Control Protocol (TCP) and User Datagram Protocol (UDP) ports that CDA uses for communication with consumer devices. These ports are open by default on CDA. CDA chooses the ports dynamically to communicate with the Domain Controllers.
The ports mentioned in Table 2-3 should be open to establish proper communication between CDA and ASA or WSA.
The following ports are open for internal communication between CDA processes, but blocked for access from outside the appliance:
Active Directory Requirements for Successful Connection with CDA
CDA leverages Active Directory login audit events generated by the Active Directory domain controller to gather user logins information. In order for CDA to work appropriately, CDA needs to be able to connect to Active Directory and fetch the user logins information.
The following steps should be performed on the Active Directory domain controller:
1. Make sure the Active Directory version is supported (refer to Supported Active Directory Versions) and there is network connectivity between Active Directory domain controller and CDA (refer to Connectivity Requirements)
2. Make sure relevant Microsoft patches are installed on the Active Directory domain controllers.
a. http://support.microsoft.com/kb/958124
This patch fixes a memory leak in Microsoft’s WMI, which prevents CDA to establish successful connection with the domain controller (CDA administrator can experience it in CDA Active Directory domain controller GUI page, where the status need to be “up” once the connection establishes successfully).
b. http://support.microsoft.com/kb/973995
This patch fixes different memory leak in Microsoft’s WMI, which sporadically prevents the Active Directory domain controller from writing the necessary user login events to the Security Log of the domain controller. As result CDA may not get all user login events from this domain controller.
a. http://support.microsoft.com/kb/981314
This patch fixes memory leak in Microsoft’s WMI, which sporadically prevents the Active Directory domain controller from writing the necessary user login events to the Security Log of the domain controller. As result CDA may not get all user login events from this domain controller.
b. http://support.microsoft.com/kb/2617858
This patch fixes unexpectedly slow startup or logon process in Windows Server 2008 R2.
a. http://support.microsoft.com/kb/2591403
These hotfixes are associated with the operation and functionality of the WMI service and its related components.
3. Make sure the Active Directory logs the user login events in the Windows Security Log.
Verify that the settings of the “Audit Policy” (part of the “Group Policy Management” settings) allows successful logons to generate the necessary events in the Windows Security Log (this is the default Windows setting, but you must explicitly ensure that this setting is correct). See Setting the Audit Policy.
4. You must have an Active Directory user with sufficient permissions to be used by CDA to connect to the Active Directory. In CDA patch 2, you can choose whether this user is member of the Active Directory domain admin group or not. Follow the following instructions to define permissions either for admin domain group user or none admin domain group user:
– Permissions Required when an Active Directory User is a Member of the Domain Admin Group
– Permissions Required when an Active Directory User is Not a Member of the Domain Admin Group
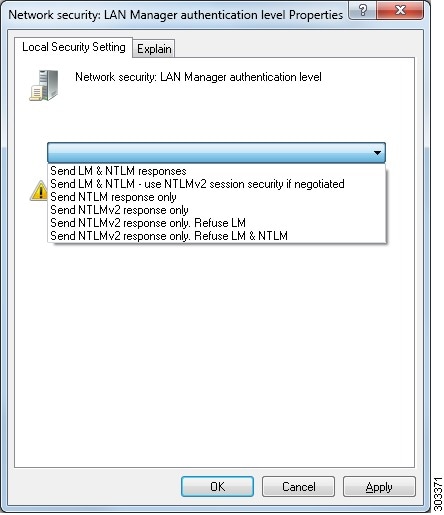
5. The Active Directory user used by CDA can be authenticated either by NTLMv1 or NTLMv2. You need to verify that the Active Directory NTLM settings are aligned with CDA NTLM settings to ensure successful authenticated connection between CDA and the Active Directory Domain Controller. Figure 2-1 illustrates all Microsoft NTLM options. In case CDA is set to NTLMv2, all six options described in Figure 2-1 are supported. In case CDA is set to support NTLMv1, only the first five options are supported. This is also summarized in Table 2-4 .
Figure 2-1 MS NTLM Authentication Type Options
6. Make sure that you have created a firewall rule to allow traffic to dllhost.exe on Active Directory domain controllers.
Setting the Audit Policy
Ensure that the “Audit Policy” (part of the “Group Policy Management” settings) allows successful logons to generate the necessary events in the Windows Security Log of that AD domain controller machine (this is the default Windows setting, but you must explicitly ensure that this setting is correct).
Step 1 Choose Start > Programs > Administrative Tools > Group Policy Management .
Step 2 Navigate under Domains to the relevant domain and expand the navigation tree.
Step 3 Choose Default Domain Controller Policy, right click and choose Edit .
The Group Policy Management Editor appears.
Step 4 Choose Default Domain Controllers Policy > Computer Configuration > Policies > Windows Settings > Security Settings .
- For Windows Server 2003 or Windows Server 2008 (non-R2), choose Local Policies > Audit Policy . For the two Policy items, Audit Account Logon Events and Audit Logon Events , ensure that the corresponding Policy Setting for each of these either directly or indirectly includes the Success condition. To include the Success condition indirectly, the Policy Setting must be set to Not Defined , indicating that the effective value will be inherited from a higher level domain, and the Policy Setting for that higher level domain must be configured to explicitly include the Success condition.
- For Windows Server 2008 R2 and Windows 2012, choose Advanced Audit Policy Configuration > Audit Policies > Account Logon . For the two Policy items, Audit Kerberos Authentication Service and Audit Kerberos Service Ticket Operations , ensure that the corresponding Policy Setting for each of these either directly or indirectly includes the Success condition as described above.
Step 5 If any Audit Policy item settings have been changed, you should then run “ gpupdate /force ” to force the new settings to take effect.
Permissions Required when an Active Directory User is a Member of the Domain Admin Group
No special permission is required for the following Active Directory versions:
For Windows 2008 R2,Windows 2012, and Windows 2012 R2, the Domain Admin group does not have full control on certain registry keys in the Windows operating system by default. In order to get the CDA to work, Active Directory admin must give the Active Directory user Full Control permissions on the following registry keys:
- HKEY_CLASSES_ROOT\CLSID\{76A64158-CB41-11D1-8B02-00600806D9B6}
- HKLM\Software\Classes\Wow6432Node\CLSID\{76A64158-CB41-11D1-8B02-00600806D9B6}
In order to grant full control, the Active Directory admin must first take ownership of the key. To do this:
Step 1 Go to the Owner tab by right clicking the key.
Permissions Required when an Active Directory User is Not a Member of the Domain Admin Group
For CDA to work with Windows 2012 R2, Active Directory admin must first give the Active Directory user Full Control permissions on the following registry keys:
- HKEY_CLASSES_ROOT\CLSID\{76A64158-CB41-11D1-8B02-00600806D9B6}
- HKLM\Software\Classes\Wow6432Node\CLSID\{76A64158-CB41-11D1-8B02-00600806D9B6}
The following permissions also are required when an Active Directory user is not part of the Domain Admin group but of the Domain Users group:
- Required Registry Changes
- Permissions to Use DCOM on the Domain Controller
- Permissions to the WMI Root\CIMv2 Name Space
- Access to Read the Security Event Log of the Active Directory Domain Controller
The above four permissions are valid for all the following Active Directory versions:
Required Registry Changes
For CDA to work with a Domain User, certain registry keys should be added manually. These registry changes are required to establish a valid connection between CDA and domain controllers to retrieve the users login authentication events. CDA does not require installation of an agent on the domain controllers or on a machine in the domain.

Note Despite using Domain Admin rights, it was learned overtime that these registry entries are still required when connecting to Windows 2012 R2. Without it, the server resets the CDA connection attempts.
The changes are described in the following registry script. The Active Directory admin can also copy and paste this into a text file with a .reg extension and double click it to make the registry changes. For adding registry keys as described below, the user must be an owner of the root key.
Windows Registry Editor Version 5.00
[HKEY_CLASSES_ROOT\CLSID\{76A64158-CB41-11D1-8B02-00600806D9B6}]
"AppID"="{76A64158-CB41-11D1-8B02-00600806D9B6}"
[HKEY_CLASSES_ROOT\AppID\{76A64158-CB41-11D1-8B02-00600806D9B6}]
[HKEY_CLASSES_ROOT\Wow6432Node\AppID\{76A64158-CB41-11D1-8B02-00600806D9B6}]

"DllSurrogate"="  "
Make sure that you include two spaces in the value of the key “DllSurrogate”.
You should keep the empty lines as shown in the script above, including an empty line at the end of the file.
Permissions to Use DCOM on the Domain Controller
The Active Directory user must have permissions to use DCOM (remote COM) on the Domain Controller. You can do this by using the dcomcnfg tool.
Step 1 Run the dcomcnfg tool from the command line.
Step 2 Expand Component Services.
Step 3 Expand Computers and click on My Computer.
Step 4 Select Action from the menu bar, click on properties and click on COM Security.
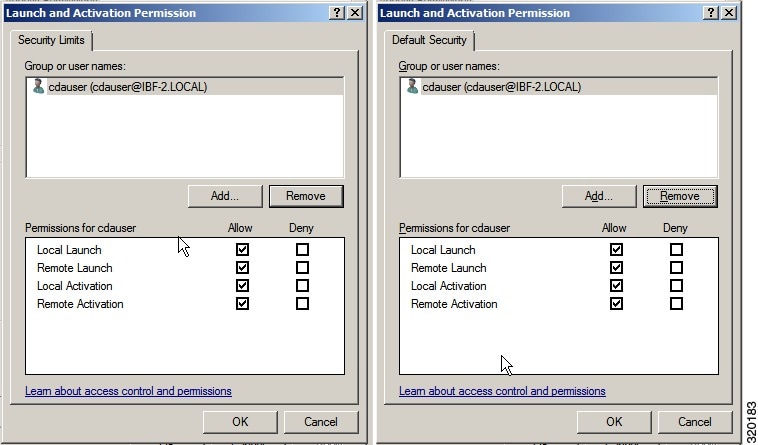
Step 5 Make sure that the CDA account for both Access and Launch has Allow permissions. The Active Directory user should be added to all the four options (Edit Limits and Edit Default for both Access Permissions and Launch and Activation Permissions). See Figure 2-2.
Step 6 Allow all Local and Remote access for both Access Permissions and Launch and Activation Permissions.
Figure 2-2 My Computer Properties
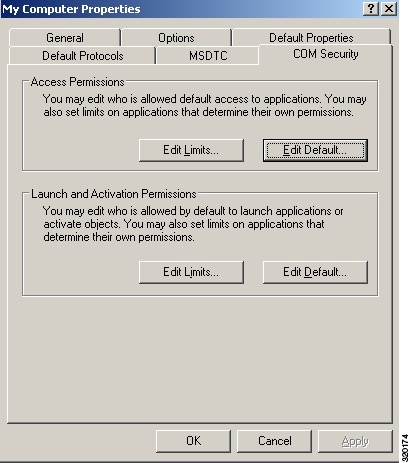
Figure 2-3 Local and Remote Access for Access Permissions
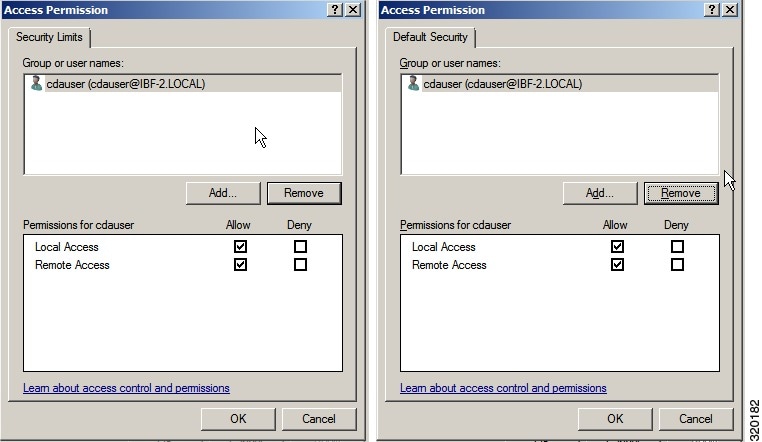
Figure 2-4 Local and Remote Access for Launch and Activation Permissions
Permissions to the WMI Root\CIMv2 Name Space
The Active Directory users do not have the Execute Methods and Remote Enable permissions by default. These can be granted by using the wmimgmt.msc MMC console.
Step 1 Click Start > Run and type wmimgmt.msc.
Step 2 Right-click WMI Control and click Properties .
Step 3 Under the Security tab expand Root and choose CIMV2.
Step 5 Add the Active Directory user and give the required permissions as shown in Figure 2-5
Figure 2-5 Required Permissions for WMI Root\CIMv2 Name Space

Access to Read the Security Event Log of the Active Directory Domain Controller
On Windows 2008 and later, this can be done by adding the user to a group called Event Log Readers.
On all older versions of Windows, this can be done by editing a registry key in the following way:
Step 1 Find the SID for the account in order to delegate access to the Security event logs.
Step 2 Use the following command from the command line, as shown in Figure 2-6 to list all the SID accounts:
You can also use the following for a specific username and domain:
wmic useraccount where name=“cdaUser” get domain,name,sid
Step 3 Find the SID open Registry Editor and browse to the following location:
HKEY_LOCAL_MACHINE/SYSTEM/CurrentControlSet/Services/Eventlog
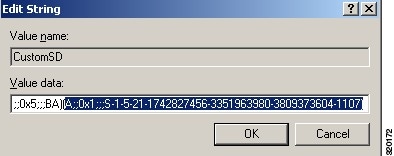
Step 4 Click on Security and double click CustomSD. See Figure 2-7.
For example, to allow read access to the cda_agent account (SID - S-1-5-21-1742827456-3351963980-3809373604-1107), enter (A;;0x1;;;S-1-5-21-1742827456-3351963980-3809373604-1107)
Step 5 Restart the WMI service on the DC. You can restart the WMI services in the following two ways:
a. Run the following command from the CLI,
b. Run Services.msc (This opens the Windows Services Management window)
In the Windows Services Management window, locate “Windows Management Instrumentation” service, right click and select Restart.
Figure 2-6 List All the SID Accounts

Figure 2-7 Edit CustomSD String
Installing Context Directory Agent
Context Directory Agent is packaged as an ISO image. You can download the package from Cisco.com and install it on a dedicated X86 machine or a VMWare ESX server.
CDA supports VMWare ESX versions 4.0, 4.1, and 5.0.
If you are installing CDA on a VMWare:
- You must select Use Guest OS as Linux CentOS 4/5 32 bit . Misconfiguration of the guest OS might result in very low performance.
- You must select LSI Logic Parallel as the SCSI controller.
- VMWare tools are automatically installed.
To install the Context Directory Agent, complete the following steps:
Step 1 Download the CDA ISO image, cda-1.0.0.xxx.i386.iso and save it in your local repository.
Step 2 Burn the ISO image on a DVD.
Step 3 Insert the DVD, choose the option to install the image from the optical drive.
The CDA package installation begins. After the installation is complete, the machine is rebooted. The following prompt is displayed when the boot sequence is completed:
**********************************************
Please type ‘setup’ to configure the appliance
**********************************************
The boot sequence takes about two minutes to complete.
Step 4 At the prompt, enter ‘setup’ to start the Setup program. You are prompted to enter networking parameters and first credentials.
The following illustrates a sample Setup program and default prompts:
localhost.localdomain login: setup
Enter IP Address []: 192.168.10.10
Enter IP netmask []:
255.255.255.0
Enter IP default gateway []: 192.168.10.100
Enter default DNS domain []: cisco.com
Enter primary nameserver []: 200.150.200.150
Enter secondary nameserver? Y/N: n
Enter primary NTP server [time.nist.gov]: clock.cisco.com
Enter secondary NTP server? Y/N: n
Enter system timezone [UTC]: UTC
Bringing up the network interface...
Pinging the primary nameserver...
Do not use ‘Ctrl-C’ from this point on...
Application bundle (cda) installed successfully
=== Initial setup for application: cda ===
Step 5 Install the latest patch available for CDA. See Installing Context Directory Agent Patches.
Step 6 You can log in to the CDA CLI after the machine is rebooted and verify the package installation. The following illustrates a sample verification procedure:
cda Cisco Context Directory Agent
/admin# show application status cda
CDA application server is running PID:2840
Step 7 You can now log in to the CDA user interface and start configuring your CDA.

Note The username and password specified during the initial setup program can be used for both the CLI and the GUI. If you change the GUI password using the user interface, the CLI password does not change and vice versa.
Installing Context Directory Agent Patches
You can download and install the latest CDA 1.0, patch from Cisco.com.
Step 1 Create a repository which will allow you to upload the patch into CDA. Refer to “repository” section for instructions on how to create a repository.
Step 2 Download the latest CDA patch to the repository created.
Step 3 Install the CDA patch, as described in “patch install” section.
Step 4 Verify that the patch is installed as follow:
Migrating from AD Agent to CDA
CDA is compatible with AD agent. If AD Agent is already deployed in the network, you can replace it by CDA with a similar corresponding configuration, without requiring software changes or upgrades in other components of the Identity Based Firewall solution—Active Directory servers and Identity consumer devices (ASA/WSA).
Before you transition from AD Agent to CDA, take a note of the following AD Agent configuration details:
Use the AD agent command adacfg options list
Use the AD agent command adacfg syslog list
Use the AD agent command adacfg dc list (does not show the password.)
Use the AD agent command adacfg client list (does not show the shared secret.)
See the Installation and Setup Guide for the Active Directory Agent, Release 1.0 for all the syntax and output examples for the above commands.
Install and configure CDA to correspond to your existing AD Agent application.
- Optionally configure the Active Directory General Settings. AD monitoring in the CDA is the equivalent of dcStatusTime in AD agent (note that the 10 seconds default in CDA is different from the 60 seconds default in AD agent.)
History in CDA is the equivalent of dcHistoryTime in AD agent (note the 10 minutes default in CDA is different than the 24 hours default in AD Agent)
User logon expiration period in CDA is the equivalent of userLogonTTL in AD agent (here the 24 hours default remains the same).
- Set the security policy on the DC machines. The differences between the AD agent and CDA with respect to Active Directory security policy setting is applicable only for Windows 2008R2 servers. For CDA, set the account permission on Microsoft Windows 2008 R2 server as described in Step 2 of “$paratext>” section.
- Optionally, configure the Log Level setting in CDA to correspond to logLevel in AD Agent.
- Optionally, add any syslog servers from adacfg syslog list to CDA.
- Add all Active Directory Servers from adacfg dc list to CDA.
- Add all Identity Consumers from adacfg client list to CDA.
If you are replacing the AD agent server with the CDA server, using the same hostname/IP Address, no changes are required in the consumer device (ASA/WSA) configuration, and consumer devices automatically connect to the CDA to retrieve identify mapping information.
If it is otherwise and you are newly adding a CDA server in your deployment, you have to update the configuration on the consumer device, to point to the new CDA server. For more information, refer to the ASA and WSA documentation on Cisco.com.
 Feedback