Check Point to Multicloud Defense Migration Workflow

Workflow for Check Point to MultiCloud Defense Migration

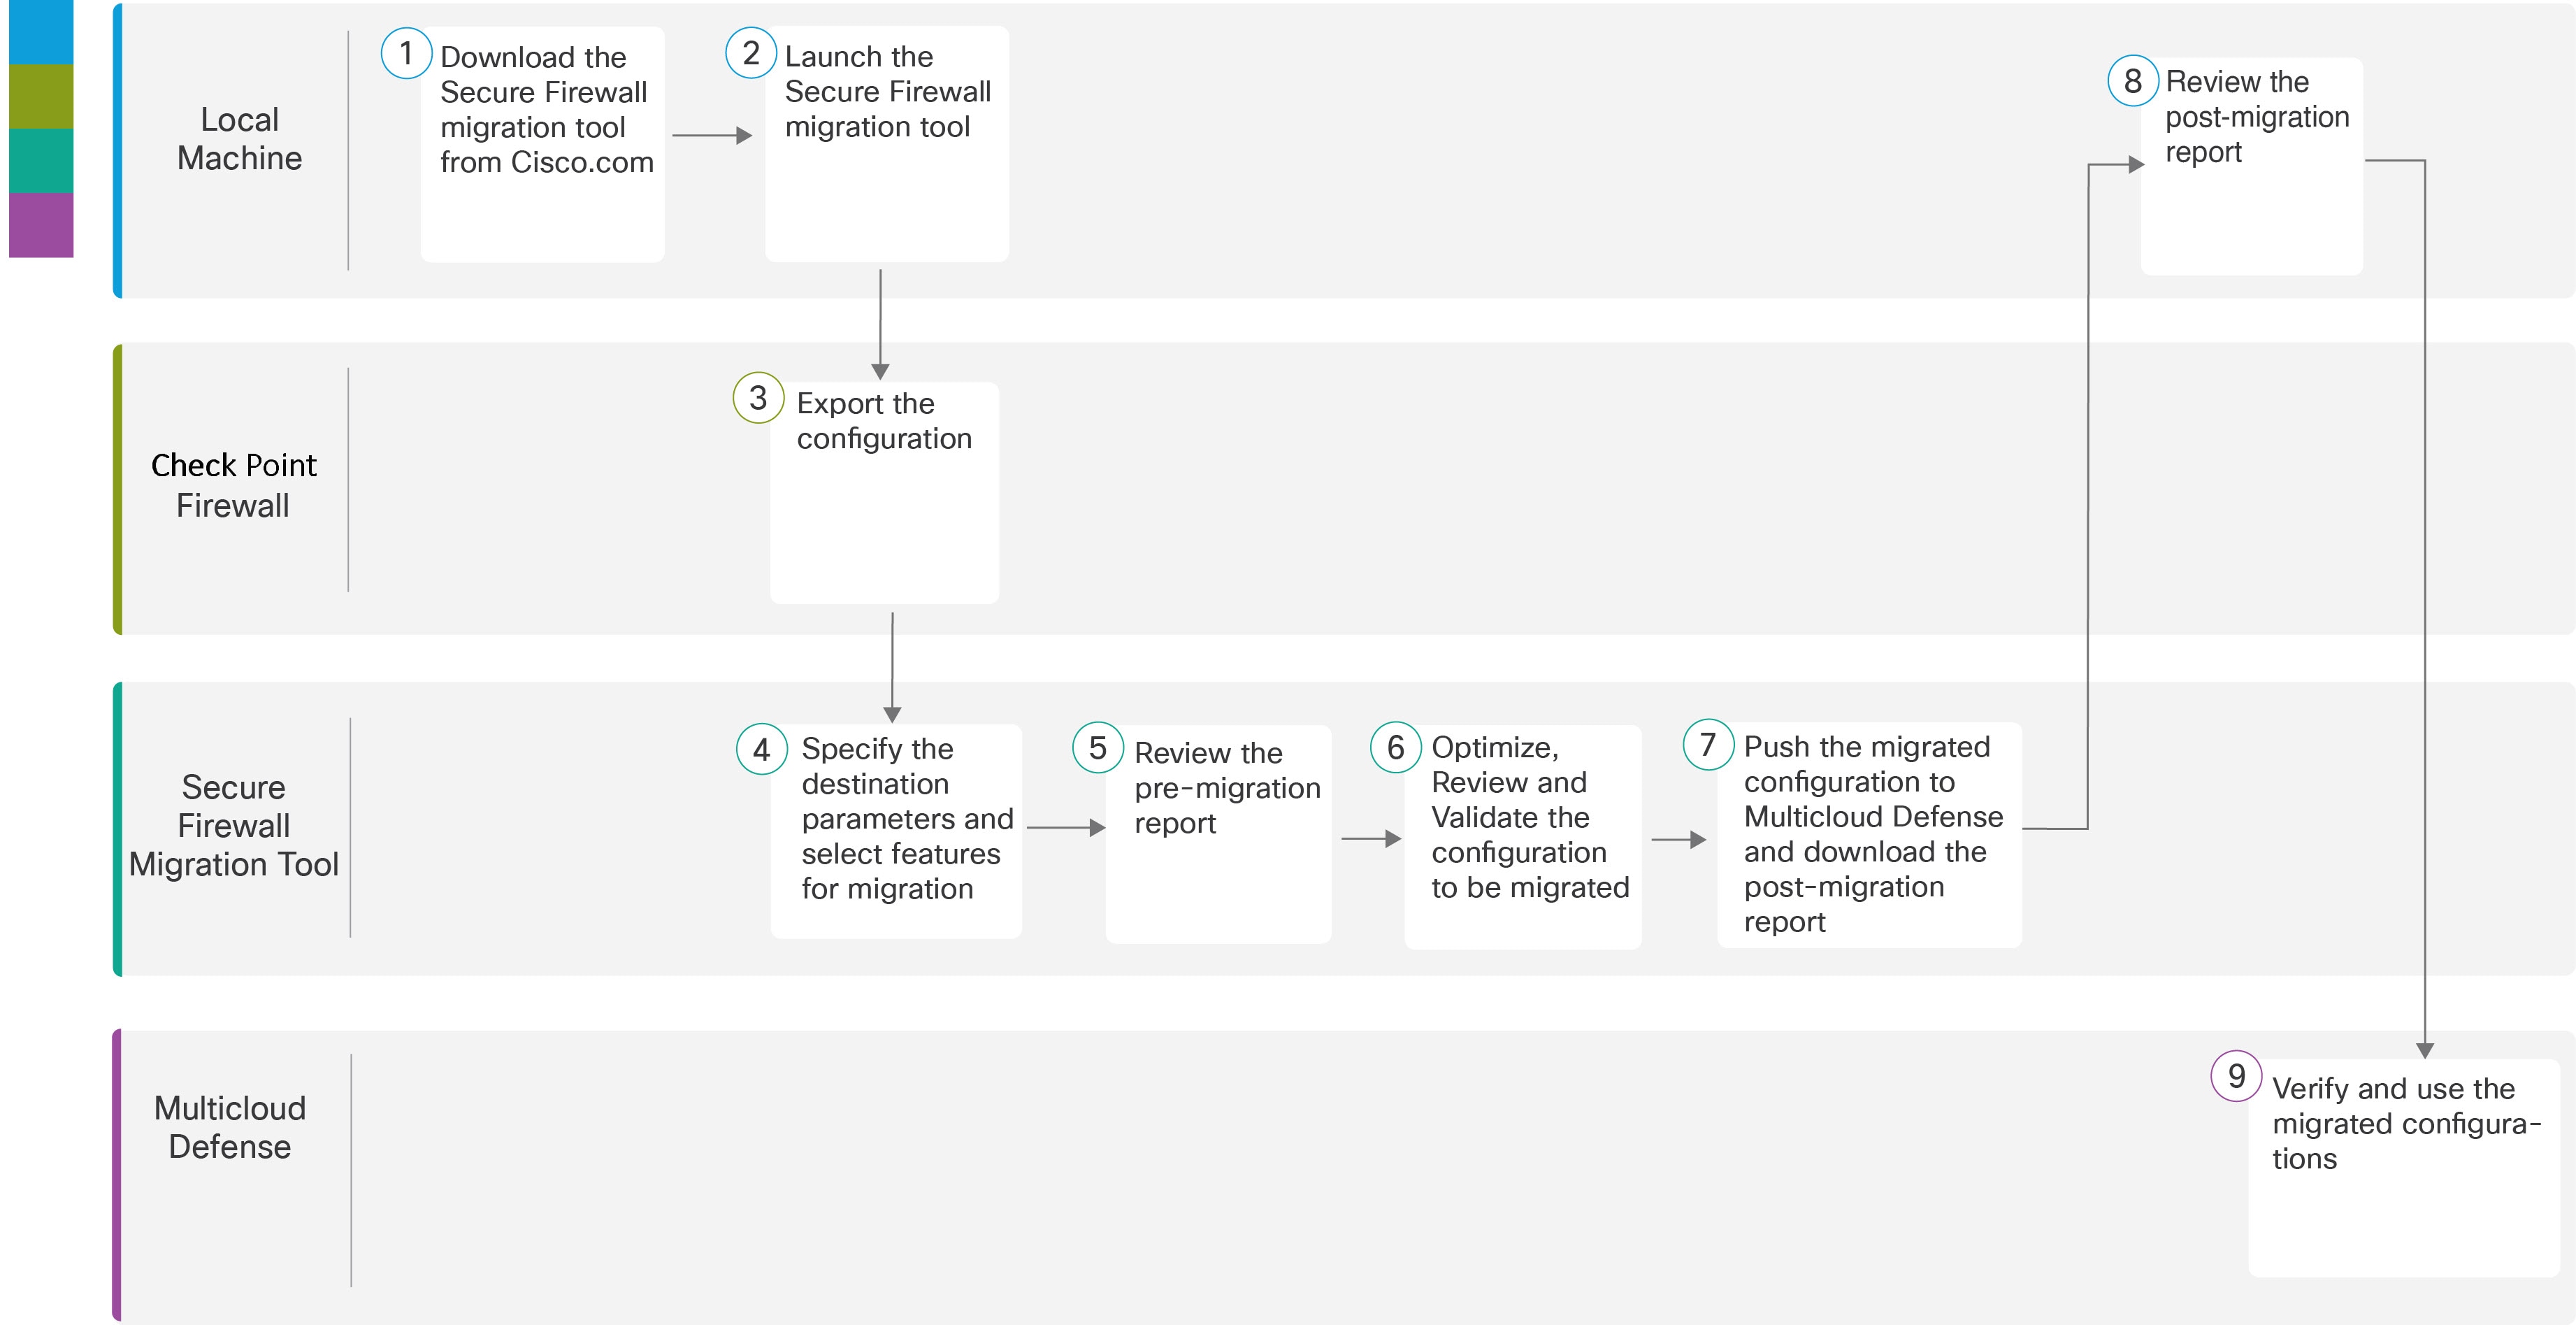
The following flowchart illustrates the workflow for migrating a Check Point firewall to Multicloud defense using the Secure Firewall Migration Tool.

Workspace

Steps

Local machine

Download the latest version of the Secure Firewall Migration Tool from Cisco.com.

For detailed steps, see Download the Secure Firewall Migration Tool from Cisco.com.

Local Machine

In the local machine, initiate the Secure Firewall Migration tool by double-clicking in the application file that you downloaded from Cisco.com.

Check Point Firewall

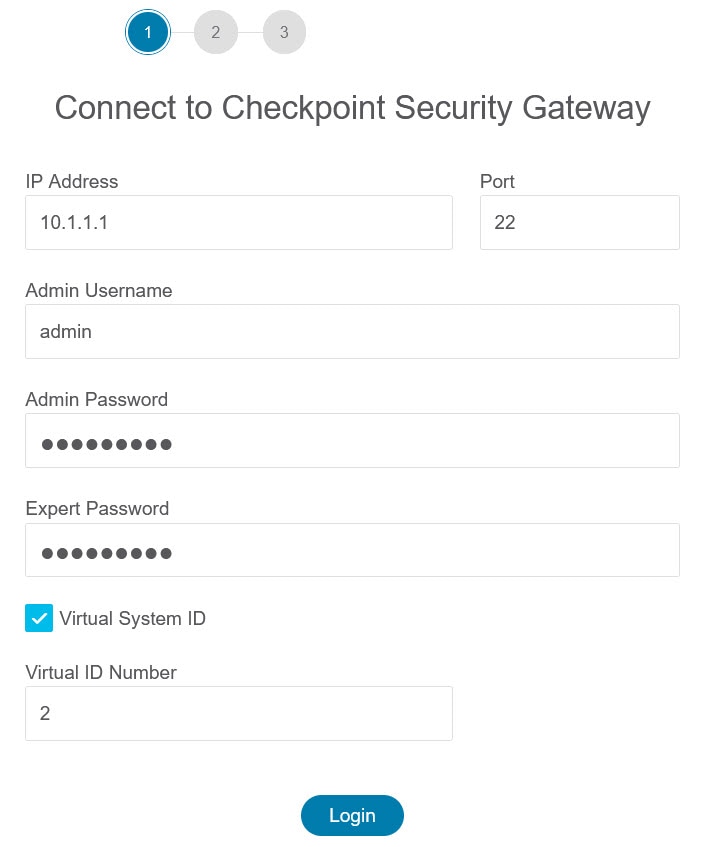
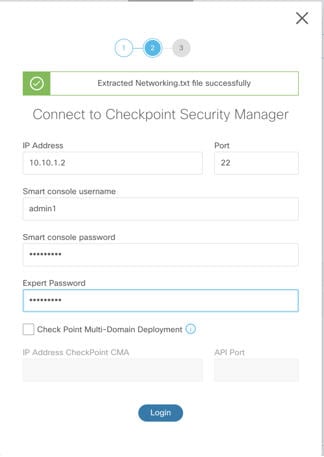
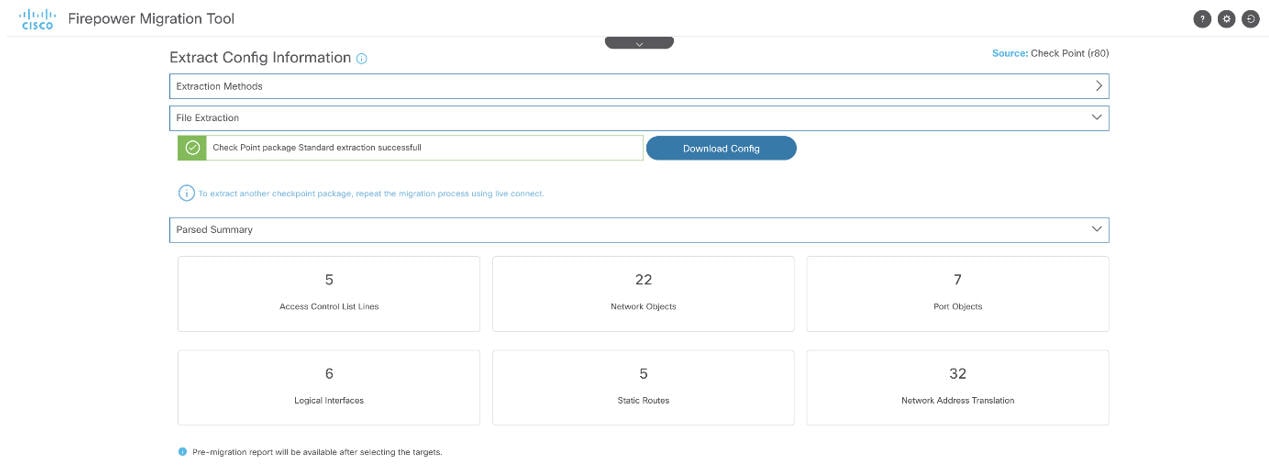
Export the configuration file. To export the configuration from the Check Point firewall, see Export the Check Point Configuration Files for r80.

Secure Firewall Migration Tool

During this step, you can specify the destination parameters for Multicloud Defense. For detailed steps, see Specify Destination Parameters for Multicloud Defense.

Secure Firewall Migration Tool

Navigate to the location where you downloaded the premigration report and review the report. For detailed steps, see Review the Pre-Migration Report.

Secure Firewall Migration Tool

Optimize and review the configuration carefully and validate that it is correct. For detailed steps, see Optimize, Review, and Validate the Configuration to be Migrated.

Secure Firewall Migration Tool

This step in the migration process sends the migrated configuration to Multicloud Defense and allows you to download the postmigration report. For detailed steps, see Push the Configuration to Multicloud Defense.

Local Machine

Navigate to the location where you downloaded the postmigration report and review the report. For detailed steps, see Review the Post-Migration Report and Complete the Migration.

Multicloud Defense

Verify the migrated configurations and use them as required in configuring gateways.

Prerequisites for Migration

Before you migrate your configuration, execute the following activities.

Download the Secure Firewall Migration Tool from Cisco.com

Before you begin

You must have a Windows 10 64-bit or macOS version 10.13 or higher machine with an internet connectivity to Cisco.com.

If you want to use the cloud version of the Secure Firewall migration tool hosted on CDO, skip to step 4.

Procedure


Step 1

On your computer, create a folder for the Secure Firewall migration tool.

We recommend that you do not store any other files in this folder. When you launch the Secure Firewall migration tool, it places the logs, resources, and all other files in this folder.

Note

 
Whenever you download the latest version of the Secure Firewall migration tool, ensure, you create a new folder and not use the existing folder.

Step 2

Browse to https://software.cisco.com/download/home/286306503/type and click Firewall Migration Tool.

The above link takes you to the Secure Firewall migration tool under Firewall NGFW Virtual. You can also download the Secure Firewall migration tool from the Firewall Threat Defense device download areas.

Step 3

Download the most recent version of the Secure Firewall migration tool into the folder that you created.

Ensure that you download the appropriate executable of the Secure Firewall migration tool for Windows or macOS machines.

Step 4

If you are a CDO user and want to use the migration tool hosted on it, log in to your CDO tenant and on the left pane, navigate to Administration > Migration > Firewall Migration Tool to create your migration instance.


Run the Migration

Launch the Secure Firewall Migration Tool

This task is applicable only if you are using the desktop version of the Secure Firewall migration tool. If you are using the cloud version of the migration tool hosted on CDO, skip to Upload the Check Point Configuration File .


Note


When you launch the desktop version of the Secure Firewall migration tool a console opens in a separate window. As you go through the migration, the console displays the progress of the current step in the Secure Firewall migration tool. If you do not see the console on your screen, it is most likely to be behind the Secure Firewall migration tool.

Before you begin

Procedure


Step 1

On your computer, navigate to the folder where you downloaded the Secure Firewall migration tool.

Step 2

Do one of the following:

  • On your Windows machine, double-click the Secure Firewall migration tool executable to launch it in a Google Chrome browser.

    If prompted, click Yes to allow the Secure Firewall migration tool to make changes to your system.

    Note


    Ensure you disable any popup blockers in your browser because they might hinder login popus from appearing.

    The Secure Firewall migration tool creates and stores all related files in the folder where it resides, including the log and resources folders.

  • On your Mac move, the Secure Firewall migration tool *.command file to the desired folder, launch the Terminal application, browse to the folder where the Secure Firewall migration tool is installed and run the following commands:

    # chmod 750 Firewall_Migration_Tool-version_number.command

    # ./Firewall_Migration_Tool-version_number.command

    The Secure Firewall migration tool creates and stores all related files in the folder where it resides, including the log and resources folders.

    Tip

     
    When you try to open the Secure Firewall migration tool, you get a warning dialog because the Secure Firewall migration tool is not registered with Apple by an identified developer. For information on opening an application from an unidentified developer, see Open an app from an unidentified developer.

    Note


    Use MAC terminal zip method.

Step 3

On the End User License Agreement page, click I agree to share data with Cisco Success Network if you want to share telemetry information with Cisco, else click I'll do later.

When you agree to send statistics to Cisco Success Network, you are prompted to log in using your Cisco.com account. Local credentials are used to log in to the Secure Firewall migration tool if you choose not to send statistics to Cisco Success Network.

Step 4

On the Secure Firewall migration tool's login page, do one of the following:

  • To share statistics with Cisco Success Network, click the Login with CCO link to log in to your Cisco.com account using your single sign-on credentials. If you do not have a Cisco.com account, create it on the Cisco.com login page.

    Proceed to step 8, if you have used your Cisco.com account to log in.

  • If you have deployed your firewall in an air-gapped network that does not have internet access, contact Cisco TAC to receive a build that works with administrator credentials. Note that this build does not send usage statistics to Cisco, and TAC can provide you the credentials.

Step 5

On the Reset Password page, enter the old password, your new password, and confirm the new password.

The new password must have 8 characters or more and must include upper and lowercase letters, numbers, and special characters.

Step 6

Click Reset.

Step 7

Log in with the new password.

Note

 
If you have forgotten the password, delete all the existing data from the <migration_tool_folder> and reinstall the Secure Firewall migration tool.

Step 8

Review the premigration checklist and make sure you have completed all the items listed.

If you have not completed one or more of the items in the checklist, do not continue until you have done so.

Step 9

Click New Migration.

Step 10

On the Software Update Check screen, if you are not sure you are running the most recent version of the Secure Firewall migration tool, verify the version on Cisco.com.

Step 11

Click Proceed.


What to do next

You can proceed to the following step:

Using the Demo Mode in the Secure Firewall Migration Tool

When you launch the Secure Firewall Migration tool and are on the Select Source Configuration page, you can choose to start performing a migration using Start Migration or enter the Demo Mode.

The demo mode provides an opportunity to perform a demo migration using dummy devices and visualize how an actual migration flow would look like. The migration tool triggers the demo mode based on the selection you make in the Source Firewall Vendor drop-down; you can also upload a configuration file or connect to a live device and continue with the migration. You can proceed performing the demo migration by selecting demo source and target devices such as demo FMC, demo FTD devices, or Multicloud Defense.


Caution


Choosing Demo Mode erases existing migration workflows, if any. If you use the demo mode while you have an active migration in Resume Migration, your active migration is lost and needs to be restarted from first, after you use the demo mode.


You can also download and verify the pre-migration report, and perform all other actions like you would in an actual migration workflow. However, you can only perform a demo migration up to validation of the configurations. You cannot push the configurations to the demo target devices you selected because this is only a demo mode. You can verify the validation status and the summary and click Exit Demo Mode to go the Select Source Configuration page again to start your actual migration.


Note


The demo mode lets you leverage the whole feature set of the Secure Firewall Migration Tool, except pushing of configurations, and do a trial run of the end-to-end migration procedure before performing your actual migration.


Export the Check Point Configuration Files for r80


Note


Export of Check Point r80 configuration is supported only with the Live Connect feature on the Secure Firewall migration tool.


To configure on the Check Point device the credentials required for migration and to export the Check Point configuration files, perform the following:

Pre-Stage the Check Point (r80) Devices for Configuration Extraction Using Live Connect


Note


Ensure that your Check Point management center command line (CLI) is in CLISH mode. If it is in Expert mode, exit Expert mode and switch to CLISH mode before proceeding with the configuration export via Live Connect.


You can configure the credentials on the Check Point (r80) devices before migration using any one of the following steps:

Export from Distributed Check Point Deployment
You must configure the credentials on the Check Point (r80) devices before using Live Connect on the Secure Firewall migration tool to extract the Check Point configuration.

The procedure for pre-staging credentials on a distributed Check Point deployment includes the following steps:

Procedure

Step 1

Create the following on the Gaia Console Check Point Security Gateway:

  1. In the web browser, open the Check Point Gaia Console application through an HTTPS session to connect to the Check Point Security Gateway.

  2. Navigate to the User Management tab and choose Users > Add.

  3. In the Add User window, create a new username and password with the following details:

    • From the Shell drop-down, choose /etc/cli.sh.

    • From the Available Roles, choose adminRole.

    • Retain the default values for the remaining fields.

    • Click Ok.

  4. SSH into your Check Point Security Gateway and create a new password using the command:

    set expert-password <password>

    Note

     
    • If you already have the expert password configured on the Check Point device, reuse that.

    • You will need these credentials on Connect to Check Point Security Gateway page as shown in step 3.

    Once you have configured the expert password, the pre-staging of credentials for Check Point r80 Gateway is complete.

    For more information, see Figure 3.

Step 2

Create the username and password on the Check Point Security Manager for r80:

  1. On the SmartConsole application, perform these steps:

    1. Log in to Check Point Security Manager.

    2. Navigate to Manage and Settings > Permissions and Administrators > Administrators.

    3. Click * to create a new username and password, and perform these steps:

      • Choose Authentication Method as Check Point Password.

      • Click Set New Password to set up a new password.

        Note


        Ensure that you do not select the User Must Change Password on the Next Login check box.

      • Choose Permission Profile as Super User.

      • Choose Expiration as Never.

    4. Click Publish to save the configuration changes on the Check Point SmartConsole application.

  2. On the Gaia Console for Check Point Security Manager, perform these steps:

    Note


    Ensure that the username and password that you now create is the same as that created in the SmartConsole application in Step 2a.

    1. In the web browser, open the Gaia Console application through an HTTPS session to connect to the Check Point Security Manager.

    2. Navigate to the User Management tab, and choose Users > Add.

    3. Create a username and password that are the same as the username and password created in Step 2a (3) of the SmartConsole application.

      • From the Shell drop-down, choose /bin/bash.

      • From the Available Roles drop-down, choose adminRole.

      • Retain the default values for the remaining fields.

      • Click Ok.

    4. SSH into the Check Point Security Manager and create an expert password using the command:

      set expert-password <password>

      Note

       
      • If you have already configured the expert password, you can use that password.

      • The username and password that are created in Step 2b (3) and Step 2a (3) must be the same.

    Pre-staging of credentials on Check Point in a distributed deployment for Check Point Security Manager is complete.

    You will need these credentials on Connect to Check Point Security Manager page as shown in Step 4.

If you are using a custom API port on the Check Point Smart Manager, see Custom API Port for Check Point r80.


What to do next

Export the Check Point Configuration Files for r80

Export from Standalone Check Point Deployment
You must configure the credentials on the Check Point (r80) devices before using Live Connect on the Secure Firewall migration tool to extract the Check Point configuration.

The procedure for pre-staging credentials on standalone Check Point deployment includes the following steps:

Procedure

Step 1

In the web browser, open the Gaia Console application through an HTTPS session to connect to the standalone Check Point Device that manages both Check Point Security Gateway and Check Point Security Manager.

Step 2

Navigate to the User Management tab and choose Users > Add.

  1. In the Add User window, create a new username and password with the following details:

    • From the Shell drop-down, choose /etc/cli.sh.

    • From the Available Roles drop-down, choose adminRole.

    • Retain the default values for the remaining fields.

    • Click Ok.

    You will need these credentials on Connect to Check Point Security Gateway page as shown in step 3.

    For more information, see Figure 3.

  2. In the Add User window, create another username and password with the following details:

    • From the Shell drop-down, choose /bin/bash.

    • From the Available Roles drop-down, choose adminRole.

    • Retain the default values for the remaining fields.

    • Click Ok.

Step 3

Create the following on the SmartConsole application for r80 on the Check Point device:

Note


Ensure that the username and password that you will now create are the same as those created in the Check Point Gaia Console in the preceding step.

  1. Log in to SmartConsole application of the Check Point device.

  2. Navigate to Manage and Settings > Permissions and Administrators > Administrators.

  3. Click * to create a new username and password with the following details:

    • Choose the Authentication Method as Check Point Password.

    • Click Set New Password to set up a new password.

      Note


      Ensure that you do not select the User Must Change Password on the Next Login check box.

    • Choose the Permission Profile as Super User.

    • Choose the Expiration as Never.

    The username and password that you created in Step b of Step 2 and Step c of Step 3 must be the same.

    You will need these credentials on Connect to Check Point Security Manager page as shown in Step 4.

  4. Click Publish to save the configuration changes on the Check Point SmartConsole application.

Step 4

SSH into the Check Point device and create an expert password using the command:

set expert-password <password>

Note

 
  • If you already have the expert password configured on the Check Point device, reuse that.

  • The username and password that were created in Step b of Step 2 and Step c of Step 3 must be the same.

Pre-staging of credentials on Check Point devices in a Standalone deployment is complete.

If you are using a custom API port on the Check Point Smart Manager, see Custom API Port for Check Point r80.


What to do next

Export the Check Point Configuration Files for r80

Export from Multi-Domain Check Point Deployment
You must configure the credentials on the Check Point (r80) devices using Live Connect on the Secure Firewall migration tool to extract the Check Point configuration.

The procedure for pre-staging credentials on a multi-domain Check Point deployment includes the following steps:

Procedure

Step 1

Create the following on the Gaia Console Check Point Security Gateway:

  1. In the web browser, open the Gaia Console application through an HTTPS session to connect to the Check Point Security Gateway.

  2. Navigate to the User Management tab, and choose Users > Add.

  3. In the Add User window, create a new username and password with the following details:

    • From the Shell drop-down, choose /etc/cli.sh.

    • From the Available Roles drop-down, choose adminRole.

    • Retain the default values for the remaining fields.

    • Click Ok.

  4. SSH into your Check Point Security Gateway and create a new password using the command:

    set expert-password <password>

    Pre-staging of credentials on the Check Point Security Gateway for a multi-domain deployment is complete.

  5. (Optional) When exporting configuration from a Virtual System Extension (VSX) device, check the Virtual System ID checkbox to be able to enter the virtual system ID.

    Figure 1. Connect to Check Point Security Gateway - Multi-Domain Deployment

Step 2

Create the username and password on the Check Point Security Manager:

  1. On the SmartConsole (mds) application, perform these steps:

    1. Log in to Check Point Security Manager.

    2. Navigate to Manage and Settings > Permissions and Administrators > Administrators.

    3. Click * to create a new username and password with the following details:

      • Choose the Authentication Method as Check Point Password.

      • Click Set New Password to set up a new password.

        Note


        Ensure that you do not select the User Must Change Password on the Next Login check box.

      • Choose the Permission Profile as Multi-domain Super User.

      • Choose the Expiration as Never.

    4. Click Publish to save the configuration changes on the Check Point SmartConsole application.

      If you are using a custom API port on the Check Point Smart Manager, see Custom API Port for Check Point r80.

  2. On the Gaia Console for Check Point Security Manager, perform these steps:

    Note


    Ensure that the username and password that you will now create is the same as that created in the SmartConsole application Step 2a (3).

    1. In the web browser, open the Gaia Console application through an HTTPS session to connect to the Check Point Security Manager.

    2. Navigate to the User Management tab, and choose Users > Add.

    3. Create a username and password that is the same as that created in Step 2a (3) of the SmartConsole application.

      • From the Shell drop-down, choose /bin/bash.

      • From the Available Roles drop-down, choose adminRole.

      • Retain the default values for the remaining fields.

      • Click Ok.

    4. SSH into your Check Point Security Manager and create a new password using the command:

      set expert-password <password>

      Note

       
      • If you already have the expert password configured on the Check Point device, reuse that.

      • The username and password that are created in Step 2a (3) and Step 2b (3) must be the same.

    Pre-staging of credentials on Check Point Security Manager in a Multi-Domain deployment is complete.

    You will need the credentials to connect to Live Connect as in Figure 2.

    Figure 2. Connect to Check Point Security Manager - Multi-Domain Deployment

    Note

     
    • If you are using a custom API port on the Check Point Smart Manager, see Custom API Port for Check Point r80.

    • Extraction of Global Policy Package for Multi-Domain Deployment is not possible. Hence, the Objects, ACE rules, and NAT rules configured as part of configuration under Check Point CMA are only exported and migrated.


What to do next

Export the Check Point Configuration Files for r80

Use a Custom API Port for Check Point (r80) Security Manager

Note


If you are using a custom API port on the Check Point Smart Manager, perform these steps:

  • Check the Check Point Multi-Domain Deployment check box on the Check Point Security Manager page of Live Connect.

  • Add the IP Address of Check Point CMA and API port details if using the multi-domain deployment.

  • Retain the IP Address of the Check Point Security Manager if it is a general deployment and enter the details of the Custom API Port.


Procedure to Export the Check Point Configuration Files for r80

Before you begin
It is mandatory to pre-stage the Check Point devices. For detailed information on configuring the credentials on the Check Point (r80) devices before migration, see Pre-stage the Check Point (r80) Devices for Configuration Extraction Using Live Connect.

Note


  • We recommend that you use Live Connect to extract the Check Point (r80) configurations.

  • Using a Check Point (r80) configuration, that is not exported using Live Connect in the Secure Firewall migration tool, results in the configuration getting migrated as unsupported, getting partially migrated, or resulting in a failed migration.

    If the information in the configuration export is incomplete, certain configurations are not migrated and are marked as unsupported.


To export the Check Point configuration files for r80, perform the following:

Procedure

Step 1

Select Check Point (r80) from the Select Source Config page.

Step 2

Click Connect.

Note

 
Live connect is available for Check Point (r80) only.

Step 3

Connect to Check Point Security Gateway. Perform the following:

  1. Enter the following in the Check Point r80 Security Gateway:

    • IP Address

    • SSH Port

    • Admin Username

    • Admin Password

    • Expert Password

    Figure 3. Connect to Check Point Security Gateway
  2. Click Login.

    The Secure Firewall migration tool generates the networking.txt file that has device-specific configurations such as interface and route configurations. Store the networking.txt file in a local directory for the current session of the Secure Firewall migration tool.

Step 4

Connect to Check Point Security Manager. Perform the following:

  1. Enter the following in the Check Point r80 Security Manager:

    • IP Address

    • SSH Port

    • Smart Console Username

    • Smart Console Password

    • Expert Password

    Figure 4. Connect to Check Point Security Manager
  2. Click Login.

    The Secure Firewall migration tool generates the Extracted-objects.json file that captures the complete network and service object configuration available in the Check Point Security Manager.

    Store the Extracted-objects.json in a local directory for the current session of the Secure Firewall migration tool.

Note


If you have connected the Secure Firewall migration tool to the Check Point Security Manager, the list of policy packages available in the Check Point Security Manager is displayed.

Step 5

Select the Check Point Policy Package that you want to migrate from the Select Check Point Package list, and click Start Extraction.

Figure 5. Extracting the Check Point Policy Package

Step 6

Download the configuration and proceed with the migration.

Figure 6. Extraction of the Check Point Configuration Complete for Distributed and Standalone Deployment

Step 7

Click Next to proceed with Migration of Check Point (r80) configuration.


Extract Another Configuration File

To extract another configuration file, perform the following steps:

  • Click Back to source selection to extract a new configuration for a different policy package or to connect to a different Check Point (r80) firewall.

  • Download the current configuration if you must migrate the extracted Check Point (r80) configuration later.


    Note


    The current configuration file is downloaded to a default download location set by the browser.


You can use Assembly Line Approach to extract r80 configuration:

  • Perform Live Connect to extract the Check Point (r80) configuration file for each package of firewall or for different firewalls.

  • Create a repository for multiple configurations.

  • Use the Start Migration later option using manual upload to proceed with the migration later.

Specify Destination Parameters for Multicloud Defense

Before you begin

  • Ensure that you have a CDO tenant with Multicloud Defense enabled on it.

  • Ensure that you have purchased the required operating licenses for Multicloud Defense.


    Note


    You can migrate configurations to Multicloud Defense even during the 90-day free trial because the trial experience offers full functionality of a paid subscription.


  • Ensure that you have obtained the base URL of Multicloud Defense and the CDO tenant name.

  • Ensure that you have created an API key and also copied the API Key ID and API Key Secret that Multicloud Defense generates when you create the API key. See Create an API Key in Multicloud Defense for more information.

Procedure


Step 1

On the Select Target window, choose Multicloud Defense.

Step 2

Specify the following parameters in the correponding fields to enable the connection between the migration tool and Multicloud Defense:

  • Enter Base URL: This is the base URL that you see on your browser when you connect to your Multicloud Defense controller. For example, when you are in the controller dashboard, copy the link on your browser, excluding the /dashboard part. The URL looks like https://xxxx.mcd.apj.cdo.cisco.com

  • Enter Tenant Name: The name of your CDO tenant. Copy it from the profile drop-down on the top-right corner when you are in the Multicloud Defense window or from Administration > General Settings if you are in the CDO window.

  • Enter API Key ID: The API Key ID that Multicloud Defense controller generates when you create an API key by navigating to System and Accounts > API Keys. Specify a name for the key, your email address, the role you want the API key to have, and the API key lifetime to generate a key. The default key lifetime is set to 365 days.

  • Enter API Key Secret: The API Key Secret that Multicloud Defense controller generates when you create an API key.

    Note


    Ensure you copy both the API Key ID and API Key Secret when they are displayed only at the time of creating the API key. If you missed to copy them, delete the API key that you created, generate a new one, and make sure you copy them this time.

Step 3

Click Connect and wait to receive the Successfully gathered message, which confirms that the connection attempt to Multicloud Defense is a success.

Step 4

The Select Features lets you select the configurations that you want to migrate to Multicloud Defense. Access Control and Migrate Only Reference Objects checkboxes are checked by default.

Note that other configurations from the source firewall such as interfaces and routes are not supported for this migration.

Step 5

Click Proceed and Start Conversion. Wait for the migration tool to parse the source configurations.

Step 6

Review the summary of the elements that the Secure Firewall migration tool converted.

To check whether your configuration file is successfully uploaded and parsed, download and verify the Pre-Migration Report before you continue with the migration.

Step 7

Click Download Report and save the Pre-Migration Report.

A copy of the Pre-Migration Report is also saved in the Resources folder in the same location as the Secure Firewall migration tool.

Step 8

Click Next.


Review the Pre-Migration Report


Note


Configurations which are not parsed by the Secure Firewall Migration Tool are represented in the Pre-Migration Report with the exact XML (r75-r77.30) or json (r80) tags as in the source configuration files.

If you have missed to download the Pre-Migration Reports during migration, use the following link to download:

Pre-Migration Report Download Endpoint—http://localhost:8888/api/downloads/pre_migration_summary_html_format


Note


You can download the reports only when the Secure Firewall Migration Tool is running.

Procedure


Step 1

Navigate to the location where you downloaded the Pre-Migration Report.

Note


A copy of the Pre-Migration Report is also saved in the Resources folder in the same location as the Secure Firewall Migration Tool.

Step 2

Open the Pre-Migration Report and carefully review its contents to identify issues, if any, that may cause the migration to fail.

The Pre-Migration Report includes the following information:

  • A summary of the supported configuration elements that can be successfully migrated to Firewall Threat Defense or Multicloud Defense and specific features selected for migration.

  • Configuration Lines with Errors—Details of configuration elements that cannot be successfully migrated because the Secure Firewall Migration Tool could not parse them. Correct these errors in the configuration, export a new configuration file, and then upload the new configuration file to the Secure Firewall Migration Tool before proceeding.

  • Ignored Configuration—Details of configuration elements that are ignored because they are not supported by the Multicloud Defense or the Secure Firewall Migration Tool. The Secure Firewall Migration Tool does not parse these lines. Review these lines, verify whether each feature is supported in Multicloud Defense, and if not supported, plan to configure the features manually.

Step 3

(Optional) If the Pre-Migration Report recommends corrective actions, complete the corrections in the interface, export the configuration file again, and upload the updated configuration file before proceeding.

Step 4

After your configuration file is successfully uploaded and parsed, return to the Secure Firewall Migration Tool, and click Next to continue the migration.


Optimize, Review, and Validate the Configuration to be Migrated

Before you begin

The Optimize, Review and Validate Configuration page lets you review and validate the configuration parameters that you are about to migrate to the target Multicloud Defense. In this step, the migration tool validates the configurations against the existing configuration on Multicloud Defense and suggests changes that need to be performed for the migration to be successful, such as associating access control rules and renaming objects to avoid duplicates on the target Multicloud Defense.

After you validate, a flashing tab indicates that there is action you need to perform on the tab.

Procedure


Step 1

On the Access Control tab that lists all your access control list (ACL) entries, you can do the following:

  • Click Optimize ACL to let the migration tool identify all the shadow and redundant ACLs and choose whether to migrate them as disabled ACLs or to exclude them from being migrated.

    Secure Firewall Migration Tool ACL Optimization Overview

    The Secure Firewall migration tool provides support to identify and segregate ACLs that can be optimized (disabled or deleted) from the firewall rule base without impacting the network functionality.

    The ACL optimization supports the following ACL types:

    • Redundant ACL—When two ACLs have the same set of configurations and rules, then removing the non-base ACL will not impact the network. For example, if any two rule allows FTP and IP traffic on the same network with no rules that are defined for denying access, the first rule can be deleted.

    • Shadow ACL—The first ACL completely shadows the configurations of the second ACL. If two rules have similar traffic, the second rule is not applied to any traffic as it appears later in the access list. If the two rules specify different actions for traffic, you can either move the shadowed rule or edit any one of the rules to implement the required policy. For example, the base rule may deny the IP traffic, and the shadowed rule may allow FTP traffic for a given source or destination.

    The Secure Firewall migration tool uses the following parameters while comparing rules for ACL optimization:

    • The disabled ACLs are not considered during the optimization process.

    • The source ACLs are expanded into the corresponding ACEs (inline values), and then compared for the following parameters:

      • Source and Destination Network

      • Source and Destination Port

    Click Download Report to review the ACL name and the correponding redundant and shadowed ACLs tabulated in an Excel file. Use the Detailed ACL Information sheet to view more ACL information.

    Click Proceed to start the optimization process.

  • For each entry in the table, review the mappings and verify that they are correct.

    A migrated Access Policy Rule uses the ACL name as prefix and appends the ACL rule number to it to make it easier to map back to the configuration file. For example, if an ACL is named "inside_access," then the first rule (or ACE) line in the ACL will be named as "inside_access_#1." If a rule must be expanded because of TCP or UDP combinations, an extended service object, or some other reason, the Secure Firewall migration tool adds a numbered suffix to the name. For example, if the allow rule is expanded into two rules for migration, they are named "inside_access _#1-1" and " inside_access_#1-2".

    For any rule that includes an unsupported object, the Secure Firewall migration tool appends an "_UNSUPPORTED" suffix to the name.

  • If you do not want to migrate or want to migrate a few ACLs as disabled, check the checkboxes against the row, click Actions, and choose the relevant option. Check the Select all entries checkbox to perform bulk changes.

  • To edit an access control list policy, select the row by checking the check box for the policy, and choose Actions > Edit.

    All rules that are not applicable are grayed out in the table.

Step 2

On the Objects tab, you can do the following:

Choose the following tabs and review the mappings:

  • Network Objects

  • Port Objects

  • FQDN Objects

If you want to rename an object, check the checkbox against the object row, click Actions, and choose Rename. Check the Select all entries checkbox to perform bulk changes.

Step 3

After you have completed your review, click Validate. Note that the mandatory fields that need your attention keeps flickering until you enter values in them. The Validate button gets enabled only after all the mandatory fields are filled.

During validation, the Secure Firewall migration tool connects to Multicloud Defense, reviews the existing objects, and compares those objects to the list of objects to be migrated. If an object already exists in Multicloud Defense, the Secure Firewall migration tool does the following:

  • If the object has the same name and configuration, the Secure Firewall migration tool reuses the existing object and does not create a new object in Multicloud Defense.

  • If the object has the same name but a different configuration, the Secure Firewall migration tool reports an object conflict.

You can view the validation progress in the console.

Step 4

When the validation is complete, if the Validation Status dialog box shows one or more object conflicts, do the following:

  1. Click Resolve Conflicts.

    The Secure Firewall migration tool displays a warning icon on either or both of the Network Objects or Port Objects tab, depending upon where the object conflicts were reported.

  2. Click the tab and review the objects.

  3. Check the entry for each object that has a conflict and choose Actions > Resolve Conflicts.

  4. In the Resolve Conflicts window, complete the recommended action.

    For example, you might be prompted to add a suffix to the object name to avoid a conflict with the existing Multicloud Defense object. You can accept the default suffix or replace it with one of your own.

  5. Click Resolve.

  6. When you have resolved all object conflicts on a tab, click Save.

  7. Click Validate to revalidate the configuration and confirm that you have resolved all object conflicts.

Step 5

When the validation is complete and the Validation Status dialog box displays the message Successfully Validated, continue with pushing the configuration to Multicloud Defense.


Push the Configuration to Multicloud Defense

Before you begin

You cannot push the configuration to Multicloud Defense if you have not successfully validated the configuration and resolved all object conflicts.


Note


Do not make any configuration changes or deploy to any device while the Secure Firewall migration tool is sending the configuration to Multicloud Defense.


Procedure


Step 1

In the Validation Status dialog box, review the validation summary.

Step 2

Click Push Configuration to send the source firewall configuration to Multicloud Defense.

The Secure Firewall migration tool displays a summary of the progress of the migration. You can view detailed, line-by-line progress of which the components that are being pushed to Multicloud Defense in the console.

Note


If there are configurations with errors when a bulk configuration push is being done, the migration tool throws a warning, prompting you to abort the migration to fix the error manually or to continue the migration leaving out the incorrect configurations. You can choose to view the configurations that have errors and then select Continue with migration or Abort. If you abort the migration, you can download the troubleshooting bundle and share it with Cisco TAC for analysis.

If you continue the migration, the migration tool will treat the migration as a partial success migration. You can download the postmigration report to view the list of configurations that were not migrated because of the push error.

Step 3

After the migration is complete, click Download Report to download and save the post-migration report.

A copy of the Post-Migration Report is also saved in the Resources folder in the same location as the Secure Firewall migration tool.

Step 4

If your migration failed, review the post-migration report, log file, and unparsed the configuration file carefully to understand what caused the failure.

You can also contact the support team for troubleshooting.

Migration Failure Support

If the migration is unsuccessful, contact Support.

  1. On the Complete Migration screen, click the Support button.

    The Help support page appears.

  2. Check the Support Bundle check box and then select the configuration files to download.

    Note

     
    The Log and dB files are selected for download by default.
  3. Click Download.

    The support bundle file is downloaded as a .zip to your local path. Extract the zip folder to view the log files, DB, and the configuration files.

  4. Click Email us to email the failure details for the technical team.

    You can also attach the downloaded support files to your email.

  5. Click Visit TAC page to create a TAC case in the Cisco support page.

    Note

     
    You can open a TAC case at any time during the migration from the support page.

Review the Post-Migration Report and Complete the Migration

Before you begin

The post-migration report provides details on ACL count under various categories, ACL optimization, and the overall view of optimization performed on the configuration file.

Procedure


Step 1

Navigate to where you downloaded the Post-Migration Report.

Step 2

Open the post-migration report and carefully review its contents to understand how your source configuration was migrated.

  1. Migration Summary—A summary of the configuration that was successfully migrated from your source firewall to Multicloud Defense.

    You can also view a comparison chart that illustrates the difference between the count of pre-migration and post-migration states.

  2. Object Conflict Handling—Details of the objects that were identified as having conflicts with existing objects in Multicloud Defense. If the objects have the same name and configuration, the Secure Firewall migration tool reused the Multicloud Defense object. If the objects have the same name but a different configuration, you renamed those objects. Review these objects carefully and verify that the conflicts were appropriately resolved.

  3. Access Control Rules That You Chose Not to Migrate—Details of the rules that you choose not to migrate with the Secure Firewall migration tool. Review these rules that were disabled by the Secure Firewall migration tool and were not migrated. Review these lines and verify that all the rules you choose are listed in this section. If desired, you can configure these rules manually.

  4. Partially Migrated Configuration—Details of the rules that were only partially migrated, including rules with advanced options where the rule could be migrated without the advanced options. Review these lines, verify whether the advanced options are supported in Multicloud Defense, and if so, configure these options manually.

  5. Expanded Access Control Policy Rules—Details of the source firewall access control policy rules that were expanded from a single point rule into multiple Multicloud Defense rules during migration.

  6. Actions Taken on Access Control Rules

    • Access Rules You Chose Not to Migrate—Details of the access control rules that you choose not to migrate with the Secure Firewall migration tool. Review these lines and verify that all the rules you choose are listed in this section. If desired, you can configure these rules manually in Multicloud Defense.

    • Access Rules with Rule Action Change—Details of all Access Control Policy Rules that had ‘Rule Action’ changed using the Secure Firewall migration tool. The Rule Action values are - Allow, Trust, Monitor, Block, Block with reset. Review these lines and verify that all the rules you choose are listed in this section. If desired, you can configure these rules manually in Multicloud Defense.

Note

 
An unsupported rule that was not migrated causes issues with unwanted traffic getting through your firewall. We recommend that you configure a rule in Multicloud Defense to ensure that this traffic is blocked.

Step 3

Open the Pre-Migration Report and make a note of any configuration items that you must migrate manually on Multicloud Defense.

Step 4

Verify and ensure that all the migrated configuration parameters are available on Multicloud Defense.