Administration

This chapter provides information on the following topics:

Administration FAQs

This section provides answers to frequently asked questions (FAQs) about the role of a Cisco Secure Email Encryption Service (Encryption Service) corporate account administrator.

Q. What is a Cisco Secure Email Encryption Service Corporate Account?

A. Each organization that uses encryption technology and Encryption Service has a corporate account with the service. This account can be used in conjunction with one or more Cisco Secure Email Gateways that send encrypted messages.

Typically, an organization has a single corporate account, and the account administrator(s) manages only that account.

Q. What are the typical tasks of an account administrator?

A. Typical administrative tasks include:

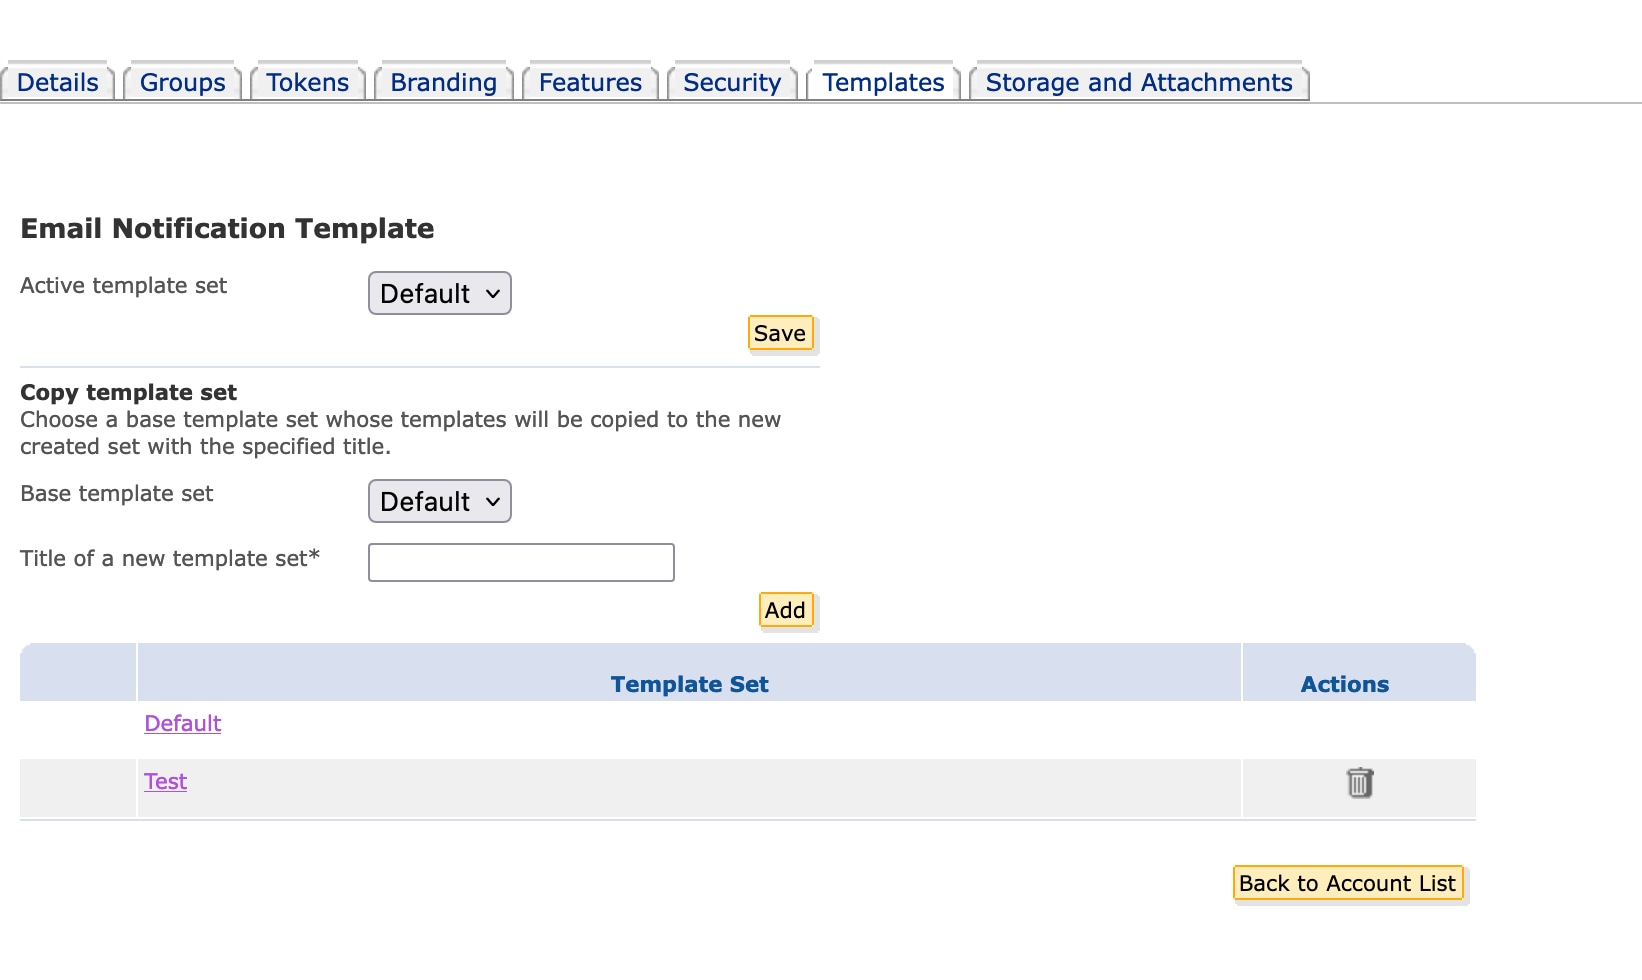
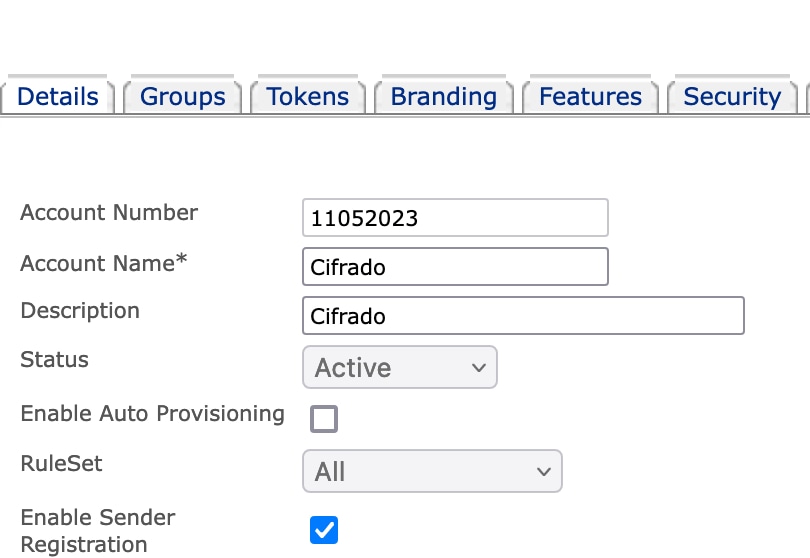
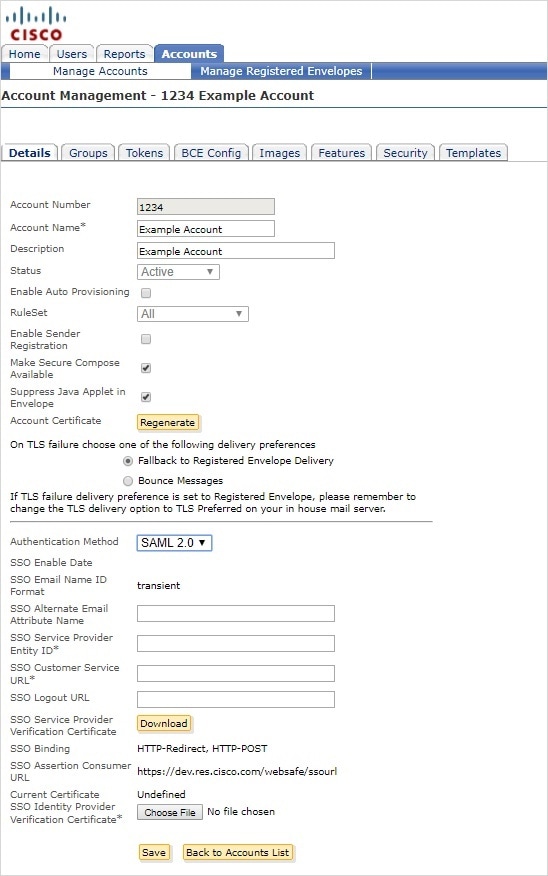
  • Configuring the corporate account (for example, uploading an organization’s logo to display it on Secure Messages sent using the account)

    .
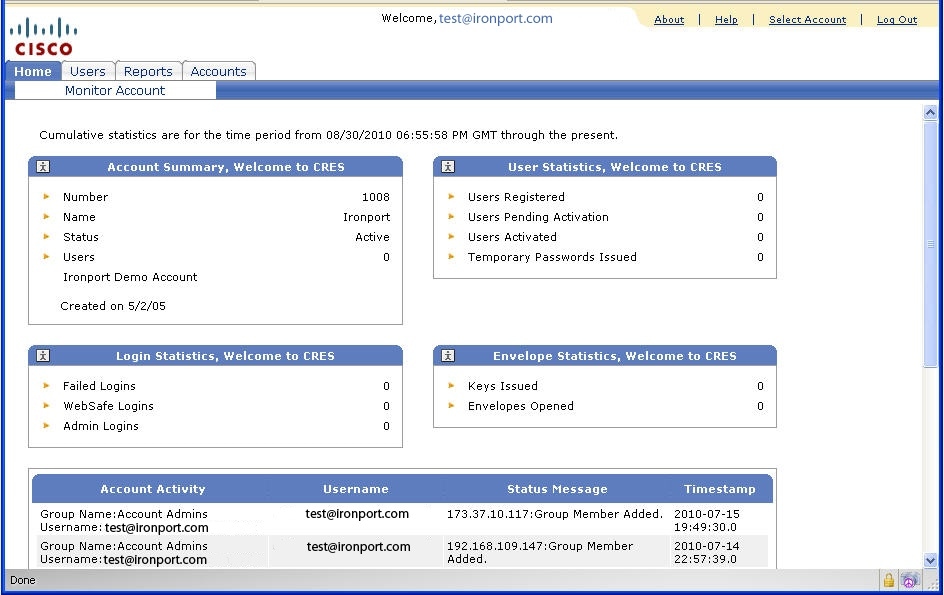
  • Monitoring account usage (for example, viewing statistics about user registration and user account activation).

  • Managing messages sent using the account (for example, disabling access to a particular message).


Note


Account administrators cannot access the content of user messages that they manage in the Administration Console.

For more information about administrative tasks, see the Common Tasks.

Q. Which email administration topics are covered in this guide?

A. Administration of a Cisco Secure Email solution involves two distinct areas of responsibility:

  • Managing Cisco Secure Email Gateways and Cisco Encryption appliances

  • Managing a Encryption Service corporate account

This guide contains information about managing a Encryption Service corporate account. For information about managing Cisco Secure Email Gateways, see the product documentation available on the Cisco Customer Support Portal.

Q. What is recipient enrollment?

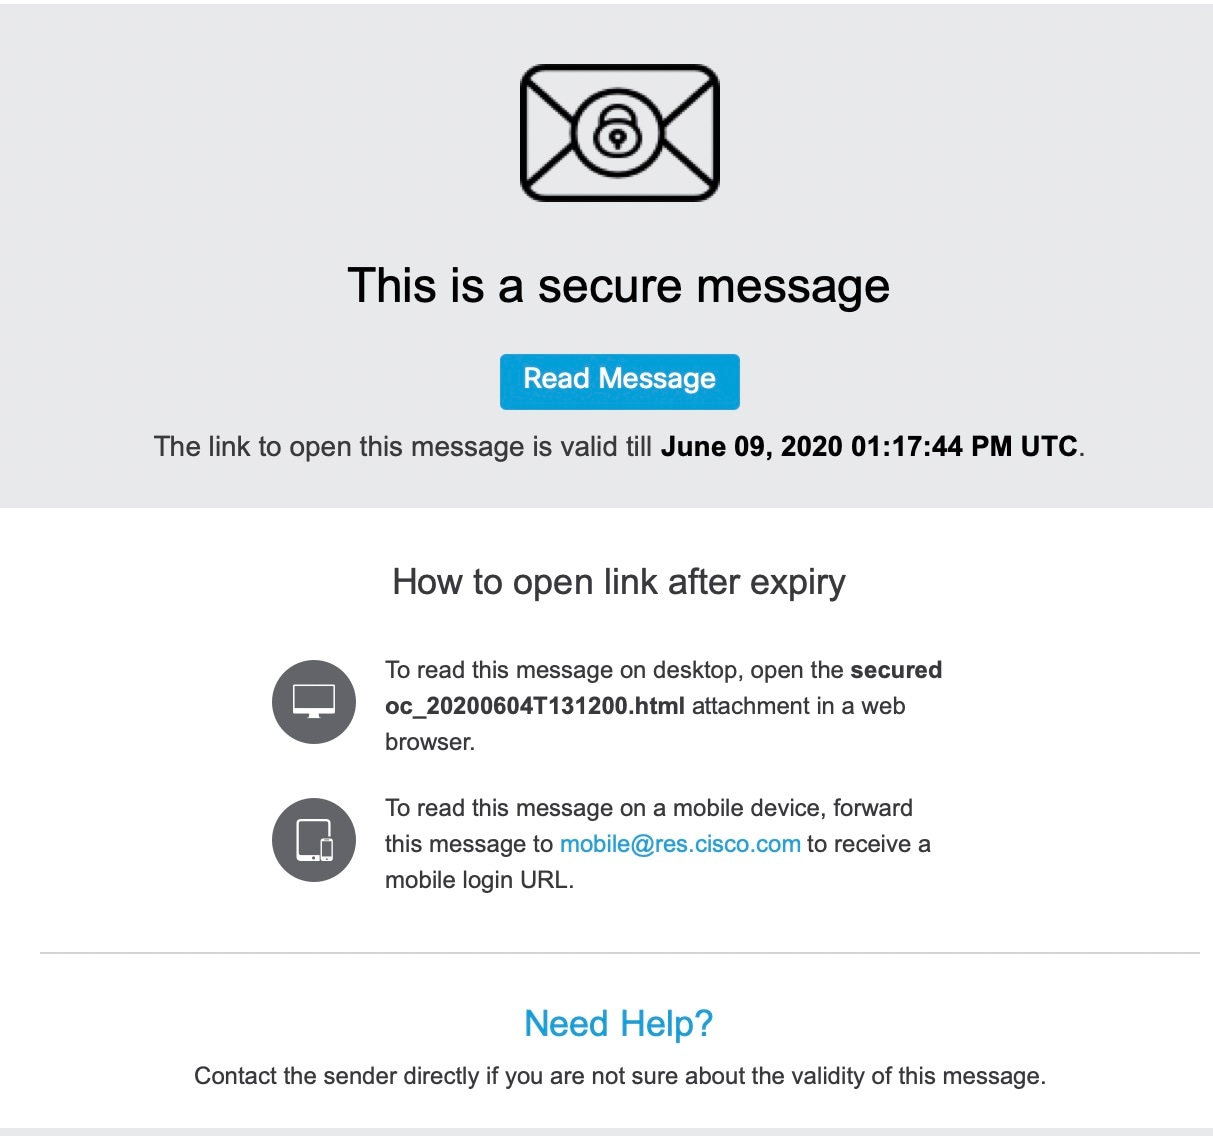
A. Recipient enrollment, also called user registration, is the process of creating a Encryption Service user account for a first-time recipient of a Registered Secure Message. Most message recipients must complete the enrollment process by providing user profile information and choosing a password before opening the encrypted messages that they receive. However, if the message uses low security, the user can open the message without registering.

Cisco Secure Email Encryption Service Accounts

Q. When a user enrolls with Encryption Service, why is the user not associated with a particular sender’s corporate account.

A. Senders and recipients have Encryption Service accounts. The sender Encryption Service account allows the sender of an encrypted message to manage their secure messages either by expiring or recalling them.

Users

User account administration is handled by system administrators at Encryption Service. Typically, corporate account administrators do not manage individual user accounts.

Corporate administrator manages internal Encryption Service users for the purpose of resetting passwords or locking existing accounts. If a Encryption Service administrator wishes to manage their user accounts, a customer support ticket must be filed to add the managed domains to the account.

Q. What are user groups and roles?

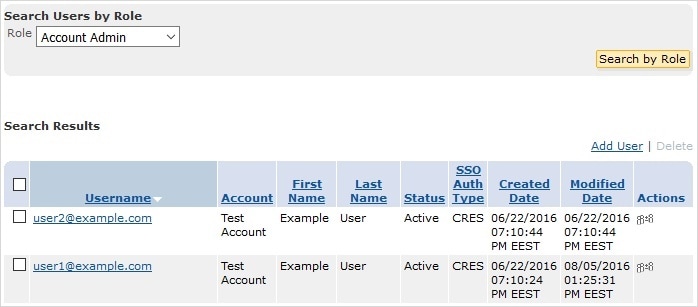
A. Groups are lists of enrolled users. Roles are sets of privileges that you can associate with groups. For example, to create an account administrator, someone with administrative privileges for the account must add the user to the account administrator group. Roles are not associated with individuals.


Note


Every user in a particular account administrator group can administer that account.

Getting Started

This section explains how to get started using the Administration Console for a Cisco Secure Email Encryption Service corporate account.

Understanding the Corporate Account Setup Process

When an organization configures a Cisco Secure Email Gateway to use encryption with Cisco Secure Email Encryption Service as the hosted key service, a corporate account is created for the organization. The Cisco Secure Email Gateway of the organization is associated with the corporate account.


Note


Corporate account administrators do not manage the initial account setup process.

By default, the Account Administrator group for the new account includes the organization’s initial corporate account administrator. The corporate account administrator can create additional administrators by adding users to the Account Administrator group. For more information, see the Adding a Corporate Account Administrator. The Account Administrator group may also include Cisco Sales Engineers who are familiar with the Cisco Secure Email Gateways and system configuration of the organization.

Logging In

To manage your corporate account, log in using this URL:

https://res.cisco.com/admin/index.action

If you are the administrator for multiple accounts, you are asked to select an account when you log in. You must:

  • Remember the selected account on your computer.

  • Automatically select the saved account the next time you log in.

When you select the Remember me on this computer option, your browser stores a persistent cookie that Cisco Secure Email Encryption Service uses to identify you when you open a Secure Message.

When you select the Remember me on this computer option, opening Secure Messages can involve fewer steps, depending on the message security level specified by the sender.


Note


You must not check the Remember me on this computer check box, if you use a shared computer.

The Automatically select remembered account check box is not enabled if the Remember account on this computer check box is not selected.

To select another account after you are logging in, use the Select Account link at the bottom of the home page of the Administration Console. This link also allows you to clear the Automatically select remembered account check box.

When you log in to a corporate account, the Administration Console is displayed.

The home page is the Monitor Account page, which displays a summary of account activity.

The Administration Console contains the following tabs and links for navigating the site:

  • Home: Displays the Monitor Account page.

    Use the Monitor Account page to view system and account status. Click the Update button to retrieve the latest status information, or enter a value in the Update Interval field. Click Update to refresh the page at regular intervals (for example, every 10 seconds).

  • Users: Displays the User Management page.

    Typically, this page is used only by system administrators at Cisco. Corporate account administrators have access to only the individuals assigned to their account, and only if they have added the correct domain.

  • Reports: Displays the View Reports page.

    The View Reports page is typically used to run the Account Usage report. For more information about the Account Usage report, see Reporting

    The View Reports page includes links to the following reports:

    • User Information Report: Displays list of users associated with your account. This is applicable only if one or more domains are associated with the account, including sequence number ( # ), User ID, Email Address, First Name, Last Name, Status, Date Created, Last Login Date, and Last Modified Date.

    • Users Status Report: Displays the status —New, Active, Blocked for users associated with your domain.

    • Account Usage Report: Displays usage statistics for your corporate account. For more information about the Account Usage report, see Reporting

  • Accounts: Displays tabs for the Account Management page and the Manage Secure Messages page.

    Click the Manage Accounts tab to view the Account Management page, where you can configure your Encryption Service corporate account. For more information, see the Branding Secure Messages, the Adding a Corporate Account Administrator, and the Customizing Templates.

    Click the Manage Secure Messages tab to search for and manage the Secure Messages that were sent using your corporate account. For more information, see the Managing Messages.

Understanding the Icons in the Administration Console

Use the icons in the Administration Console to navigate the system and manage areas such as accounts and users. Hover text indicates what each icon represents.

Table 1. Icon Listing

Icon

Title

Action

Manage Users

Access the Group Membership page.

Manage Roles

Access the Group Authorization page.

Save Token

Save the token to your local machine. Tokens are customer-specific keys used to encrypt data between the Cisco Secure Email Gateway and Encryption Service (or a local key server). Currently used only by Customer Support.

Manage Rules

Access the Rules page.

Close or

Delete item

Delete the item.

Preview

Template

Preview template in the selected language.

Common Tasks

This section explains how to use the Administration Console to perform the following administrative tasks:


Note


Users can set the timestamp to their local time zone and to their desired format (12 hours or 24 hours). Any Administration Console screen that includes user timestamps will be affected by this feature for those users that have set the timestamp to their local time zone.

Configuring Cisco Secure Email Encryption Service Add-In

The Cisco Secure Email Encryption Service add-in allows your end users to encrypt their messages directly from Microsoft Outlook with a single click. This add-in can be deployed on Microsoft Outlook (for Windows and macOS) and Outlook Web App.

In addition to encrypting your messages, the end users can use the add-in to:

  • Identify if the recipient has read your message

  • Revoke the encryption keys

  • Set expiration dates for encrypted messages

  • Lock and unlock encrypted messages

  • Manage and search your encrypted messages

Supported Configurations

Microsoft Office Variant

Certified

Microsoft 365 Apps for Enterprise

Outlook Web App

(on the latest version of Google Chrome, Mozilla Firefox, Microsoft Edge, and Apple Safari.)


Note


You can install the Cisco Secure Email Encryption Service add-in only if you are using an Office 365/Microsoft 365 subscription.


Note


Only Microsoft Office 365 and Exchange Online are supported for Secure Email Encryption Add-In. Exchange Server (on-premises) is not supported.


How to Configure Cisco Secure Email Encryption Service Add-In

Step

Do This

More Information

1

Review the prerequisites and deployment best practices.

2

Register the Cisco Secure Email Encryption Service add-in as an application in the Azure Active Directory admin center.

See https://docs.microsoft.com/en-us/azure/active-directory/develop/quickstart-register-app

Note

 
Alternatively, you can reuse an existing registered application.

3

Obtain the following details of the registered application from the Azure Active Directory admin center.

  • Tenant ID

  • Client ID

  • Client Secret

Obtaining Tenant ID, Client ID, and Client Secret from Azure AD

4

Configure Graph API Permissions for the registered application in the Azure Active Directory admin center.

Configuring Graph API Permissions in Azure AD

5

Configure the Cisco Secure Email Encryption Service add-in in the Cisco Secure Email Encryption Service portal.

Configure the Cisco Secure Email Encryption Service Add-In in the Cisco Secure Email Encryption Service Portal

Prerequisites

Ensure that:

  • All the end users who plan to use the add-in use Office 365/Microsoft 365 subscription.

  • All the end users who plan to use the add-in are registered Cisco Secure Email Encryption Service users.

  • You have added the domain on which you plan to configure the add-in to your account in the Cisco Secure Email Encryption Service Administration Console. For more information, contact Cisco Customer Support (support@res.cisco.com)

Best Practices for Deploying the Cisco Secure Email Encryption Service Add-In

We recommend that you deploy the Cisco Secure Email Encryption Service add-in in a phased manner. The following are the recommended phases:

  1. Test Phase. Deploy the add-in to a small set of end users within a department or function. Evaluate the results and, if successful, move to the next phase.

  2. Pilot Phase. Deploy the add-in to more end users from different departments and functions. Evaluate the results and, if successful, move to the next phase.

  3. Production Phase. Deploy the add-in to all users.

Obtaining Tenant ID, Client ID, and Client Secret from Azure AD

Procedure

Step 1

Log in to the Azure Active Directory admin center https://aad.portal.azure.com/ as an administrator.

Step 2

Switch to the tenant in which you have registered the application.

Step 3

From App registrations, select your application.

Step 4

From Overview, copy the Application (client) ID and Directory (tenant) ID values.

Step 5

From Certificates & secrets, copy the value of an existing client secret or generate a new one.

Note


Make sure that you copy the client secret value before leaving this page. Otherwise, you will have to create another client secret on the Microsoft O365 Settings page.


Configuring Graph API Permissions in Azure AD

Procedure

Step 1

Log in to the Azure Active Directory admin center https://aad.portal.azure.com/ as an administrator.

Step 2

Switch to the tenant in which you have registered the application.

Step 3

From App registrations, select your application.

Step 4

Under API permissions, add the following Application Permissions:

  • Mail.Read

  • Mail.ReadWrite

  • Mail.Send

  • User.Read.All


Configure the Cisco Secure Email Encryption Service Add-In in the Cisco Secure Email Encryption Service Portal

Procedure

Step 1

Log in to the Cisco Secure Email Encryption Service portal as an Account Administrator.

Step 2

Go to Accounts > Manage Accounts.

Step 3

Click the account number on which you plan to configure the Cisco Secure Email Encryption Service add-in.

Step 4

Click the Add-in Config tab.

Step 5

Configure the Office 365/Microsoft 365 Mailbox settings. Enter the Azure AD details that you obtained from the Azure Management Portal and click Save Details .

Step 6

Configure the Cisco Secure Email Encryption Service add-in. Adjust the following options as needed and click Save Configuration.

Option

Description

Domain

Select the domain on which you plan to configure the Cisco Secure Email Encryption Service add-in.

Encryption Type

Select one of the following encryption types:

  • Flag-Allows end users to flag their messages for encryption, and the Cisco Secure Email Gateway encrypts the messages before they are sent out of the network. Configure your gateway to detect the flagged messages and encrypt them within the gateway. For more information, see the relevant User Guide for Cisco Secure Email Gateway.

  • Encrypt – Allows end users to encrypt and send their messages from within Outlook.

Password remembered in Add-In client for

Enter the number of days the password will be stored in the Add-In, so that users need not enter their password every time they open the client.

If you have selected the Encryption Type as Encrypt, the Add-In can remember the password up to a maximum of 30 days. If you have selected the Encryption Type as Flag, then you need not enter the number of days for the Add-In to remember the password.

Flag Type

Select one of the following encryption flags:

  • Subject Flag – Add a specific value to the subject field. Use ${subject} for the original subject.

  • Header Flag – Add a specific value to the MIME header.

Note

 
Configure this option only if the encryption type is Flag.

Flag Value

Enter the value that you want to add to the subject field or the MIME header.

Note

 
Configure this option only if the encryption type is Flag.

Security Level

Select the security level for the encrypted message:

  • High: The recipient must authenticate whenever the messages are decrypted.

  • Medium: If the password of the recipient is cached, the recipient does not need to authenticate whenever the messages are decrypted.

  • Low: Transmitted securely, but the recipient does not need to authenticate whenever the messages are decrypted.

Note


If the account admins change the security levels, they must notify the end users to update their configurations to reflect the new security level changes

Note

 
If you want to apply the same add-in configuration to all the domains in an account, click Save Configuration for All Domains .

Step 7

Download the manifest file. Click Download Manifest and save the manifest file.

Step 8

Deploy the Cisco Secure Email Encryption Service add-in to the end users using the manifest file that you downloaded in Step 7.

Note

 
You can either use the Centralized Deployment feature in the Microsoft 365 admin center or share the manifest file directly with your end users. For more information about the Centralized Deployment feature, see the Microsoft Office documentation.

Step 9

Notify your end users that a new configuration update is available for the Cisco Secure Email Encryption Service add-ins. Do the following:

  1. Upload a CSV file that contains the email addresses of the end users, enter the email addresses directly in theRecipient addresses field.

  2. Update the subject of the notification.

  3. Click Config Update Notification.


Configuring Storage and Attachments

Read from Message

The Read from Message feature (earlier known as Easy Open) allows the recipient to open the envelopes from any device without the need to install any client-side application. This can be achieved by storing a copy of the encrypted envelope in Cisco Secure Email Encryption Service in addition to sending the envelope as an attachment to the recipient.

When enabled, the Read Message feature leverages a new template featuring a Read Message button. When the recipient clicks this button, it directs the recipient to authenticate and decrypt the secure message.


Important


Support for Read Message is available in Ciso Secure Email Gateway (ESA) 11.1.0-302, 11.1.3-006 and 12.x (General Deployment) and later releases.

When this feature is enabled, a copy of the encrypted envelope is stored in the Cisco storage on AWS.

Retention, Protection, and Purging

After the link expires, recipients can read the message by opening the attachment (if it is present) in a web browser or forwarding the message to mobile@res.cisco.com.

The data is encrypted using the AES cipher with 256-bit keys. After the retention expiry threshold period, all the files and their duplicates are deleted from the storage space.


Note


  • By default, the messages exchanged between public or unregistered domain users are not stored in Cisco Secure Email Encryption Service storage and those recipients will not get Read Message button on the received messages.

  • Messages sent and replied-to and from public domain user to Read from Message enabled account users, contains Read Message button. In this scenario, the encrypted envelope replied from any public domain user are stored in Cisco Secure Email Encryption Service only for 5 days.


Large File Attachments

You can enable the large file attachments feature to allow users to send up to 100MB of attachments in a secure email. The default allowed size limit is 25MB. When you enable this feature, end-users can send emails with more than 25MB file size attachments. The encrypted email does not contain a securedoc attachment. It contains only the Read Message button. However, for attachment sizes up to 25MB, the encrypted email contains the securedoc attachment.


Note


You can enable the large file attachment feature only if you have enabled the Read from Message feature.


Note


The large file attachments feature is available for encrypted emails sent using the websafe portal only. It is not supported for emails sent using Secure Email Gateway (ESA), Secure Email Add-In, and Secure Email Plug-In.


Enabling Storage Options and Large File Attachments

Procedure

Step 1

Log into Encryption Service using your Admin account credentials.

Step 2

On the Accounts tab, choose the Manage Accounts tab.

Step 3

Click an account number and choose the Storage and Attachments tab.

Step 4

Select the Read from Message check box.

Step 5

Enter the number of days for storage duration. You can enter a maximum of 30 days.

Step 6

Select the Enable Large Attachments check box. If enabled, end users can send encrypted emails having file attachments up to 100MB of size.

Note


You can enable the lage file attachments feature only if Read from Message is enabled.

Step 7

Click Save Settings.

This is a global setting. When you configure Read from Message, all the envelopes are stored in the selected storage when sending emails from the websafe portal.

Note

 
You can also customize the parts of a new secure message. For more information, see the Branding Secure Messages below.

When you disable the Read from Message feature, all existing messages in Cisco Secure Email Encryption Service Storage will be purged immediately and the large file attachments feature will also be disabled. Recipients can still read the existing secure messages by downloading the HTML attachment.


Branding Secure Messages

You can customize the company logo displayed on the Secure Messages and secured messages sent by Cisco Secure Message Service end-users. You also can choose to show or hide the footer information on the Secure Messages and secure messages.

Before you begin

  • You have the account administrator access to the Cisco Secure Email Encryption Service server: https://res.cisco.com/admin.

  • You have administrator access to your Cisco Secure Email Gateway or Cisco Secure Email Cloud Gateway.

  • You have configured and provisioned the Encryption Profile on your Cisco Secure Email Gateway.

Procedure


Step 1

Log in to https://res.cisco.com/admin/ using your credentials.

Step 2

Click the Accounts tab.

Step 3

In the Account Management page that appears, click your corporate account number displayed under Search Results.

Step 4

Click the Branding tab.


Customizing the Logo

Procedure

Step 1

In the Secure Message Profile box, type the name of the encryption Secure Message profile.

Note


The Secure Message Profile name must be the same as the Encryption Profile name used in the Cisco Secure Email Gateway.

Step 2

Click Browse and select the image file that you need to set as the logo.

Note


The file size must be less than 100 KB and 60 x 160 pixels. The supported file types are: GIF, JPEG, PNG, BMP, and WBM.

Step 3

Click Add Image.

Note

 
To view the same logo in the WebSafe portal and the secured messages sent using the Secure Email Gateway, make sure to use the same image (selected in step2) with a blank Secure Message Profile name.

Customizing the Footer

Procedure

Step 1

Navigate to Administration Console Log In > Accounts > Account Management > Branding.

Step 2

Click the Footer tab.

Step 3

Modify the Copyright text and other footer links by entering the required details in the following fields:

  • Copyright Text

  • About Link

  • Terms of Service Link

  • Privacy Policy

Note

 
You will not be able to customize the Customer Support footer link because it displays Cisco Customer Support information by default.

Step 4

Choose the language to preview the modified Copyright text and footer links and click Preview

Step 5

Click Save.


Adding a Corporate Account Administrator

To add a corporate account administrator:

Procedure


Step 1

Log in to the Administration Console for the corporate account.

Step 2

Click the Accounts tab. The Account Management page is displayed.

Step 3

Click the link for your account number.

Note

 
Organizations typically have a single corporate account.

The Details tab for your account is displayed.

Step 4

Click the Groups tab for the account.

Step 5

Click the Manage Users icon.

For more information, see the Understanding the Icons in the Administration Console

Step 6

On the Group Membership page, enter the user ID of the registered user that you want to add as a corporate account administrator.

Step 7

Click Add to Group.


Customizing Templates

You can customize the template and also modify the expiry date format for custom email notification template.

To customize a template for the notification messages:


Note


You can only add one customized template to a notification message.

Important


The existing customized templates will be migrated to the Encryption Service 6.0 application after upgrade. If you want to add a new customized template, you must delete the existing templates.

Procedure


Step 1

Log in to the Administration Console for the corporate account.

Step 2

Click the Accounts tab. The Account Management page opens.

Step 3

Click the link for your account number.

Note

 
Each organization typically has a single corporate account.

The Details tab for the account opens.

Step 4

Click the Templates tab for the account.

Step 5

From the Base Template Set drop-down list, select a template you want to copy, and then enter a title of new template set.

Step 6

Click Add.

Step 7

Click the link of the added template.

Step 8

Click the needed locale for template. The Edit Template page opens.

Step 9

Edit the information in the HTML and Text fields as appropriate.

Step 10

Click Save.

Step 11

Click Back to Templates List.

Step 12

(Optional) Click Preview Template to preview the customized template.

Note

 
The customized template displays the custom logo that you chose for the envelope profile in Account Management > Branding > Images page in the Encryption Service application.

Step 13

Click Back to Template Set List.

Step 14

From the Active Template Set drop-down list, select the needed template.

Step 15

Click Save.

Modifying Expiry Date Format for Custom Email Notification Template

When the Easy Open feature is enabled, you can configure the following variables in the email notification custom template:

  • ${PORTAL_EXPIRATION_MONTH} - To display the month in text format.

  • ${PORTAL_EXPIRATION_DAY} - To display the day of month with the timestamp.

The following date format is displayed:

The link to open this message is valid till June 09, 2020 01:17:44 PM UTC.

Note


Make sure that you replace the ‘(‘ with ‘{‘ while adding the variables.

The default template has ${PORTAL_EXPIRATION_DATE} variable and the following date format is displayed:

The link to open this message is valid till 06/09/2020 01:17:44 PM UTC.


Monitoring Account Activity

The Cisco Secure Email Gateway provides detailed information about encryption usage. For example, you can use the gateway to generate reports on the content filters that mark messages for encryption.

To supplement the reports that the gateway generates, Encryption Service provides general information about corporate account activity. You can view this information in the Administration Console. The Monitor Accounts tab on the home page displays information about account activity, including user registration, login counts, and statistics about opened and sent encrypted messages (secure messages).

In addition, you can view the Account Usage report on the Accounts tab. For more information about Encryption Service reports, see Reporting

Managing Messages

As a corporate account administrator, you can view and manage the status of any message sent using the account.

To manage messages:

Procedure


Step 1

Log in to the Administration Console for the corporate account.

Step 2

Click the Accounts tab. The Account Management page is displayed, as shown in the following figure.

Step 3

Click the Manage Secure Message tab.

The Manage Secure Message page is displayed.

Step 4

Click Search to view all messages sent in the last hour, or enter search criteria and click Search to view particular messages.

The search results display the status of each message, including time sent, time last opened, message expiration time, and message lock information.

To set an expiration date, select one or more messages and click the Update Expiration Dates link.

To lock or unlock messages, select one or more messages and click the Lock/Unlock Envelopes link. When you lock envelopes, you can enter a reason for the lock. The reason is displayed on the envelope when a recipient attempts to open it.


Opening Envelopes With Social Network Credentials

You can enable opening the secure messages using social network credentials on the Security tab of the Manage Accounts page. Only the Gmail recipients could open the messages through Google authentication. If the users have a Google account, that is not registered on Encryption Service, they need to register by clicking the Sign-up with Google button in an envelope. After registering, the users can sign in with Google and read your secure messages. When this option is not enabled, the recipients will not have the Sign-in with Google button available. They will need to enter their Encryption Service password to open the messages.

To enable this option, select the Enable opening envelopes with social credentials check box.

Configuring Key Retention Period

You can configure the time period up to which the encryption keys are stored. By default, the keys are stored for one year. You can configure the key retention period up to five years.

End users cannot open and read the existing secure messages after the key retention period expires.

To select the key retention period, go to the Security tab and choose the desired value in the Key Retention Period drop-down list.

The Key Retention Period options available are: 30 days, 90 days, 180 days, 1 year, 2 years, 3 years, 4 years, and 5 years.

Setting Password Expiration Date

You can set the password expiration date for users and administrators on the Security tab of the Manage Accounts page.

To enable password expiration:

Procedure


Step 1

Select the Enable password expiration check box.

Step 2

Enter the number of days after which the password will expire in the following fields:

  • Password expiration for users

  • Password expiration for administrators

Step 3

In the Password expiration warning field, enter the number of days when the users will be notified to change their password.

Step 4

Click Save.


Managing Password Requirements

When creating or changing a password, ensure that password meets the following requirements:

  • Password must be alphanumeric (required).

  • Password must be case-sensitive (required).

  • Password must contain characters from at least three of the available character types: lowercase letters, uppercase letters, digits, and special characters.

  • Password must not contain a character repeated more than three times consecutively.

  • Password must not contain the username or the reversed username.

  • Password must not be "Cisco", "ocsic" or any similar words by changing the capitalization of letters, or replacing "i" with "1", "|", "!", "o" with "0", or "s" with "$".

Only two password requirements are set by default. You can change password requirements for users by selecting other options.

You can manage the password requirements on the Security tab of the Manage Accounts page.

Managing Users

You can manage users of the system using the Users tab— create users, search for users, reset passwords, add users to groups, and disable users.

You can manage users only for a domain associated with your account. If you need to associate a domain with your account, contact support.


Note


Users existing in the system before the domain was associated with your account will need to be migrated to your account. Let support know if you have existing users when requesting the domain association.

Creating Users

To create a user:

Procedure

Step 1

Click Add User on the Manage Users page.

Step 2

Fill in the form.

Note

 
Password must comply with the Cisco password requirements.

Step 3

You can set custom options, such as enforcing a password expiration date and skipping the creation of mailboxes for certain users.

Step 4

Click Save.

Note

 
The user that you create must belong to your email domain.

Resetting User Passwords

Users can reset their passwords using the following link:

https://res.cisco.com/websafe/pswdForgot.action


Note


During password reset, security questions are no longer required to be custom defined for the user and password challenge answers are no longer required from the user to be authenticated. While resetting password, the user receives an email that contains a link to create a new password. Clicking on this link will re-direct the user to a browser to create a new password and use that password to log in to the account.

Note


The password reset link is valid for 60 minutes only. Users must change their password before the link expires.


Adding Users to Groups

You can add a user to a group (or remove a user from a group) to give that user additional (or fewer) privileges.

To manage a user’s group membership:

Procedure

Step 1

Select the user. You must click the username in the search results on the Manage Users page.

Step 2

Click the Groups icon in the Actions column for the user.

Step 3

The Group Membership page is displayed. The box on the left shows the groups of which the user is a member. The box on the right shows any other available groups.

Step 4

Click a group to select it and then click the right or left arrow to move the group between the two boxes.

Step 5

Click Done to save your changes.


Disabling Users

You may need to temporarily disable a user’s account—for example, when a user leaves a company. To disable a user:

Procedure

Step 1

Select the user (click the username in the search results on the Manage Users page).

Step 2

Click Modify.

Step 3

Set the User Status to Locked.

Step 4

Save your changes.


Using TLS Delivery

Transport Layer Security (TLS) delivery allows Encryption Service-originated messages such as secure replies to be delivered encrypted back to the sending domain without having to use an envelope.

You can enable TLS delivery to provide a secure method of delivering email without requiring end users to log in to Encryption Service to receive or view email.

TLS is enabled on a per-account basis. For each account, you specify one or more TLS domains and error handling behavior.


Note


From Encryption Service 5.4.1 release onwards, there is no support for domains with only TLS 1.0 enabled for mail delivery. You need to migrate to TLS 1.1 or higher.

Note


Cisco Secure Email Encryption do not support emails with attachment size greater than 25MB to TLS domains even if large file attachments feature is enabled.


Adding and Testing TLS Domains

To enable TLS for an account, you must add at least one domain. Adding a domain initiates a process where the domain is scanned for TLS support. A domain must pass TLS domain testing before it can be added.

The TLS domain test uses the Encryption Service servers to verify information and connectivity. The check ensures that:

  • There are MX records associated with the domain entry, and

  • The MX records can be resolved to an IP address and each MX record has working mail servers associated with it, and

  • The Encryption Service servers can establish an SMTP connection via port 25 with the above-mentioned mail servers, and

  • The mail server supports the STARTTLS extension, and

  • The Encryption Service servers can initiate a successful TLS connection to each mail server serving the MX record.

To use TLS for secure replies, you must use a certificate signed by, or chained to, one of the certificates listed in the Supported Certificate Authorities for Encryption Service section of the https://www.cisco.com/c/dam/en/us/td/docs/security/email_encryption/Compatibility_Matrix/Cisco_Email_Encryption_Compatibility_Matrix.pdf. You must also use a certificate that has not expired. A certificate has expired if the date and time when a TLS connection is made is not within the certificate’s validity window.

A TLS test for a domain generates one of three possible results: pass, inconclusive (partial pass), and failure.

  • Pass: A domain is considered to pass a TLS test when the test on all servers in the MX records passes. Domains that pass TLS tests are added as TLS domains and receive a status of “processing” while they await approval by Customer Support.

  • Inconclusive: If the test has passed on at least one associated mail server but not all, the result is considered inconclusive. Inconclusive domains are, by default, not added as TLS domains. You can add an inconclusive domain by clicking the Request Approval button displayed by the results. Enter information about why the domain should be added and then submit.

  • Failure: If no mail servers associated with the domain support TLS, the domain has failed the test. Domains that fail TLS tests are not added as TLS domains.

A customer support ticket is opened for each passing domain or approval request for inconclusive domains. You will receive an email indicating that the domain has been added or requesting more information about the domain.

You can also test domains without adding them to the list of TLS domains by using the Test Domain button rather than the Add Domain button. Support requests are not opened for tested domains.

To add or test a TLS domain:

Procedure

Step 1

On the Accounts tab, choose the Manage Accounts tab.

Step 2

Click on an account number and choose the Features tab.

Step 3

Enter a domain.

  1. To test the domain, click Test Domain.

  2. To add the domain, click Add Domain.

Step 4

A message is displayed indicating the results.

Step 5

If an added domain passes, it is displayed in the “Domain” list with a status of “Processing.”

Step 6

Delete domains by clicking the trash can icon.

Note

 
Do not forget to specify the TLS error handling behavior. See TLS Error Handling for more information.

TLS Error Handling

If TLS delivery stops working (due to an expired certificate, for example), you need to configure TLS error handling. You can choose “Bounce Messages” or “Fallback to Secure Message Delivery.”


Note


If the TLS failure delivery preference is set to “Fallback to Secure Message Delivery,” remember to change the TLS delivery option to TLS Preferred on your in-house mail server.
  • Fallback to Secure Message Delivery: If the TLS delivery fails (due to an expired certificate, for example), the system reverts to sending Secure Messages.

  • Bounce Messages: For accounts configured to bounce messages during TLS delivery failure, the bounce will happen after 24 hours, during which a retry will be attempted every hour. For accounts configured to fall back to Secure Message delivery, fall back will happen after 1 hour, during which a retry will be attempted every 20 minutes.

To specify TLS error handling behavior for an account:

Procedure

Step 1

On the Accounts tab, choose the Manage Accounts tab.

Step 2

Click on an account number and choose the Details tab.

Step 3

Select a TLS failure delivery preference.

Step 4

Click Save.


Enabling Sender Registration

You can configure the system to automatically offer to register senders on a per-account basis. This is also useful if you would like to offer Encryption Service accounts to your email senders who do not currently use Encryption Service to send encrypted mail. Once registered, senders can learn more about the options available to them for controlling their encrypted messages.

If you enable this feature, senders receive email messages inviting them to create an account on the Encryption Service server. They receive these invitations once every 30 days, and they can opt out easily by following the instructions included in the invitation. You cannot change the frequency of invitations.

To enable sender registration for an account:

Procedure


Step 1

On the Accounts tab, choose the Manage Accounts tab.

Step 2

Click an account number and choose the Details tab.

Step 3

Select the Enable Sender Registration check box.

Step 4

Click Save.


Enabling Java Applet


Note


The most used browsers have disabled Java Applet because of the security reasons.

By default, Java Applet is disabled in the Secure Message. To enable Java Applet:

Procedure


Step 1

On the Accounts tab, click Manage Accounts.

Step 2

Click an account number and then click the Details tab.

Step 3

Clear the Suppress Java Applet in Secure Message check box.

Step 4

Click Save.


Selecting an Authentication Method

Secure Email Encryption Service allows you to configure the sign-in settings in the following ways:

  • Encryption Service authentication

  • SAML authentication

You can choose the authentication method in any of the following combinations:

  • SAML 2.0 authentication for both websafe and admin portal,

  • Encryption Service authentication for both websafe and admin portal, OR

  • SAML 2.0 for one and Encryption Service authentication for the other.

You can use Google authentication to log in to Websafe by clicking the Sign-in with Google button if you have a Google account that is registered on Encryption Service. Also, you can open the secure Secure Messages through Google authentication. For more information, see Opening Envelopes With Social Network Credentials

You can use Encryption Service authentication if you want to retain full control over the authentication process.

SAML is an XML application for Single Sign-On (SSO). For further information on how Encryption Service implements SAML authentication, see Authenticating with SAML.

You may want to use SAML-based authentication if you are already using the Cisco Secure Web Appliance or PingFederate as a SAML identity provider for SSO. For more information, see Configuring the PingFederate Logout URL.

For more information on Encryption Service and SAML authentication, see:

Configuring Encryption Service Account Authentication

To configure Encryption Service authentication for an account:

Procedure

Step 1

On the Accounts tab, choose the Manage Accounts tab.

Step 2

Click an account number and choose the Details tab.

Step 3

In the Authentication Method list, select CRES for both websafe and admin portal.

If you choose SAML 2.0 as the authentication method for either websafe or admin portal, then you must confirgure the SAML authentication process. See Configuring SAML Account Authentication for more information.

Step 4

Click Save.


Authenticating with SAML

SAML is an XML-based standard primarily used for Single Sign-On (SSO), a simpler way for end users to authenticate with multiple web services, such as Encryption Service. Currently only SAML 2.0 is supported.

You can use SAML 2.0 authentication method as the sign-in method for either websafe, admin portal, or both.

Single Sign-On means users log in once to authenticate (with an identity provider) and thereafter use a range of services from service providers without having to log in again. The protocol also supports Single Log-Out.

This simplifies the user experience, and improves security because the user no longer has to remember login details for multiple services. Encryption Service support for SAML works for new and existing Encryption Service envelopes. SAML authentication must be enabled individually for each corporate account. After this is done, all users in that account must authenticate with SAML. Any users not owned by the account will continue to use Encryption Service authentication.

SAML Overview

SAML enables exchanging authentication and authorization data between different secure networks, sometimes referred to as security domains. Typically, SAML is used when there are users in one domain accessing a network (a different domain) using a web browser.

To achieve Single Sign-On, a SAML dialogue must be engaged by an entity in each domain, which SAML defines using the following terms:

  • Identity provider (IdP). An identity provider is an entity that produces SAML assertions. The identity provider is expected to authenticate its end users before producing a SAML assertion. Encryption Service should work with most SAML 2.0 identity providers. However, it is certified to work only with the Cisco Secure Web Appliance, Active Directory Federation Services (AD FS), and PingFederate.

  • Service provider (SP). A service provider is an entity that consumes SAML assertions. The service provider relies on the identity provider to identify the end user and communicate that identification to the service provider in the SAML assertion. The service provider makes an access control decision based on the assertion. With SAML authentication enabled, Encryption Service acts as a service provider.

SAML assertions are containers of information passed between identity providers and service providers inside SAML requests and responses. Assertions contain statements (such as authentication and authorization statements) that service providers use to make access control decisions. Assertions start with the <saml:Assertion> tag.

SAML dialogues are called flows, and flows can be initiated by either provider:

  • Service provider initiated flow. The service provider is contacted by an end user requesting access, so it starts a SAML dialogue by contacting the identity provider to provide identification for the user. For service provider initiated flows, the end user accesses the service provider using a URL that contains the service provider’s domain, such as http://www.serviceprovider.com/.

  • Identity provider initiated flow. The identity provider starts a SAML dialogue by contacting the service provider, requesting access on behalf of an end user. For identity provider initiated flows, the end user accesses the service provider using a URL that contains a local domain, such as http://saas.example.com/.

Encryption Service supports only service provider initiated flows.


Note


This section does not provide a comprehensive discussion of SAML, nor how identity and security providers communicate with each other. For more detailed information, see http://saml.xml.org/wiki/saml-wiki-knowledgebase .For further information about using the Secure Web appliance as an identity provider, see the “Controlling Access to SaaS Applications” chapter in the Cisco AsyncOS for Web User Guide (release 7.0 or later).
Requirements

To use SAML authentication with Encryption Service as the service provider, the following requirements must be met:

  • Encryption Service currently supports using only the Cisco Secure Web Appliance, Active Directory Federation Services (AD FS), or PingFederate as an identity provider.

  • The indentity provider’s SAML login mechanism must be able to work without JavaScript.

  • The identity provider must support SAML 2.0.

  • In the SAML assertion, the SAML NameID or attribute must contain the email address.

Caveats

There are some caveats when using SAML authentication:

  • SAML must be enabled individually for each corporate account.

  • The SAML login page is provided by the SAML identity provider, not by Encryption Service. This means no Encryption Service logging is available for the SAML logins and login problems should be reported to your SAML identity provider.

  • User password maintenance, such as recovering a forgotten password or changing a password, must be performed via the identity provider, not Encryption Service, for users with SAML-authenticated accounts.

  • SAML authentication is not enabled for administration accounts (admin config) to prevent those accounts being inadvertently locked out.

  • Unlike Encryption Service-authenticated accounts, you cannot consolidate SAML authenticated accounts.

  • When the Cisco Secure Web Appliance is used as the identity provider, JavaScript must be enabled for the login page to function correctly.

  • When the Cisco Secure Web Appliance is used as the identity provider, passwords are not cached and the user must authenticate every session.

  • If there is a problem with the identity provider, SAML users may be unable to authenticate even when their credentials are valid.

  • If the identity provider becomes permanently unavailable, you must change the authentication method to Encryption Service to enable users to authenticate.

  • The administrator is dependent on the identity provider to provide an alert if there is a problem with the SAML service.

  • Even if end users have valid credentials, they may be unable to access the service if there is a problem with the identity provider.

  • If end-users see the following message when opening a secure message: A required attribute is not present in the SAML message: 'Version', perform the following steps:

    1. Log in to the Admin Portal as Account Administrator.

    2. Click the Accounts tab and select your account.

    3. In the Details tab, scroll down to the Sign In Settings section where the SAML configurations are present.

    4. Click Save.

User Experience

The user experience with SAML authentication is much the same whether JavaScript is enabled, whether there are one or more recipients, or whether those are BCC recipients. Users open a Secure Message (or Mobile Device Support (MDS) link), select their user identity or provide their email address as required, and authenticate through the identity provider. Alternatively, users can navigate to https://res.cisco.com/websafe/root in a web browser, enter an email address, and authenticate through the identity provider.

Admin users can navigate to https://res.cisco.com/admin and authenticate through the identity provider.

Configuring SAML Account Authentication

You can configure SAML authentication to use one of the following identity providers:

  • Active Directory Federation Services (AD FS)

  • Microsoft Entra ID (Previously known as Microsoft Azure Active Directory)

  • Cisco Secure Web Appliance

  • PingFederate

The configuration procedures for using these identity providers are described in the following sections:

Configuring SAML Account Authentication When Using AD FS as the Identify Provider

When you enable SAML authentication, it is very important to configure the Encryption Service account to match the settings of the AD FS account.

You will need the following information (AD FS equivalents):

  • Service provider entity ID (SaaS application name / connection ID)

  • Customer service URLs (Single sign-on URL/base URLs)

  • Identity provider verification certificate

  • (Optional) Alternate email attribute name (SAML attribute / email address)

The procedure for SAML Account Authentication When Using AD FS as the Identify Provider is described in the following sections:

Configuring Relaying Party Trust for AD FS
Procedure

Step 1

Start the AD FS 2.0 Management tool.

Step 2

Click Add.

Step 3

Click Start on the Welcome screen.

Step 4

Select Enter data about the relying party manually and click Next.

Step 5

Enter a display name for the Encryption Service SP and click Next.

Step 6

Select AD FS 2.0 profile and click Next.

Step 7

Select Enable support for the SAML 2.0 Web SSO protocol.

Step 8

For the Relying party SAML 2.0 SSO service URL, enter

https://res.cisco.com/websafe/ssourl and click Next.

Step 9

For the Relying party trust identifier, enter https://res.cisco.com/ and click Add.

Step 10

Click Next.

Step 11

Select Permit all users to access this relying party and click Next.

Step 12

Check your settings and click Next.

Step 13

Select Open the Edit Claim Rules dialog for this relying party trust when thewizard closes and click Close


Configuring Claim Rules
Procedure

Step 1

When the Edit Claim Rules for Encryption Service SP dialog opens, select the IssuanceTransform Rules tab and click Add Rule .

Step 2

For the Claim rule template, select Send LDAP Attributes as Claims and click Next.

Step 3

Enter a Claim rule name.

Step 4

For the Attribute store, select Active Directory.

Step 5

In the LDAP Attribute column, select either User-Principal-Name or E-Mail Addresses.

The recommended value is User-Principal-Name because it can be used for anyuser in your Active Directory catalogue. During SAML authentication, Encryption Service compares the user’s name from Active Directory with the user’s Encryption Service account.

To use E-Mail Addresses, value, you must enter the email address in the E-mail under the General tab of the User’s Properties configuration. Because Encryption Service takes the email address from the user’s account in Active Directory, an error will occurif the optional E-mail is not correctly configured for all users.

Step 6

In the Outgoing Claim Type column, select E-Mail Addresses.

Step 7

Click Finish and click Add Rule.

Step 8

For the Claim rule template, select Transform an Incoming Claim and click Next.

Step 9

Enter a Claim rule name.

Step 10

For the “Incoming claim type,” select E-mail Address.

Step 11

For the Outgoing claim type, select Name ID.

Step 12

For the Outgoing name ID format, select Transient Identifier.

Step 13

Select Pass through all claim values.

Step 14

Click Finish.


Adding SAML Assertion Consumer Endpoint for AD FS
Procedure

Step 1

In the Relying Party Trusts, select the added Relying Party Trust.

Step 2

In the right pane, select Properties.

Step 3

On the Endpoints tab, click Add.

Step 4

For the Endpoint Type, select SAML Assertion Consumer.

Step 5

For the Binding, select POST.

Step 6

For the Index, select 1.

Step 7

For the URL, enter https://res.cisco.com/keyserver/saml/saml-resp and click OK.

Step 8

Click OK.


Exporting the Signing Certificate from ADFS
Procedure

Step 1

Start the AD FS 2.0 Management tool.

Step 2

In the left pane, select AD FS 2.0 > Service > Certificates.

Step 3

Select the Token-signing certificate.

Step 4

In the right pane, click View Certificate.

Step 5

On the Details tab, click Copy to File.

Step 6

Click Next on the Welcome to the Certificate Export Wizard screen.

Step 7

For the export file format, select DER excoded binary X .509 (.CER) and click Next.

Step 8

Enter the location and file name of the export file and click Next.

Step 9

Click Finish.


Configuring Encryption Service
Procedure

Step 1

Log into Encryption Service using your Admin account credentials.

Step 2

On the Accounts tab, choose the Manage Accounts tab.

Step 3

Click an account number and choose the Details tab.

Step 4

Select SAML 2.0 as the Authentication Method for either Websafe and Add-In, Admin Portal, or both

Step 5

For the SSO Alternate Email Attribute Name, leave it blank.

Step 6

For the SSO Service Provider Entity ID, enter https://res.cisco.com/.

Step 7

For the SSO Customer Service URL, enter https://AD FS/adfs/ls.

Step 8

For the SSO Logout URL, enter https://AD FS/adfs/ls.

Step 9

For the Verification Certificate, click Browse and upload the Signing-Certificate exported from the AD FS settings.

Step 10

Click Save.

Step 11

After the page has saved, click Download to download Encryption Service signing certificate.


Configuring the AD FS Signing Settings
Procedure

Step 1

Start the AD FS 2.0 Management tool.

Step 2

In the left pane, select AD FS 2.0 > Trust Relationships > Relying Party Trusts.

Step 3

Select your Relying Party (Encryption Service SP) and click Properties in the right pane.

Step 4

Select the Signature tab, click Add, and select the Encryption Service Signing Certificate thatwas downloaded from Encryption Service admin page.

Step 5

Select the Advanced tab.

Step 6

For the Secure hash algorithm, select SHA-1 and click OK.

Step 7

The AD FS Management tool will create the /adfs/ls website in Internet Information Services (IIS).

Step 8

Start the Server Manager Tool.

Step 9

In the left pane, select Server Manager > Roles > Web Server (IIS) > Internet Information Services (IIS) Manager.

Step 10

In the Connections pane, select your server > Sites > Default Web Site > adfs > ls.

Step 11

In the /adfs/ls Home pane, select Authentication under IIS.

Step 12

Enable Anonymous Authentication and disable all others.

Step 13

Right-click ls in Connections tree and click Explore.

Step 14

Right-click the web.config file and click Edit.

Step 15

Find the “localAuthenticationTypes” section and remove all entries except for <add name="Forms" page="FormsSignIn.aspx" />.

This allows only forms authentication instead of the Windows integrated one.

Step 16

Save and close the file.


Activating the SAML Login
Procedure

Step 1

Return to the Encryption Service Account page by choosing the Manage Accounts tab under the Accounts tab.

Step 2

Click an account number and choose the Details tab.

Step 3

Click Activate SAML at the bottom of the page.

Step 4

Click Continue.

Step 5

Enter your domain User name and Password and click Sign In.

Step 6

Click Continue.

Step 7

Verify that the message SAML Activated Successfully is displayed at the top of the Encryption Service Account Details page.

Step 8

Verify that the SSO Enable Date set to the current time.

Step 9

Check that SAML 2.0 is selected for the Authentication Method for the account.


Logging into Websafe or Admin Portal with LDAP Credentials
Procedure

Step 1

To log in to websafe, go to https://res.cisco.com/websafe/.

The websafe and admin portal login pages are visually identical, but the URL address will tell you which portal you are logging into.

Step 2

Verify that you are redirected to the AD FS authenticating page.

Step 3

Enter your Active Directory user and password.

Step 4

Click Sign In.

Step 5

Verify that you have successfully logged into websafe or admin portal.

Step 6

Verify that you are able send secure messages and open secure messages that you have received. (If you have logged in to websafe).

  1. Send a message to any user in the same domain.

  2. Open the encrypted email that was received by the user.

  3. Verify that a new window is opened so that you can enter your Active Directory credentials.

  4. Enter your Active Directory credentials.

  5. Verify that your secure message is decrypted.


Configuring SAML Account Authentication When Using Microsoft Entra ID as the Identify Provider

When you enable SAML authentication, it is very important to configure the Encryption Service account to match the settings of the identity provider account.

You will need the following information (Microsoft Entra ID equivalents):

  • Service provider entity ID (SaaS application name/connection ID)

  • Customer service URLs (Single sign-on URL/base URLs)

  • Identity provider verification certificate

  • (Optional) Alternate email attribute name (SAML attribute/email address)

To configure SAML authentication for an account:

Procedure

Step 1

On the Accounts tab, choose the Manage Accounts tab.

Step 2

Click an account number and choose the Details tab.

Step 3

Select SAML 2.0 as the Authentication Method for either Websafe and Add-In, Admin Pportal, or both.

The SSO Enable Date, indicating the most recent successful configuration and activation of SAML, is displayed. Additionally, the SSO Email Name ID Format is shown. Currently, the only supported SAML name format is 'transient'.

Step 4

Go to https://entra.microsoft.com/#home.

Step 5

On the left pane, navigate to Applications > Enterprise applications.

You can see all the applications in your organizations that are set up to use Microsoft Entra as their Identity Provider.

Step 6

Go to the Secure Email Encryption Service application on this page.

Step 7

Click Single sign-on under the Manage section of the application's menu.

Step 8

Go to Attributes & Claims > Edit.

Step 9

Copy the Claim Name URL under Additional Claims. This is the SSO Alternate Email Attribute Name to be used in the Secure Email Encryption Service admin portal. It is the attribute name that holds the alternate email addresses used as the name identifier.

Step 10

Go back to the Single sign-on page.

Step 11

Copy the Identifier (Entity ID) on the Single Sign-on page. This is the SSO Service Provider Entity ID to be used in the Secure Email Encryption Service admin portal.

Step 12

Copy the Login URL from the entra portal (under Set up <yuor application name>. This is the SSO Customer Service URL to be used in the Secure Email Encryption Service admin portal.

Step 13

Leave the SSO Logout URL empty.

The Single Sign-On binding, typically HTTP-Redirect or HTTP-POST, is displayed together with theSSO Assertion Consumer URL.

Step 14

(Optional) Click Download to download a copy of the SSO service provider verification certificate. This is the public self-signed certificate that is required by your identity provider (IdP) to verify the signature of the SAML logout request from Encryption Service.

Step 15

Downlaod the certificate from the Entra portal under SAML Certificates section in the Single sign-on page. You can download either the Base64 or Raw format.

Step 16

Click Browse on the Secure Email Encryption Service admin portal, and select and upload the SSO identity provider verification certificate, provided by the SAML identity provider. The current certificate is displayed.

Step 17

Click Save.

Step 18

Click Activate.

Note

 
When you have saved the details, you must then activate the SAML login. This prevents you from accidentally locking out users in case of a configuration error.

Configuring SAML Account Authentication When Using a Cisco Secure Web Appliance or PingFederate as the Identify Provider

When you enable SAML authentication, it is very important to configure the Encryption Service account to match the settings of the identity provider account.

You will need the following information (Cisco Secure Web Applianceor PingFederate equivalents):

  • Service provider entity ID (SaaS application name/connection ID)

  • Customer service URLs (Single sign-on URL/base URLs)

  • Identity provider verification certificate

  • (Optional) Alternate email attribute name (SAML attribute/email address)

If you are using the Cisco Secure Web Appliance as the identity provider, this information can be found on the SaaS Application Authentication Policies page.The certificate can be downloaded from the Edit Identity Provider Settings forSaaS Single Sign On page.

If you are using PingFederate as the identity provider, this information can befound in the Summary area.


Note


When configuring PingFederate as the IDP, you must specify the Encryption Service Assertion Consumer Service URLs as an endpoints. In addition, for the users to log out, the SSO Logout URL must be configured.For instructions on configuring this setting, see Configuring the PingFederate Logout URL.

To configure SAML authentication for an account:

Procedure

Step 1

On the Accounts tab, choose the Manage Accounts tab.

Step 2

Click an account number and choose the Details tab.

Step 3

From the Authentication Method drop-down list, choose SAML 2.0. The SSO Enable Date, the last dateSAML was successfully configured and activated, is displayed. The SSO Email Name ID Format isshown. Currently only the transient SAML name format is supported.

Step 4

Enter the SSO Alternate Email Attribute Name. This is the attribute name that contains the alternate

email addresses used as the name identifier.

Step 5

Enter the service provider’s entity ID in the SSO Service Provider Entity ID field.

Step 6

Enter the SSO Customer Service URL. This is the SAML identity provider Single Sign-On URL.

Step 7

Enter the SSO Logout URL. This is the SAML identity provider logout URL.

The Single Sign-On binding, typically HTTP-Redirect or HTTP-POST, is displayed together with theSSO Assertion Consumer URL.

Step 8

(Optional) Click Download to download a copy of the SSO service provider verification certificate. This is the public self-signed certificate that is required by your identity provider (IdP) to verify the signature of the SAML logout request from Encryption Service.

Step 9

Click Browse, and select and upload the SSO identity provider verification certificate, provided by theSAML identity provider (Cisco Secure Web Appliance or PingFederate). The current certificate is displayed.

Step 10

Click Save.

Step 11

Click Activate.

Note

 
When you have saved the details, you must then activate the SAML login. This prevents you from accidentally locking out users in case of a configuration error.

Configuring the PingFederate Logout URL

In order to log out from an envelope that was configured with PingFederate as the IDP, the logout URL must be configured in PingFederate. This is critical because the end user must click the logout button to completely log out of Encryption Service.

To configure the logout URL in PingFederate:

Procedure

Step 1

From the Encryption Service Account Management screen for the account, download and save the public certificate.

Step 2

On the PingFederate server for the account, click Signature Verification Certificate.

Step 3

Click Manage Certificates.

Step 4

Import the certificate that you saved in Step 1.

Step 5

Ensure that the imported certificate is the primary certificate.

Note

 
PingFederate allows you have more than one public certificate when verifying SAML logout requests. As a result, after you download the public certificate from Encryption Service, you must ensure that this certificate is the first, or primary, certificate in PingFederate.

Disabling and Enabling Access to Secure Compose

This feature enables you to restrict your users from sending emails through Secure Compose. This feature therefore allows you to have control over emails from Secure Compose that cannot be scanned or archived and could cause issues with security or violations of corporate policy.

Disabling Secure Compose will remove the Compose Message link from the left-hand navigation menu of the end-user portal for users in your account.

You can disable Secure Compose only for users in a domain associated with your account. To associate a domain with your account, contact customer support.

Procedure


Step 1

On the Accounts tab, choose the Manage Accounts tab.

Step 2

Click on an account number and choose the Details tab.

Step 3

To enable access to Secure Compose, select the Make Secure Compose Available check box.

Step 4

To disable access to Secure Compose, clear the Make Secure Compose Available check box.

Step 5

Click Save.

Note

 
Any SecureCompose token on your account’s Tokens tab is used internally and should not be modified. Modifying or deleting that token will not disable Secure Compose. To disable Secure Compose use the procedure described above.

Configuring DNS to Include Encryption Service

Secure Messages sent from Websafe often encounter Sender Policy Framework (SPF) verification issues at the recipient's end. This problem occurs because the secure messages are not sent from your domain but instead from hosted key servers managed by the Encryption Service. So, the IP addresses from which these emails are sent do not align with the IP addresses specified in the recipient's SPF records, resulting in verification failures. These SPF verification failures causes secure messages to be classified as spam.

To avoid these failures and ensure email deliverability, you need to modify your domain's SPF record. To do this, you must add
include:res.cisco.com
to your SPF record. This step allows the Encryption Service's servers to send emails on behalf of your domain, ensuring SPF compliance and preventing mismatches in IP addresses. Contact your network administrator to update your SPF record correctly.