This chapter
describes how to configure Flex Links, a pair of Layer 2 interfaces, where one
interface is configured to act as a backup to the other.
Finding Feature Information
Your software release may not support all the features documented in this module. For the latest caveats and feature information,
see
Bug Search Tool and the release notes for your platform and software release. To find information about the features documented in this module,
and to see a list of the releases in which each feature is supported, see the feature information table at the end of this
module.
Use Cisco Feature Navigator to find information about platform support and Cisco software image support. To access Cisco Feature
Navigator, go to
www.cisco.com/go/cfn. An account on Cisco.com is not required.
Restrictions for Configuring Flex Links
You can configure only one Flex Link backup link for any active link, and it must be a different interface from the active
interface.
An interface can belong to only one Flex Link pair. An interface can be a backup link for only one active link. An active
link cannot belong to another Flex Link pair.
Neither of the links can be a port that belongs to an EtherChannel nor port channel
A backup link does not have to be the same type (TenGigabit Ethernet, Gigabit Ethernet) as the active link.
STP is disabled on Flex Link ports. If STP is configured on the switch, Flex Links do not participate in STP in all VLANs
in which STP is configured. With STP not running, be sure that there are no loops in the configured topology.
Flex link is only supported on trunk EFP.
In bi-directional traffic, FlexLink Convergence will be high in one-direction due to mac address black holing.
Admin shut has no effect on interfaces that are configured under flexlinks.
Dynamically editing encapsulations using add and remove options is not supported.
Dynamic editting or overwriting VLANs on Active and Backup causes traffic loop.
Note
Remove ethernet backup command from primary flexlink interface and then edit the VLANs of primary and backup interfaces.
Information About
Flex Links
The feature provides
an alternative solution to the Spanning Tree Protocol (STP), allowing you to
turn off STP and still provide basic link redundancy. Flex Links are typically
configured in service provider or enterprise networks, where, you do not want
to run STP on the router. If the router is running STP, it is not necessary to
configure Flex Links, because STP already provides link-level redundancy or
backup. Flex Links are supported only on Trunk EFP and are not supported on
other EVCs.
Following are the two flex link modes supported:
Active-Alone Forwarding Method
Active-Backup-Both Forwarding Method
Active-Alone forwarding Method
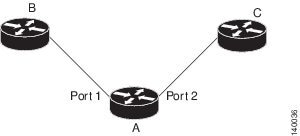
From the schematic representation, ports 1 and 2 on switch A are connected to uplink switches B and C. Because they are configured
as Flex Links Active-Alone forwarding mode, only one of the interfaces forwards traffic; the other is in standby mode. If
port 1 is the active link, it begins forwarding traffic between port 1 and switch B; the link between port 2 (the backup link)
and switch C do not forward traffic. If port 1 goes down, port 2 comes up and starts forwarding traffic to switch C. Since
pre-emption is not supported, even after port 1 comes back to operational state, traffic continues to be forwarded to port
2. Switch over back to port 1 happens only when port 2 goes down.
Figure 1. Active-Alone Forwarding Method
Configuring Active
Alone Forwarding Method
SUMMARY STEPS
enable
configure terminal
interfaceinterface-id
no shutdown
ethernet backup interfaceinterface-id
end
DETAILED STEPS
Command or Action
Purpose
Step 1
enable
Example:
Router> enable
Enables
privileged EXEC mode.
Enter your
password if prompted.
Step 2
configure terminal
Example:
Router# configure terminal
Enters global
configuration mode.
Step 3
interfaceinterface-id
Example:
Router(config)# interface gigabitEthernet 0/0/5
Specify the interface, and enter interface configuration mode. The interface can be a physical Layer 2 interface.
Step 4
no shutdown
Example:
Router(config-if)# no shutdown
Enable the
port, if necessary. By default, UNIs are disabled, and NNIs are enabled.
Configure a physical Layer 2 interface as part of a Flex Link pair with the interface. When one link is forwarding traffic,
the other interface is in standby mode.
Step 6
end
Example:
Router(config-if)# end
Return to
privileged EXEC mode.
Configuration
Example
On Active interface(Port 5)
Router> enable
Router# configure terminal
Router# service instance trunk 1000 ethernet
Router# encapsulation dot1q 1-1000
Router# rewrite ingress tag pop 1 symmetric
Router# bridge-domain from-encapsulationBackup interface (Port 6)
Router> enable
Router# configure terminal
Router# service instance trunk 1000 ethernet
Router# encapsulation dot1q 1-1000
Router# rewrite ingress tag pop 1 symmetric
Router# bridge-domain from-encapsulationFlexlink Configuration
Router> enable
Router# configure terminal
Router(config)# interface gigabitEthernet 0/0/5
Router(config-if)# no shutdown
Router(config-if)# ethernet backup interface gigabitEthernet 0/0/6
Router(config-if)# end
Verifying Active
Alone Forwarding Method Configuration
SUMMARY STEPS
enable
configure terminal
show ethernet backup detail
DETAILED STEPS
Command or Action
Purpose
Step 1
enable
Example:
Router> enable
Enables
privileged EXEC mode.
Enter your
password if prompted.
Step 2
configure terminal
Example:
Router# configure terminal
Enters global
configuration mode.
Step 3
show ethernet backup detail
Example:
Router# show ethernet backup detail
This displays
the flex link configuration.
Configuration
Output
Switch Backup Interface Pairs:
Active Interface Backup Interface State
------------------------------------------------------------------------
GigabitEthernet0/0/5 Te0/0/12 Active Up/Backup Standby
Preemption Mode : off
Multicast Fast Convergence : Off
Bandwidth : 1000000 Kbit (Gi0/0/3), 1000000 Kbit (Te0/0/12)
Mac Address Move Update Vlan : auto
Forwarding : Active-Only
Active-Backup-Both
forwarding Method
From the schematic representation, ports 1 and 2 on switch A are
connected to uplink switches B and C. Because they are configured as Flex Link
in active-backup both forwarding mode, both the interfaces will be forwarding
traffic. If port 1 is the active link, all mutually inclusive vlans (common
vlans configured in both active / backup interface) would be forwarded on
active interface and mutually exclusive vlans would be forwarded from the
respective active / backup interfaces. If port 1 goes down, then port 2 will
start forwarding only the traffic for the common vlans along with its specific
exclusive vlans. All traffic belonging to the exclusive vlans as part of active
interface configuration would be dropped until port 1 comes back to operational
state.
Configure a physical Layer 2 interface as part of a Flex Link pair with the interface. When one link is forwarding traffic,
the other interface is in standby mode.
Step 6
end
Example:
Router(config-if)# end
Return to
privileged EXEC mode.
Configuration
Example
On Active interface(Port 7)
Router> enable
Router# configure terminal
Router# service instance trunk 1000 ethernet
Router# encapsulation dot1q 1-512
Router# rewrite ingress tag pop 1 symmetric
Router# bridge-domain from-encapsulationBackup interface (Port 8)
Router> enable
Router# configure terminal
Router# service instance trunk 1000 ethernet
Router# encapsulation dot1q 512-1000
Router# rewrite ingress tag pop 1 symmetric
Router# bridge-domain from-encapsulationFlexlink Configuration
Router> enable
Router# configure terminal
Router(config)# interface gigabitEthernet 0/0/7
Router(config-if)# no shutdownRouter(config-if)# ethernet backup interface gigabitEthernet 0/0/7 prefer forwarding
Router(config-if)# end
The Cisco
Support website provides extensive online resources, including documentation
and tools for troubleshooting and resolving technical issues with Cisco
products and technologies.
To receive
security and technical information about your products, you can subscribe to
various services, such as the Product Alert Tool (accessed from Field Notices),
the Cisco Technical Services Newsletter, and Really Simple Syndication (RSS)
Feeds.
Access to
most tools on the Cisco Support website requires a Cisco.com user ID and
password.