- Uploading a Firmware Image to FND
- Uploading a Firmware Image to a Resilient Mesh Endpoint Group
- Setting the Installation Schedule for a Firmware Image
- Other Firmware Actions
- Viewing Mesh Device Firmware Image Upload Logs
- Viewing Mesh Endpoint Firmware Update Information
- Resilient Mesh Endpoint Firmware Update
- Using the Device Tab to Filter the Firmware Management Page Display
- Mesh Firmware Migration (CG-OS CG4 platforms only)
- Viewing Firmware Image Files in IoT FND
- Adding a Firmware Image to IoT FND
- Uploading a Firmware Image to a Router Group
- Canceling Router Firmware Image Upload
- Pausing and Resuming Router Firmware Image Uploads
- Installing a Firmware Image
- Stopping Firmware Image Installation
- Pausing and Resuming Router Firmware Image Installation
Managing Firmware Upgrades
This section describes managing firmware upgrade settings in IoT FND, and includes the following sections:
■![]() Image Diff Files for IR809 and IR829
Image Diff Files for IR809 and IR829
■![]() Configuring Firmware Group Settings
Configuring Firmware Group Settings
■![]() Working with Router Firmware Images
Working with Router Firmware Images
■![]() Performing CG-OS to Cisco IOS Migrations
Performing CG-OS to Cisco IOS Migrations
■![]() Working with Resilient Mesh Endpoint Firmware Images
Working with Resilient Mesh Endpoint Firmware Images
Use IoT FND to upgrade the firmware running on routers (CGR1000s, C800s, IR800s), AP800s and Cisco Resilient Mesh Endpoints (RMEs) such as meters and range extenders. IoT FND stores the firmware binaries in its database for later transfer to routers in a firmware group through an IoT FND and IoT-DM file transfer, and to RMEs using IoT FND.
Cisco provides the firmware bundles as a zip file. For Cisco IOS, software bundles include hypervisor, system image and IOx images (for example, Guest-OS, Host-OS).
For Cisco CG-OS, IoT FND automatically unzips the kickstart and system images included in the bundle. Firmware system images are large (approximately 130 MB); kickstart images are approximately 30 MB. Every firmware bundle includes a manifest file with metadata about the images in the bundle. You can pause, stop, or resume the upload process.
Router Firmware Updates
IoT FND updates router firmware in two steps:
1.![]() Uploads the firmware image from IoT FND to the router. Firmware images upload to the flash:/managed/images directory on the router. Note: In some cases the router might be in a Firmware Group. Refer to Configuring Firmware Group Settings
Uploads the firmware image from IoT FND to the router. Firmware images upload to the flash:/managed/images directory on the router. Note: In some cases the router might be in a Firmware Group. Refer to Configuring Firmware Group Settings
Because of their large size, firmware-image uploads to routers take approximately 30 minutes, depending on interface speeds.
2.![]() Installs the firmware on the device and reloads it.
Installs the firmware on the device and reloads it.
During the firmware install the boot parameters on the routers are updated according to the new image file and the router is reloaded after enabling the cg-nms-register cgna profile.
Note: You must initiate the firmware installation process. IoT FND does not automatically start the upload after the image upload.
When a router contacts IoT FND for the first time to register and request tunnel provisioning, IoT FND rolls the router back to the default factory configuration (ps-start-config) before uploading and installing the new firmware image.
Note: This rollback requires a second reload to update the boot parameters in ps-start-config and apply the latest configuration. This second reload adds an additional 10–15 minutes to the installation and reloading operation.
Upgrading Guest OS Images
Depending on CGR factory configuration, a Guest OS (GOS) may be present in the VM instance. You can install or upgrade Cisco IOS on the CONFIG > Firmware Update page (see Router Firmware Updates). The GOS, hypervisor, and Cisco IOS all upgrade when you perform a Cisco IOS image bundle installation or update.
After after any Cisco IOS install or upgrade, when IoT FND discovers a GOS, it checks if the initial communications setup is complete before it performs the required setup. The CGR must have a DHCP pool and GigabitEthernet 0/1 interface configured to provide an IP address and act as the gateway for the GOS. The new GOS image overwrites existing configurations. IoT FND has an internal backup and restore mechanism that ports existing apps to the upgraded Guest OS (see Monitoring a Guest OS).
See the Cisco 1000 Series Connected Grid Routers Configuration Guides documentation page for information on configuring the CGR.
Note: If IoT FND detects a non-Cisco OS installed on the VM, the firmware bundle will not upload and the Cisco reference GOS will not install.
Upgrading WPAN Images
At the CONFIG > Firmware Update page, you can upload the independent WPAN images (IOS-WPAN-RF, IOS-WPAN-PLC, IOS-WPAN-OFDM, IOS-WPAN-IXM) to IoT FND using the Images sub-tab (left-hand side) and Upload Image button like other image upgrades. This process is known as a non-integrated WPAN firmware upgrade.
Note: The WPAN firmware image integrated with the IOS CGR image option is still supported.
Also, if only the WPAN firmware upgrade from the image bundled with IOS image is desired (for example, when the WPAN firmware upgrade option was not checked during IOS upgrade), the “Install from Router” option is also provided under respective WPAN image types (IOS-WPAN-RF or IOS-WPAN-PLC).
For detailed steps, go to Working with Router Firmware Images.
Changing Action Expiration Timer
You can use the cgnms_preferences.sh script to set or retrieve the action expiration timer value in the IoT FND database:
■![]() set <pkg>actionExpirationTimeoutMins<value>
set <pkg>actionExpirationTimeoutMins<value>
–![]() <pkg> is the preference package (required for set and get operations).
<pkg> is the preference package (required for set and get operations).
–![]() actionExpirationTimeoutMins is the preference key (required for set and get operations).
actionExpirationTimeoutMins is the preference key (required for set and get operations).
–![]() <value> is the preferred value, in minutes (required for set and setCgrActionExpirationTimeout operations).
<value> is the preferred value, in minutes (required for set and setCgrActionExpirationTimeout operations).
■![]() setCgrActionExpirationTimeout <value>
setCgrActionExpirationTimeout <value>
■![]() get <pkg>actionExpirationTimeoutMins
get <pkg>actionExpirationTimeoutMins
■![]() getCgrActionExpirationTimeout
getCgrActionExpirationTimeout
In the following example, the action timer value is retrieved, set, the current value retrieved again, the value removed, and a null value retrieved:
Working with Resilient Mesh Endpoint Firmware Images
This section describes how to add Resilient Mesh Endpoint (RME) firmware images to IoT FND, and how to upload and install the images on routers.
When you instruct IoT FND to upload a firmware image to the members of an RME firmware group or subnet, IoT FND pushes the image to the group members in the background and tracks the upload progress to ensure that the devices receive the image.
A Resilient Mesh Endpoint (RME) stores three firmware images:
■![]() Uploaded image: Image most recently uploaded.
Uploaded image: Image most recently uploaded.
■![]() Running image: Image that is currently operational.
Running image: Image that is currently operational.
■![]() Backup image: It serves as a golden (fallback) image for the RME if there is an issue with the running image.
Backup image: It serves as a golden (fallback) image for the RME if there is an issue with the running image.
Note: You can initiate up to 3 firmware downloads simultaneously.
Note: IR500s and other RME devices can coexist on a network; however, for firmware management they cannot belong to the same group.
Note: RME devices can report BL/Boot Loader image types to IoT FND, but IoT FND cannot upload boot loader images to devices.
Uploading a Firmware Image to FND
To upload a firmware image to mesh endpoint group members:
1.![]() Choose CONFIG > FIRMWARE UPDATE.
Choose CONFIG > FIRMWARE UPDATE.
3.![]() Select the Endpoint Image type to be uploaded.
Select the Endpoint Image type to be uploaded.
4.![]() Click on + to browse the firmware from your local system.
Click on + to browse the firmware from your local system.
5.![]() Browse and click on Add file.
Browse and click on Add file.
IoT FND can upload the image types listed in Firmware Images for EndpointsFirmware Images for EndpointsFirmware Images for EndpointsFirmware Images for EndpointsFirmware Images for Endpoints to Endpoints.
Uploading a Firmware Image to a Resilient Mesh Endpoint Group
To upload a firmware image to mesh endpoint group members:
1.![]() Choose CONFIG > FIRMWARE UPDATE.
Choose CONFIG > FIRMWARE UPDATE.
2.![]() Click the Groups tab (left pane).
Click the Groups tab (left pane).
3.![]() Select the Endpoint firmware group to update.
Select the Endpoint firmware group to update.
4.![]() In the right panel. select Firmware Management and then click the Upload Image button. An entry panel appears.
In the right panel. select Firmware Management and then click the Upload Image button. An entry panel appears.
a.![]() From the Select Type drop-down menu, choose the firmware type for your device.
From the Select Type drop-down menu, choose the firmware type for your device.
b.![]() From the Select an Image drop-down menu, choose the firmware bundle to upload.
From the Select an Image drop-down menu, choose the firmware bundle to upload.
c.![]() Click Upload Image, to upload the whole image (To only install want to install the patch of the new image, first select the Install Patch box and then click Upload Image.)
Click Upload Image, to upload the whole image (To only install want to install the patch of the new image, first select the Install Patch box and then click Upload Image.)
d.![]() Click OK. The new image appears in the image summary list in the bottom panel of the CONFIG > FIRMWARE UPDATE screen and the upload process begins in the background. A bar chart in the middle panel shows the progression of the upload (percentage complete).
Click OK. The new image appears in the image summary list in the bottom panel of the CONFIG > FIRMWARE UPDATE screen and the upload process begins in the background. A bar chart in the middle panel shows the progression of the upload (percentage complete).
5.![]() You can configure the Transmission Speed for the Unicast and Multicast Transmissions for a device (e.g. ENDPOINT > Default-cgmesh) on the Transmission Settings page. (CONFIG > FIRMWARE UPDATE > Transmission Settings tab).
You can configure the Transmission Speed for the Unicast and Multicast Transmissions for a device (e.g. ENDPOINT > Default-cgmesh) on the Transmission Settings page. (CONFIG > FIRMWARE UPDATE > Transmission Settings tab).
a.![]() Select the Transmission Speed as Slow, Medium, Fast or Custom.
Select the Transmission Speed as Slow, Medium, Fast or Custom.
b.![]() You can configure the minimum number of Multicast nodes for enabling the Multicast firmware upload.
You can configure the minimum number of Multicast nodes for enabling the Multicast firmware upload.
c.![]() For Custom Transmission Speed, you will have to specify Multicast Threshold, Unicast Delay and Minimum Multicast Delay values.
For Custom Transmission Speed, you will have to specify Multicast Threshold, Unicast Delay and Minimum Multicast Delay values.
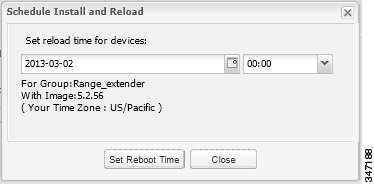
Setting the Installation Schedule for a Firmware Image
To set the installation schedule:
1.![]() Click the Schedule Install and Reload button under the Actions icon (calendar icon).
Click the Schedule Install and Reload button under the Actions icon (calendar icon).
2.![]() In the panel that appears, select the date and time for the firmware installation from the drop-down menus.
In the panel that appears, select the date and time for the firmware installation from the drop-down menus.
4.![]() To have the selected image also serve as the firmware image backup, click Set as Backup.
To have the selected image also serve as the firmware image backup, click Set as Backup.
Other Firmware Actions
At the CONFIG > Firmware Update page:
■![]() To sync the group members in the same firmware group, click the Sync Membership button.
To sync the group members in the same firmware group, click the Sync Membership button.
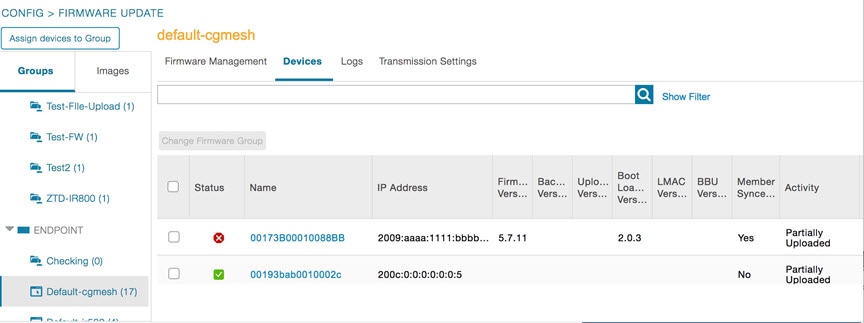
Viewing Mesh Device Firmware Image Upload Logs
To view the firmware image upload logs for mesh devices:
1.![]() Choose CONFIG > FIRMWARE UPDATE.
Choose CONFIG > FIRMWARE UPDATE.
2.![]() Click the Groups tab (left-pane).
Click the Groups tab (left-pane).
3.![]() Under the Firmware Groups =heading of the Groups pane, select the Default-cgmesh firmware group.
Under the Firmware Groups =heading of the Groups pane, select the Default-cgmesh firmware group.
Viewing Mesh Endpoint Firmware Update Information
You can view the endpoint firmware update process down to the subnet level for greater visibility.
1.![]() Choose > CONFIG > FIRMWARE UPDATE
Choose > CONFIG > FIRMWARE UPDATE
3.![]() Under the Groups heading, select a mesh devices group (such as Default-cgmesh or Default-ir500)
Under the Groups heading, select a mesh devices group (such as Default-cgmesh or Default-ir500)
Resilient Mesh Endpoint Firmware Update
When you instruct IoT FND to upload a firmware image to the members of an RME firmware group or subnet, IoT FND pushes the image to the group members in the background and tracks the upload progress to ensure that the devices receive the image.
A Resilient Mesh Endpoint (RME) stores three firmware images:
■![]() Uploaded image: Image most recently uploaded.
Uploaded image: Image most recently uploaded.
■![]() Running image: Image that is currently operational.
Running image: Image that is currently operational.
■![]() Backup image: It serves as a golden (fallback) image for the RME if there is an issue with the running image.
Backup image: It serves as a golden (fallback) image for the RME if there is an issue with the running image.
Note: You can initiate up to 3 firmware downloads simultaneously.
To view RME firmware update information:
1.![]() Choose CONFIG > FIRMWARE UPDATE.
Choose CONFIG > FIRMWARE UPDATE.
3.![]() Under the Groups heading, select a mesh device group (such as Default-cgmesh or Default-ir500).
Under the Groups heading, select a mesh device group (such as Default-cgmesh or Default-ir500).
4.![]() Click the Devices tab (right-pane).
Click the Devices tab (right-pane).
Using the Device Tab to Filter the Firmware Management Page Display
You can filter the display by Subnet, PanId or Group in the Devices Tab.
To sync the group members within the same firmware group, click the Sync Membership button.
Mesh Firmware Migration (CG-OS CG4 platforms only)
Note: Mesh Firmware Migration to Cisco Resilient Mesh is not supported for CGRs running CG-OS version CG4(4).
IoT FND allows you to update earlier versions of CGR firmware to allow Cisco Resilient Mesh networking using the following IoT FND North Bound APIs:
■![]() startReprovisionByEidListAbridged
startReprovisionByEidListAbridged
■![]() startReprovisionByGroupAbridged
startReprovisionByGroupAbridged
See the North Bound API User Guide for the Cisco IoT Field Network Director, Releases 3.x and 4.x for usage information.
Image Diff Files for IR809 and IR829
To reduce file size that transfers across network for IR809 and IR829, you can send a partial image.
At the Upload Image page, select type: IOS-IR800
Check box for option: “install patch for IOS and hypervisor from this bundle.”
Gateway Firmware Updates
At the CONFIG > FIRMWARE UPDATE page, you can add or delete the IC3000 firmware image.
At the Images tab on that page, expand the Gateway icon and click on IC3000 to see a list of available IC3000 images.
Configuring Firmware Group Settings
This section describes how to add, delete, and configure firmware groups, and includes the following topics:
■![]() Assigning Devices to a Firmware Group
Assigning Devices to a Firmware Group
Note: Upload operations only begin when you click the Resume button.
When you add routers or RMEs to IoT FND, the application sorts the devices into the corresponding default firmware group: default- <router> or default-cgmesh. Use these groups to upload and install firmware images on member devices. Add firmware groups to manage custom sets of devices. You can assign devices to firmware groups manually or in bulk. Before deleting a firmware group, you must move all devices in the group to another group. You cannot delete non-empty groups.
Note: When creating firmware groups note the guidelines:
■![]() CGRs, IR800s, and C800s can coexist on a network; however, for firmware management, they cannot belong to the same firmware group.
CGRs, IR800s, and C800s can coexist on a network; however, for firmware management, they cannot belong to the same firmware group.
■![]() IR500s and other RMEs devices can coexist on a network; however, for firmware management, they cannot belong to the same group.
IR500s and other RMEs devices can coexist on a network; however, for firmware management, they cannot belong to the same group.
The Groups tab on the CONFIG > Firmware Update page displays various device metrics.
IoT FND displays this information about the image on the routers in the selected firmware group:
|
|
|
|---|---|
| The name of the current image zip archive or the image being uploaded to group members. |
|
| The status of the image uploading. Possible statuses are: ■ ■ ■ |
|
| Specifies how many devices received or installed the image out of the total number of devices in the group. For example, 1/3 means that one device received the firmware image out of 3 devices in the group. |
|
| Specifies how many devices failed to receive or install the image out of the total number of devices in the group. For example, 2/3 means that two out of the three devices in the group failed to install the image. Tip: Click the Error/Devices link (1 in Firmware Update Page – Viewing Errored Devices) to view the devices that are in the errored state. |
For every router in the group, IoT FND displays this information:
|
|
|
|---|---|
| Firmware image updating progress. A progress of 100% indicates that the image uploading is complete. |
|
Tip: At the Firmware Update page, click the Error/Devices link (not shown) in Firmware Update Page – Viewing Errored Devices to apply a filter. Click the Clear Filter to revert to an unfiltered view of the selected device group.
Figure 1 Firmware Update Page – Viewing Errored Devices
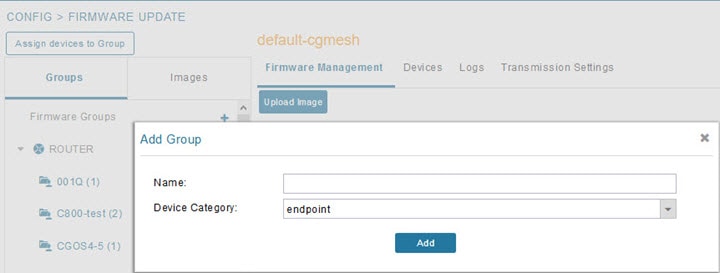
Adding Firmware Groups
1.![]() Choose CONFIG > Firmware Update.
Choose CONFIG > Firmware Update.
3.![]() In the Groups pane, select one of the following: Default-cgr1000, Default-c800, Default-ir500, Default-ir800, Default-cgmesh or Default-sbr.
In the Groups pane, select one of the following: Default-cgr1000, Default-c800, Default-ir500, Default-ir800, Default-cgmesh or Default-sbr.
4.![]() Click + next to Firmware Groups heading in the Groups pane to Add Group.
Click + next to Firmware Groups heading in the Groups pane to Add Group.
5.![]() In the Add Group dialog box, enter the name of the firmware group. Device Category options depend on the device type you select in step In the Groups pane, select one of the following: Default-cgr1000, Default-c800, Default-ir500, Default-ir800, Default-cgmesh or Default-sbr.
In the Add Group dialog box, enter the name of the firmware group. Device Category options depend on the device type you select in step In the Groups pane, select one of the following: Default-cgr1000, Default-c800, Default-ir500, Default-ir800, Default-cgmesh or Default-sbr.
The new group label appears under the corresponding device type in the Firmware Groups pane.
To assign devices to the new group, see Assigning Devices to a Firmware Group.
Assigning Devices to a Firmware Group
This section describes moving devices, and includes the following topics:
Moving Devices to Another Group Manually
To manually move devices to a group:
1.![]() Choose CONFIG > Firmware Update.
Choose CONFIG > Firmware Update.
3.![]() In the Firmware Groups pane, select the desired firmware group based on device type.
In the Firmware Groups pane, select the desired firmware group based on device type.
Note: If this is an ENDPOINT firmware group, click the Devices![]() tab above the main pane.
tab above the main pane.
4.![]() Check the check boxes of the devices that you want to move.
Check the check boxes of the devices that you want to move.
5.![]() Click Change Firmware Group. to open a pop up window.
Click Change Firmware Group. to open a pop up window.
6.![]() From the Firmware Group drop-down menu, choose the firmware group to which you want to move the devices or enter a new group name.
From the Firmware Group drop-down menu, choose the firmware group to which you want to move the devices or enter a new group name.
Moving Devices to Another Group In Bulk
To move devices from one group to another in bulk:
1.![]() Create a CSV or XML file listing devices that you want to move using the format shown in the following examples:
Create a CSV or XML file listing devices that you want to move using the format shown in the following examples:
Note: Each file can only list one device type.
2.![]() Choose CONFIG > Firmware Update.
Choose CONFIG > Firmware Update.
4.![]() Click Assign devices to Firmware Group button (found above Groups tab).
Click Assign devices to Firmware Group button (found above Groups tab).
5.![]() In the window that appears, click Browse and locate the device list CSV or XML file.
In the window that appears, click Browse and locate the device list CSV or XML file.
6.![]() From the Group drop-down menu, choose the destination group.
From the Group drop-down menu, choose the destination group.
IoT FND moves the devices listed in the file from their current group to the destination group.
Renaming a Firmware Group
1.![]() Choose CONFIG > Firmware Update.
Choose CONFIG > Firmware Update.
3.![]() In the Firmware Groups pane, select the firmware group to rename.
In the Firmware Groups pane, select the firmware group to rename.
4.![]() Move the cursor over the group and click the Edit Group Name pencil icon.
Move the cursor over the group and click the Edit Group Name pencil icon.

5.![]() In the Rename Group window, enter the new name and then click OK.
In the Rename Group window, enter the new name and then click OK.
Note: When you enter an invalid character entry (such as, @, #, !, or +) within the Rename Group field, IoT FND displays a red alert icon, highlights the field in red, and disables the OK![]() button.
button.
Deleting Firmware Groups
Note: Before deleting a firmware group, you must move all devices in the group to another group. You cannot delete non-empty groups.
1.![]() Choose CONFIG > Firmware Update.
Choose CONFIG > Firmware Update.
3.![]() In the Firmware Groups pane, select a firmware group to display a list of all possible firmware images for that group in the right pane.
In the Firmware Groups pane, select a firmware group to display a list of all possible firmware images for that group in the right pane.
4.![]() Check the box next to the firmware group that you want to delete.
Check the box next to the firmware group that you want to delete.
5.![]() Click Clear Selection that appears above the entry (yellow bar).
Click Clear Selection that appears above the entry (yellow bar).
Working with Router Firmware Images
This section describes how to add router firmware images to IoT FND and how to upload and install the images on routers, and includes the following topics:
■![]() Viewing Firmware Image Files in IoT FND
Viewing Firmware Image Files in IoT FND
■![]() Adding a Firmware Image to IoT FND
Adding a Firmware Image to IoT FND
■![]() Uploading a Firmware Image to a Router Group
Uploading a Firmware Image to a Router Group
■![]() Canceling Router Firmware Image Upload
Canceling Router Firmware Image Upload
■![]() Pausing and Resuming Router Firmware Image Uploads
Pausing and Resuming Router Firmware Image Uploads
■![]() Stopping Firmware Image Installation
Stopping Firmware Image Installation
■![]() Pausing and Resuming Router Firmware Image Installation
Pausing and Resuming Router Firmware Image Installation
Viewing Firmware Image Files in IoT FND
You can display firmware image information from the Images pane in the CONFIG > Firmware Update page. Select ROUTER or ENDPOINT to display all firmware images for those devices in the IoT FND database. Select the firmware image type to refine the display (see CONFIG > Firmware Update Images Pane).
Figure 2 CONFIG > Firmware Update Images Pane

For every image in the list, IoT FND provides this information:
|
|
|
|---|---|
| The version of the firmware bundle. Click the arrowhead icon to switch between ascending and descending listing of the firmware version. |
|
Adding a Firmware Image to IoT FND
Before you can upload and install a firmware image on a device, add the image file (as a zip archive) to IoT FND. IoT FND stores the image in its database.
Note: Do not unzip the image file. IoT FND unzips the file.
To add a firmware image to IoT FND:
1.![]() Choose CONFIG > Firmware Update.
Choose CONFIG > Firmware Update.
2.![]() Click the Images tab (CONFIG > Firmware Update Images Pane).
Click the Images tab (CONFIG > Firmware Update Images Pane).
3.![]() In the Images pane, select ROUTER, ENDPOINT or GATEWAY, and the type of device group.
In the Images pane, select ROUTER, ENDPOINT or GATEWAY, and the type of device group.
4.![]() Click the + icon to select an image found to the right of the Firmware Images heading.
Click the + icon to select an image found to the right of the Firmware Images heading.
5.![]() Click Browse to locate the firmware image. Select the image, then click Add File.
Click Browse to locate the firmware image. Select the image, then click Add File.
The image appears in the Firmware Images panel (CONFIG > Firmware Update Images Pane).
| ■ |
| Firmware images with a download in progress (with Yes in the Active Download? column) cannot be deleted. |
| ■ |
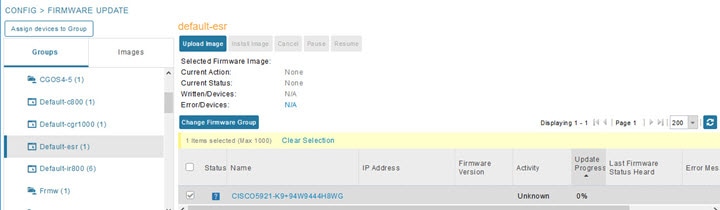
Uploading a Firmware Image to a Router Group
When you upload a firmware image to router firmware group members, IoT FND pushes the image to the group members in the background and tracks the upload progress to ensure that the devices receive the image.
On routers, firmware image upload and installation requires 200 MB of free disk space. IoT FND stores image files in the.../managed/images directory on the router.
Note: If there is not enough disk space on the router for the firmware image, the IoT FND initiates disk cleanup process on the router and removes the following files, sequentially, until there is enough disk space to upload the new image:
■![]() Unused files in the.../managed/images directory that are not currently running or referenced in the before-tunnel-config, before-registration-config, express-setup-config, and factory-config files for IOS CGRs; golden-config, ps-start-config, express-setup-config, or factory-config for CG-OS CGRs
Unused files in the.../managed/images directory that are not currently running or referenced in the before-tunnel-config, before-registration-config, express-setup-config, and factory-config files for IOS CGRs; golden-config, ps-start-config, express-setup-config, or factory-config for CG-OS CGRs
■![]() Unused.gbin and.bin files from the bootflash directory in CG-OS CGRs
Unused.gbin and.bin files from the bootflash directory in CG-OS CGRs
If there is still not enough space, you must manually delete unused files on the router.
To upload a firmware image to router group members:
1.![]() Choose CONFIG > Firmware Update.
Choose CONFIG > Firmware Update.
3.![]() In the Groups pane, select the router firmware group that you want to update.
In the Groups pane, select the router firmware group that you want to update.
Note: CGR groups can include devices running Cisco IOS and CG-OS. Therefore, Cisco IOS software images only upload to devices running Cisco IOS (C5921s, IR800s, ISR800s, CGR1000s); only CGRs accept CG-OS images.
IoT FND displays the firmware image type applicable to the router:
|
|
|
|
|---|---|---|
| Image (Cisco IOS only) loads to IR807 within the IR800 firmware group. |
||
| LoRaWAN IXM module when operating as an interface for Cisco IR809. |
||
4.![]() Click Upload Image to open the entry panel.
Click Upload Image to open the entry panel.
5.![]() From the Select Type: drop-down menu, choose the firmware type for your device.
From the Select Type: drop-down menu, choose the firmware type for your device.
6.![]() From the Select an Image: drop-down menu, choose the firmware bundle to upload.
From the Select an Image: drop-down menu, choose the firmware bundle to upload.
For some software bundles, you also have the option to select one or more of the following options (as noted in parenthesis next to the options listed below):
–![]() Install Guest OS from this bundle (IOS-CGR, IOS-IR800)
Install Guest OS from this bundle (IOS-CGR, IOS-IR800)
–![]() Clean LoRaWAN application data on the install (LORAWAN)
Clean LoRaWAN application data on the install (LORAWAN)
–![]() Install WPAN firmware from this bundle (IOS-CGR)
Install WPAN firmware from this bundle (IOS-CGR)
IoT FND starts the upload process. After the image uploads, install the image as described in Installing a Firmware Image.
Canceling Router Firmware Image Upload
You can stop the image upload process to firmware router groups at any time. Stopping the upload can take a few minutes. When you cancel the image upload, the image upload process immediately stops currently running tasks, and blocks all queued tasks.
Note: Running tasks do not complete, leaving partial files on the disk and sets the firmware group status to CANCELING until you complete the upload operation.
To stop firmware image uploading to a group:
1.![]() Choose CONFIG > Firmware Update.
Choose CONFIG > Firmware Update.
Pausing and Resuming Router Firmware Image Uploads
You can pause the image upload process to router firmware groups at any time, and resume it later.
Note: The image upload process does not immediately pause; all queued (but not running) operations pause, but currently running tasks complete. The status changes to PAUSING until the active operations complete.
To pause firmware image upload:
1.![]() Choose CONFIG > Firmware Update.
Choose CONFIG > Firmware Update.
3.![]() In the Groups pane, select the firmware group.
In the Groups pane, select the firmware group.
The Status column displays PAUSING until the active upload operations complete. No new upload operations start until you click the Resume button.
To resume the upload process, click Resume.
Note: If a IoT FND server goes down while the firmware image is being uploaded to devices, the server resumes the upload process for the scheduled devices after the server comes up. For IoT FND server clusters, if one server goes down during the upload process, another server in the cluster resumes the process.
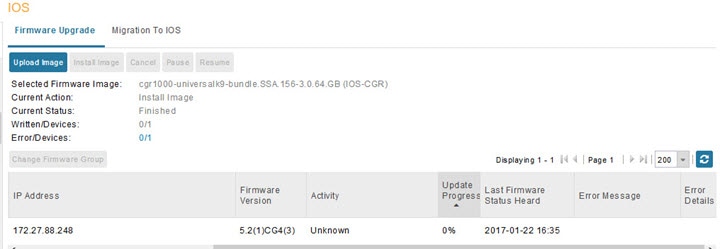
Installing a Firmware Image
To install an image on devices in a router firmware group:
1.![]() Choose CONFIG > Firmware Update.
Choose CONFIG > Firmware Update.
3.![]() In the Groups pane, select the firmware group.
In the Groups pane, select the firmware group.
Note: IoT FND recognizes devices as firmware-specific, and uploads the proper image to selected devices.
4.![]() In the Images pane, select a device subgroup (such as IOS-CGR, IOS-WPAN-RF, CDMA) to refine the display to those device types.
In the Images pane, select a device subgroup (such as IOS-CGR, IOS-WPAN-RF, CDMA) to refine the display to those device types.
This step above is necessary because IoT FND recognizes devices as firmware-specific and ensures the system uploads the proper image to selected devices.
5.![]() At the CONFIG > Firmware Update page, click the Groups tab; and, then Install Image on the Firmware Upgrade tab.
At the CONFIG > Firmware Update page, click the Groups tab; and, then Install Image on the Firmware Upgrade tab.
IoT FND sends commands to install the uploaded image and make it operational.
IoT FND starts the installation or reloading process.
Note: If you restart IoT FND during the image installation process, IoT FND restarts the firmware installation operations that were running prior to IoT FND going offline.
You can pause or stop the installation operation as described in:
■![]() Stopping Firmware Image Installation
Stopping Firmware Image Installation
■![]() Pausing and Resuming Router Firmware Image Installation
Pausing and Resuming Router Firmware Image Installation
Note: The firmware installation operation can time out on some routers. If routers are not heard from for more than an hour, IoT FND logs error messages.
Stopping Firmware Image Installation
You can stop firmware image installation at any time. When you stop image installation, the running version of the firmware remains in place.
Note: Stopping the installation cancels all queued tasks. Currently running tasks complete.
To stop firmware image installation to devices in a firmware group:
1.![]() Choose CONFIG > Firmware Update.
Choose CONFIG > Firmware Update.
3.![]() In the Groups pane, select the firmware group.
In the Groups pane, select the firmware group.
Pausing and Resuming Router Firmware Image Installation
You can pause the firmware image installation process at any time.
Note: Pausing the installation pauses all queued tasks. Currently running tasks complete.
To pause firmware image installation to devices in a firmware group:
1.![]() Choose CONFIG > Firmware Update.
Choose CONFIG > Firmware Update.
2.![]() In the Groups pane, select the firmware group.
In the Groups pane, select the firmware group.
3.![]() In the Firmware Upgrade window, click Pause button.
In the Firmware Upgrade window, click Pause button.
Performing CG-OS to Cisco IOS Migrations
You can upgrade CGRs from CG-OS to IOS in bulk or by device. The migration package is in the IoT Field Network Director installation package, and is available in the Select IOS Image menu.
Note: The Migration to IOS button is disabled if all CGRs in the group are IOS.
For CG-OS CGRs that you are migrating, modify the device configuration properties CSV or XML file to include the following IOS properties (see Changing Device Configuration Properties):
This example preserves tunnels during migration:
Note: You can only migrate from CG4(3) to the minimum IOS image for that device. Refer to Table 4 for minimum IOS image requirements.
To add CGR IOS images to IoT Field Network Director and upload and install the migration image on CGRs:
1.![]() Select CONFIG > Firmware Update, and click the Migration to IOS tab.
Select CONFIG > Firmware Update, and click the Migration to IOS tab.
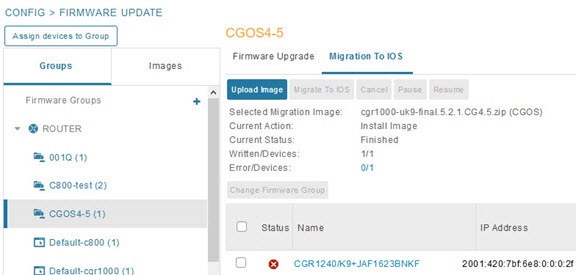
2.![]() In the Groups pane, select a CGR (or a group of CGRs) running CGOS4(5) software.
In the Groups pane, select a CGR (or a group of CGRs) running CGOS4(5) software.
3.![]() Select the Cisco IOS software image to upload to the CGR(s), and click Upload Image (right-pane).
Select the Cisco IOS software image to upload to the CGR(s), and click Upload Image (right-pane).
4.![]() Click OK to begin the upload.
Click OK to begin the upload.
Upload progress appears in the device list.
5.![]() Upload the following properties files (see Installing Cisco IoT FND in the appropriate Cisco IoT FND 4.3 installation guide:
Upload the following properties files (see Installing Cisco IoT FND in the appropriate Cisco IoT FND 4.3 installation guide:
–![]() Cisco IoT Field Network Director Installation Guide-Oracle Deployment, Release 4.3.x
Cisco IoT Field Network Director Installation Guide-Oracle Deployment, Release 4.3.x
–![]() Cisco IoT Field Network Director Post-Installation Guide - Release 4.3.x (Tunnel Provisioning and High Availability)
Cisco IoT Field Network Director Post-Installation Guide - Release 4.3.x (Tunnel Provisioning and High Availability)
6.![]() Click the Migrate To IOS button.
Click the Migrate To IOS button.
7.![]() Click Yes to confirm and begin the migration process.
Click Yes to confirm and begin the migration process.
The Update Progress displays as a percentage during the software image upload. If an upload fails, error messages and error details also appear for the software image. You can cancel, pause, or resume the migration process.
Tip: If any routers fail to upgrade, restart migration on the group. IoT Field Network Director skips routers that were successfully upgraded.
Interface Names After Migration
IoT Field Network Director preserves metrics for the various interfaces and associated properties during migration. CG-OS-to-IOS Interface Migration Map maps CG-OS interfaces to the corresponding IOS interfaces to preserve metrics.
Working with Resilient Mesh Endpoint Firmware Images
This section describes how to add Resilient Mesh Endpoint (RME) firmware images to IoT FND, and how to upload and install the images on routers, and includes the following topics:
■![]() Uploading a Firmware Image to a Resilient Mesh Endpoint Group
Uploading a Firmware Image to a Resilient Mesh Endpoint Group
■![]() Viewing Mesh Device Firmware Image Upload Logs
Viewing Mesh Device Firmware Image Upload Logs
■![]() Viewing Mesh Endpoint Firmware Update Information
Viewing Mesh Endpoint Firmware Update Information
Note: IR500s and other RME devices can coexist on a network; however, for firmware management they cannot belong to the same group.
Note: RME devices can report BL/Boot Loader image types to IoT FND, but IoT FND cannot upload boot loader images to devices.
Uploading a Firmware Image to a Resilient Mesh Endpoint Group
To upload a firmware image to mesh endpoint group members:
1.![]() Choose CONFIG > Firmware Update.
Choose CONFIG > Firmware Update.
2.![]() Click the Groups tab (left pane).
Click the Groups tab (left pane).
3.![]() Select the firmware group to update.
Select the firmware group to update.
4.![]() In the right panel, select Firmware Management and the click Upload Image button and an entry panel appears.
In the right panel, select Firmware Management and the click Upload Image button and an entry panel appears.
a.![]() From the Select Type drop-down menu, choose the firmware type for your device.
From the Select Type drop-down menu, choose the firmware type for your device.
IoT FND can upload these image types to ENDPOINT devices.
|
|
|
|---|---|
b.![]() From the Select an Image drop-down menu, choose the firmware bundle to upload.
From the Select an Image drop-down menu, choose the firmware bundle to upload.
d.![]() Check the appropriate box based on the Selected Type and Image:
Check the appropriate box based on the Selected Type and Image:
–![]() Install Guest OS from this bundle
Install Guest OS from this bundle
–![]() Clean LoRaWAN application data on install?
Clean LoRaWAN application data on install?
–![]() install WAPN firmware from this bundle:
install WAPN firmware from this bundle:
IoT FND adds the image to the list of images in the Firmware Management pane and starts the upload process in the background. A bar chart displays the upload progress (percent complete). You can filter the display by Subnet, PanId or Group.

|
|
Click button to sync the group members in the same firmware group. |
For every image in the list, IoT FND displays the following information:
Setting the Installation Schedule
To set the installation schedule:
1.![]() Click the Schedule Install and Reload button under the Actions heading.
Click the Schedule Install and Reload button under the Actions heading.
2.![]() Specify the date and time for the installation of the image and the rebooting of the device.
Specify the date and time for the installation of the image and the rebooting of the device.
| ■ |
| ■ |
Viewing Mesh Device Firmware Image Upload Logs
To view the firmware image upload logs for mesh devices:
1.![]() Choose CONFIG > Firmware Update.
Choose CONFIG > Firmware Update.
2.![]() Click the Groups tab (left-pane).
Click the Groups tab (left-pane).
3.![]() Under the Firmware Groups heading of the Groups pane, select the Default-cgmesh firmware group.
Under the Firmware Groups heading of the Groups pane, select the Default-cgmesh firmware group.
Viewing Mesh Endpoint Firmware Update Information
You can view the endpoint firmware update process down to the subnet level for greater visibility. To view details of firmware updates for mesh endpoint devices (by Subnet, Pan Id or Group) in a table or histogram, during the upgrade process or after the firmware upgrade completes, follow these steps:
Note: For Subnet and Pan Ids, you must enter the value in the text box provided:
1.![]() Choose CONFIG > Firmware Update.
Choose CONFIG > Firmware Update.
3.![]() Under the Groups heading, select a mesh devices group (such as Default-cgmesh or Default-ir500).
Under the Groups heading, select a mesh devices group (such as Default-cgmesh or Default-ir500).
4.![]() Click the Firmware Management tab (right-pane).
Click the Firmware Management tab (right-pane).

Viewing Mesh Device Firmware Information
To view the firmware information for mesh devices:
1.![]() Choose CONFIG > Firmware Update.
Choose CONFIG > Firmware Update.
3.![]() In the Groups pane under the Firmware Groups heading, select a Mesh devices group.
In the Groups pane under the Firmware Groups heading, select a Mesh devices group.
For every device in the group, IoT FND displays the following Device Info:
|
|
|
|---|---|
| Firmware image upload progress. An update progress of 100% indicates that the upload is complete. |
|
 Feedback