Cisco WAE 6.4 Network Visualization Guide
Bias-Free Language
The documentation set for this product strives to use bias-free language. For the purposes of this documentation set, bias-free is defined as language that does not imply discrimination based on age, disability, gender, racial identity, ethnic identity, sexual orientation, socioeconomic status, and intersectionality. Exceptions may be present in the documentation due to language that is hardcoded in the user interfaces of the product software, language used based on RFP documentation, or language that is used by a referenced third-party product. Learn more about how Cisco is using Inclusive Language.
- Updated:
- January 19, 2016
Chapter: Access Remote WAE Design Archive
Access an Archive
Plan files and templates are stored in archive repositories, which can be installed on the same or on a different device or VM than WAE Design GUI. From the WAE Design GUI, you can extract.pln plan files from these archive directories, make whatever modifications are necessary, and re-insert them as.pln files into an archive used by other applications. You can also open, modify, and then save a remote archive template.

Note![]() When uploading a template to a remote archive, you are overwriting the template that is in the archive.
When uploading a template to a remote archive, you are overwriting the template that is in the archive.
Prerequisites
Access an Archive
Step 1![]() In the WAE Design GUI, use the file menu to start the process.
In the WAE Design GUI, use the file menu to start the process.
- To open a WAE Design Archive plan file or template from a remote archive directory, select the File->Open from->Archive menu.
- To save a WAE Design Archive plan file or template in a remote archive directory, select the File->Save to->Archive menu. You must have an administrative username and password to upload plan files or templates.
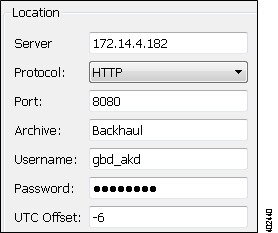
Step 2![]() After opening the dialog box, enter or select the hostname or IP address of the server.
After opening the dialog box, enter or select the hostname or IP address of the server.
Step 3![]() Identify how to connect to the server by selecting the appropriate protocol and by entering or selecting the port number (for example, HTTP 8080).
Identify how to connect to the server by selecting the appropriate protocol and by entering or selecting the port number (for example, HTTP 8080).
Step 4![]() Enter or select the name of the archive you are accessing.
Enter or select the name of the archive you are accessing.
Step 5![]() Enter the username and password that gives you access to the server. Both are case sensitive. If you do not know the password, contact your web system administrator.
Enter the username and password that gives you access to the server. Both are case sensitive. If you do not know the password, contact your web system administrator.
Step 6![]() Enter the UTC offset to apply to the date specified in the "Plan at Time" field. If you do not enter a date, the file is opened or saved according the server’s UTC time.
Enter the UTC offset to apply to the date specified in the "Plan at Time" field. If you do not enter a date, the file is opened or saved according the server’s UTC time.
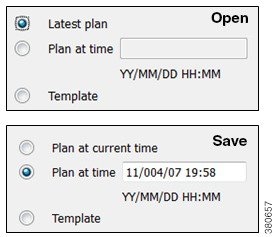
Step 7![]() Select options for either opening/saving a plan file or template.
Select options for either opening/saving a plan file or template.
–![]() If opening a plan file, identify which one by the latest or by a specific time.
If opening a plan file, identify which one by the latest or by a specific time.
–![]() If saving a plan file, identify the time as current or as a specific time.
If saving a plan file, identify the time as current or as a specific time.
–![]() If entering a time, use the YY/MM/DD HH:MM format.
If entering a time, use the YY/MM/DD HH:MM format.
Step 8![]() Select one of the following options, and then click OK.
Select one of the following options, and then click OK.
- Template—Open the template file.
- (Open from) Latest plan—Open the most recent plan file available.
- (Save to) Plan at current time—Save the plan file using the current date and time stamp.
- Plan at time—Specify an exact date and time. If these plan file are not local, you either need to log in to the server or ask the administrator of that server for the proper date and time.
On the server, these plan files are stored in an archive directory. To find it, go to the directory in which the plan file is stored and then drill down to the specific directory to list its contents. The format of this directory structure is as follows.
<archive_path>/data/<year>/<month>/<YYMMDD>_UTC
Plan files are listed in these archive directories in the following format.
Example: This example shows an archive directory named cgo-archive for November 8, 2015. It has three plan files that were collected 30 minutes apart as shown by their times.
/opt/cariden/archives/cgo-archive/data/2015/11/151108_UTC
-rw-r--r-- 1 cariden cariden 115651 Feb 23 02:04 151108_0201_UTC.pln
-rw-r--r-- 1 cariden cariden 115651 Feb 23 02:04 151108_0231_UTC.pln
-rw-r--r-- 1 cariden cariden 115651 Feb 23 02:04 151108_0301_UTC.pln
Save and Clear Settings
- To save all settings for use the next time you open the remote access dialog box, click Save Settings. This saves all settings whether the fields and all entries in the drop-down lists are empty or not. You can optionally save the authentication password.
- To clear all current user-specified settings from the fields and from the drop-down lists, click Clear Settings. Note that this does not clear the default Protocol, Port, and UTC Offset values, though manual entries in these fields are cleared.
- To delete all user-specific settings so the next time you open the remote access dialog box all fields and all drop-down lists are empty (except for the default Protocol, Port, and UTC Offset values), follow these steps.
Ensure Save Settings is enabled.
Click OK to exit. Upon being prompted for whether to continue, click Yes.
 Feedback