Custom Device Types

Prime Cable Provisioning comes with out-of-the box support for detecting a fixed set of device types (e.g. DOCSISModem, PacketCableMTA etc). Going forward, we will refer them as Built-in Device Types. Prime Cable Provisioning also provides support to add custom device types. This Chapter describes the Custom Device Type feature with which you can create custom device types and also configure RDU to use the custom logic for the detection of the device types.

Built-in Device Types

Prime Cable Provisioning has built-in (out of the box) support for detecting and managing the following device types:

  • DOCSISModem

  • PacketCableMTA

  • STB

  • eRouter

  • RPD

  • CableHomeWanData

  • CableHomeWanMan

  • Computer

Device type detection process in RDU uses information extracted from DHCP configuration sent by CNR Extension Points. For built-in device types, DHCPv4 information such as class identifier, vendor specific information, relay agent circuit-id and remote-id and DHCPv6 information such as vendor-class, vendor-opts are used for detection.

Following sections describe in detail how DHCP configuration is used for the detection process for built-in device types and Custom Device Types.

DHCPv4 Information Used to Determine Built-in Device Types

The following DHCPv4 options are checked in the order for detecting the device type if it runs on IPv4 mode:

  • Option 60 class-identifier (or)

  • Option 43 vendor-encapsulated-options, sub-option 2 device-type (or)

  • Option 82 relay-agent-info, sub-option 2 remote-id

  • Option 82 relay-agent-info, sub-option 1 circuit-id

First the class-identifier option (60) is checked to match built-in device type. If no match is detected, vendor-encapsulated-option (43.2) is checked. In the absence of a match, relay-agent-remote-id and relay-agent-circuit-id options are checked.

  1. Detection of DOCSISModem involves following checks:

    1. If value of Option 60 (class-identifier) starts with “docsis”.

    2. If Option 43.2 (vendor-encapsulated-options.device-type) is "ECM".

    3. If relay-agent-remote-id equals chaddr.

    4. If Cable modem indicator flag and type of provisioning is set in circuit-id from Cisco CMTS.

  2. Detection of PacketCableMTA involves following checks:

    1. If value of Option 60 (class-identifier) starts with “pktc”.

    2. If Option 43.2 (vendor-encapsulated-options.device-type) is "EMTA" or "SMTA" or "EDVA".

  3. Detection of CableHome involves following checks:

    1. If value of Option 60 (class-identifier) starts with “cablehome”

    2. If Option 43.2 (vendor-encapsulated-options.device-type) is "EPS" or "SPS".

      1. CableHomeWanMan if option 43.11 (vendor-encapsulated-options.realm) = 1

      2. CableHomeWanData if option 43.11 (vendor-encapsulated-options.realm) = 2

  4. Detection of STB involves following checks:

    1. If value of Option 60 (class-identifier) starts with “opencable” or “rng” or “dsg” or “opentv”.

    2. If Option 43.2 (vendor-encapsulated-options.device-type) is "ESTB".

  5. Detection of eRouter involves following checks:

    1. If value of Option 60 (class-identifier) starts with “erouter”.

    2. If Option 43.2 (vendor-encapsulated-options.device-type) is "EROUTER".

  6. Detection of RPD involves following checks:

    1. If value of Option 60 (class-identifier) starts with “rpd”.

    2. If Option 43.2 (vendor-encapsulated-options.device-type) is "RPD".

  7. Detection of Computer involves following checks:

    1. If value of Option 60 (class-identifier) starts with “msft” or “sunw”.

    2. If relay-agent-remote-id does not equal chaddr.

    3. If Cable modem indicator flag is not set in circuit-id from Cisco CMTS.

DHCPv6 Information Used to Determine Built-in Device Types

The following DHCPv6 options are checked in the order for detecting the device type if it runs on IPv6 mode:

  • Option 16 vendor-class (or)

  • Option 17 vendor-opts (enterprise-number 4491), sub-option 2 (device-type) (or)

  • Relay Agent Option 17 vendor-opts (enterprise-number 4491), sub-option 1026 (cm-mac-address)

First the vendor-class option (16) is checked to match built-in device type. If no match is detected, vendor-opts (17.2) is checked. Finally, cm-mac-address (1026) option in vendor-opts (17) of relay agent is checked.

  1. Detection of DOCSISModem involves following checks:

    1. If value of Option 16 (vendor-class) starts with “docsis”.

    2. If Option 17.2 (vendor-opts.device-type) is "ECM".

    3. If relay agent option 17.1026 (vendor-opts.cm-mac-address) equals option 17.36 (vendor-opts.device-id)

  2. Detection of PacketCableMTA involves following checks:

    1. If value of Option 16 (vendor-class) starts with “pktc”.

    2. If Option 17.2 (vendor-opts.device-type) is "EMTA" or "EDVA".

  3. Detection of CableHome involves following checks:

    1. If Option 17.2 (vendor-opts.device-type) is "EPS".

  4. Detection of STB involves following checks:

    1. If value of Option 16 (vendor-class) starts with “opencable” or "rng".

    2. If Option 17.2 (vendor-opts.device-type) is "ESTB".

  5. Detection of eRouter involves following checks:

    1. If value of Option 16 (vendor-class) starts with “erouter”.

    2. If Option 17.2 (vendor-opts.device-type) is "EROUTER".

  6. Detection of RPD involves following checks:

    1. If value of Option 16 (vendor-class) starts with “rpd”.

    2. If Option 17.2 (vendor-opts.device-type) is "RPD".

  7. Detection of Computer involves following checks:

    1. RDU is unable to determine device type by checking option 16 and 17.2.

    2. RDU has determined that the device is a behind device due to presence of relay agent option 17.1026 (vendor-opts.cm-mac-address).

Configuring Custom Device Type

You perform the tasks described in this workflow to use Custom Device Types feature:

Table 1. Configuring Custom Device Types Feature on RDU

Step

Task

See

Step 1

Create custom device types

Adding Custom Device Type

Step 2

Write groovy expression/script with custom logic to detect custom device types created in Step 1

Custom Logic for Device Type Detection

Step 3

Enable the feature on RDU and provide the expression created in Step 2

Enabling Custom Device Types Feature

To manage custom device types from Admin UI, click Configuration > Custom Device Type. Manage Custom Device Type page is displayed, you can use this page to add or delete custom device types.

Adding a Custom Device Type

To add a Custom Device Type:

Procedure


Step 1

Choose Configuration > Custom Device Type, the Manage Custom Device Type page appears.

Step 2

Click Add, the Add Custom Device Type page appears.

Step 3

Select the base device type from the Base Type drop-down list as per your requirement. Base type of a custom device type could be:

  • Built-in device type. With this, you can create a custom device type with exactly same properties as built-in device type. For example, you can create a custom device type called DPoE which has same properties as DOCSISModem.

  • Custom. With this, you intend to create a custom device type which is unique to itself. It has unique set of properties with custom logic of generation, service-level selection and disruption. For example, you can create a custom device type called ATA whose properties and extensions do not match with any built-in device type. Creating a custom device type with base type set to built-in device type is just a convenience option provided in Prime Cable Provisioning. You can always have base type set to Custom.

Note


Some sample custom device type extensions are available in, BPR_HOME/rdu/samples/cdtextensions.

Step 4

Enter the new device type name in the Custom Device Type Name field.

Steps 5 to 7 are applicable only if you select, Base Type = Custom in Step 3.

Step 5

Provide the value in Extension Point fields - Extension Point (generation), Service Level Selection and Disruption.

Step 6

For Is Behind Device, if the new custom device type is a behind device, check the enabled check box.

Step 7

In the Custom Device Type Properties field, you can enter list of custom properties and their values. From PCP 7.2.2, the delimiter of the properties is changed from comma to new-line.

Steps 8 is applicable only if you chose, Base Type = <existing built-in device type>, in Step 3.

Step 8

Set the value of the other properties as required for this custom device type.

Step 9

Click Submit.

Once a Custom Device Type has been added, the new Custom Device Type will gets displayed where the device types are listed. For example, while adding device records or Class of Service, all the defined Custom Device Types will be available in the device type choices.


Modifying a Custom Device Type

To modify Custom Device Type:

Procedure


Step 1

Choose Configuration > Custom Device Type, the Manage Custom Device Type page appears.

Step 2

Click the custom device type that has to be modified, the Modify Custom Device Type page appears.

Step 3

Make the necessary changes.

Step 4

Click Submit.


Deleting a Custom Device Type

You can delete any existing Custom Device Type, but before you attempt to do so, ensure that no devices are associated with that Device Type. To delete a Custom Device Type, select the Custom Device Type that you want to delete and click Delete.


Note


If you try to delete a Custom Device Type which has devices or Class of Service objects associated with it, an error message is displayed saying, Unable to delete device type.


Custom Logic for Device Type Detection

Prime Cable Provisioning allows you to create Custom Device Types and configure RDU to use the custom logic for the detection of those device types. This logic must be based on DHCP Fingerprint of the device i.e. DHCP Discovered Data as received from CNR Extension Points. So, while using this feature to manage custom device types from Prime Cable Provisioning, a DHCP Fingerprint Expression must be provided to RDU.

DHCP Fingerprint Expression contains the custom logic for device type detection. It can be provided as an expression or a file, both written in Groovy language. For the description of Groovy scripting language support in Prime Cable Provisioning, see Chapter 19 - Managing Dynamic File Configuration.

Bindings that are visible as input to the custom device type detection Groovy environment are:

  • services - of type ExtensionServices

  • isV6 - of type boolean (true if the discoveredData is v6)

  • discoveredData - REQUEST dictionary of type DhcpDataAccess

  • discoveredDataRelay - RELAY_REQUEST dictionary of type DhcpDataAccess

The script/expression is expected to return as a string matching the name of an existing Custom Device Type.

The device type detection Groovy script samples are available in BPR_HOME/rdu/samples/cdtexpression. They are examples and do not reflect CableLabs compliant implementation.

Example 21-1 Sample CDT Groovy Script


import com.cisco.provisioning.cpe.extensions.services.DiscoveredData
import com.cisco.provisioning.cpe.extensions.services.LogLevel;

def deviceType = null;
def logger = services.getLogManager();
if (isV6)
{
	def vendorclass = discoveredData.get("vendor-class");
	logger.log(LogLevel.INFO, "Vendor-Class Option: " + vendorclass);
	if (vendorclass.contains("pktc2.0"))
		deviceType='eDVA';
}else
{
	def classid = discoveredData.get("dhcp-class-identifier");
	logger.log(LogLevel.INFO, "Class Identifier : " + classid);
	if (classid.contains("pktc2.0"))
		deviceType='eDVA';
}
return deviceType;

Note


RDU executes DHCP Fingerprint Expression for every device request, whih will impact the performance of the RDU. So, it is advised to keep the logic simple.


Enabling Custom Device Types Feature

By default, the Custom Device Type feature is disabled and in this state, you cannot configure RDU to run custom logic for device detection. To enable the Custom Device Type feature:

  1. RDU Defaults page by navigating Configuration > Defaults > RDU Defaults.

    If you enable this feature, then the DHCP Fingerprint expression or script must also be set, so that RDU can use the custom logic to detect the device types.

    The relevant properties for configuring this feature are:

    • Custom Device Type Support

    • Custom Device Type DHCP Fingerprint Expression

    • Custom Device Type DHCP Fingerprint Expression Filename

    These properties are described in the RDU Defaults section.

  2. API, using the RDUDetailsKeys constants and Batch.changeRDUDefaults(). For details, see the API Javadoc located at the docs directory of the build.

  3. REST PWS using changeRDUDefaults API. The corresponding keys in the "properties" field are:

    • /rdu/cdt/enable

    • /rdu/cdt/dhcpFingerPrint/expression

    • /rdu/cdt/dhcpFingerPrint/filename


Note


  1. The CDT DHCP Fingerprint Expression File must be added to RDU as filetype “GENERIC” prior to setting it in this property. It must use .groovy extension.

  2. When both CDT DHCP Fingerprint Expression and Filename properties are set, the expression property takes precedence over the file name.


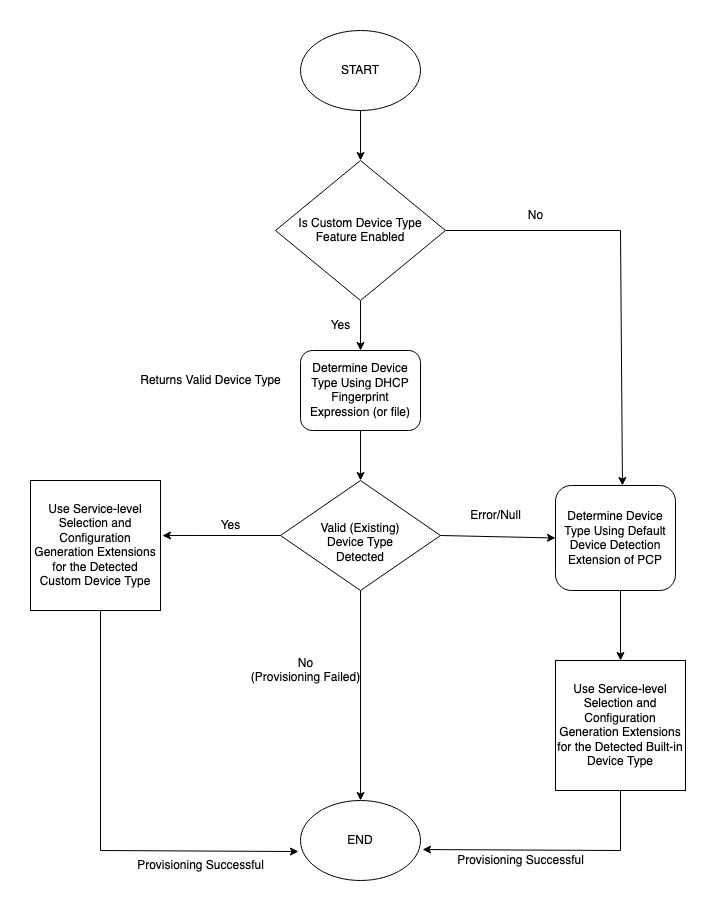
If Custom Device Type feature is enabled, RDU will first run the custom logic provided in Custom Device Type DHCP Fingerprint Expression/Filename.

Expression can return valid device type - If custom logic returns a valid (i.e. existent) device type, provisioning of that device continues with generation. The built-in logic of device type detection is not invoked.

Expression can return null - If custom logic does not return a valid device type (i.e. null), RDU uses its built-in logic to detect device type.

Expression can fail - If custom logic fails (due to runtime error), RDU will fall back to use its built-in logic to detect device type.

Expression can return invalid device type - If custom logic returns an invalid (i.e. non-existent) device type, provisioning of that device fails.

Promiscuous Mode for Custom Device Types

Prime Cable Provisioning supports promiscuous mode provisioning for custom device types as well. For details of promiscuous mode support, see Chapter 17 - Provisioning CPEs in Promiscuous Mode.

The promiscuous policy properties specify the Class of Service, the DHCP Criteria, and whether promiscuous access is enabled or disabled for each device type.

This requires creating and configuring Custom Properties as described in the Properties for Configuring Promiscuous Policy section.

/promiscuousMode/enable/<CDTName>

/provisioning/cpeClassOfService/<CDTName>

/provisioning/cpeDhcpCriteria/<CDTName>

Example 1: If you want to allow promiscuous access for a custom device type ATA behind Cable Modem, then you can enable promiscuous access on the DOCSISModem as:


/promiscuousMode/enable/ATA=true
 /provisioning/cpeClassOfService/ATA=sampleATACOS
 /provisioning/cpeDhcpCriteria/ATA=sampleATACriteria

You may require the custom device type as a front device and to enable promiscuous access for behind device (which could also be a custom device type or a built-in device type).

This works out-of-the-box in Prime Cable Provisioning. You do not have to configure anything on the custom front device. Just need to enable the promiscuous access for the selected behind device type on the custom front device.

Example 2: If you want to allow promiscuous access for a custom device type ATA behind custom front device DPoE, then you can enable promiscuous access on the DPoE as:


/promiscuousMode/enable/ATA=true
 /provisioning/cpeClassOfService/ATA=sampleATACOS
 /provisioning/cpeDhcpCriteria/ATA=sampleATACriteria