- Overview
- Configuring Cisco Prime Access Registrar
- Customizing Your Configuration
- Setting the Cisco Prime Access Registrar Configurable Option
- Configuring and Monitoring the RADIUS Server
- Configuring Local Authentication and Authorization
- Using Extension Points
- Testing the RADIUS Server
- Using Trusted ID Authorization with SESM
- Using the REX Accounting Script
- Enhanced IP Allocation in Cisco Prime Access Registrar
Customizing Your Configuration
After you have configured and tested a basic site, you can begin to make changes to better address your own sites’ needs. This chapter provides information that describes how to:
- Use groups to select the appropriate user service
- Use multiple user lists to separate users
- Performs authentication and authorization against data from an LDAP server
- Use a script to determine which remote server to use for authentication and authorization
- Use session management to allocate and account for dynamic resources such as the number of concurrent user sessions.
The examples in this chapter provides an introduction to many of the Prime Access Registrar objects and their properties. See “Configuring and Monitoring the RADIUS Server,” for more detailed information.
Configuring Groups
The first change you might want to make is to create distinct groups based on the type of service, and divide your user community according to these groups.
You can use Prime Access Registrar UserGroups in two ways:
- You can create separate groups for each specific type of service. For example, you can have a group for PPP users and another for Telnet users.
- You can use a default group and, depending on how the user logs in, use a script to determine which service to provide.
The default Prime Access Registrar installation provides examples of both types of groups.
Configuring Specific Groups
For users who always require the same type of service, you can create specific user groups, and then set the user’s group membership to that group.
Table 3-1 provides an overview of the process. The following sections describe the process in more detail.
|
|
|
|---|---|
Creating and Setting Group Membership
Step 1![]() Run the aregcmd command:
Run the aregcmd command:
Step 2![]() Use the cd command to change to the UserGroups object.
Use the cd command to change to the UserGroups object.
Step 3![]() Use the add command to create a user group, specifying the name and optional description, BaseProfile, AuthenticationScript, or AuthorizationScript. The following example shows how to add the PPP-users group.
Use the add command to create a user group, specifying the name and optional description, BaseProfile, AuthenticationScript, or AuthorizationScript. The following example shows how to add the PPP-users group.
This example sets the BaseProfile to default-PPP-users. When you set this property to the name of a profile, Prime Access Registrar adds the properties in the profile to the response dictionary as part of the authorization process.
add PPP-users "Users who always connect using PPP" default-PPP-users
Step 4![]() Use the cd command to change to the user you want to include in this group. The following example shows how to change to the user, jean:
Use the cd command to change to the user you want to include in this group. The following example shows how to change to the user, jean:
cd /Radius/UserLists/Default/jean
Step 5![]() Use the set command to set the user’s group membership to the name of the group you have just created.
Use the set command to set the user’s group membership to the name of the group you have just created.
Step 6![]() Use the save command to save your changes.
Use the save command to save your changes.
Step 7![]() Use the reload command to reload the server.
Use the reload command to reload the server.

Note![]() You must save whenever you change the configuration, either through adds, deletes, or sets. Before you exit, log out, or reload, Prime Access Registrar prompts you to save. You must reload after all saves except when you have only made changes to individual users (either adds, deletes, or sets). Unlike all other changes, Prime Access Registrar reads user records on demand; that is, when there is a request from that user.
You must save whenever you change the configuration, either through adds, deletes, or sets. Before you exit, log out, or reload, Prime Access Registrar prompts you to save. You must reload after all saves except when you have only made changes to individual users (either adds, deletes, or sets). Unlike all other changes, Prime Access Registrar reads user records on demand; that is, when there is a request from that user.
Configuring a Default Group
If you allow users to request different Services based on how they specify their username, you can use a script to determine the type of Service to provide. For example, the user joe can request either PPP or Telnet Service by either logging in as joe%PPP or joe%Telnet.
This works because there are two scripts: ParseServiceHints and AuthorizeService.
- ParseServiceHints —checks the username suffix and if it corresponds to a service, it modifies the request so it appears as if the NAS requested that type of Service.
- AuthorizeService —adds a certain profile to the response based on the Service type. The script chooses the authentication and/or authorization Service, and the Service specifies the UserGroup which then specifies the UserList, which contains the user
joe.
Table 3-2 provides an overview of the process. The following sections describe the process in more detail.
|
|
|
|---|---|
Using a Script to Determine Service
The following instructions assume you have already created a UserGroup and you have written a script that performs this function. For some sample scripts, see Chapter7, “Using Extension Points”
Step 1![]() Use the cd command to change to the UserGroup you want to associate with the script. The following example changes to the Default group.
Use the cd command to change to the UserGroup you want to associate with the script. The following example changes to the Default group.
Step 2![]() Use the set command to set the AuthorizationScript to the name of the script you want run. The following example sets the script to AuthorizeService :
Use the set command to set the AuthorizationScript to the name of the script you want run. The following example sets the script to AuthorizeService :
set AuthorizationScript AuthorizeService
Step 3![]() Use the cd command to change to Scripts :
Use the cd command to change to Scripts :
Step 4![]() Use the add command to add the new script, specifying the name, description, language (in this case
Use the add command to add the new script, specifying the name, description, language (in this case Rex which is short for RADIUS Extension), filename and an optional entry point. When you do not specify an entry point, Prime Access Registrar uses the script’s name.
add AuthorizeService "Authorization Script" Rex libAuthorizeService.so AuthorizeService
Step 5![]() Use the cd command to change to the user. The following example changes to the user
Use the cd command to change to the user. The following example changes to the user beth :
cd /Radius/UserLists/Default/beth
Step 6![]() Use the set command to set the user’s group membership to the name of that group. The following example sets
Use the set command to set the user’s group membership to the name of that group. The following example sets beth ’s group membership to the Default group.
Step 7![]() Use the save command to save your changes:
Use the save command to save your changes:
Step 8![]() Use the reload command to reload the server:
Use the reload command to reload the server:
Note![]() To save your changes and reload the server after following this example, you must have an actual script. Prime Access Registrar displays a warning message when it detects missing configuration objects.
To save your changes and reload the server after following this example, you must have an actual script. Prime Access Registrar displays a warning message when it detects missing configuration objects.
Configuring Multiple UserLists
The basic site contains a single userlist, Default, and uses group membership to determine the type of Service to provide each user. When all users are in the same UserList, each username must be unique.
You can, however, group your user community by department or location, and use separate UserLists to distinguish amongst them. In this case, the users names must be unique only within each UserList. Thus, you can allow a user Jane in the North UserList as well as one in the South UserList.
When you have more than one UserList, you must have an incoming script that Prime Access Registrar can run in response to requests. The script chooses the authentication and/or authorization Service, and the Service specifies the actual UserList (Figure 3-1).
Figure 3-1 Using a Script to Choose a UserList
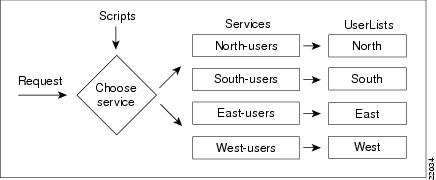
Table 3-3 provides an overview of the process. The following sections describe the process in more detail.
|
|
|
|---|---|
Configuring Separate UserLists
Divide your site along organizational or company lines, and create a UserList for each unit.
Creating Separate UserLists
Step 1![]() Run the aregcmd command.
Run the aregcmd command.
Step 2![]() Use the cd command to change to UserLists.
Use the cd command to change to UserLists.
Step 3![]() Use the add command to create a UserList, specifying the name and optional description. The following example specifies the name
Use the add command to create a UserList, specifying the name and optional description. The following example specifies the name North and the description Users from the northern office.
add North "Users from the northern office"
Step 4![]() Repeat for the other UserLists you want to add.
Repeat for the other UserLists you want to add.
Configuring Users
After you have created multiple UserLists, you must populate them with the appropriate users.
Populating UserLists
Step 1![]() Use the cd command to change to the UserList you have created.
Use the cd command to change to the UserList you have created.
Step 2![]() Use the add command to add a user. Using the sample users as models, configure the appropriate group membership. The following example adds user
Use the add command to add a user. Using the sample users as models, configure the appropriate group membership. The following example adds user beth, with the optional description telemarketing, the password Bethuser@123, Enabled set to TRUE, and group membership to PPP-users.
add beth telemarketing Bethuser@123 TRUE PPP-users
Step 3![]() Repeat for the other users you want to add.
Repeat for the other users you want to add.
You can use the script, add-100-users, which is located in the /opt/CSCOar/examples/cli directory to automatically add 100 users.
Configuring Services
You must create a corresponding Service for each UserList. For example, when you create four UserLists, one for each section of the country, you must create four Services.
Note![]() Before configuring services, ensure that you run the save and reload commands, after installation of the Prime Access Registrar kit.
Before configuring services, ensure that you run the save and reload commands, after installation of the Prime Access Registrar kit.
Creating Separate Services
Step 1![]() Use the cd command to change to Services :
Use the cd command to change to Services :
Step 2![]() Use the add command to create a Service, specifying the name and optional description. The following example specifies the name
Use the add command to create a Service, specifying the name and optional description. The following example specifies the name North-users and the description All users from the northern branch office :
add North-users "All users from the northern branch office"
Step 3![]() Use the cd command to change to North-users.
Use the cd command to change to North-users.
cd /Radius/Services/North-users
Step 4![]() Use the set command to set the type to local. S pecify the name of the UserList you want Prime Access Registrar to use. You can accept the default Outage Policy and MultipleServersPolicy or you can use the set command to change them. The following example sets the type to
Use the set command to set the type to local. S pecify the name of the UserList you want Prime Access Registrar to use. You can accept the default Outage Policy and MultipleServersPolicy or you can use the set command to change them. The following example sets the type to local and the UserList to North :
Step 5![]() Repeat for each Service you must create.
Repeat for each Service you must create.
Creating the Script
You must write a script that looks at the username and chooses the Service to which to direct the request.
For example, you create four UserLists ( North, South, East, and West), with the Service based on the origin of the user. When a user requests a Service, your script can strip off the origin in the request and use it to set the environment dictionary variables Authentication-Service and/or Authorization-Service to the name or names of the appropriate Service.
In this situation, when beth@North.QuickExample.com makes an Access-Request, the script will strip off the word North and use it to set the value of the environment variable Authentication-Service and/or Authorization-Service. Note, the script overrides any existing default authentication and/or authorization specifications.
Note![]() For more information about writing scripts, see “Using Extension Points,”and the role the dictionaries play in Prime Access Registrar, see the Cisco Prime Access Registrar 9.3 Reference Guide.
For more information about writing scripts, see “Using Extension Points,”and the role the dictionaries play in Prime Access Registrar, see the Cisco Prime Access Registrar 9.3 Reference Guide.
Client Scripting
Though, Prime Access Registrar allows external code (Tcl/C/C++/Java) to be used by means of a script, custom service, policy engine, and so forth, while processing request, response, or while working with the environment dictionaries, it shall not be responsible for the scripts used and will not be liable for any direct, indirect, incidental, special, exemplary, or consequential damages (including, but not limited to, procurement of substitute goods or services; loss of use, data, or profits; or business interruption) however caused and on any theory of liability, whether in contract, strict liability, or tort (including negligence or otherwise) arising in any way out of the use of the script.
Configuring the Script
When you have multiple UserLists, you need a script to determine which UserList to check when a user makes an Access-Request. When you want the script to apply to all users, irrespective of the NAS they are using, place the script at the Radius level. When, on the other hand, you want to run different scripts depending on the originating NAS, place the script at the Client level.
Client Scripting
Though, Prime Access Registrar allows external code (Tcl/C/C++/Java) to be used by means of a script, custom service, policy engine, and so forth, while processing request, response, or while working with the environment dictionaries, it shall not be responsible for the scripts used and will not be liable for any direct, indirect, incidental, special, exemplary, or consequential damages (including, but not limited to, procurement of substitute goods or services; loss of use, data, or profits; or business interruption) however caused and on any theory of liability, whether in contract, strict liability, or tort (including negligence or otherwise) arising in any way out of the use of the script.
Choosing the Scripting Point
Step 1![]() Use the cd command to change to the appropriate level. The following example sets the script for all requests.
Use the cd command to change to the appropriate level. The following example sets the script for all requests.
Step 2![]() Use the set command to set the incoming script. The following example sets the script,
Use the set command to set the incoming script. The following example sets the script, ParseUserName :
set IncomingScript ParseUserName
Step 3![]() Use the cd command to change to Scripts.
Use the cd command to change to Scripts.
Step 4![]() Use the add command to add the new script, specifying the name, description, language, filename and an optional entry point. If you do not specify an entry point, Prime Access Registrar uses the script’s name.
Use the add command to add the new script, specifying the name, description, language, filename and an optional entry point. If you do not specify an entry point, Prime Access Registrar uses the script’s name.
The following example specifies the name ParseUserName, the language Rex (which is RADIUS Extension), the filename LibParseUserName.so, and the entry point ParseUserName.
add ParseUserName ""Rex libParseUserName.so ParseUserName
Step 5![]() Use the save command to save your changes:
Use the save command to save your changes:
Step 6![]() Use the reload command to reload the server.
Use the reload command to reload the server.
Handling Multiple Scripts
Prime Access Registrar can run only one script from a given extension point. However, you can write a script that runs several scripts serially, one after the other. For example, the following tcl script, MasterScript, might look like the following:
Save tcl scripts in the directory /opt/CSCOar/scripts/radius/tcl.
Configuring a Remote Server for AA
All the sites described so far in this chapter have used the Prime Access Registrar RADIUS server for authentication and authorization. You might want to delegate either one or both of those tasks to another server, such as an LDAP server or another RADIUS server.
You can specify one of the following services when you want to use a particular remote server:
- radius—authentication and/or authorization
- ldap—authentication and/or authorization
- tacacs-udp—authentication only.
Note![]() Although these services differ in the way they handle authentication and authorization, the procedure for configuring a remote server is the same independent of its type.
Although these services differ in the way they handle authentication and authorization, the procedure for configuring a remote server is the same independent of its type.
Table 3-4 provides an overview of the process. The following sections describe the process in more detail.
|
|
|
|---|---|
Configuring the Remote Server
The RemoteServer object allows you to specify the properties of the remote server to which Services proxy requests. The remote servers you specify at this level are referenced by name from the RemoteServers list in the Services objects.
Creating a RemoteServer
Step 1![]() Run the aregcmd command:
Run the aregcmd command:
Step 2![]() Use the cd command to change to the RemoteServers level:
Use the cd command to change to the RemoteServers level:
Step 3![]() Use the add command to add the remote server you will reference in the Services level. The following example adds the remote server’s hostname
Use the add command to add the remote server you will reference in the Services level. The following example adds the remote server’s hostname QuickExample.
Step 4![]() Use the cd command to change to the QuickExample RemoteServers object level.
Use the cd command to change to the QuickExample RemoteServers object level.
cd /Radius/RemoteServers/QuickExample
Step 5![]() Use the set command to specify the protocol
Use the set command to specify the protocol ldap :
Step 6![]() Use the set command to specify the required LDAP properties.
Use the set command to specify the required LDAP properties.
At the very least you must specify:
- IPAddress—the IP address of the LDAP server (for example,
196.168.1.5). - Port—the port the LDAP server is listening on (for example,
389). - HostName—the hostname of the machine specified in the IP address field (for example,
ldap1.QuickExample.com). - SearchPath—the directory in the LDAP database to use as the starting point when searching for user information (for example,
o=Ace Industry, c=US). - Filter—the filter to use to find user entries in the LDAP database (for example,
(uid=%s)). - UserPasswordAttribute—the name of the LDAP attribute in a user entry that contains the user’s password (for example,
userpassword). - BindName—specifies the distinguished name (DN) in the LDAP server for Prime Access Registrar to bind with the LDAP server (for example,
uid=admin,ou=administrators,ou=topologymanagement,o=netscaperoot) - BindPassword—Specifies the password for the distinguished name (for example,
cisco123)
set HostName ldap1.QuickExample.com
set SearchPath "o=Ace Industry, c=US"
set UserPasswordAttribute password
set BindName uid=admin,ou=administrators,ou=topologymanagement,o=netscaperoot
See the “Using LDAP” chapter of the Cisco Prime Access Registrar 9.3 User Guide for descriptions of the other LDAP properties.
Configuring Services
To use LDAP for authorization and/or authentication, you must configure a Services object.
Creating Services
Step 1![]() Run the aregcmd command:
Run the aregcmd command:
Step 2![]() Use the cd command to change to the Services level:
Use the cd command to change to the Services level:
Step 3![]() Use the add command to add the appropriate LDAP service. The following example adds the
Use the add command to add the appropriate LDAP service. The following example adds the remote-ldap service:
add remote-ldap "Remote LDAP Service"
Step 4![]() Use the cd command to change to the remote-ldap object:
Use the cd command to change to the remote-ldap object:
cd /Radius/Services/remote-ldap
Step 5![]() Use the set command to set the type to
Use the set command to set the type to ldap. You can accept the default Outage Policy and MultipleServersPolicy or you can use the set command to change them.
Step 6![]() Use the cd command to change to the RemoteServers :
Use the cd command to change to the RemoteServers :
cd /Radius/Services/remote-ldap/RemoteServers
Step 7![]() Use the set command to set the server number and name. By giving each server a number you tell Prime Access Registrar the order you want it to access each server. Prime Access Registrar uses this order when implementing the MultipleServersPolicy of Failover or RoundRobin.
Use the set command to set the server number and name. By giving each server a number you tell Prime Access Registrar the order you want it to access each server. Prime Access Registrar uses this order when implementing the MultipleServersPolicy of Failover or RoundRobin.
The following example sets the first remote server to the server QuickExample :
The MultipleServersPolicy determines how Prime Access Registrar handles multiple remote servers.
- When you set it to
Failover, Prime Access Registrar directs requests to the first server in the list until it determines the server is offline. At that time, Prime Access Registrar redirects all requests to the next server in the list until it finds a server that is online. - When you set it to
RoundRobin, Prime Access Registrar directs each request to the next server in the RemoteServers list in order to share the resource load across all the servers listed in the RemoteServers list.
Configuring the RADIUS Server
In the default Prime Access Registrar configuration, authentication and authorization are handled through the local-users Service object. This causes Prime Access Registrar to match requesting users with the names in its own database. When you select LDAP as a remote server for authentication and authorization, Prime Access Registrar looks to that server for user information.
To have Prime Access Registrar perform authentication and authorization against information from the LDAP server, you must change the DefaultAuthenticationService and DefaultAuthorizationService at the Radius level.
Changing the Authentication and Authorization Defaults
Step 1![]() Run the aregcmd command:
Run the aregcmd command:
Step 2![]() Use the cd command to change to the Radius level:
Use the cd command to change to the Radius level:
Step 3![]() Use the set command to change the DefaultAuthentication :
Use the set command to change the DefaultAuthentication :
set DefaultAuthentication remote-ldap
Step 4![]() Use the set command to change the DefaultAuthorization :
Use the set command to change the DefaultAuthorization :
set DefaultAuthorization remote-ldap
Step 5![]() Use the save command to save your changes:
Use the save command to save your changes:
Step 6![]() Use the reload command to reload the server:
Use the reload command to reload the server:
Configuring Multiple Remote Servers
All of the sites described so far in this chapter have used a single server for authentication and authorization; either the local RADIUS server or a remote LDAP server.
You can configure multiple remote servers to use the same Service, or multiple remote servers to use different Services. Figure 3-2 shows how to use multiple servers for authentication and authorization, and how to employ a script to determine which one to use.
Figure 3-2 Using a Script to Choose a Remote Server
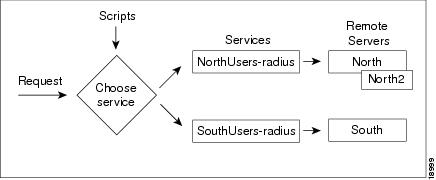
Table 3-5 provides an overview of the process. The following sections describe the process in more detail. Repeat for each RemoteServer you want to configure.
|
|
|
|---|---|
Configuring Two Remote Servers
Configure each remote server you want to use for authentication and authorization. The following example shows the North remote server.
Creating RemoteServers
Step 1![]() Run the aregcmd command:
Run the aregcmd command:
Step 2![]() Use the cd command to change to the RemoteServers level:
Use the cd command to change to the RemoteServers level:
Step 3![]() Use the add command to add the remote server you specified in the Services level. The following example adds the
Use the add command to add the remote server you specified in the Services level. The following example adds the North remote server:
Step 4![]() Use the cd command to change to the North RemoteServers level:
Use the cd command to change to the North RemoteServers level:
cd /Radius/RemoteServers/North
Step 5![]() Use the set command to specify the protocol
Use the set command to specify the protocol radius :
Step 6![]() Use the set command to specify the
Use the set command to specify the SharedSecret 789 :
Step 7![]() Repeat these steps for the other remote servers.
Repeat these steps for the other remote servers.
Configuring Services
To use multiple remote servers for authorization and/or authentication you must configure the corresponding Services.
Creating the Services
Step 1![]() Run the aregcmd command:
Run the aregcmd command:
Step 2![]() Change directory to /Radius/Services.
Change directory to /Radius/Services.
Step 3![]() Use the add command to add the appropriate RADIUS service. The following example adds the
Use the add command to add the appropriate RADIUS service. The following example adds the NorthUsers-radius object:
add NorthUsers-radius “NorthRemote server”
Step 4![]() Use the cd command to change the NorthUsers-radius object:
Use the cd command to change the NorthUsers-radius object:
cd /Radius/Services/NorthUsers-radius
Step 5![]() Use the set command to set the type to
Use the set command to set the type to radius :
Step 6![]() Use the set command to set the remote server number and name. By giving each server a number, you tell Prime Access Registrar the order you want it to access each server. Prime Access Registrar uses this order when implementing the MultipleServersPolicy of Failover or RoundRobin.
Use the set command to set the remote server number and name. By giving each server a number, you tell Prime Access Registrar the order you want it to access each server. Prime Access Registrar uses this order when implementing the MultipleServersPolicy of Failover or RoundRobin.
The following example sets the first remote server to the server North and the second remote server to North2 :
Step 7![]() Create another Service (SouthUsers-radius) for the South remote server.
Create another Service (SouthUsers-radius) for the South remote server.
Configuring the Script
When you have multiple RemoteServers, you need a script that determines the authentication and/or authorization Service, which in turn specifies the RemoteServer to check when a user makes an Access-Request. If you want the script to apply to all users, irrespective of the NAS they are using, place the script at the Radius level.
Note![]() See “Using Extension Points,” for sample scripts you can use as a basis for your own scripts.
See “Using Extension Points,” for sample scripts you can use as a basis for your own scripts.
Choosing the Scripting Point
Step 1![]() Run the aregcmd command:
Run the aregcmd command:
Step 2![]() Use the cd command to change to the Scripts object:
Use the cd command to change to the Scripts object:
Step 3![]() Use the add command to add the new script, specifying the name, description, language, filename and an optional entry point. If you do not specify an entry point, Prime Access Registrar uses the script’s name.
Use the add command to add the new script, specifying the name, description, language, filename and an optional entry point. If you do not specify an entry point, Prime Access Registrar uses the script’s name.
The following example specifies the name ParseRemoteServers, the language Rex, the filename libParseRemoteServers.so, and the entry point ParseRemoteServers:
add ParseRemoteServers “Remote Server Script” RexlibParseRemoteServers.so ParseRemoteServers
Step 4![]() Use the cd command to change to the appropriate object level. The following example changes to the server level:
Use the cd command to change to the appropriate object level. The following example changes to the server level:
Step 5![]() Use the set command to set the incoming script. The following example sets the script, ParseRemoteServers , at the server level:
Use the set command to set the incoming script. The following example sets the script, ParseRemoteServers , at the server level:
set IncomingScript ParseRemoteServers
Step 6![]() Use the save command to save your changes:
Use the save command to save your changes:
Step 7![]() Use the reload command to reload the server.
Use the reload command to reload the server.
Configuring Session Management
You can use session management to track user sessions, and/or allocate dynamic resources to users for the lifetime of their sessions. You can define one or more Session Managers, and have each one manage the sessions for a particular group or company.
Configuring a Resource Manager
Session Managers use Resource Managers, which in turn manage a pool of resources of a particular type. The Resource Managers have the following types:
- IP-Dynamic —manages a pool of IP address and allows you to dynamically allocate IP addresses from that pool of addresses
- IP-Per-NAS-Port —allows you to associate NAS ports to specific IP addresses, and thus ensure specific NAS ports always get the same IP address
- IPX-Dynamic —manages a pool of IPX network addresses
- Gateway Subobject—includes a list of names of the Frame Relay Gateways for which to encrypt the session key.
- Group-Session-Limit —manages concurrent sessions for a group of users; that is, it keeps track of how many sessions are active and denies new sessions after the configured limit has been reached.
- User-Session-Limit —manages per-user concurrent sessions; that is, it keeps track of how many sessions each user has, and denies the user a new session after the configured limit has been reached.
- USR-VPN —allows you to set up a Virtual Private Network (VPN) using a US Robotics NAS. (A Virtual Private Network is a way for companies to use the Internet to securely transport private data.)
- IP Address Pool—allows you to manage pool of dynamic IP addresses
- On-Demand Address Pool—allows you to manage pool of IP dynamic subnet address
- Session Cache—allows you to cache additional attributes to existing session and supports the identity cache feature
- Home-Agent—manages a pool of on-demand IP addresses
- Home-Agent-IPv6—manages a pool of on-demand IPv6 addresses
- Subnet-Dynamic—supports the On Demand Address Pool feature
- Dynamic-DNS—manages the DNS servers
- Remote-IP-Dynamic—manages a pool of IP addresses that allows you to dynamically allocate IP addresses from a pool of addresses. It internally works with a remote ODBC database.
- Remote-User-Session-Limit—manages per-user concurrent sessions; that is, it keeps track of how many sessions each user has and denies the user a new session after the configured limit has been reached. It internally works with a remote ODBC database.
- Remote-Group-Session-Limit—manages concurrent sessions for a group of users; that is, it keeps track of how many sessions are active and denies new sessions after the configured limit has been reached. It internally works with a remote ODBC database
- Remote-Session-Cache—allows you to define the RADIUS attributes to store in cache. It should be used with session manager of type 'remote'.
- 3GPP—supports HLR and/or HSS.
Each Resource Manager is responsible for examining the request and deciding whether to allocate a resource for the user, pass the request through, or cause Prime Access Registrar to reject the request.
Table 3-6 provides an overview of the process. The following sections describe the process in more detail.
|
|
|
|---|---|
Creating a Resource Manager
You can use the default Resource Managers as models for any new Resource Managers you want to create. The following describes how to create a Resource Manager that limits the number of users to 100 or less at any one time.
Step 1![]() Run the aregcmd command:
Run the aregcmd command:
Step 2![]() Use the cd command to change to the ResourceManagers level:
Use the cd command to change to the ResourceManagers level:
Step 3![]() Use the add command to add a new ResourceManager. The following example adds the ResourceManager rm-100:
Use the add command to add a new ResourceManager. The following example adds the ResourceManager rm-100:
Step 4![]() Use the cd command to change to the ResourceManager you have just created:
Use the cd command to change to the ResourceManager you have just created:
Step 5![]() Use the set command to set the type:
Use the set command to set the type:
Step 6![]() Use the set command to set the number of GroupSessionLimit to 100:
Use the set command to set the number of GroupSessionLimit to 100:
Configuring a Session Manager
After you create a Resource Manager, you must associate it with the appropriate Session Manager.
Creating a Session Manager
Step 1![]() Run the aregcmd command:
Run the aregcmd command:
Step 2![]() Use the cd command to change to the SessionManagers level:
Use the cd command to change to the SessionManagers level:
Step 3![]() Use the add command to add a new SessionManager. The following example adds the SessionManager sm-1:
Use the add command to add a new SessionManager. The following example adds the SessionManager sm-1:
Step 4![]() Use the cd command to change to the SessionManager/ResourceManagers property:
Use the cd command to change to the SessionManager/ResourceManagers property:
Step 5![]() Use the set command to specify the ResourceManagers you want tracked per user session. Specify a number and the name of the ResourceManager. Note, you can list the ResourceManager objects in any order.
Use the set command to specify the ResourceManagers you want tracked per user session. Specify a number and the name of the ResourceManager. Note, you can list the ResourceManager objects in any order.
Enabling Session Management
Prime Access Registrar, by default, comes configured with the sample SessionManagement session-mgr-1. You can modify it or change it to the new SessionManager you have created.
Note![]() When you want the Session Manager to manage the resources for all Access-Requests Prime Access Registrar receives, set the RADIUS DefaultSessionManager to this Session Manager. When you want a Session Manager to manage the resources of a particular object, or to use multiple Session Managers, then use an incoming script at the appropriate level.
When you want the Session Manager to manage the resources for all Access-Requests Prime Access Registrar receives, set the RADIUS DefaultSessionManager to this Session Manager. When you want a Session Manager to manage the resources of a particular object, or to use multiple Session Managers, then use an incoming script at the appropriate level.
Configuring Session Management
Step 1![]() Run the aregcmd command:
Run the aregcmd command:
Step 2![]() Use the cd command to change to the Radius level:
Use the cd command to change to the Radius level:
Step 3![]() Use the set command to set the DefaultSessionManager to the name you have just created:
Use the set command to set the DefaultSessionManager to the name you have just created:
set DefaultSessionManager sm-1
Step 4![]() Use the save command to save your changes:
Use the save command to save your changes:
Step 5![]() Use the reload command to reload the Prime Access Registrar server.
Use the reload command to reload the Prime Access Registrar server.
 Feedback