![]()
Role-Based Access in Cisco MSX
In Cisco MSX, user permissions are managed using Role-Based Access Control (RBAC). RBAC restricts or authorizes system access for users based on user roles. Based on the permissions assigned to a user by an administrator, a user can define and customize how their services are exposed to customers. The permissions allow the user to customize various aspects of a service workflow, such as managing tenants, notifications, integration with BSS systems, announcements, and so on. The role-based access permissions are categorized into the following categories:
-
Service Pack Specific Permissions: Include permissions for controlling various settings for the service packs.
-
Services, Configurations, and Devices Specific Permissions: Include permissions for configuring various settings for the devices and services.
-
Integrations, Settings, and Log Specific Permissions: Include permissions for controlling integration, log, and SSO configurations.
-
Users, Roles, and Tenants Specific Permissions: Include permissions to configure user, remote users, tenants, roles, provider settings, and so on.
For more information on all the available permissions in Cisco MSX and to also see the minimum required permissions to perform various operations in Cisco MSX, see the latest version of Cisco Managed Services Accelerator (MSX) 4.3 Platform and Service Pack Permissions Addendum.
 Note |
You will need Cisco Customer or Cisco Employee privileges to access the Cisco MSX documentation. |
Cisco MSX provides out-of-the-box roles that have permissions applied by default. You can either modify the permissions associated with these out-of-the-box roles or add a new role. For the description of these permissions, see the latest version of Cisco Managed Services Accelerator (MSX) 4.3 Platform and Service Pack Permissions Addendum.
Cisco MSX Out-of-the-box Roles
The following are the out-of-the-box roles available with Cisco MSX:
-
Service Provider Operators support multiple customers by maintaining service information and settings, viewing, monitoring the SP-DNA platform, remediating basic customer issues, and escalating severe issues.
-
Service Provider Administrators have Operator permissions and can also perform more advanced tasks like managing price plans, importing, and exporting service definitions, and configuring the service platform.
-
Service Provider API Administrators update tenant data using API calls instead of the standard methods available through applications and platform web interface. This is a powerful role, as it bypasses Tenant RBAC checks.
-
Tenant Administrators have Tenant Operator permissions and can also perform more advanced tasks like managing service policies and configurations.
-
Super User supports all actions from user management to service management or operator.
-
Enterprise Administrator is a superset of Tenant Admin-level permissions, but with additional capabilities of accessing billing and licensing insights.
-
Workflow Administrator can view and manage workflows and instances.
-
Workflow User can view and manage workflow instances.
For more information on how to add a new role or modify an existing role and to associate this role to a user, see Managing User Roles and Managing Users.
Managing Cisco MSX Platform-Specific User Roles
In Cisco MSX, you need to create a new role (such as Tenant Operator) and assign the permissions required to operate the platform tasks.
To create a new role and assign it to users:
Procedure
| Step 1 |
Log in to the Cisco MSX portal (as an Admin or Super User). |
| Step 2 |
Create the tenants. For more information, see Managing Tenants and Tenant Groups. |
| Step 3 |
Create a new role (such as Tenant Operator) and assign the permissions required to operate the Cisco MSX application and the service packs.
|
| Step 4 |
Create a user (such as Tenant Operator User), assign the role defined in Step 3 to this user, and select all the tenants that the user needs to access. For more information on creating a new user, see Managing Users. |
Managing User Roles
What you can see and do in the user interface is controlled by your user account privileges. In Cisco MSX, the permissions are managed using Role-Based Access Control (RBAC). RBAC restricts or authorizes system access for users based on user roles. A role defines the privileges of a user in the system. Since users are not directly assigned with privileges, management of individual user privileges is simply a matter of assigning the appropriate roles.
A user is granted access to desired system resources only if the assigned role grants the access privileges. For example, a user with the Service Extension Designer role can import service extension templates, define service extension parameters, define default parameter values, and so on. For more information on assigning roles to a user, see Managing Users.
Adding a User Role
Using this procedure, you can add a user role:
Procedure
| Step 1 |
Log in to the Cisco MSX portal using your credentials. |
||||||
| Step 2 |
From the left pane, click Roles. The Roles window is displayed. |
||||||
| Step 3 |
Click the Add Role button. |
||||||
| Step 4 |
Enter the role name, display name, and description. |
||||||
| Step 5 |
To assign the permission for the roles, click Category and select the corresponding check box for the permission that you want to grant to the role. For more information on permissions required to perform a specific task on the Cisco MSX platform and for the complete list of Cisco MSX permissions, see the latest version of Cisco MSX Platform and Service Pack Permissions Addendum. The types of permission you can grant are:
|
||||||
| Step 6 |
Click Save. |
Modifying an Existing Role
Using this procedure, you can modify an existing role.
Procedure
| Step 1 |
Log in to the Cisco MSX portal using your credentials. |
||||||
| Step 2 |
From the left pane of the Service Interface, click Roles to view the list of roles. The Manage Roles windows are displayed. |
||||||
| Step 3 |
Select the role that you want to modify and click the Edit icon. |
||||||
| Step 4 |
To assign or revoke the permission for the roles, click Category and select or clear the corresponding check box for the permissions. The types of permission you can grant are:
|
||||||
| Step 5 |
Click Save. |
Managing Users
Using this procedure, you can add new user details, assign an appropriate role to the user, and associate the new user to the tenant.
Note |
You can disable the creation and modification of users, if you choose Single Sign-On and use your Identity Provider. The following procedure, describes the use of local user accounts. |
Procedure
| Step 1 |
Log in to the Cisco MSX portal using your credentials. |
| Step 2 |
From the left pane, click Users to view the list of users with their details in the Manage Users window. The Users window is displayed. |
| Step 3 |
Click Add User and enter details such as first name, last name and user ID, email address, and contact number. |
| Step 4 |
To assign a role, you can choose from the available options in the drop-down by selecting them from the Assigned Roles drop-down list. You can associate one or more roles to a user. |
| Step 5 |
Choose a tenant from the Associate Tenants drop-down list. You can associate one or more tenants to a user. |
| Step 6 |
Click Save. The new user details are displayed in the Manage User window. |
Adding a User
In Cisco MSX, after you have added the password policy in the settings through the web portal, you can add a user and assign the password policy for the user.
Using this procedure, you can add a user.
Procedure
| Step 1 |
Log in to the Cisco MSX portal using your credentials. |
||
| Step 2 |
From the left pane, click Users. The Users window is displayed. |
||
| Step 3 |
Click Add Users. The User window is displayed. |
||
| Step 4 |
In the User window, enter:
|
||
| Step 5 |
Click Save. |
||
| Step 6 |
Select a user, click the Edit icon from the existing Users table if you want to edit the Password Policy of the user. |
||
| Step 7 |
Choose a password policy from the Password Policy drop-down list that the user uses for his password. |
||
| Step 8 |
Click Update.
|
Searching for a User
In Cisco MSX, the User Management window uses a pagination API form to address the scaling issue in the page.
Using this procedure, you can search for a user.
Procedure
| Step 1 |
Log in to the Cisco MSX portal window is displayed. |
||
| Step 2 |
From the left pane click Users. The Users window is displayed. |
||
| Step 3 |
Search for any user by using the search bar.
|
Managing Tenants and Tenant Groups
The multi-tenant architecture of Cisco MSX provides the ability to segment the data stored by tenant. When tenants are defined, data is partitioned by tenant. This provides data security and privacy for each tenant, while allowing cloud or managed service providers the flexibility to consolidate many smaller customer configurations on a set of infrastructure servers.
The following are the key points you must know while configuring tenants:
-
Tenant administrators are linked to their data by a tenant object.
-
Tenant objects must be consistent and unique across all clusters.
-
A tenant administrator cannot view or modify the data of another tenant.
This topic contains the following sections:
Managing Tenants
You can add a new tenant and sub-tenant details using this procedure. When you add a customer user, you need to associate the user with a tenant.
The following are the key points you should know while managing tenants:
-
Tenant administrators are linked to their data by a tenant object.
-
Tenant objects should be unique across all clusters.
-
A tenant administrator cannot view or modify the data of any tenant not under their direct control.
-
A tenant administrator can manage more than one tenant.
Using this procedure, you can manage tenants.
Procedure
| Step 1 |
Log in to the Cisco MSX portal using using your credentials. |
||||
| Step 2 |
From the left pane, click Tenants to view the list of existing tenants with their details on the Tenants window. The Tenants window is displayed |
||||
| Step 3 |
Click Add Tenant and enter the customer name, email address, website URL, external ID, and select the parent tenant/sub-tenant.
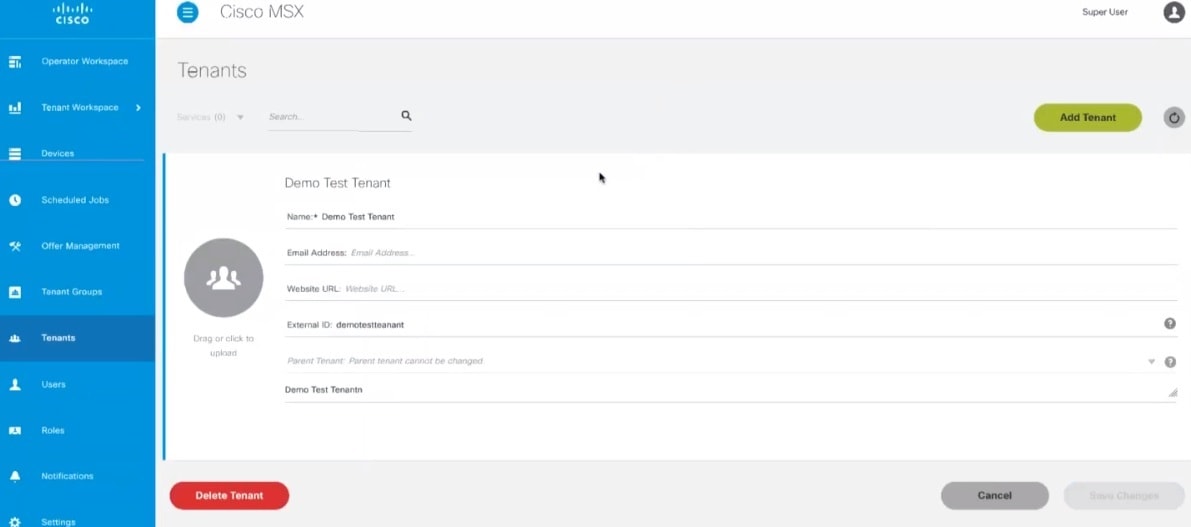
|
||||
| Step 4 |
Click Save. The new customer details are listed on the Tenants window as parent tenant. You can create a sub-tenant/child tenant similarly. You can also update the customer details (under Action), if required. |
||||
| Step 5 |
Click View Sub-Tenants to list the sub-tenants under the parent tenant.
In addition, you can also disable the ability to create, modify or delete Tenants. For more information, see Configuring Integrations for Outbound APIs.
|
Managing Tenant Groups
After you create tenants, you can configure the tenant groups. The collection of tenants, grouped for assigning a common list of functions such as, service extensions parameter values, and so on.
Using this procedure, you can manage the tenant groups.
Procedure
| Step 1 |
Log in to the Cisco MSX portal using your credentials. |
| Step 2 |
From the left pane, click Tenant Groups. The Tenant Groups window is displayed with the list of all the Tenant Groups. |
| Step 3 |
Create a new Tenant Group. |
| Step 4 |
Edit an existing Tenant Group.

|
Deleting Tenant Groups
Using this procedure, you can delete the tenant groups.
Procedure
| Step 1 |
Log in to the Cisco MSX portal using your credentials. |
| Step 2 |
From the left pane, click Tenant Groups. The Tenant Groups window is displayed with the list of all the Tenant Groups. |
| Step 3 |
Click the Tenant Group that you need to delete. |
| Step 4 |
Click Delete to remove the tenant group. |
Generating Tenant Dynamically from Cisco.com Account
The Cisco MSX platform integrates with the Okta to enable the expansion of existing Cisco MSX identity capabilities and onboard users into Cisco MSX. The Cisco MSX assigns the first user from the company as the tenant administrator user. The tenant administrator can browse through the Cisco MSX as-a-service catalog and subscribe to an offer. Other users logging in to the Cisco MSX portal from the same company are grouped under this tenant. You can enable the option to dynamically generate tenants and associate enterprise users to a tenant from the Cisco MSX portal.
The Cisco MSX platform can generate a new tenant for a user logging into the Cisco MSX portal for the first time using cisco.com credentials. The Cisco MSX portal checks the user based on the SAML attributes in the assertion and extracts the Company_Name attribute value. Once an offer subscription has been selected, Cisco MSX must create the tenant for this customer by pulling the Company_Name field from the user's cisco.com profile. If the Company_Name field is not specified, the user should be prompted to supply this information in the Cisco MSX portal. Once the tenant is created, the subscription should be associated with this tenant (federated user), and any subsequent operations for this user and subscription are done within the context of the newly created Tenant.
To enable this functionality for an enterprise, do the following:
-
Create or edit your existing SAML Identity Provider setting from the Cisco MSX portal to enable the Create user option.
When Create user option is enabled, Cisco MSX works as follows:
-
The Cisco MSX checks the user who attempts to login based on the assertion.
-
If the user does not exist already, Cisco MSX checks tenant using the value of the Company_Name attribute and finds that tenants are missing. New tenant (federated user) is automatically created using the attributes in the SAML assertion.
-
If the user already exist, Cisco MSX compares the Company_Name attribute with the existing user’s tenant. If it does not match, SSO process will stop and an error message is shown on the portal. Otherwise the user’s name and email will be updated according to the value in the assertion.
-
-
Apply elevated user roles for an administrator user or regular user roles for other users.
For more information on new tenant creation and assigning roles, see Step 8 through Step 12 in the Configuring SAML-Based IDPs on MSX.
Viewing Permissions Mapping
The API permissions viewer allows you to view API endpoints for all Cisco MSX microservices and permissions required to execute these API endpoints.
Using this procedure, you can view the permissions mapping.
Procedure
| Step 1 |
Log in to the Cisco MSX portal using your credentials. |
||
| Step 2 |
From the left pane, choose Settings > API Permissions. The API Permissions Viewer window is displayed. You can view the permissions by:
|
![]()
 Feedback