![]()
Configuring Integrations for Outbound APIs
Using this procedure, you can enter the configuration details for the Business Support Set (BSS), Representational State Transfer (REST), and outbound API calls.
Procedure
| Step 1 |
Log in to the Cisco MSX portal using your credentials. |
| Step 2 |
From the left pane, choose Settings > BSS Integration. The BSS Integration window is displayed. |
| Step 3 |
In the Global tab, enable or disable the following attributes:
|
| Step 4 |
Click the REST Configuration tab to set the authentication mode details for the Integrations system. Here you provide the BSS credentials to receive the API. |
| Step 5 |
Select Basic or OAuth 2 based on your requirement.
|
| Step 6 |
Click Save to save the authentication details. |
| Step 7 |
In the Outbound API tab, under API Context, enter the base context URL for the outbound API calls in the Base Context attribute. It allows you to define the file path for APIs to BSS.
|
| Step 8 |
The Service Pack API tab allows API payload validation by platform from service packs. |
Configuring SMTP Parameters
Using this procedure, you can configure various SMTP parameters using SMTP settings. The Cisco MSX portal allows you to edit the SMTP settings after the installation.
Procedure
| Step 1 |
Log in to the Cisco MSX portal using your credentials. |
| Step 2 |
From the left pane, click Settings. The Settings window is displayed. |
| Step 3 |
Click SMTP. |
| Step 4 |
Enter the following SMTP Basic information:
|
| Step 5 |
Enter the Security setting details that allows Cisco MSX to communicate to the SMTP server. The security setting has the following fields:
|
| Step 6 |
Click Save. |
Enabling Notification for Events
You can either enable notifications for various events through email or REST API. Cisco MSX provides support to trigger notifications when certain events occur:
 Note |
|
|
Recipients |
Events |
|---|---|
|
Consumer, operator, or administrator |
Password is reset. |
|
Remote user |
|
|
Service Provider End User |
|
|
Service Provider End User |
|
Using this procedure, you can enable notification for events.
Procedure
| Step 1 |
Log in to the Cisco MSX portal using your credentials. |
| Step 2 |
From the left pane, click Notifications. The Notifications window is displayed. Events related to Provider, End Users, and Tenants are displayed when you click the Provider, End Users, or Tenant tab respectively.
The Tenant tab contains the vulnerability events details of the registered devices. The new template is created for the notification service to support vulnerability alerts. The vulnerability information is communicated to the tenants by sending an email, which contains the list of discovered device vulnerabilities and the severity level of the devices. The email address of the Cisco MSX tenants should be updated periodically and stored for sending the email communication. The tenant emails are included in the Tenants window. For more information, see Managing Tenants. 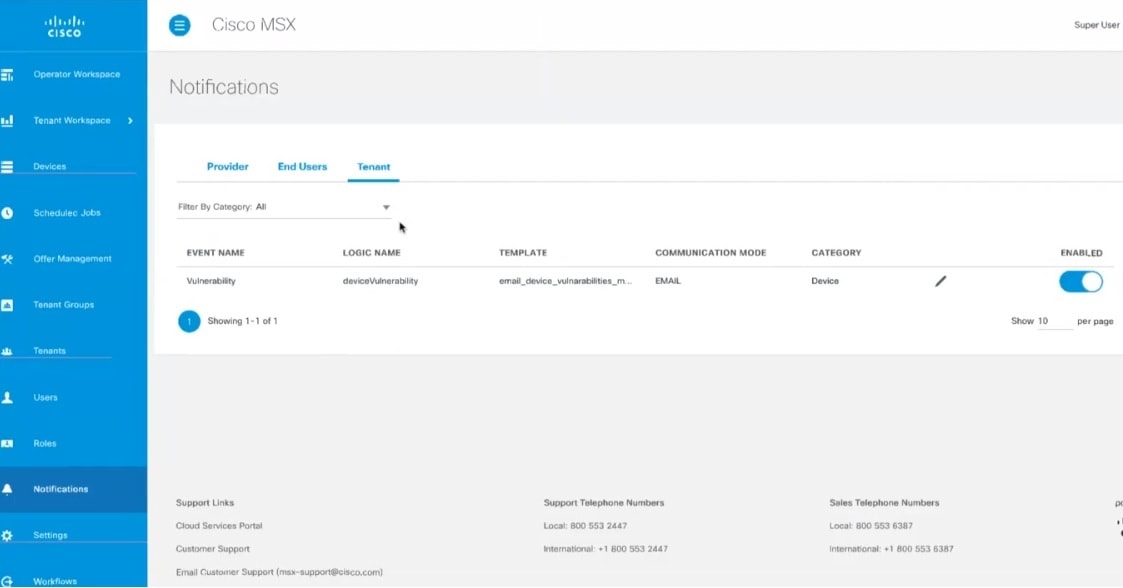
|
Auditing an Event Log
Cisco MSX provides an auditing framework that allows you to capture Platform and Service Pack events.
Cisco MSX auditing framework is a microservice that monitors, collects, and publishes auditing events data. This framework also provides integration endpoints for third party systems to monitor real-time auditing events via technologies such as HTTP streams.
Cisco MSX auditing framework relies on Kafka to collect auditing events. Also, this framework is protected by Cisco MSX SSO.
Cisco MSX auditing framework has two components - the library and the collecting service that would expose a set of APIs and streaming of the components to expose the data collected. Streaming APIs is used for general purpose.
Currently, Cisco MSX supports three types of events:
-
General-purpose audit events—Publish general-purpose events via an Auditing API
-
Device logging events—Publish device logging events via an Auditing API
-
Auditing events—Publish auditing events via an Auditing API
For more information on the Auditing API, refer the Swagger documentation that can be accessed from Cisco MSX portal > Account Settings > Swagger > Auditing Microservice API.
Configuring Webhooks
Cisco MSX allows you to receive notifications when changes are made to a third-party system through webhooks. A webhook is a standard that allows you to generate event-based triggers for your users using the Cisco MSX portal. Webhooks enable you to create applications, events, and subscriptions as well as endpoints for subscriptions for sending notifications to users.
To allow third-party systems to send notifications, you must also configure API key. API key is an additional layer of security on top of the Cisco MSX authentication system that allows third-party systems to send notifications. For more information on API key, see Configuring API Keys.
The table below shows the sequence to configure webhooks.
|
Step |
Procedure |
|---|---|
|
1 |
|
|
2 |
|
|
3 |
|
|
4 |
|
|
5 |
Creating an Application
Using this procedure, you can create an application for webhooks.
Procedure
| Step 1 |
Log in to the Cisco MSX portal using your credentials. |
| Step 2 |
From the left pane, choose Settings > Webhooks. The Webhooks window is displayed. |
| Step 3 |
Click + on the far right of the window. |
| Step 4 |
In the Add Application dialog box, enter the following details, and click Add.
The new application is added, and you can see the newly added applications in the Settings >Webhooks Apps window. Editing an Application
Deleting an Application
|
Creating an Event
Using this procedure, you can create an event for an application.
Procedure
| Step 1 |
Log in to the Cisco MSX portal using your credentials. |
| Step 2 |
From the left pane, choose Settings > Webhooks. The Webhooks window is displayed with the list of applications. |
| Step 3 |
Select an application and click on it. A detailed view of the Application is displayed. |
| Step 4 |
Click + on the far right of the window. |
| Step 5 |
In the Add Event dialog box, enter the Event Type and Version, and click Add. The new event is added, and you can see the newly added events in the detailed view of the Application. Editing an Event
Deleting an Event
|
Creating a Subscription
Using this procedure, you can create a subscription for an application.
Procedure
| Step 1 |
Log in to the Cisco MSX portal using your credentials. |
| Step 2 |
From the left pane, choose Settings > Webhooks. The Webhooks window is displayed with the list of applications. |
| Step 3 |
Select an application and click on it. A detailed view of the Application is displayed. |
| Step 4 |
Click + on the far right of the window. |
| Step 5 |
In the Add Subscription dialog box, enter the Name and Description, and click Add. The new subscription is added, and you can see the newly added subscriptions in the detailed view of the Application. Editing a Subscription
Deleting a Subscription
|
Creating an Endpoint for the Subscription
Using this procedure, you can create an endpoint for the subscription.
Procedure
| Step 1 |
Log in to the Cisco MSX portal using your credentials. |
| Step 2 |
From the left pane, choose Settings > Webhooks. The Webhooks window is displayed with the list of applications. |
| Step 3 |
Select an application and click on it. A detailed view of the Application is displayed. |
| Step 4 |
Select a subscription and click on it. A detailed view of the Subscription is displayed. |
| Step 5 |
Click + on the far right of the window. |
| Step 6 |
In the Add Endpoint dialog box, enter the following details, and click Add.
The new endpoint is added, and you can see the newly added endpoints in the detailed view of the Subscription. Editing an Endpoint
Deleting an Endpoint
|
Configuring API Keys
Cisco MSX provides API keys to enable access to specific APIs. The API keys do not specifically represent a tenant or user; instead, they function as an additional layer of security on top of the Cisco MSX authentication system.
Using this procedure, you can create an API key using the Cisco MSX portal.
Before you begin
Procedure
| Step 1 |
Log in to the Cisco MSX portal using your credentials. |
||
| Step 2 |
From the left pane, choose Settings > API Key Management. The API Key Management window is displayed. |
||
| Step 3 |
Click + on the far right of the window. |
||
| Step 4 |
In the Add API Key dialog box, enter the following details, and click Add.
A pop-up message will appear, informing you that your API key has been created. |
||
| Step 5 |
Click Copy and save it to a secure location.
|
||
| Step 6 |
After copying the API key, click Close. You can see the newly added API keys in the Settings > API Key Management window. Deleting an API Key
|
Renewing an API Key
Using this procedure, you can renew an API key using the Cisco MSX portal.
Procedure
| Step 1 |
Log in to the Cisco MSX portal using your credentials. |
||
| Step 2 |
From the left pane, choose Settings > API Key Management. The API Key Management window is displayed. |
||
| Step 3 |
Select the API Key and click on it, then click Renew. |
||
| Step 4 |
In the Renew API Key dialog box, make the required changes, and click Renew. A pop-up message will appear, informing you that your API key has been renewed. |
||
| Step 5 |
Click Copy and save it to a secure location. |
||
| Step 6 |
After copying the API key, click Close.
|
Configuring an Announcement
Using this procedure, you can create an announcement text to display the alert messages such as planned maintenance alert and technical issues. These announcements are displayed for users upon login.
Procedure
| Step 1 |
Log in to the Cisco MSX portal using your credentials. |
| Step 2 |
From the left pane, choose Settings > Announcements. The Announcements window is displayed. |
| Step 3 |
Enter the title and the message to be communicated. |
| Step 4 |
Choose an announcement style - Danger, Warning, Info, or Success from the Visual Style drop-down list, depending on the criticality or type of announcement to make. |
| Step 5 |
Optionally select the Start Time and End Time for the announcement. If Start Time is not specified, the announcement is displayed immediately after it is saved. If an End Time is not specified, the announcement is displayed indefinitely after start time - You need to resolve the message for it to
stop displaying.
|
| Step 6 |
Choose either Page Header Announcement or Ticker Announcement to select the Announcement Type. |
| Step 7 |
Click Save. The newly added announcements are listed. Once the issue is resolved, you can select the announcement that you want to delete from the list. |
Viewing Permissions Mapping
The API permissions viewer allows you to view API endpoints for all Cisco MSX microservices and permissions required to execute these API endpoints.
Using this procedure, you can view the permissions mapping.
Procedure
| Step 1 |
Log in to the Cisco MSX portal using your credentials. |
||
| Step 2 |
From the left pane, choose Settings > API Permissions. The API Permissions Viewer window is displayed. You can view the permissions by:
|
Managing Service Chains in Cisco MSX
Using the Cisco MSX CRUD APIs, you can manage configurations for the following entities for the service chains in Cisco MSX:
-
SD-Branch Catalog
-
Service virtual network function descriptor (VNFD)—VNFDs describe the requirements of a particular VNF on its execution environment. For example, a given VNF might need a fixed set of virtual CPUs and a certain amount of memory and disk space.
-
Service network service descriptor (NSD)—NSDs describe the relationship between a set of VNFDs such that they become a network service. Typically, this entails a service chain of connected VNFDs with parameters for how they function together. For example, the NSD could specify the options for scaling up the service if utilization passes a certain threshold.
Descriptors are templates to instantiate VNFs and services. After being instantiated, these are represented as records: NSR and VNFR.
-
Service network service information (NS Info)—In the latest ETSI specifications, NSR and VNFR are renamed as NS Info and VNF info elements.
For more information on these APIs, refer to the Swagger documentation that can be accessed from Cisco MSX portal > Account Settings > Swagger > Orchestration API.
Important Notes:
-
Any configuration changes to the service chains must be executed only using these service chain APIs.
-
Only users with NSO Configuration/Data (Manage) permission can execute these service chain APIs. This permission can be found under the Services, Configurations, and Devices category.
-
Cisco MSX provides two sets of service chain APIs for SD-Branch Catalog, VNFD, and NSD. One set of APIs needs ‘ShardID’ as input, whereas the other set of APIs requires ‘servicetype’ as an input.
Use only the API that requires ‘servicetype’ as an input to make these configuration changes because the “ShardID” are deprecated.
Standardizing Device Listing and Status
Cisco MSX allows you to create a centralized place for device listing and the visualizing associated site status through a defined API across all the service packs that are deployed within Cisco MSX.
The capabilities of Device API (/v4/devices) are to:
-
Create a device
-
Create a device with and without having a prior subscription ID and a service instance ID.
-
Create a device with and without having a prior serial key (This is optional).
-
Set initial status to a new device created.
-
Create non-NSO devices, such as Meraki.
-
-
Delete one device by ID
-
Get one device by ID
-
Get paginated devices by filters (multiple filters, that is, AND combination is supported at a time to get the desired result)
-
Get count of the total number of devices by filters (Multiple filters, that is, AND combination is supported at a time to get the desired result)
-
Update the device status
Cisco MSX supports three types of v4 devices for creating and deleting devices:
-
Unmanaged Devices—When you create/delete a device, the device gets created/deleted in the platform and does not need further processing by any system, like NSO or Meraki.
-
Managed Devices (NSO-specific devices)—When you create/delete a device in the platform, it expects to be processed by other devices. This is used by Cisco MSX SD-Branch and Managed Device service pack.
-
Managed Devices (Viptela and Meraki-specific devices)—When you create/delete a device in the platform, it expects to be processed by other devices.
Only users with Device Settings (Manage) permission can execute these Device APIs. This permission can be found under the Services, Configurations, and Devices category.
To enable this feature, use the Devices (/v4/devices) API in the Device Controller section of the Manage Service API. For more information on these APIs, refer to the Swagger documentation that can be accessed from Cisco MSX portal > Account Settings > Swagger > Manage Service API.
Managing Region Using API
The Cisco MSX platform provides Administration Microservice API to create, update, delete, and get configurations of the region. This API manages the PnP and VPN configurations of the region.
Use the Administration Microservice API for the following:
-
To manage the region configuration, use the Region Controller section of the Administration Microservice API.
-
To manage the PnP configuration, use the PnP Controller section of the Administration Microservice API.
-
To manage the VPN configuration, use the VPN Controller section of the Administration Microservice API.
From the Integrations, Settings, and Logs category, assign these permissions to a user to run this API.
-
Region (View and Manage)
-
PnP (View and Manage)
-
VPN (View and Manage)
For more information on this API, see the Swagger documentation that can be accessed from Cisco MSX portal > Account Settings > Swagger > Administration Microservice API.
![]()
 Feedback