![]()
Managing Cisco MSX Authentication
Managing Cisco MSX Authentication contains the following sections:
About Password Policies
The password policies allow you to enforce secure password checks on newly created passwords for additional management users of the controller and access points.
Cisco MSX allows you to configure and update password policies using the Cisco MSX admin portal.
In Cisco MSX, you can define various settings for the password policies. These settings include password strength, password length, account locking, password history, and password aging.
By default, there are three built-in policies available on the Cisco MSX. As a user with an administrator role, you can modify these existing policies or create new policies. These built-in policies can be used when you add users. The default policies can be edited, but they cannot be deleted. The default policies created are:
-
ppolicy_default: This policy applies to the consumer user.
-
ppolicy_strong: This policy only applies to administrator accounts.
-
ppolicy_system: This policy applies to both consumer and administrator accounts.
Configuring Password Policies
Using this procedure, you can configure password policies using the Cisco MSX portal.
Procedure
| Step 1 |
Log in to the Cisco MSX portal using your credentials. |
| Step 2 |
From the left pane, choose Settings > Authentication. The Authentication window is displayed. |
| Step 3 |
Click Add Policy. |
| Step 4 |
In the Create Password Policy window, enter the following details:
|
| Step 5 |
Click OK. A new policy is added and displayed in the Password Policies table. |
| Step 6 |
Select a policy from the Password Policies table and click Edit to change the password policy features. |
| Step 7 |
In the Edit Password Policy window, make the required changes, and click OK. Deleting the Password Policy
|
Enabling Two-Factor User Authentication
Two-Factor Authentication (TFA) is an additional layer of security along with a strong password to ensure the identity of a user and reduce the risk of unauthorized access to Cisco MSX application and data. This additional factor can be something that only a user has access to, such as a One-time authentication code (OTP).
You can enable the Two-Factor Authentication from the Cisco MSX portal or by using the Global Settings API. To enable it from the Cisco MSX portal, select the Use Two Factor Authentication check box available in Settings > Authentication. For more information on the Global Setting API, refer to the Swagger documentation accessible from Cisco MSX Portal > Account Settings > Swagger > Administration Service API.
When enabled, it is applicable for all users. After the Two-Factor Authentication is enabled, users accessing the Cisco MSX portal must provide the following authentication factors:
-
Username and password
-
One-time authentication code (OTP). This code is sent to registered email address of the user. Each OTP is intended for use by only one user. This code is valid for a specific period of time and becomes invalid after the user successfully logs in.
By default, the user login attempts and validity duration of OTP are as follows:
-
Number of user login attempts–The number of times a user can try logging in to the Cisco MSX portal. By default, this is five.
-
Validity duration of OTP–The default validity duration of an OTP is 5 minutes. If the OTP expires, the user is forced to sign in again with the first authentication factor, that is, username and password.
 Note |
|
Configuring Session Timeout Values
The Cisco MSX portal allows you to configure the inactivity timeout of a server session, as well as the absolute timeout.
Note |
|
When the session expires, Cisco MSX displays a message stating that the session has expired. You have the option to log in again or reauthenticate with the login credentials.
Using this procedure, you can configure session timeout values.
Procedure
| Step 1 |
Log in to the Cisco MSX portal using your credentials. |
||
| Step 2 |
From the left pane, choose Settings > Authentication. The Authentication window is displayed. |
||
| Step 3 |
In the session timeout, enter the inactivity timeout value and the absolute session timeout value in seconds.
|
||
| Step 4 |
Click Save. |
Configuring Single Sign-On (SSO)
Cisco MSX allows you to configure and update SSO either through the API or the Cisco MSX admin portal.
Cisco MSX supports the following types of SSO configuration:
-
Configuring SAML-Based IDPs on Cisco MSX: An Identity Provider (IDP) is responsible for issue authentication assertions. Cisco MSX can be configured with multiple SAML IDPs. If Service Providers already have one or more IDPs, they can configure Cisco MSX to work with these IDPs to set up SSO. Cisco MSX supports SAML 2.0 for SSO.
When one or more IDPs are configured, Cisco MSX uses a subdomain to determine which IDP to route the login request to. The default IDP is the local database IDP—user credentials will be validated against the local user database. This means that by default, SSO using SAML is not enabled on Cisco MSX. Additional SAML IDP can be configured either through an API or through the Cisco MSX admin portal. Adding an IDP allows the login request to be routed to that IDP. Users will be logged in to Cisco MSX once the IDP authenticates the user.
-
Configuring the SSO Clients (Using Cisco MSX as an IDP): This means Cisco MSX can be configured as an IDP. Cisco MSX itself can also act as an IDP to other systems that want to use Cisco MSX for SSO. A third-party system can connect to Cisco MSX using OAuth2, OpendID Connect (OIDC), or SAML. SAML is an XML-based, open-standard data format that enables users to have access to multiple applications seamlessly after they sign in to Cisco MSX.
When a user visits the third-party system, they will be redirected to Cisco MSX to login. Once Cisco MSX authenticates the user, the user will be redirected back to the third-party system and is logged in there. These third-party systems are considered SSO clients to Cisco MSX. This can work in conjunction with the multiple IDPs configured in Cisco MSX.
This topic contains the following sections:
Configuring Single Sign-On (SSO) Through API
Cisco MSX enables you to configure and update SSO through API at run time. This will allow you to add and remove IDP, OAuth2 client, and SAML client without having to interact with consul directly. It will also not require a microservice restart.
Cisco MSX supports the following types of SSO authentication through API:
-
Configuring SAML-Based IDPs on Cisco MSX: To configure Cisco MSX with multiple SAML IDPs, use the Identity Provider Management Controller section of the User Management Service API. For more information on the User Management Service API, refer to the Swagger documentation accessible from the Cisco MSX portal > Account Settings > Swagger > User Management Service API.
-
Configuring the SSO Clients (Using Cisco MSX as an IDP): To configure Cisco MSX as an IDP, use the Security Client Controller section of the User Management Service API if the SSO client is an Oauth2 or OpenID Connect (OIDC) client.
If the SSO client is a SAML Service Provider, you need to additionally add the SAML specific details by using the SAML Service Provider Management Controller section of the User Management Service API. For more information on the User Management Service API, refer to the Swagger documentation accessible from the Cisco MSX portal > Account Settings > Swagger > User Management Service API.
Configuring Single Sign-On (SSO) Through the Cisco MSX Portal
In Cisco MSX, as a user with an administrator role, you can configure SSO using the Cisco MSX admin portal, in addition to using the API.
You need to either add the IDP or SSO clients based on your SSO requirements.
Cisco MSX supports the following types of SSO authentication through Cisco MSX Portal:
Configuring SAML-Based IDPs on Cisco MSX
Using this procedure, you configure the SAML based IDP using the Cisco MSX portal.
Procedure
| Step 1 |
Log in to the Cisco MSX portal using your credentials. |
||
| Step 2 |
From the left pane, choose Settings > SSO Configuration. The SSO Configuration window is displayed. |
||
| Step 3 |
Click the expand button for Add IDP. A table appears with a list of all the IDPs that you can add, edit, or delete. |
||
| Step 4 |
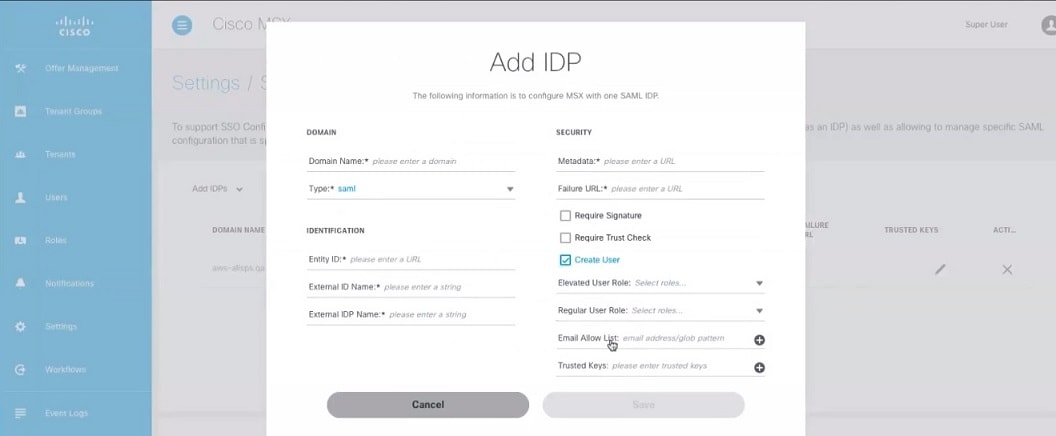
Click Add to configure Cisco MSX with one SAML IDP. The Add IDP window is displayed. |
||
| Step 5 |
Enter the following in the Domain section.
|
||
| Step 6 |
Enter the following in the Identification section.
|
||
| Step 7 |
Enter the following in the Security section.
|
||
| Step 8 |
Create a tenant dynamically by enabling Create User option. To create a tenant:
|
||
| Step 9 |
Click Save. A new IDP is added and displayed in the IDPs table. |
||
| Step 10 |
Select an IDP from the IDPs table, click the Edit icon if you want to change the IDP features. The Edit IDP window is displayed. |
||
| Step 11 |
Change the features as required and click Save. |
||
| Step 12 |
Select an IDP from the IDPs table, click the Delete icon if you want to delete an IDP. The Delete IDP window is displayed. |
||
| Step 13 |
Click Delete. |
Configuring Single Sign-On (SSO) Using Cisco MSX as an IDP
Cisco MSX allows you to configure SSO using Cisco MSX as an IDP in the Cisco MSX admin portal.
The SSO clients are of two types—SAML and Non-SAML. It depends on the selection of the value in the Grant Types field selection.
Configuring the Non-SAML SSO Client
Using this procedure, you can configure SSO using the Cisco MSX portal for non-SAML SSO client authentication.
Procedure
| Step 1 |
Log in to the Cisco MSX portal using your credentials. |
||||
| Step 2 |
From the left pane, choose Settings > SSO Configuration. The SSO Configuration window is displayed. |
||||
| Step 3 |
Click the expand button for Add SSO Clients. A table is displayed with a list of all the SSO Clients that you can add, edit, or delete. |
||||
| Step 4 |
Click Add to configure Cisco MSX with non-SAML SSO Client. The Add SSO Client window is displayed. |
||||
| Step 5 |
In the Attributes section:
|
||||
| Step 6 |
In the Token section, enter:
|
||||
| Step 7 |
In the Client ID section, enter:
|
||||
| Step 8 |
In the Scope section, enter:
|
||||
| Step 9 |
Click Save. A new SSO Client configuration is added and displayed in the SSO Clients table. |
||||
| Step 10 |
Select a SSO Client from the SSO Clients table, click the Edit icon if you want to change the SSO Client features.
The Edit SSO Client window is displayed. |
||||
| Step 11 |
Change the features as required and click Save. |
||||
| Step 12 |
Select a SSO Client from the SSO Clients table, click the Delete icon if you want to delete a SSO Client. The Delete SSO Client window is displayed. |
||||
| Step 13 |
Click Delete. 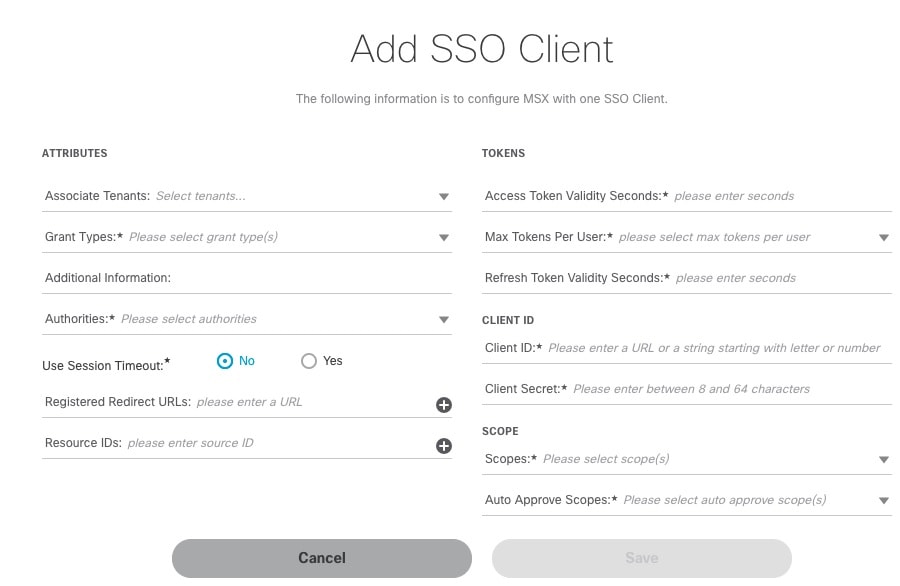
|
What to do next
For SSO to seamlessly work between Cisco MSX to SD-WAN Control Plane, do the following additional steps:
-
Upload the Cisco MSX Metadata to SD-WAN Control Plane.
-
Download the Cisco MSX metadata from the following link: https://msx-fqdn/idm/metadata.
-
Upload the metadata file to SD-WAN Control Plane manually using the SD-WAN Control Plane web interface under Settings > Identity Provider Settings.
-
-
Create user roles in Cisco MSX that map to SD-WAN Control Plane user roles (Basic, Netadmin, and Operator).
Configuring the SAML SSO Client
Using this procedure, you can configure SSO using the Cisco MSX portal for SAML SSO client authentication.
Procedure
| Step 1 |
Log in to the Cisco MSX portal using your credentials. |
||||||
| Step 2 |
From the left pane, choose Settings > SSO Configuration. The SSO Configuration window is displayed. |
||||||
| Step 3 |
Click the expand button for Add SSO Clients. A table is displayed with a list of all the SSO Clients that you can add, edit, or delete. |
||||||
| Step 4 |
Click Add to configure Cisco MSX with SAML SSO Client. The Add SSO Client window is displayed. |
||||||
| Step 5 |
In the Attributes section:
|
||||||
| Step 6 |
In the Token section, enter:
|
||||||
| Step 7 |
In the Client ID section, enter:
|
||||||
| Step 8 |
In the Scope section, enter:
|
||||||
| Step 9 |
Click Save. A new SSO Client configuration is added and displayed in the SSO Clients table. |
||||||
| Step 10 |
Select a SSO Client from the SSO Clients table, click the Edit icon if you want to change the SSO Client features.
The Edit SSO Client window is displayed. |
||||||
| Step 11 |
Change the features as required and click Save. |
||||||
| Step 12 |
Select a SSO Client from the SSO Clients table, click the Delete icon if you want to delete a SSO Client. The Delete SSO Client window is displayed. |
||||||
| Step 13 |
Click Delete. |
What to do next
For SSO to seamlessly work between Cisco MSX to SD-WAN Control Plane, do the following additional steps:
-
Upload the Cisco MSX Metadata to SD-WAN Control Plane.
-
Download the Cisco MSX metadata from the following link: https://msx-fqdn/idm/metadata.
-
Upload the metadata file to SD-WAN Control Plane manually using the SD-WAN Control Plane web interface under Settings > Identity Provider Settings.
-
-
Create user roles in Cisco MSX that map to SD-WAN Control Plane user roles (Basic, Netadmin, and Operator).
Configuring SSO for Meraki Using Cisco MSX as an IDP
Cisco MSX IDP-initiated SSO allows you to access Meraki dashboard from Cisco MSX. Using this procedure, you can configure SSO for Meraki using Cisco MSX as an IDP.
Procedure
| Step 1 |
Configure the following on Meraki side: |
| Step 2 |
After you complete the above steps, configure the following on Cisco MSX side: |
| Step 3 |
Add a link similar to the following in Cisco MSX to trigger the Cisco MSX IDP-initiated SSO. In the above link, entity_id points to the Meraki SAML entityID you used in step 2.a. The idp_init parameter tells Cisco MSX to initiate the SSO process from the Cisco MSX side. |
Generating X509 Fingerprint from Metadata File on Mac
Using the procedure, you can generate X509 fingerprint from a metadata file on Mac.
Procedure
| Step 1 |
Copy the <X509Certificate> used for signing from the metadata file and save it in a temp file. For instance, tmp.txt. |
| Step 2 |
Use the following command to format the temp file to 64 characters per line: |
| Step 3 |
Open the idp.crt file and add -----BEGIN CERTIFICATE----- as the first line of the file and -----END CERTIFICATE----- as the last line: |
| Step 4 |
Use the openssl command to generate the finger print: |
Retrieving the Device Password
The Cisco MSX platform allows you to retrieve the deleted or existing device password using the serial number. When the devices are deleted from the Cisco MSX, you can enter the device serial number in the Devices window and retrieve the deleted device password using the IDM Microservice API.
You can manage the configurations of the IDM Microservice API as follows:
Manage the secrets configuration and supports scope such as servicetype, devicetype, devicesubtype, and serialkey. Use the Secrets Controller API of the IDM Microservice API.
For more information on this API, refer to the Swagger documentation that can be accessed for Cisco MSX portal > Account Settings > Swagger > IDM Microservice API.
Using this procedure, you can retrieve the deleted password using the device serial number.
Procedure
| Step 1 |
Log in to the Cisco MSX portal using your credentials. |
| Step 2 |
From the left pane, click Devices. The Devices window is displayed. |
| Step 3 |
Click the ellipsis (...) that is located on the far right of the column heading and choose Retrieve Deleted Device. The Retrieve Deleted Device dialog box is displayed. You can also select mutliple device and click the ellipsis (...) on the column heading to retrieve multiple deleted devices credential. |
| Step 4 |
Enter the device serial number. |
| Step 5 |
Click Show Credentials. The device credential is displayed. You can also copy this device password by clicking the Copy icon. 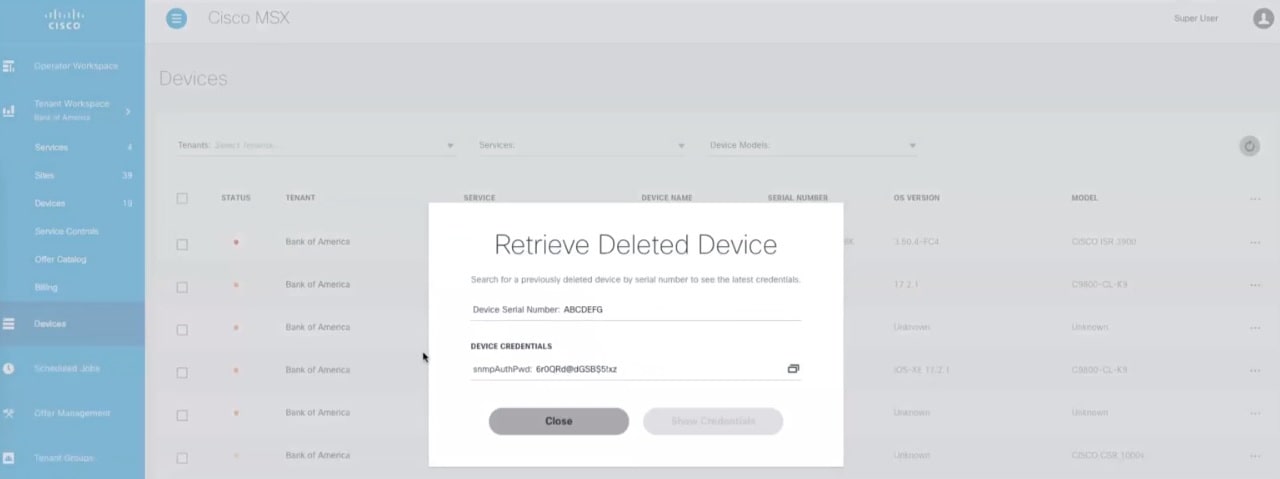
|
![]()
 Feedback