- Transport Gateway Requirements
- Installation Task Pre-Reqs
- Installation/Configuration Process Overview for the Transport Gateway
- Download the Transport Gateway Package
- Installing the Transport Gateway Package for Windows
- Uninstalling the Transport Gateway for Windows
- Installing the Transport Gateway for Solaris
- Uninstalling the Transport Gateway for Solaris
- Upgrading Customers From NLS IR 1.X to Version 2
- Launch the Cisco Transport Gateway Application
- Configuring the Transport Gateway
- Other Transport Gateway Functions
- Configure the Transport Gateway (Non-GUI mode)
Installing and Configuring the Transport Gateway
This chapter provides an overview of the Cisco Smart Call Home service and covers the following areas:
•![]() Transport Gateway Requirements
Transport Gateway Requirements
•![]() Installation/Configuration Process Overview for the Transport Gateway
Installation/Configuration Process Overview for the Transport Gateway
•![]() Download the Transport Gateway Package
Download the Transport Gateway Package
•![]() Installing the Transport Gateway Package for Windows
Installing the Transport Gateway Package for Windows
•![]() Uninstalling the Transport Gateway for Windows
Uninstalling the Transport Gateway for Windows
•![]() Installing the Transport Gateway for Solaris
Installing the Transport Gateway for Solaris
•![]() Uninstalling the Transport Gateway for Solaris
Uninstalling the Transport Gateway for Solaris
•![]() Upgrading Customers From NLS IR 1.X to Version 2
Upgrading Customers From NLS IR 1.X to Version 2
•![]() Launch the Cisco Transport Gateway Application
Launch the Cisco Transport Gateway Application
•![]() Configure the Transport Gateway
Configure the Transport Gateway
•![]() Other Transport Gateway Functions
Other Transport Gateway Functions
•![]() Configure the Transport Gateway (Non-GUI mode)
Configure the Transport Gateway (Non-GUI mode)
Transport Gateway Requirements
The Transport Gateway is operational on the following operating systems:
•![]() Solaris
Solaris
•![]() Windows: 2000, 2003, XP platforms
Windows: 2000, 2003, XP platforms
The Transport Gateway needs to be installed on the same workstation on which the CNC is installed.
System Requirements for Solaris
The following are the system requirements for the Solaris platform:
•![]() Operating System - Solaris 9 or later
Operating System - Solaris 9 or later
•![]() CDE or Xterm (Display supported)
CDE or Xterm (Display supported)
•![]() Netscape Navigator 4.76 or later
Netscape Navigator 4.76 or later
•![]() Textedit or dtpad application for viewing log files from the User Interface of Transport Gateway
Textedit or dtpad application for viewing log files from the User Interface of Transport Gateway
•![]() Sun SPARC Processor
Sun SPARC Processor
•![]() PC or laptop with 512 MB of RAM (1 GB recommended)
PC or laptop with 512 MB of RAM (1 GB recommended)
•![]() Hard disk: 60 MB
Hard disk: 60 MB
•![]() Broadband Internet connectivity for faster response to the Cisco servers (recommended)
Broadband Internet connectivity for faster response to the Cisco servers (recommended)
System Requirements for Windows
System Requirements for Windows for the Transport Gateway:
•![]() Operating System:
Operating System:
–![]() Windows 2000
Windows 2000
–![]() Windows 2003
Windows 2003
–![]() Windows XP platforms
Windows XP platforms
•![]() Pentium 4 or later (Pentium M recommended).
Pentium 4 or later (Pentium M recommended).
•![]() PC or laptop with 512 MB of RAM (1 GB recommended).
PC or laptop with 512 MB of RAM (1 GB recommended).
•![]() Hard disk: 60 MB.
Hard disk: 60 MB.
•![]() Broadband Internet connectivity for faster response to the Cisco servers (recommended).
Broadband Internet connectivity for faster response to the Cisco servers (recommended).
Installation Task Pre-Reqs
Before configuring the Transport Gateway the following tasks must be completed:
•![]() CNC 5.0, 5.0.2 or 5.0.3 must be installed on the same machine as the Transport Gateway.
CNC 5.0, 5.0.2 or 5.0.3 must be installed on the same machine as the Transport Gateway.

Note ![]() For information about downloading/installing CNC 5.x see Cisco Network Collector 5 Installation and Quick Start Guide.
For information about downloading/installing CNC 5.x see Cisco Network Collector 5 Installation and Quick Start Guide.
•![]() You must have Admin or Root privileges for the Windows and Solaris platforms, respectively, to install and configure the Transport Gateway.
You must have Admin or Root privileges for the Windows and Solaris platforms, respectively, to install and configure the Transport Gateway.
•![]() You must be registered with Inventory and Reporting as an administrator to register the Transport Gateway (see User registration).
You must be registered with Inventory and Reporting as an administrator to register the Transport Gateway (see User registration).
•![]() Required ports need to be enabled in the customer network for the Transport Gateway to work properly, the ports are noted below:
Required ports need to be enabled in the customer network for the Transport Gateway to work properly, the ports are noted below:
–![]() Port 80 and port 443 to enable connection to tools.cisco.com
Port 80 and port 443 to enable connection to tools.cisco.com
–![]() Port 443 to enable connection to upload.cisco.com
Port 443 to enable connection to upload.cisco.com
The Transport Gateway must be registered (see Transport Gateway registration) - the registration does two things:
•![]() Creates a Transport Gateway id, viewed on Inventory and Reporting under the Transport Gateways tab.
Creates a Transport Gateway id, viewed on Inventory and Reporting under the Transport Gateways tab.
•![]() Generates a security token, which is sent via email to the administrator of the Transport Gateway.
Generates a security token, which is sent via email to the administrator of the Transport Gateway.

Note ![]() Both the Transport Gateway ID (TG ID) and security token are needed by the administrator to install the security certificate, during Transport Gateway Configuration. The TG ID can be viewed in IR under the Transport Gateways tab.
Both the Transport Gateway ID (TG ID) and security token are needed by the administrator to install the security certificate, during Transport Gateway Configuration. The TG ID can be viewed in IR under the Transport Gateways tab.
Installation/Configuration Process Overview for the Transport Gateway
There are three parts for the installation of the Transport Gateway:
•![]() Download the Transport Gateway Package.
Download the Transport Gateway Package.
•![]() Installing the Transport Gateway package:
Installing the Transport Gateway package:
–![]() Installing the Transport Gateway Package for Windows.
Installing the Transport Gateway Package for Windows.
–![]() Installing the Transport Gateway for Solaris.
Installing the Transport Gateway for Solaris.
•![]() Performing the Transport Gateway configuration, which consists of the following tasks:
Performing the Transport Gateway configuration, which consists of the following tasks:
–![]() Specifying the proxy settings.
Specifying the proxy settings.
–![]() Installing the security certificate.
Installing the security certificate.
–![]() Configuring the Transport Gateway.
Configuring the Transport Gateway.
Download the Transport Gateway Package
To download the Transport Gateway package perform the following tasks:
Step 1 ![]() An email is sent to the customer that contains a link location of the Transport Gateway code. The link to the Transport Gateway code download location is valid for a few days.
An email is sent to the customer that contains a link location of the Transport Gateway code. The link to the Transport Gateway code download location is valid for a few days.

Note ![]() This download page is available to only registered Cisco.com users with a Cisco Service Agreement.
This download page is available to only registered Cisco.com users with a Cisco Service Agreement.
Step 2 ![]() On the web application click the download link for the Cisco Transport Gateway package; select the package that matches your environment (Windows or Solaris) then start downloading the package.
On the web application click the download link for the Cisco Transport Gateway package; select the package that matches your environment (Windows or Solaris) then start downloading the package.
Installing the Transport Gateway Package for Windows
Perform the following steps to install the Transport Gateway:
Step 1 ![]() Go to the download location for Transport Gateway code that was specified in the email.
Go to the download location for Transport Gateway code that was specified in the email.

Note ![]() The customer is notified via email about the location for downloading the Transport Gateway code. The email contains both a URL for the Special File Access area of Software Center and a Special Access Code.
The customer is notified via email about the location for downloading the Transport Gateway code. The email contains both a URL for the Special File Access area of Software Center and a Special Access Code.
Step 2 ![]() Open the installation file Cisco_Transport_Gateway.exe; the InstallShield Wizard window opens.
Open the installation file Cisco_Transport_Gateway.exe; the InstallShield Wizard window opens.
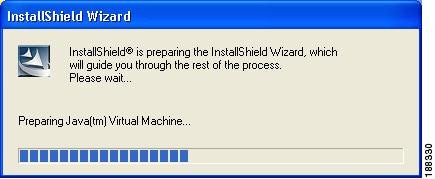
After the preparations are finished for the InstallShield wizard, a Transport Gateway logo window briefly appears, followed by an initializing message.

After the logo window and initializing message briefly appear, then the Installation Wizard window appears.
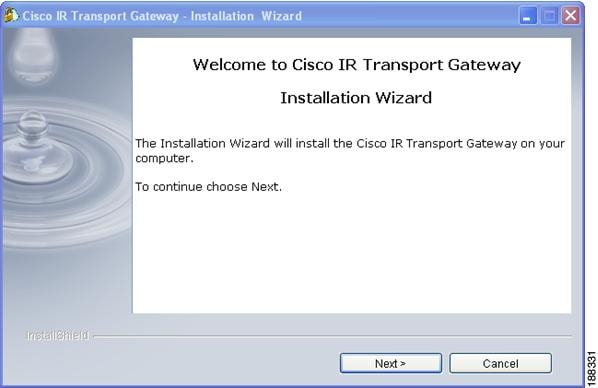
Step 3 ![]() Click Next; the wizard displays a prompt for the directory location, where the wizard will install the Transport Gateway.
Click Next; the wizard displays a prompt for the directory location, where the wizard will install the Transport Gateway.
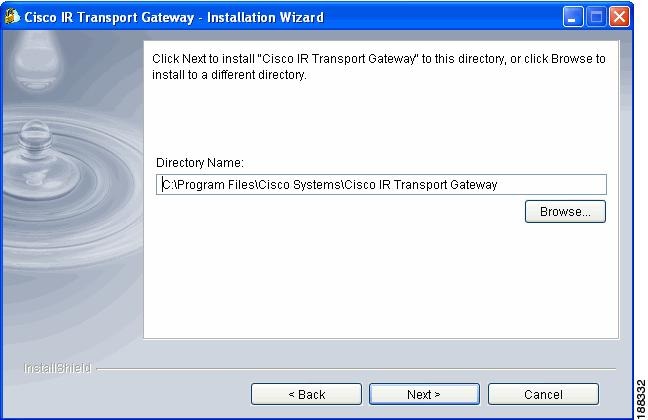
Step 4 ![]() Click Next to accept the specified directory location, or
Click Next to accept the specified directory location, or
Step 5 ![]() Click Browse to specify a different directory location; then click Next.
Click Browse to specify a different directory location; then click Next.
The wizard displays the summary information for the installation, indicating the install location and total size of the install file.
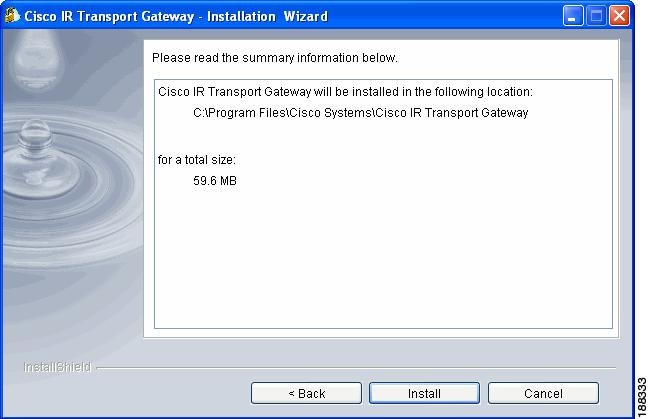
Step 6 ![]() Click Install, after verifying that the summary information is correct; the wizard displays a progress indicator for the install.
Click Install, after verifying that the summary information is correct; the wizard displays a progress indicator for the install.
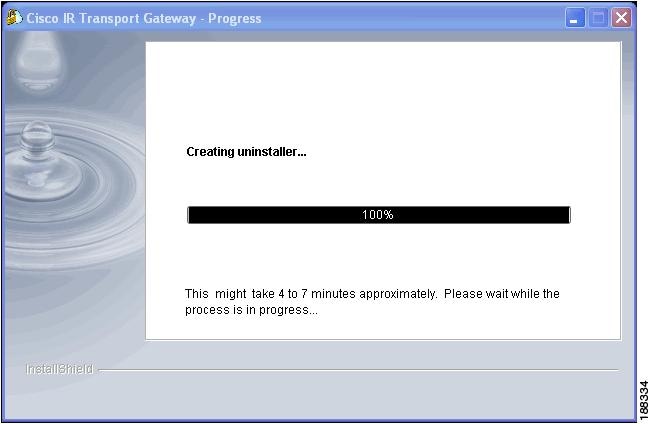

Note ![]() At the end of the package installation the progress message displays "Creating uninstaller ..." and has 100% indicated.
At the end of the package installation the progress message displays "Creating uninstaller ..." and has 100% indicated.

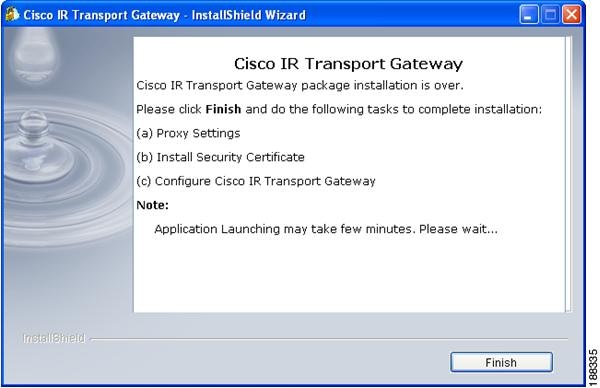
Step 7 ![]() Review the steps that need to be performed next to complete the Transport Gateway installation.
Review the steps that need to be performed next to complete the Transport Gateway installation.
Step 8 ![]() Click Finish; the Transport Gateway application window appears.
Click Finish; the Transport Gateway application window appears.
Uninstalling the Transport Gateway for Windows
Perform the following steps to uninstall the Transport Gateway on the Windows platform:
Step 1 ![]() On the desktop choose one of the following:
On the desktop choose one of the following:
•![]() Start->Programs->Cisco IR Transport Gateway-> Uninstall Cisco IR Transport Gateway
Start->Programs->Cisco IR Transport Gateway-> Uninstall Cisco IR Transport Gateway
•![]() For Windows XP and Windows 2003 - Start > Control Panel > Add or Remove Programs
For Windows XP and Windows 2003 - Start > Control Panel > Add or Remove Programs
•![]() For Windows 2000 - Start > Settings > Control Panel > Add or Remove Programs
For Windows 2000 - Start > Settings > Control Panel > Add or Remove Programs
For the last two above options, the Add or Remove Programs window appears; remove the Cisco IR Transport Gateway.
In the list find then select the Transport Gateway program; click the Change/Remove button to start the uninstall process for the Transport Gateway; a Transport Gateway logo window briefly appears, followed by an initializing message

.
After the logo window and initializing message briefly appear, then the Uninstallation Wizard window appears.
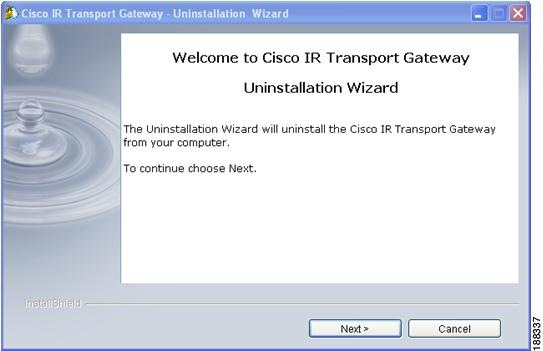
Step 2 ![]() Click Next; the Summary Information pane appears.
Click Next; the Summary Information pane appears.
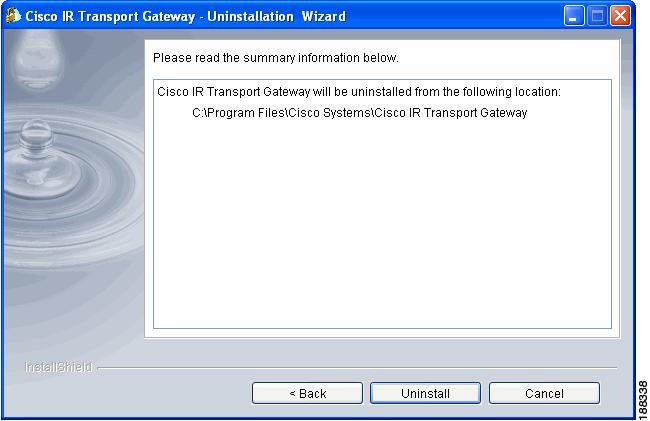
Step 3 ![]() Click Uninstall; the uninstall progress window appears.
Click Uninstall; the uninstall progress window appears.


Note ![]() At the end of the uninstall process, the wizard displays a message indicating that the final portion may take several minutes.
At the end of the uninstall process, the wizard displays a message indicating that the final portion may take several minutes.
A summary information pane appears, indicating that the uninstall was successful.

Step 4 ![]() Click Finish; the wizard displays another pane with a prompt for a system reboot.
Click Finish; the wizard displays another pane with a prompt for a system reboot.
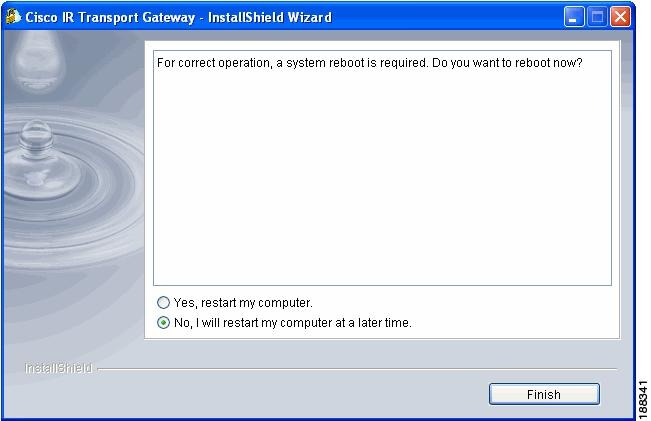
Step 5 ![]() Click Yes to complete the Uninstall process on the computer immediately, or
Click Yes to complete the Uninstall process on the computer immediately, or
Step 6 ![]() Click No to defer the final step of the configuration process to a later time.
Click No to defer the final step of the configuration process to a later time.
Step 7 ![]() Click Finish; the application processes the computer option you selected.
Click Finish; the application processes the computer option you selected.
Installing the Transport Gateway for Solaris
To install the Transport Gateway application on the machines running Solaris operation System, a binary installer of the Transport Gateway for the Solaris Sparc should be downloaded and executed for installation.
There are three modes of installation:
1. ![]() GUI mode - It will have wizards which will guide user through the installation process. To choose this mode, download the GUI supported version of the Transport Gateway installer.
GUI mode - It will have wizards which will guide user through the installation process. To choose this mode, download the GUI supported version of the Transport Gateway installer.
2. ![]() Console mode - The installation progress will be displayed on the console (e.g. Xterm display supported). To choose this mode, download the non-GUI version of the Transport Gateway installer.
Console mode - The installation progress will be displayed on the console (e.g. Xterm display supported). To choose this mode, download the non-GUI version of the Transport Gateway installer.
3. ![]() Silent mode - Installation will be performed in the background with no wizards or progress information will be displayed during the process.
Silent mode - Installation will be performed in the background with no wizards or progress information will be displayed during the process.
Installing the Transport Gateway Bundle in GUI mode
To install the Transport Gateway in GUI mode perform the following steps:
Step 1 ![]() Download the installer (GUI supported version of the Transport Gateway installer) in binary mode to the Solaris machine.
Download the installer (GUI supported version of the Transport Gateway installer) in binary mode to the Solaris machine.
Step 2 ![]() Navigate to the directory that contains the downloaded installer.
Navigate to the directory that contains the downloaded installer.
Step 3 ![]() If necessary, change the installer file's permissions to make the binary, executable; do this by typing the following command from a command prompt:
If necessary, change the installer file's permissions to make the binary, executable; do this by typing the following command from a command prompt:
$ chmod +x your_binary_executable
e.g., $ chmod 755 CSCOtg.install

Note ![]() Be sure to replace "your_binary_executable" with the actual filename of the binary that you downloaded (i.e. CSCOtg.install).
Be sure to replace "your_binary_executable" with the actual filename of the binary that you downloaded (i.e. CSCOtg.install).
Step 4 ![]() The installation directory for the Transport Gateway would be '/opt/CSCOtg'. Make sure, you have adequate space on your system for the installation.
The installation directory for the Transport Gateway would be '/opt/CSCOtg'. Make sure, you have adequate space on your system for the installation.
Step 5 ![]() Launch the installer by typing the following command from a command prompt:
Launch the installer by typing the following command from a command prompt:
$ ./your_binary_executable

Note ![]() Again, be sure to replace "your_binary_executable" with the actual filename of the binary that you downloaded (i.e. CSCOtg.install).
Again, be sure to replace "your_binary_executable" with the actual filename of the binary that you downloaded (i.e. CSCOtg.install).
Be sure to launch the installer using a display or user interface supported by either the Reflection or Xterm application.
The starting message appears, shown in the following graphic.
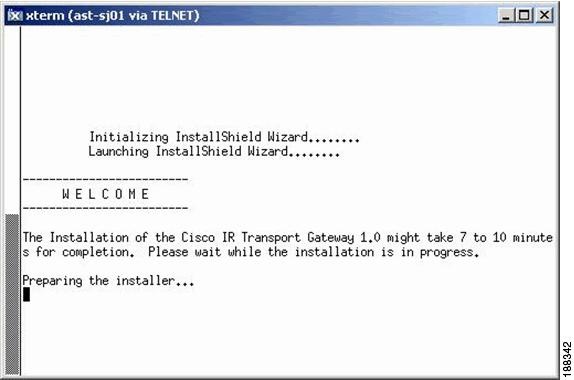
Step 6 ![]() The splash window (next graphic) appears for a few seconds and then the wizard displays a dialog to indicate that it is preparing for the setup, as shown in the graphic after the splash window.
The splash window (next graphic) appears for a few seconds and then the wizard displays a dialog to indicate that it is preparing for the setup, as shown in the graphic after the splash window.

Step 7 ![]() The wizard displays a welcome window that provides the details of the application that will be installed.
The wizard displays a welcome window that provides the details of the application that will be installed.
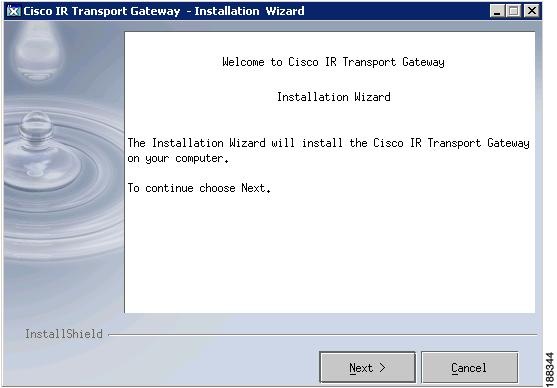
Step 8 ![]() Click Next; the installation wizard window appears.
Click Next; the installation wizard window appears.
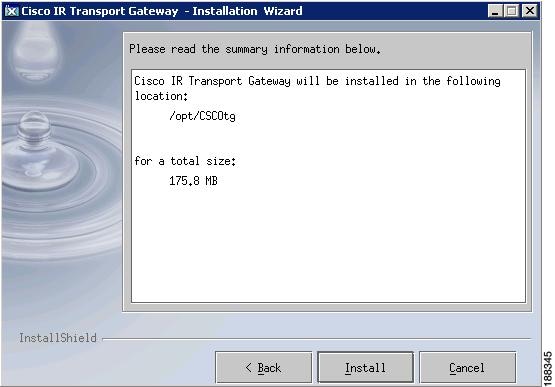
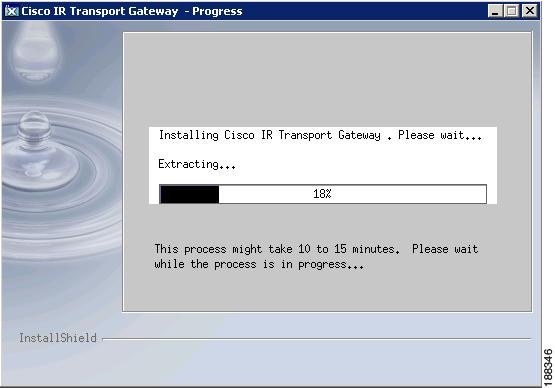
Step 9 ![]() Click Install to start installing the Cisco Transport Gateway onto your computer. The installation progress wizard window appears, as shown in the next graphic.
Click Install to start installing the Cisco Transport Gateway onto your computer. The installation progress wizard window appears, as shown in the next graphic.
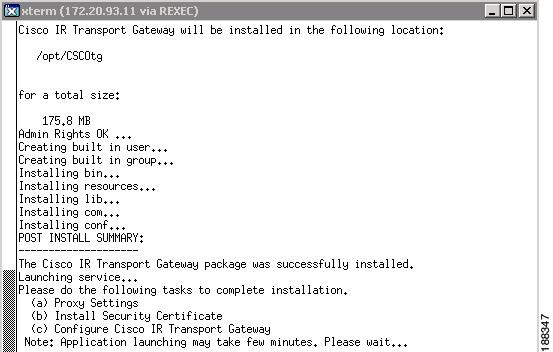
Step 10 ![]() Once the installation process is completed, you will get a confirmation message indicating that the installation was successful.
Once the installation process is completed, you will get a confirmation message indicating that the installation was successful.
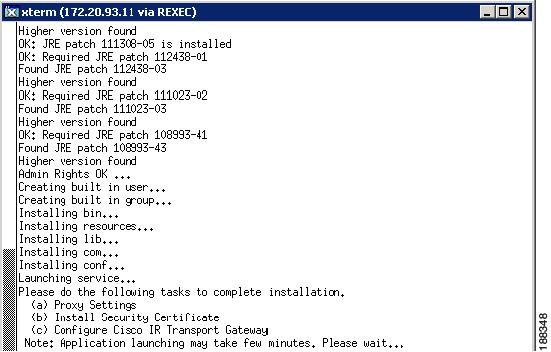
Step 11 ![]() Click Finish to install the certificate and complete the installation process and launch the application; the xterm window shows the start of the application.
Click Finish to install the certificate and complete the installation process and launch the application; the xterm window shows the start of the application.
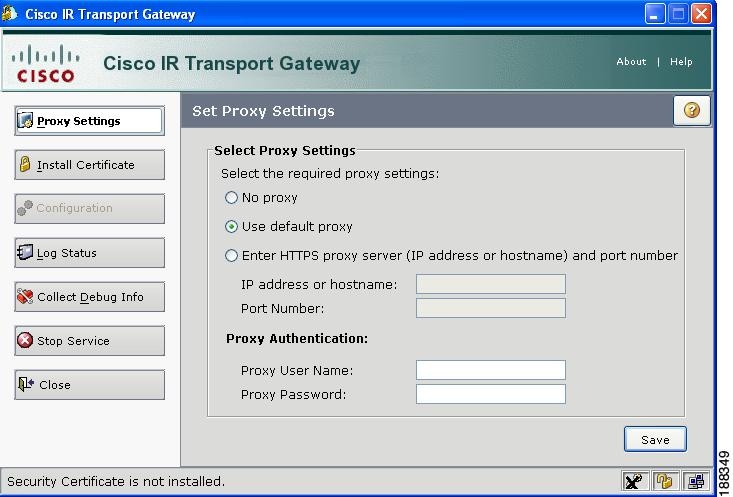
Step 12 ![]() After successful installation and launch of the Transport Gateway, the Transport Gateway Application appears.
After successful installation and launch of the Transport Gateway, the Transport Gateway Application appears.
Installing the Transport Gateway Bundle in Console mode (non-GUI mode)
To install the Transport Gateway in Console mode (non-GUI mode), perform the following steps:
Step 1 ![]() Download the installer (non-GUI version of the Transport Gateway installer) to the Solaris machine in binary mode.
Download the installer (non-GUI version of the Transport Gateway installer) to the Solaris machine in binary mode.
Step 2 ![]() Navigate to the directory that contains the installer.
Navigate to the directory that contains the installer.
Step 3 ![]() If necessary, change the installer's file permissions to make the binary, executable do this by typing the following command from a command prompt:
If necessary, change the installer's file permissions to make the binary, executable do this by typing the following command from a command prompt:
$ chmod +x your_binary_executable
e.g. $ chmod 755 CSCOtg.install

Note ![]() Replace "your_binary_executable" with the actual filename of the binary that you downloaded.
Replace "your_binary_executable" with the actual filename of the binary that you downloaded.
Be sure to launch the installer using a display or user interface supported Reflection or Xterm.
Step 4 ![]() The installation directory for the Transport Gateway would be '/opt/CSCOtg'. Make sure, you have adequate space on your system for the installation.
The installation directory for the Transport Gateway would be '/opt/CSCOtg'. Make sure, you have adequate space on your system for the installation.
Step 5 ![]() Launch the installer by typing the following command from a command prompt:
Launch the installer by typing the following command from a command prompt:
$ ./your_binary_executable
e.g. $ ./CSCOtg.install
Step 6 ![]() A welcome window appears, informing the user about the wait time during the install, followed by an informational window (shown below) that informs the user of the following information:
A welcome window appears, informing the user about the wait time during the install, followed by an informational window (shown below) that informs the user of the following information:
•![]() Install location
Install location
•![]() Total size required for the install
Total size required for the install
•![]() A successful installation message
A successful installation message
•![]() List of tasks to complete the installation
List of tasks to complete the installation

After Successful installation the Transport Gateway automatically starts the service and launches the user interface.

Installing the Transport Gateway Bundle in Silent Mode
To install the Transport Gateway in Silent mode perform the following steps:
Step 1 ![]() Download the installer to the Solaris machine in a binary mode.
Download the installer to the Solaris machine in a binary mode.
Step 2 ![]() Navigate to the directory that contains the installer.
Navigate to the directory that contains the installer.
Step 3 ![]() If necessary, change the installer's file permissions to make the binary executable by typing the following command from a command prompt:
If necessary, change the installer's file permissions to make the binary executable by typing the following command from a command prompt:
$ chmod +x your_binary_executable
e.g. $ chmod 755 CSCOtg.install

Note ![]() Be sure to replace "your_binary_executable" with the actual filename of the binary that you downloaded (i.e. CSCOtg.install.
Be sure to replace "your_binary_executable" with the actual filename of the binary that you downloaded (i.e. CSCOtg.install.
Step 4 ![]() The installation directory for the Transport Gateway would be '/opt/CSCOtg'. Make sure, you have adequate space on your system for the installation.
The installation directory for the Transport Gateway would be '/opt/CSCOtg'. Make sure, you have adequate space on your system for the installation.
Step 5 ![]() Launch the installer by typing from a command prompt:
Launch the installer by typing from a command prompt:
$ ./your_binary_executable -silent
e.g. $ ./CSCOtg.install -silent

Note ![]() Again, be sure to replace your_binary_executable with the actual filename of the binary that you downloaded.
Again, be sure to replace your_binary_executable with the actual filename of the binary that you downloaded.
Use CDE / Xterm (Display supported)
No intervention is required from the user, After Successful installation; the Transport Gateway will automatically start the service and launches the user interface.
Uninstalling the Transport Gateway for Solaris
There are three modes of uninstallation
1. ![]() GUI mode - It will have wizards which will guide the user through the uninstallation process.
GUI mode - It will have wizards which will guide the user through the uninstallation process.
2. ![]() Console mode -The uninstallation progress will be displayed on the console (e.g. Xterm display supported).
Console mode -The uninstallation progress will be displayed on the console (e.g. Xterm display supported).
3. ![]() Silent mode - Uninstallation will be performed in the background with no wizards or progress information will be displayed during the process.
Silent mode - Uninstallation will be performed in the background with no wizards or progress information will be displayed during the process.
Uninstalling the Transport Gateway Bundle in GUI Mode
To uninstall the Transport Gateway in GUI mode perform the following steps:
Step 1 ![]() The user can uninstall Cisco Transport Gateway client application by executing the file '/opt/CSCOtg/_uninstTG/uninstaller.bin' in command line from the root directory.
The user can uninstall Cisco Transport Gateway client application by executing the file '/opt/CSCOtg/_uninstTG/uninstaller.bin' in command line from the root directory.


Note ![]() The uninstaller automatically chooses the same mode for uninstallation as was used for installation; if silent mode was used for the install then the uninstall also uses silent mode. No intervention is required from the user.
The uninstaller automatically chooses the same mode for uninstallation as was used for installation; if silent mode was used for the install then the uninstall also uses silent mode. No intervention is required from the user.

Step 2 ![]() Navigate to the root (/) directory of the Solaris system.
Navigate to the root (/) directory of the Solaris system.
Step 3 ![]() Execute the command "/opt/CSCOtg/_uninstTG/uninstaller.bin" from the command prompt, a starting a message window is displayed.
Execute the command "/opt/CSCOtg/_uninstTG/uninstaller.bin" from the command prompt, a starting a message window is displayed.

Note ![]() Be sure to launch the installer using a display or user interface supported by either the Reflection or Xterm application.
Be sure to launch the installer using a display or user interface supported by either the Reflection or Xterm application.
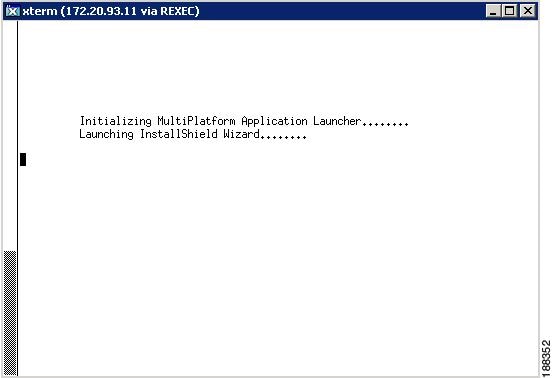
The wizard displays a welcome screen that provides the details of the application that will be uninstalled
.
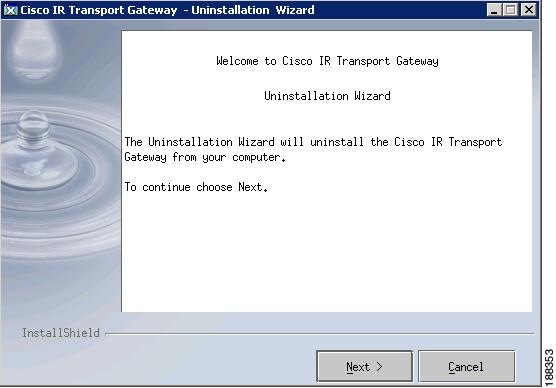
Step 4 ![]() Click Next in the welcome window to continue. The next window prompts the user with information about the Transport Gateway that is to be uninstalled. The Uninstallation wizard shows the location of the installed path
Click Next in the welcome window to continue. The next window prompts the user with information about the Transport Gateway that is to be uninstalled. The Uninstallation wizard shows the location of the installed path
.
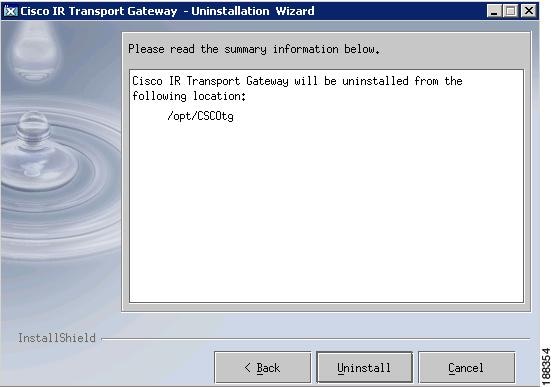
Step 5 ![]() Click Uninstall, to uninstall the Transport Gateway application; the un-installation progress wizard appears.
Click Uninstall, to uninstall the Transport Gateway application; the un-installation progress wizard appears.
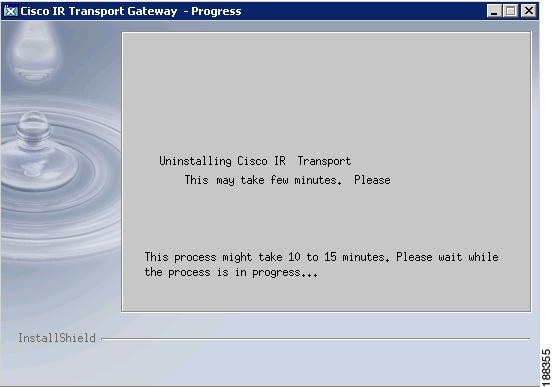
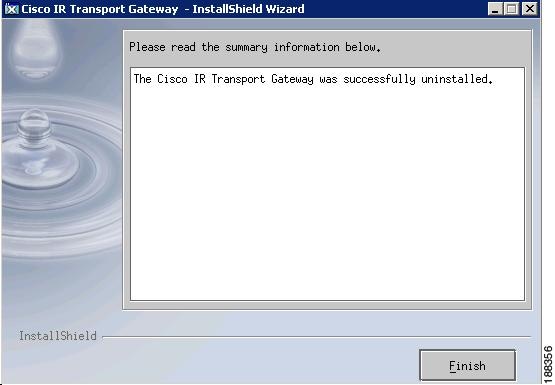
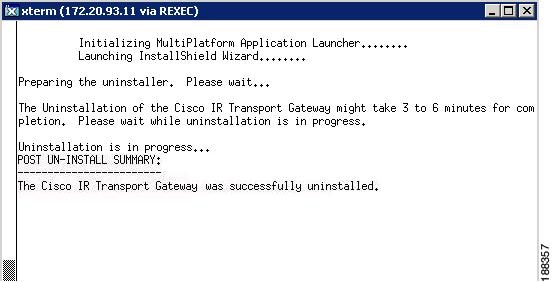
Step 6 ![]() After a few minutes the uninstall process is completed; the final uninstall summary wizard appears as shown in the next graphic; and the xterm window shows that the Transport Gateway was successfully uninstalled.
After a few minutes the uninstall process is completed; the final uninstall summary wizard appears as shown in the next graphic; and the xterm window shows that the Transport Gateway was successfully uninstalled.
Step 7 ![]() Click Finish; this restarts your computer for normal operation
Click Finish; this restarts your computer for normal operation
.
Uninstalling the Transport Gateway Bundle in Console mode
To uninstall the Transport Gateway in Console mode perform the following steps:
Step 1 ![]() The user can uninstall Cisco Transport Gateway client application by executing the file '/opt/CSCOtg/_uninstTG/uninstaller.bin' on the command line from the root directory.
The user can uninstall Cisco Transport Gateway client application by executing the file '/opt/CSCOtg/_uninstTG/uninstaller.bin' on the command line from the root directory.

Note ![]() Be sure to launch the uninstaller using a display or user interface supported by either the Reflection or Xterm application.
Be sure to launch the uninstaller using a display or user interface supported by either the Reflection or Xterm application.


Note ![]() The uninstaller automatically chooses the same mode for uninstallation as was used for installation; if console mode was used for the install then the uninstall also uses console mode. No intervention is required from the user.
The uninstaller automatically chooses the same mode for uninstallation as was used for installation; if console mode was used for the install then the uninstall also uses console mode. No intervention is required from the user.

Step 2 ![]() The xterm window shows the launch of the uninstall application, displays a pre then later post un-install summary. After a few minutes the uninstall process is completed; the xterm window shows that the Transport Gateway was successfully uninstalled.
The xterm window shows the launch of the uninstall application, displays a pre then later post un-install summary. After a few minutes the uninstall process is completed; the xterm window shows that the Transport Gateway was successfully uninstalled.
Uninstalling the Transport Gateway Bundle in Silent mode
To uninstall the Transport Gateway in Silent mode perform the following steps:
Step 1 ![]() The user can uninstall Cisco Transport Gateway client application by executing the file '/opt/CSCOtg/_uninstTG/uninstaller.bin - silent' on the command line from the root directory.
The user can uninstall Cisco Transport Gateway client application by executing the file '/opt/CSCOtg/_uninstTG/uninstaller.bin - silent' on the command line from the root directory.

Note ![]() Be sure to launch the installer using a display or user interface supported by either the Reflection or Xterm application.
Be sure to launch the installer using a display or user interface supported by either the Reflection or Xterm application.
The uninstaller automatically chooses the same mode for uninstallation as was used for installation; if console mode was used for the install then the uninstall also uses console mode. No intervention is required from the user.
Upgrading Customers From NLS IR 1.X to Version 2
TS customers that currently have version 1.x installed on their Transport Gateway need to have the following steps performed:
•![]() Customer Accepts Legal Agreement
Customer Accepts Legal Agreement
•![]() Register the Transport Gateway (TG), which generates the TG ID and security token (sent via email).
Register the Transport Gateway (TG), which generates the TG ID and security token (sent via email).
•![]() Uninstalling Transport Gateway for IR 1.x.
Uninstalling Transport Gateway for IR 1.x.
–![]() Uninstalling the Transport Gateway for Windows
Uninstalling the Transport Gateway for Windows
–![]() Uninstalling the Transport Gateway for Solaris
Uninstalling the Transport Gateway for Solaris
•![]() Installing Transport Gateway for IR 2.0:
Installing Transport Gateway for IR 2.0:
–![]() Installing the Transport Gateway Package for Windows
Installing the Transport Gateway Package for Windows
–![]() Installing the Transport Gateway for Solaris
Installing the Transport Gateway for Solaris
•![]() Configure the Transport Gateway by installing the security certificate by entering the TG ID and security token.
Configure the Transport Gateway by installing the security certificate by entering the TG ID and security token.
•![]() On the CNC application initiate a new discovery (or import a seed file) and upload an inventory to Cisco Inventory and Reporting back end.
On the CNC application initiate a new discovery (or import a seed file) and upload an inventory to Cisco Inventory and Reporting back end.
For information about uploading an inventory see section "Transfer Inventory and Reports Data to Cisco" in the CNC 5.x Quick Start Guide at http://wwwin-eng.cisco.com/CA/NSA/NetTools/Service_Appliance/CNC5.0/User_Docs/CNC_5_0_Quick_Start_Guide.pdf
Remove Customer Certificates
To remove the Customer Certificate perform the following steps:
•![]() For Windows, perform one of the following options:
For Windows, perform one of the following options:
–![]() For XP, go to folder C:\WINDOWS and delete folder CiscoiTS_TGW_1_0
For XP, go to folder C:\WINDOWS and delete folder CiscoiTS_TGW_1_0
–![]() For Windows 2000, go to folder C:\WINNT and delete folder CiscoiTS_TGW_1_0
For Windows 2000, go to folder C:\WINNT and delete folder CiscoiTS_TGW_1_0
•![]() For the Solaris go to the root directory "\" and manually delete the folder CiscoiTS_TGW_1_0.
For the Solaris go to the root directory "\" and manually delete the folder CiscoiTS_TGW_1_0.
Launch the Cisco Transport Gateway Application
The Cisco Transport Gateway application window appears in the following scenarios:
•![]() The Cisco Transport Gateway application automatically opens when the Transport Gateway installation successfully completes.
The Cisco Transport Gateway application automatically opens when the Transport Gateway installation successfully completes.
•![]() The Transport Gateway installation has been completed and the following is done on one of the following environments:
The Transport Gateway installation has been completed and the following is done on one of the following environments:
–![]() On the Windows desktop enter the following:
On the Windows desktop enter the following:
•![]() Start > All Programs > Cisco Transport Gateway > Configure Cisco Transport Gateway
Start > All Programs > Cisco Transport Gateway > Configure Cisco Transport Gateway
–![]() In Solaris there are two options:
In Solaris there are two options:
•![]() If user uses Xterm - User has to enter the command for Configure Cisco Transport Gateway: "/opt/CSCOSchtg/tg/bin/configure.bin".
If user uses Xterm - User has to enter the command for Configure Cisco Transport Gateway: "/opt/CSCOSchtg/tg/bin/configure.bin".
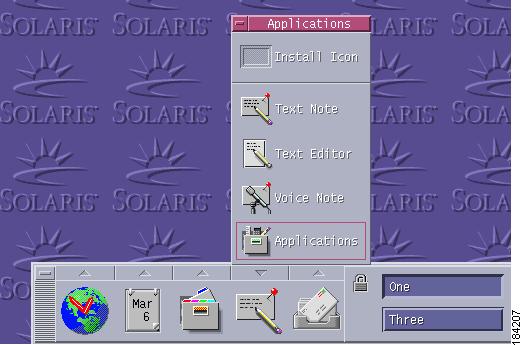
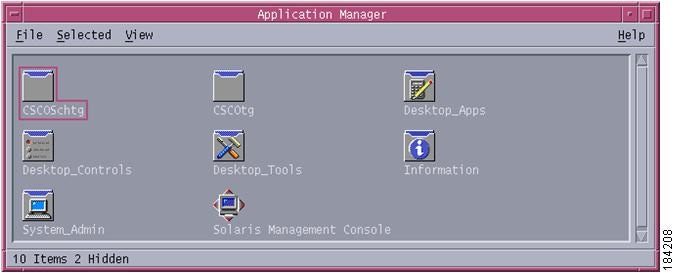
•![]() If user uses CDE - User can launch the configure Transport gateway as in the following figures.
If user uses CDE - User can launch the configure Transport gateway as in the following figures.

Configuring the Transport Gateway
There are three tasks that need to be performed to complete the Transport Gateway installation.
•![]() Install the Security Certificate
Install the Security Certificate
•![]() Configure the Transport Gateway
Configure the Transport Gateway
Select the Proxy Settings
Perform the following steps to specify the Proxy Setting:

Step 1 ![]() Click Proxy Setting
Click Proxy Setting  on the left; the Proxy Setting pane
  appears.
Step 2 ![]() Click the radio button for the Proxy Setting you want (i.e. "Use default proxy").
Click the radio button for the Proxy Setting you want (i.e. "Use default proxy").
Step 3 ![]() Click Save; the application prompts you on the save.
Click Save; the application prompts you on the save.

Step 4 ![]() Click Yes to save the Proxy Settings you specified.
Click Yes to save the Proxy Settings you specified.
Install the Security Certificate
Perform the following steps to install the Security Certificate:
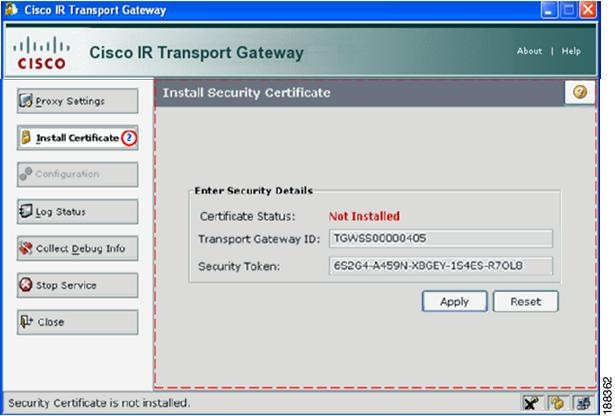
Step 1 ![]() Click Install Certificate;
Click Install Certificate;  the Enter Security Details pane
  appears.
Step 2 ![]() Enter the Transport Gateway ID.
Enter the Transport Gateway ID.
You can find the Transport Gateway ID on the Inventory and Reporting application's Transport Gateway tab, under the Transport Gateway ID column, or click on the Transport Gateway link inside the security token email.
Step 3 ![]() Enter the Security Token.
Enter the Security Token.
The token is always sent to the administrator that submitted the Transport Gateway for registration; the token is sent via email when the administrator submits the Transport Gateway registration.
Step 4 ![]() Click Apply; the status on the page changes.
Click Apply; the status on the page changes.
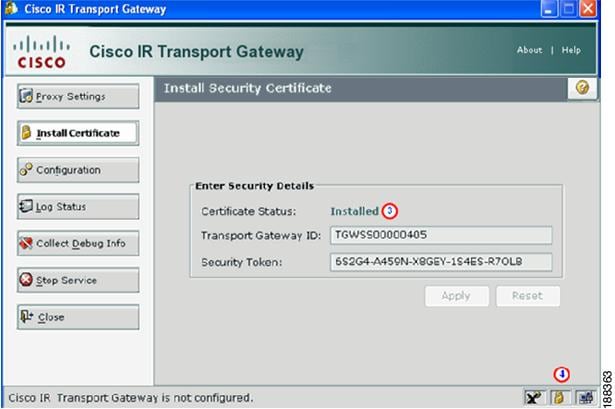
The Security Certificate status  changes from Not Installed to Installed, and the security certificate icon
  changes from unlocked to locked.
Configure the Transport Gateway
Perform the following steps to configure the Transport Gateway:
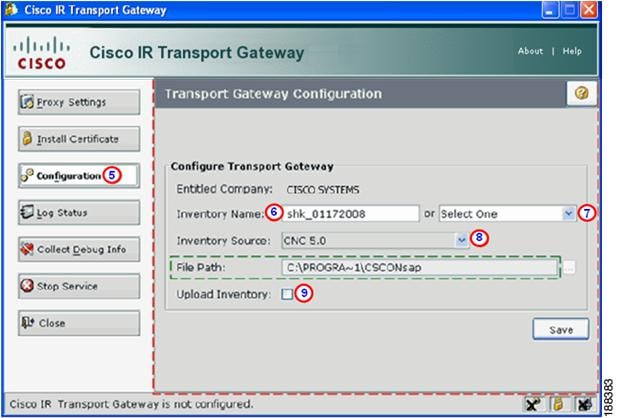
Step 1 ![]() Click Configuration;
Click Configuration;  the Transport Gateway Configuration pane
  appears.
Enter the following information on the above pane:
Step 2 ![]() You can optionally enter any Inventory Name
You can optionally enter any Inventory Name  or select a previously used name from the drop-down list,
  if available.
Step 3 ![]() Select an Inventory Source from the drop-down list;
Select an Inventory Source from the drop-down list; the file path field is automatically loaded.

Note ![]() The File Path data location
The File Path data location  is automatically filled in.
Step 4 ![]() Check the Upload Inventory check box
Check the Upload Inventory check box  to upload the inventory data to the Cisco back end.

Note ![]() When you check the Upload Inventory check box
When you check the Upload Inventory check box  the Transport Gateway automatically uploads an inventory to the back end, if an updated version of the inventory is available.
If you do not want automatic uploads, un-check the check box, then check the check box later when you want to upload an inventory to the back end.
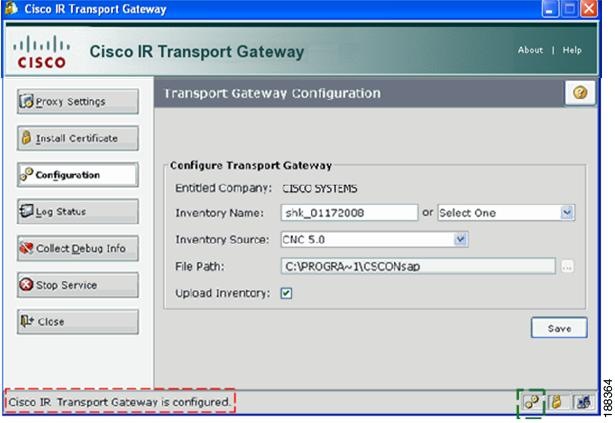
Step 5 ![]() Click Save; the Transport Gateway configuration status changes to "Cisco IR Transport Gateway is configured",
Click Save; the Transport Gateway configuration status changes to "Cisco IR Transport Gateway is configured", and the Transport Gateway configuration icon changes to the new status.
Other Transport Gateway Functions
This section also covers the following additional functions:
•![]() Stop Service and Close Functions
Stop Service and Close Functions
•![]() Transport Gateway Function Hot Keys
Transport Gateway Function Hot Keys
Log Status
To see the status of the Transport Gateway perform the following steps:
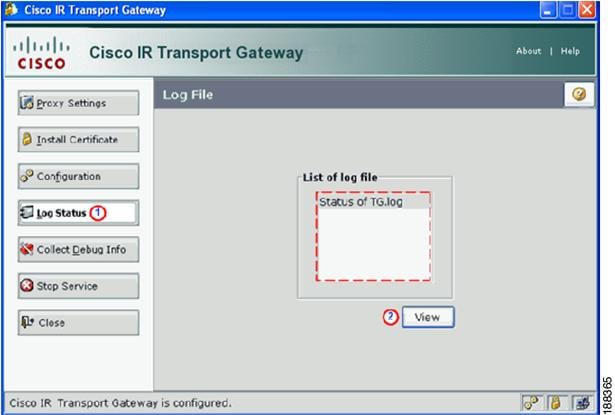
Step 1 ![]() Click Log Status;
Click Log Status;  the list of log files appear.
Step 2 ![]() Click View;
Click View;  the log file appears with the status of the Transport Gateway.


Note ![]() Some of the information you see in the log file is:
Some of the information you see in the log file is:
–![]() Name of the inventory file.
Name of the inventory file. 
–![]() The CNC version number.
The CNC version number. 
–![]() A statement that indicates if the connection to the CNC database was successful.
A statement that indicates if the connection to the CNC database was successful. 
Collect Debug Info
To Collect Debug Information perform the following steps:
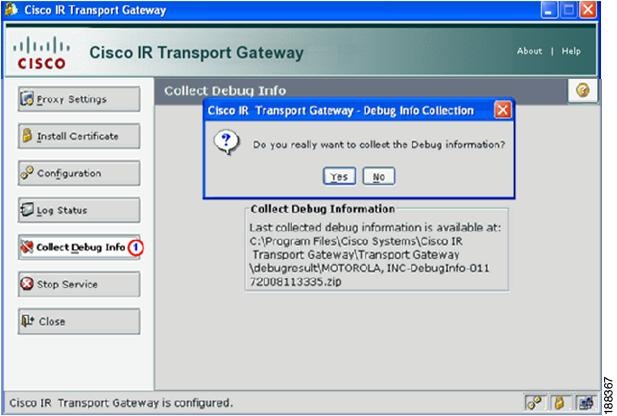
Step 1 ![]() Click Collect Debug Info;
Click Collect Debug Info;  the prompt appears.
Step 2 ![]() Click Yes; to collect the debug information; a progress window appears, then an informational message appears that indicates the location of the debug information.
Click Yes; to collect the debug information; a progress window appears, then an informational message appears that indicates the location of the debug information.

Stop Service and Close Functions
The difference between the Stop Service and Close function is:
•![]() When you click Stop Service, the Transport Gateway function stops, the Transport Gateway is no longer operational and the Transport Gateway GUI window closes.
When you click Stop Service, the Transport Gateway function stops, the Transport Gateway is no longer operational and the Transport Gateway GUI window closes.
•![]() When you click Close this action shuts down the Transport Gateway GUI window, but the Transport Gateway is still operational.
When you click Close this action shuts down the Transport Gateway GUI window, but the Transport Gateway is still operational.
To stop the TG service of the Transport Gateway, perform the following steps:
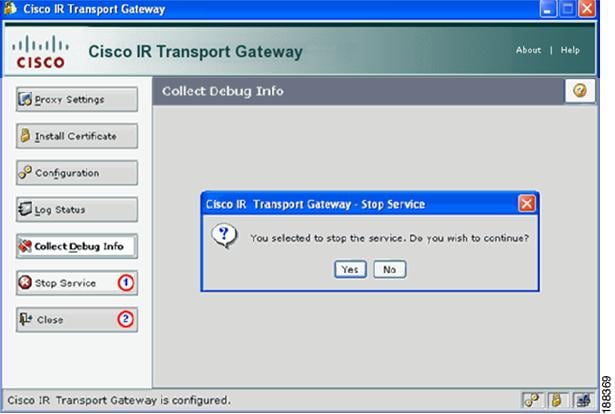
Step 1 ![]() Click Stop Service;
Click Stop Service;  the Stop Service confirmation prompt appears.
Step 2 ![]() Click Yes to continue the Stop service function; the GUI window closes and the Transport Gateway function stops operation.
Click Yes to continue the Stop service function; the GUI window closes and the Transport Gateway function stops operation.
To close the Transport Gateway GUI window, perform the following step:
Step 1 ![]() Click Close;
Click Close;  the Transport Gateway GUI window closes; however, the Transport Gateway continues to operate.
Transport Gateway Function Hot Keys
There are hot keys associated with the various Transport Gateway functions that let you perform these functions using the keyboard instead of having to click the functions on the GUI window, these hot keys are listed below:
•![]() Show Proxy Settings - Alt + p
Show Proxy Settings - Alt + p
•![]() Show Security Certificate status - Alt + i
Show Security Certificate status - Alt + i
•![]() Show Configuration Settings - Alt + f
Show Configuration Settings - Alt + f
•![]() Show Log Files - Alt + l
Show Log Files - Alt + l
•![]() Collect Debug Information - Alt + p
Collect Debug Information - Alt + p
•![]() Stop Windows Service - Alt + s
Stop Windows Service - Alt + s
•![]() Close the Window - Alt + c
Close the Window - Alt + c

Note ![]() When you position your mouse over one of the Transport Gateway functions, noted above, the application displays mouseover information that indicates the hot key for the associated Transport Gateway function.
When you position your mouse over one of the Transport Gateway functions, noted above, the application displays mouseover information that indicates the hot key for the associated Transport Gateway function.
Configure the Transport Gateway (Non-GUI mode)
Since X windows is not included with any version of Cisco Network Collector Sparc or x86(Intel) architectures Transport Gateway configuration must be done in a non-GUI format, this can be done using the Transport Gateways command line tool.
The Transport Gateway has command line options that can be used to configure and run the Transport Gateway. The command line tool can be used in both GUI and non-GUI versions of the Solaris X86 Transport Gateway releases.
This section describes how to configure the IR Transport Gateway for Solaris X86 platforms in non-GUI mode using the command line tool.
Command Line Tool
The Cisco IR Transport Gateway 2.2 build comes with an in-built command line tool for performing the Transport Gateway configuration and service tasks. The tool is available under the 'bin' directory of the Transport Gateways installation setup (/tg/bin) for example, "/opt/CSCOtg/tg/bin".
Once you have finished the installation of the Transport Gateway, the command line tool 'turn' binary will be available from the 'bin' directory of the Transport Gateway installation setup <TG install location>/tg/bin (e.g., "/opt/CSCOtg/tg/bin")
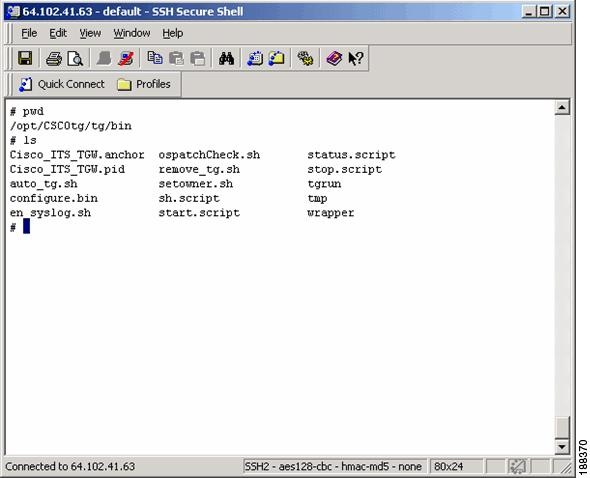
.
To run the command line tool perform the following steps:
Step 1 ![]() Navigate to the 'bin' directory that contains the command line tool.
Navigate to the 'bin' directory that contains the command line tool.
Step 2 ![]() If necessary, change the 'turn' file's permissions to make the binary executable by typing the following command from a command prompt:
If necessary, change the 'turn' file's permissions to make the binary executable by typing the following command from a command prompt:
$ chmod +x commandlinetool_binary_executable
e.g., $ chmod 755 tgrun
Step 3 ![]() Run the tool by typing from a command prompt:
Run the tool by typing from a command prompt:
$./command_line_tool
e.g., $./tgrun
Make sure that you run the Transport Gateway command line tool (tgrun) from the 'bin' directory of your Transport Gateway installation setup.
Step 4 ![]() Specify different tgrun options using the following format from a command prompt:
Specify different tgrun options using the following format from a command prompt:
$./command_line_tool options toolArugments
e.g., $./tgrun help
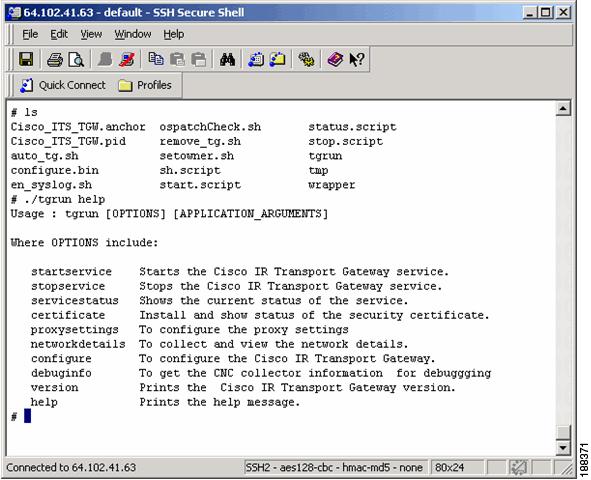
Start and Configure the Transport Gateway
Step 5 ![]() Start the Transport Gateway service by specifying the startservice option.
Start the Transport Gateway service by specifying the startservice option.
$./tgrun startservice
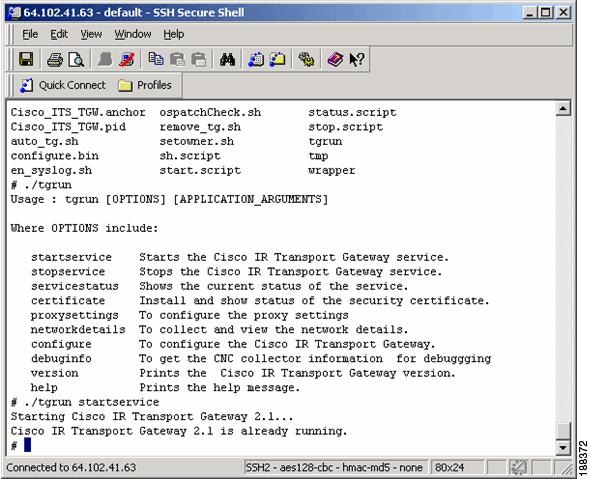
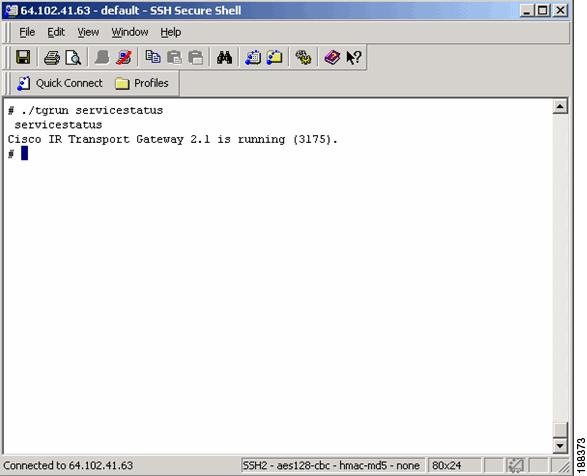
Step 6 ![]() Check the Transport Gateway service status by issuing the command:
Check the Transport Gateway service status by issuing the command:
$./tgrun servicestatus
The Transport Gateway responds with its version and running status.
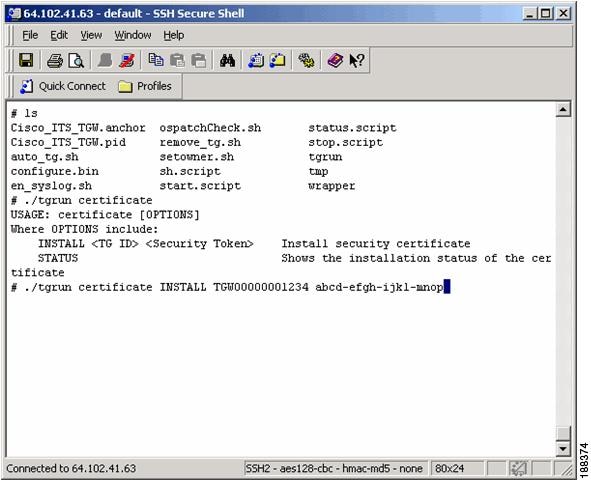
Step 7 ![]() Install the certificate by issuing the command:
Install the certificate by issuing the command:
$./tgrun certificate INSTALL <TG ID > < Security Token >
e.g., $./tgrun certificate INSTALL TGW00000001234
abcd-efgh-ijkl-mnop
Step 8 ![]() Check the status of the certificate install by issuing the command:
Check the status of the certificate install by issuing the command:
$./tgrun certificate status

Step 9 ![]() See the different the proxy setting options by issuing the command:
See the different the proxy setting options by issuing the command:
$./tgrun proxysettings
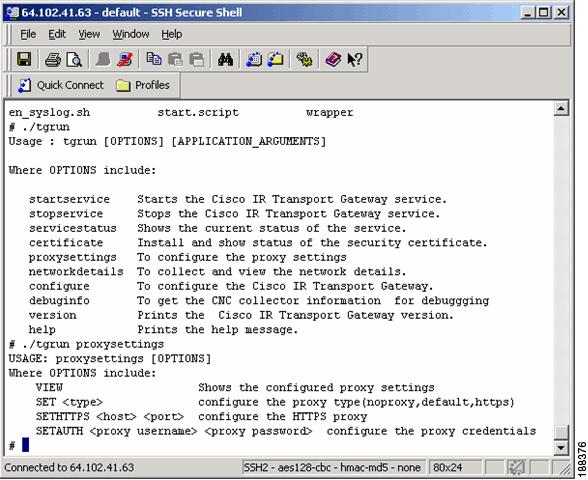
Step 10 ![]() See the different the proxy setting set options by issuing the command:
See the different the proxy setting set options by issuing the command:
$./tgrun proxysettings set
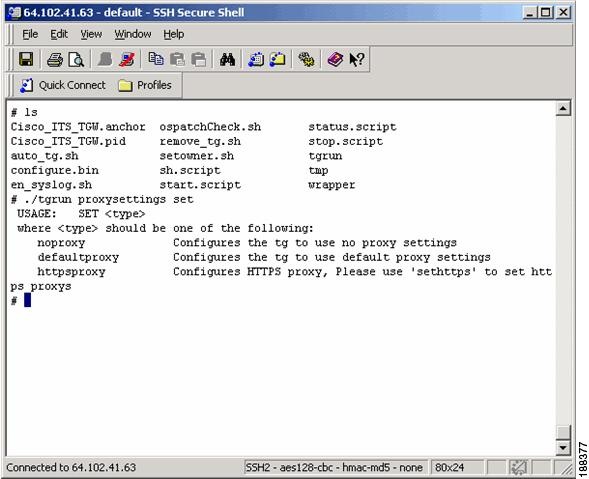
Step 11 ![]() Set the proxy setting set options to the noproxy option by issuing the command:
Set the proxy setting set options to the noproxy option by issuing the command:
$./tgrun proxysettings set noproxy
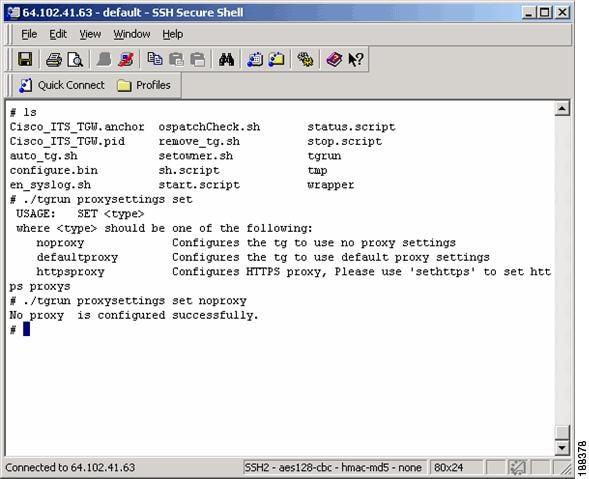
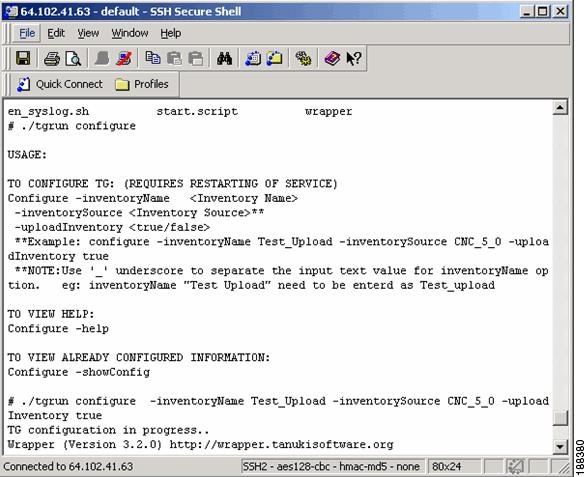
Step 12 ![]() To see the Transport Gateway configure options issue the command:
To see the Transport Gateway configure options issue the command:
$./tgrun configure
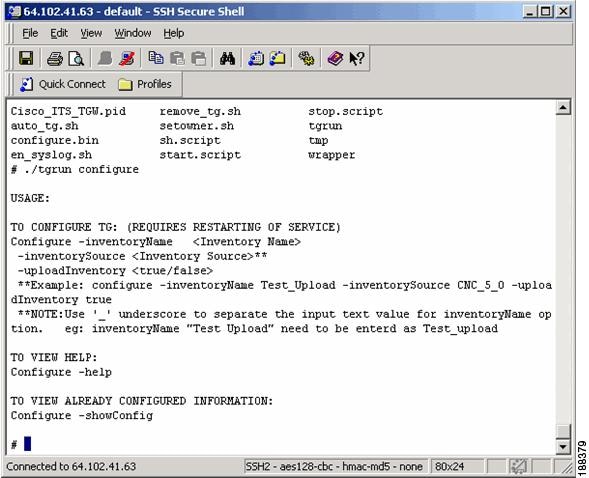
Step 13 ![]() To configure the Transport Gateway issue the command:
To configure the Transport Gateway issue the command:
$./tgrun configure -inventoryName <Inventory Name>
-inventorySource <inventorySource > -uploadInventory <true/false >
e.g., $./tgrun configure -inventoryName Test_Upload
-inventorySource CNC_5_0 -uploadInventory true
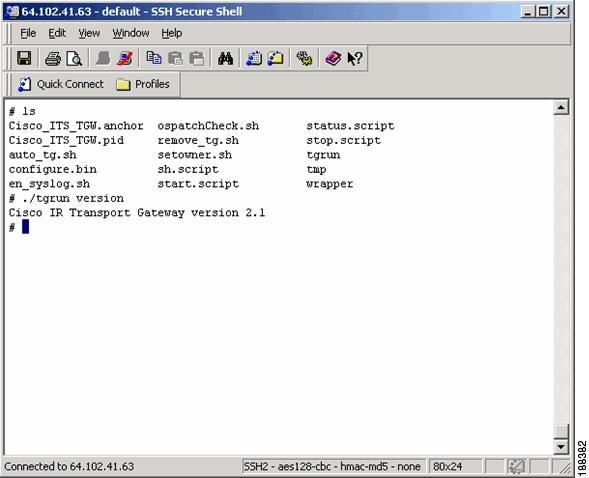
Step 14 ![]() To see the version of the Transport Gateway issue the command:
To see the version of the Transport Gateway issue the command:
$./tgrun version
 Feedback