Overview
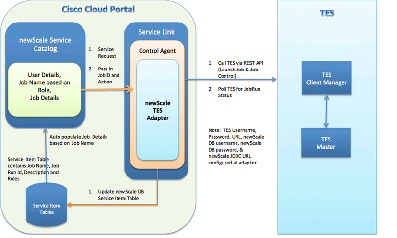
Cisco's Tidal Enterprise Scheduler Self-Service Adapter is enabled utilizing the Cisco Workplace Portal as the front-end. The interaction between Cisco Service Portal and TES uses existing TES REST API. Self-Service leverages existing Cisco Workplace Portal capabilities for administering end-user security, creation of catalogs and portal pages, and setting up and calling the exposed TES functions. Initially, Self Service allows for the commonly used job functions Launch , Rerun , Cancel , Hold , and Resume .
Configuring Self-Service Cataloginvolves:
- Meeting the prerequisites for installing Service Portal.
- Installing a version of Service Portal that includes Self-Service Catalog.
- Configuring implementations and sites within the development and production Service Portal instances.
- Using the Administration and Organization Designer modules to ensure that personnel have access to Self-Service Adapter capabilities appropriate to their functions in the implementation.
Solution Prerequisites
Before you begin configuring and deploying TES Portal, you MUST review this entire chapter to ensure that your datacenter infrastructure is properly configured. If any of the requirements presented in this chapter are not met, deployment may fail.
This chapter provides information regarding the required datacenter infrastructure configuration, and the operating system and application server software for installing the TES Portal.
See your Cisco Workplace Portal Installation Guide for Service Portal prerequisite information.
Minimum System Requirements
Before installing the TES Portal, it is recommended that you verify that your datacenter infrastructure meets the minimum hardware and software requirements. The requirements in this section provide the minimum prerequisites necessary to install and deploy Cisco Service TES Portal.
See the Cisco Service Portal 9.4 Platform Matrix in the following location:
http://www.cisco.com/en/US/docs/net_mgmt/datacenter_mgmt/intel_auto/service_portal/Platform_Matrix/ServicePortal_PlatformMatrix_9_4_x_and_below.pdf
Installing Self Service Adapter
To prepare your environment, follow these installation procedure:
Step 1![]() Prepare application servers by installing the operating system (including software prerequisites such as .NET framework, Java, JBoss, Web Server, LDAP) for the Cisco Service Portal components.
Prepare application servers by installing the operating system (including software prerequisites such as .NET framework, Java, JBoss, Web Server, LDAP) for the Cisco Service Portal components.
Step 2![]() Install database management servers that are available to the Cisco Service Portal.
Install database management servers that are available to the Cisco Service Portal.
Step 3![]() Install the Cisco Service Portal on a targeted application server.
Install the Cisco Service Portal on a targeted application server.
For instructions, see the Cisco Service Portal Installation Guide located in the following location:
http://www.cisco.com/en/US/docs/net_mgmt/datacenter_mgmt/intel_auto/service_portal/v9_4_0/user_guides/CiscoServicePortal_9_4_0_InstallationGuide.pdf
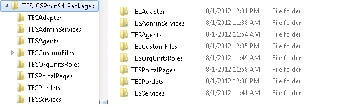
Step 4![]() Unzip the
TES_CSP.zip
file to the following location for the installation of the custom adapter:
Unzip the
TES_CSP.zip
file to the following location for the installation of the custom adapter:
Step 5![]() Install the TES Custom Adapter on the newly installed Cisco Service Portal.
Install the TES Custom Adapter on the newly installed Cisco Service Portal.
a.![]() Unzip the C:\TES_CSPwin94_Packages \TESAdapter\ISEE.Adapters file to a temporary directory (for example,
C:\TESAdapter
).
Unzip the C:\TES_CSPwin94_Packages \TESAdapter\ISEE.Adapters file to a temporary directory (for example,
C:\TESAdapter
).
b.![]() Copy the C:\TESAdapter\adapters\adapter_tes.jar file to the deployed
C:\jboss-as-7.1.1.Final\standalone\deployments\ServiceLink.war\WEB-INF\lib
directory.
Copy the C:\TESAdapter\adapters\adapter_tes.jar file to the deployed
C:\jboss-as-7.1.1.Final\standalone\deployments\ServiceLink.war\WEB-INF\lib
directory.
c.![]() Copy the C:\TESAdapter\lib\tes\* files to the deployed
C:\jboss-as-7.1.1.Final\standalone\deployments\ServiceLink.war\WEB-INF\lib
directory.
Copy the C:\TESAdapter\lib\tes\* files to the deployed
C:\jboss-as-7.1.1.Final\standalone\deployments\ServiceLink.war\WEB-INF\lib
directory.
d.![]() Unzip the
C:\TES_CSPwin94_Packages\TESCustomFile\adk.zip
file to
C:\adk
.
Unzip the
C:\TES_CSPwin94_Packages\TESCustomFile\adk.zip
file to
C:\adk
.
e.![]() Open a command prompt window and change the directory to the extracted
C:\adk \lib
folder.
Open a command prompt window and change the directory to the extracted
C:\adk \lib
folder.
f.![]() Execute the following command in single line or as a batch file:
Execute the following command in single line or as a batch file:
java -classpath newscale_adu.jar;newscale_ddlrunner.jar;newscale_drivers.jar;newscale_security.jar;castor-0.9.5.4.jar;xercesImpl.jar;xml-apis.jar;commons-logging-1.0.4.jar;newscale_core.jar com.newscale.deployer.util.JDBCUtility SqlServer <DBSERVER>:<DBPORT>;DatabaseName=RequestCenter DbNameUnused <DBUSER> <DBPASSWORD> C:\TESAdapter\deploy\tes.xml
java -classpath newscale_adu.jar;newscale_ddlrunner.jar;newscale_drivers.jar;newscale_security.jar;castor-0.9.5.4.jar;xercesImpl.jar;xml-apis.jar;commons-logging-1.0.4.jar;newscale_core.jar com.newscale.deployer.util.JDBCUtility Oracle <DBSERVER>:<DBPORT>;SID=RequestCenter DbNameUnused <DBUSER> <DBPASSWORD> C:\TESAdapter\deploy\tes.xml
g.![]() Start the Cisco Service Portal and Service Link Servers and verify the new TES Adapter exists.
Start the Cisco Service Portal and Service Link Servers and verify the new TES Adapter exists.
h.![]() Configure the TES Adapter Properties with
TES URL
,
Username
and
Password
, and
Database URL
,
Username
and
Password
.
Configure the TES Adapter Properties with
TES URL
,
Username
and
Password
, and
Database URL
,
Username
and
Password
.
Step 6![]() Verify the TES Adapter installation.
Verify the TES Adapter installation.
a.![]() Open the Cloud Portal in your browser and log in as an administrator.
Open the Cloud Portal in your browser and log in as an administrator.
b.![]() From the
Modules
drop-down list, choose
Service Links
.
From the
Modules
drop-down list, choose
Service Links
.
c.![]() Click the
Manage Integrations
tab.
Click the
Manage Integrations
tab.
d.![]() Click
Adapters
and verify that the TES Adapter displays in the list of adapters.
Click
Adapters
and verify that the TES Adapter displays in the list of adapters.
e.![]() Configure the TES Adapter
Outbound
and
Inbound Properties
with the following:
Configure the TES Adapter
Outbound
and
Inbound Properties
with the following:
- TESUsername – the username the adapter uses to sign into TES. This user should be properly configured in TES such that the access level and workgroup membership are appropriate for jobs to be exposed via the self-service portal.
- TESPassword – password for the TES user.
-
TESUrl
– the URL for the TES REST API call in the format of
http://tesclientmanager_host:port/api/plugin_name .
For example: http://tes.cisco.com:8080/api/tes-6.0.1 - NSDBUsername – database username to the Cisco Service Portal Request Center database.
- NSDBPassword – password for the database user.
- NSDBJdbcUrl – the jdbc url to the Cisco Service Portal Request Center database.
- For example:
- jdbc:sqlserver://<DBSERVER>:<DBPORT>;databaseName=RequestCenter
- NSDBPoolMinIdle – the database connection pool minimum idle setting. Default is 1.
- NSDBPoolMaxIdle – the database connection pool maximum idle setting. Default is 3.
- NSDBPoolMaxActive – the database connection pool maximum connection size. Default is 3.
- NSDBPoolMaxWait – the maximum wait time for connection from pool to be available. Default is 10,000 (10 seconds).
- UserDomain – the domain name to be used when users from Cisco Service Portal interacts with TES.
 Feedback