- Introduction
- Getting Started
- Managing Automation Packs
- Performing advanced console tasks
- Authoring Processes
- Authoring Categories
- Advanced Authoring
- Monitoring Operations
- Performing Basic Console Tasks
- Performing Administrative Actions
- Working with Events and Triggers
- Using Adapters
- Using SAP Adapters
- Using the PowerShell Snap-in CLI
- Managing High Availability and Resiliency
Working with Events and Triggers
Triggers are events and conditions in the system that can fire off processes. The attributes of the trigger that fires off a process instance can be referenced in the process workflow. Processes often use this data to control execution. If a process contains a trigger, you can view its properties in the process instance views and in the Process Editor. The Trigger tab displays all triggers associated with the process, and allows you to create new triggers, modify the properties of a trigger, and delete triggers.
Process Orchestrator supports two types of rule-based triggers:
- Events—The Process Orchestrator can monitor for events from the environment, and you can specify triggers that initiate processes when the subscribed event occurs. For example, an event might be an incoming SNMP trap or a fault on a UCS system.events and schedules.
- Schedules—Schedules allow triggering processes at some time by leveraging calendars that define which days something can occur. Calendars can be selected days or sequences of dates such as weekly or monthly, they can represent dates like fiscal quarter end, or they can be combined hierarchically. Schedules then associate a time with a calendar. When the day is in the calendar, the time is evaluated. Times can be explicit or repeating (for example, hourly).
The following sections provide information about working with triggers and events:
Creating Triggers
The following table summarizes some of the more commonly-used types of triggers and when to use them.
|
|
|
|---|---|
Use AMQP to create Process Orchestrator triggers for events that occur out on the IT landscape for which Cisco does not have adapters, but that can generate AMQP messages. |
|
Process events allow one process to pass an event to other processes. For example:
Process events include elements of the Process Orchestrator functional model so that they are aware of internal schema elements. For example, you can include a target type in your subscription criteria. Process events are exposed in the northbound web service, so an external system can programmatically submit an event to Process Orchestrator. However, the use cases for process events generally center more around Process Orchestrator-internal use cases; Advanced Message Queuing Protocol (AMQP) is preferred for external message passing. For internal use cases, process events have the advantage because they are native and lightweight within Process Orchestrator. It is easy to create message driven architectures within Process Orchestrator using process events. Since these events are not persisted to the database, they are very lightweight. Process events have the advantage that they do not require external setup and installation, as would be the case with AMQP. |
|
Indicates that a process can be used by a parent process. If this trigger is not set in the child process, the parent process will fail. The information used to start the child process can also be included in the automation summary. |
|
Indicates that the process can be started manually by a user. This trigger is added by default to a process, but can be removed. If a user attempts to manually start a process that does not have the ad-hoc trigger (or the user is restricted from starting the process in the ad-hoc trigger), an error message will be displayed and the process will not be launched. This trigger will expose all the typical trigger properties, as well as some additional properties that allow you to determine exactly how the process was manually started. |
|
Indicates that the process can be started using the Northbound Web Services. For more information, see the Cisco Process Orchestrator Northbound Web Services Guide. |
|
All task events are monitored by the Process Orchestrator environment. A user can create a trigger that can watch for any task event (task created, task deleted, task updated) that matches the user-specified criteria. |
|
Target events complement target types to allow event-driven automation for each type of service. When used as triggers, target events enable policy, which allows you to invoke automation as data is created or changed, according to patterns in the data. Available target events include:
For more information about targets, see Defining a Target. |
Creating a New Trigger
To create a new trigger for an existing process:
Step 1![]() On the Process Properties pane, click the Triggers tab, then choose New > [Trigger Type] from the drop-down list.
On the Process Properties pane, click the Triggers tab, then choose New > [Trigger Type] from the drop-down list.
Step 2![]() On the [Trigger Type] property pages, define the properties.
On the [Trigger Type] property pages, define the properties.
Step 3![]() Click the General tab and enter the required information.
Click the General tab and enter the required information.
Step 4![]() Click the Criteria tab and enter the following:
Click the Criteria tab and enter the following:
a.![]() Under Monitor options, from the Service drop–down list select the relevant option:
Under Monitor options, from the Service drop–down list select the relevant option:
b.![]() Under Monitor options, from the Action drop–down list select the relevant option for the service:
Under Monitor options, from the Action drop–down list select the relevant option for the service:
–![]() Create—To perform a platform task or create the resource.
Create—To perform a platform task or create the resource.
–![]() Update—To replace the object for update operation.
Update—To replace the object for update operation.
–![]() Delete—To remove the specific aspects of the deployment.
Delete—To remove the specific aspects of the deployment.
c.![]() Click Add and enter the relevant property information in the fields to add properties to match.
Click Add and enter the relevant property information in the fields to add properties to match.
Step 5![]() To specify that the event should be monitored on targets that match specific criteria:
To specify that the event should be monitored on targets that match specific criteria:
a.![]() On the Trigger Target property page, click Monitor on this target group and the appropriate target group.
On the Trigger Target property page, click Monitor on this target group and the appropriate target group.
b.![]() Under Monitor for Events on, click Choose a target using this algorithm, then click Choose the target that satisfies the specified criteria.
Under Monitor for Events on, click Choose a target using this algorithm, then click Choose the target that satisfies the specified criteria.
c.![]() Click “... ” to launch the Target Selection Criteria dialog box.
Click “... ” to launch the Target Selection Criteria dialog box.
d.![]() On the Properties pane, specify the required information, then click OK to return to the Trigger > Target property page.
On the Properties pane, specify the required information, then click OK to return to the Trigger > Target property page.
Step 6![]() Optional: Complete the following tabs, then click OK.
Optional: Complete the following tabs, then click OK.
- Condition—Specify when an action is to be taken based on an evaluation of the defined conditions. See Adding Conditions.
- Knowledge Base—Choose the appropriate knowledge base article to associate with the trigger.
Step 7![]() Click OK to add the trigger to the process.
Click OK to add the trigger to the process.
Step 8![]() Click Save to save the process with the new trigger.
Click Save to save the process with the new trigger.
Creating a Schedule Trigger
Use the Schedule trigger to specify the criteria on a defined calendar that must be met before the process executes. This criteria determines the values that must be met before the process executes.
Step 1![]() Click the Triggers tab, then click New > Schedule.
Click the Triggers tab, then click New > Schedule.
Step 2![]() Click the General tab and enter the general information for the trigger.
Click the General tab and enter the general information for the trigger.
Step 3![]() Click the Schedule tab and specify the schedule information.
Click the Schedule tab and specify the schedule information.
Step 4![]() Select the Conditions tab to include any special conditions for when the event log trigger will be applied.
Select the Conditions tab to include any special conditions for when the event log trigger will be applied.
Step 5![]() Click OK to complete the procedure.
Click OK to complete the procedure.
Creating a Task Trigger
Use the CCMS Alert trigger to specify the properties of the monitoring tree element (MTE) that must be monitored before an alert is generated. This criteria must be met before the process executes.
Step 1![]() Click the Triggers tab, then click New > CCMS Alert.
Click the Triggers tab, then click New > CCMS Alert.
Step 2![]() Click the General tab and enter the general information for the trigger.
Click the General tab and enter the general information for the trigger.
Step 3![]() Click the CCMS Alert tab to enter the trigger information, including:
Click the CCMS Alert tab to enter the trigger information, including:
- Monitoring Tree Element—Click Browse to launch the SAP Destination dialog box to locate the monitoring tree element for the SAP system.
- Context—The CCMS MTE context for the SAP system that will be monitored by this workflow. Enter a wildcard (*) to monitor all servers.
- Object name—The object in SAP that will be monitored by this workflow (for example, the CPU in your host system, the database, and SAP services, such as background processing).
- Short name—Short text that is assigned to the MTE class.
- MTE class—The MTE class in SAP for the monitoring tree element.
- Alert Color—CCMS alerts are assigned a color based on the severity of the alert (Red, Yellow, Green, Unknown).
Step 4![]() Click the Target tab to specify the target on which to monitor for changes that will trigger the process.
Click the Target tab to specify the target on which to monitor for changes that will trigger the process.
Step 5![]() Click the Conditions tab to include special conditions for when the event log trigger will be applied.
Click the Conditions tab to include special conditions for when the event log trigger will be applied.
Step 6![]() Click the Knowledge Base Article tab to add a knowledge base article.
Click the Knowledge Base Article tab to add a knowledge base article.
Step 7![]() Click OK to complete the procedure.
Click OK to complete the procedure.
Creating a Variable Updated Trigger
Use the Variable Updated Properties trigger to specify the changed variable value to use as a trigger to execute a process. This criteria determines the values that must be met before the process executes.
Step 1![]() Click the Triggers tab, then click New > Variable Updated.
Click the Triggers tab, then click New > Variable Updated.
Step 2![]() Click the General tab and enter the general information for the trigger.
Click the General tab and enter the general information for the trigger.
Step 3![]() Click the Conditions tab to include special conditions for when the event log trigger will be applied.
Click the Conditions tab to include special conditions for when the event log trigger will be applied.
Step 4![]() Click OK to complete the procedure.
Click OK to complete the procedure.
Adding Trigger Logic to Process Workflows
You can check the attributes of a trigger in a process, so that if one process has multiple triggers (such as started by user, started by parent process, and a trigger from an AMQP message), you can check which of these events occurred and branch the execution accordingly. The properties of the event that triggered the process are available in the process workflow using reference control.
Correlating Events
Process Orchestrator contains a technology called Correlex that allows events that match data in the workflow (such as a trigger) to be correlated. Process Orchestrator’s event correlation capabilities are real time, in memory, geared towards typical IT staff, not programmers, and can be combined with active probing and action activities to leverage correlated data.
Process Orchestrator’s correlation activities can be placed anywhere in a workflow and reference any data from prior workflow steps. It is common for workflows to capture diagnostic data to perform decision tree branching before they correlate other events. A workflow might:
- Probe the system to see if a service is up.
- Test system performance.
- Look up configuration to find a relationship that is not evident in events themselves and then use that new information to capture events.
Process Orchestrator's process workflows can include activities other than correlations to capture supplemental non-event data in real time that might be gone before the end of a classic event correlation time window.
For example, assume there are two events, A and B, and there is a need to handle things one way when only A occurs, and another when A and B happen together. In correlation, a time window is required; if A occurs, it will not be clear whether A and B both occur until the end of the time window. So the results of the correlation might not be able to publish the results until sometime after A occurs. But with complex enterprise systems, often issues can be fleeting. There is a need to capture data right when a condition occurs or it might be gone; in other words, the tool might miss event A while looking for event B. Too often for difficult issues, troubleshooting data is not available at the time the operator is notified or some correlation response script occurs.
In Process Orchestrator, when event A triggers the workflow, the workflow can first focus on data capture, then move on to correlation. In this way Process Orchestrator has at its disposal data that is more real-time, and more complete, than correlation has previously allowed, which means that analysis in Process Orchestrator workflows can be more sophisticated. The workflow can solve a superset of cases compared to traditional correlation, and the data presented to operators is more complete and accurate.
This capability is exposed through Correlate activities. For example, the Correlate Windows Events activity allows the correlation of related events from the Windows Event Logs.
Process Orchestrator provides Correlate activities that correspond to many types of supported triggers. Typically, if Process Orchestrator provides a trigger, it will also provide a correlation activity, though this is not explicitly required.
Figure 11-1 A Correlate Activity
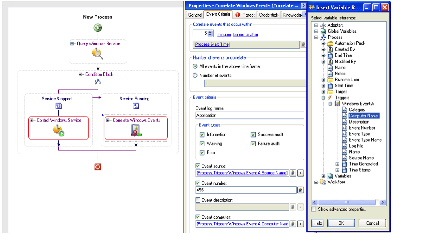
Correlate activities have several key pieces of data that specify the events to find:
- The time window in which the event can occur
- The number of events to match. If a number is specified, and when the process workflow execution gets to the correlate activity that number of events has already occurred within the time window, the Correlate activity will immediately match. If not, the activity will block waiting for those events to occur. If all is specified, the activity will wait until the end of the window and then return the results.
- The event criteria. This presents fields for filtering that type of event and is specific to the event type and adapter.
Events that match a Correlate activity are available to the later steps in the workflow and are published in the automation summary.
From a technology perspective, the server implementation:
- Allows activities to complete in real time. If you wait for one event and a matching event arrives, the activity will complete immediately rather than waiting until the end of the time window.
- Handles cases where event arrival might precede process execution of the correlation node. A process might not even be executing when an event arrives; it could be triggered later and look retrospectively for matching events. The server must cache data given its knowledge of Correlate activities in process definitions so it is ready to provide matched events should a Correlate activity execute later.
- Allows that correlation activities may never run due to untriggered workflows or workflow logic taking a different flow.
- Performs intelligent event caching and garbage collection based on process definitions.
Creating Correlate Event Activities
Use a Correlate activity to check whether an event occurred.
Step 1![]() In the Process Editor, choose Toolbox > Activities, enter correlate in the Filter by Name text box, then select the correlate activity for the specific event you want to collect.
In the Process Editor, choose Toolbox > Activities, enter correlate in the Filter by Name text box, then select the correlate activity for the specific event you want to collect.
Step 2![]() On the Correlate activity property page, click the General tab and enter the appropriate information.
On the Correlate activity property page, click the General tab and enter the appropriate information.
Step 3![]() Click the Event Criteria tab and specify the required event properties for the activity.
Click the Event Criteria tab and specify the required event properties for the activity.
Step 4![]() Click Additional properties to match and specify the appropriate information.
Click Additional properties to match and specify the appropriate information.
The Expression arrow displayed to the right of the Reference tool indicates that a wildcard expression is available.
Step 5![]() Click Save
Click Save  to complete the activity definition.
Step 6![]() To view the correlated event results:
To view the correlated event results:
a.![]() Choose Operations > Activity Views, highlight the correlate activity instance, right-click and choose Properties.
Choose Operations > Activity Views, highlight the correlate activity instance, right-click and choose Properties.
b.![]() Click the Correlated Events tab to view the alerts collected by the correlate activity.
Click the Correlated Events tab to view the alerts collected by the correlate activity.
Integrating Using the Advanced Message Queuing Protocol (AMQP)
Use AMQP to create Process Orchestrator triggers for events that occur out on the IT landscape for which Cisco does not have adapters. For example, to trigger a Process Orchestrator process in response to a syslog event:
Step 1![]() Set up an AMQP queue/exchange with a feed from an off-the-shelf component such as this: https://github.com/bkjones/bevis.
Set up an AMQP queue/exchange with a feed from an off-the-shelf component such as this: https://github.com/bkjones/bevis.
Step 2![]() Set up the IT landscape elements (application) to post messages to the newly created queue.
Set up the IT landscape elements (application) to post messages to the newly created queue.
Step 3![]() Set up a Process Orchestrator trigger from the queue/exchange.
Set up a Process Orchestrator trigger from the queue/exchange.
Debugging Process Trigger Instances
Use the Process Editor to view the process triggers. The Triggers tab in the Properties panel displays the triggers associated with the process and each trigger’s target.
To debug process trigger instances:
- Review the product's auditing log (choose Operations > Auditing > System) for any errors that the server or adapters might have experienced while monitoring for an event.
- If a process contains a trigger, use the Process Editor to view the trigger criteria that the adapter will be monitoring. In the Process Instance view, you can see the specific occurrence of the trigger that caused the specific process instance to execute.
One debugging technique is to create a new separate process that triggers from the same event as the process you are trying to debug, and set the trigger criteria to include all events with no filters. You can then monitor the operations views to see instances of the process which launch, and look at their trigger attributes to see all events. Be sure to delete these debugging processes when you are done diagnosing your problem.
Queue Resources
Think of queues as the same thing as Customs waiting area when you travel internationally. Like Customs, there is both a maximum number for going through queue and a maximum number waiting to go through the queue, or the “waiting area.” A “queue block” is the equivalent of a person going through Customs.
There are two types of Queue Resources:
–![]() Maximum concurrent executions is 1
Maximum concurrent executions is 1
–![]() Maximum entries in the queue is 1000
Maximum entries in the queue is 1000
The two values and the resource name or display name are read–only. There is only one Default System Queue Resource in a Process Orchestrator system.
–![]() Maximum concurrent executions is 1 or more
Maximum concurrent executions is 1 or more
–![]() Maximum entries in queue is 1 or more.
Maximum entries in queue is 1 or more.
–![]() You can modify the two values and the resource name or display name.
You can modify the two values and the resource name or display name.
–![]() You can create any number of User Defined Queue Resources with any maximum concurrent executions and maximum entry values.
You can create any number of User Defined Queue Resources with any maximum concurrent executions and maximum entry values.

Note![]() You can have different maximum allowed entries and maximum allowed in queue for different Queue Resources.
You can have different maximum allowed entries and maximum allowed in queue for different Queue Resources.
The Process Editor Toolbox uses an object called Queue for creating or adding queues. For more information on using the Process Orchestrator Toolbox and creating processes, see Authoring Task Activities.
Creating a Queue Block
Think of a “queue block” as the equivalent of a person going through the line in Customs.
Step 1![]() Access the Queue Block Properties page.
Access the Queue Block Properties page.
Step 2![]() Enter a Queue Block Name.
Enter a Queue Block Name.
Step 3![]() Select a Queue Resource:
Select a Queue Resource:
–![]() Select either a Queue Block Resource Name, or
Select either a Queue Block Resource Name, or
–![]() Select a Queue Resource Name (User defined or default).
Select a Queue Resource Name (User defined or default).
Note![]() The Queue Block searches for a user defined queue resource that matches the given name. If the name does not exist, the default system queue resource is used.
The Queue Block searches for a user defined queue resource that matches the given name. If the name does not exist, the default system queue resource is used.
Step 4![]() Select a Priority level.
Select a Priority level.
Step 5![]() Enter any optional Notes as needed.
Enter any optional Notes as needed.
Step 6![]() Click OK to save your work and close this page.
Click OK to save your work and close this page.
For more information on Queue Resources, see Queue Resources
Creating a Queue Resource
You can create one or many, as well as parallel queues and sequential queues in the same queue block.
Step 1![]() Go to Definitions > Queue Resources.
Go to Definitions > Queue Resources.
Step 2![]() On the Properties screen, enter a Display Name.
On the Properties screen, enter a Display Name.
Step 4![]() Select the Maximum Allowed Entries.
Select the Maximum Allowed Entries.
Step 5![]() Select the Maximum Allowed Entries Waiting on Queue.
Select the Maximum Allowed Entries Waiting on Queue.
Step 6![]() Enter an optional Description.
Enter an optional Description.
 Feedback