- Preface
- Product Overview
- Graphical User Interface
- Device and Subdevice Manager
- User Account Manager
- Configuration and Image Update Jobs Manager
- Groups
- Namespace Manager
- Query Manager
- Data Manager
- Directory Manager
- Parameter Manager
- Templates
- Security Manager
- Log Manager
- Service Manager
- Bulk Data Manager
- Email Manager
- Image Service
- Upgrade or Downgrade Cisco IOS Image
- Backup and Restore
- PIX Firewall Device Support
- IMGW Device Module Development Toolkit
- Troubleshooting
- Software Licenses and Acknowledgements
Bulk Data Manager
To access Bulk Data management tasks, log into the system (see "Logging In" section on page 2-1). Then, from the Home page, click the Tools tab. The Tools page appears.
From the Tools page, click Bulk Data Mgr. The Bulk Data Page appears showing:
•![]() Upload Bulk Data
Upload Bulk Data
•![]() Create Sample Data
Create Sample Data
XML DTD
The following example shows the Document Type Definition (DTD) for the XML bulk upload:
<?xml version="1.0" encoding="utf-8"?>
<!ELEMENT cns-bulk-upload (cns-element-data)>
<!ATTLIST cns-bulk-upload
stop-on-error (true | false) "false"
>
<!ELEMENT cns-element-data ( NSM-DATA | IMGW-DATA | IMAGE-DATA)>
<!ELEMENT IMGW-DATA (imgw-device*)>
<!ATTLIST IMGW-DATA
op-type (add) #REQUIRED
>
<!ELEMENT imgw-device (device-id, gateway-id?, device-type, hop-information*)>
<!ELEMENT device-id (#PCDATA)>
<!ELEMENT gateway-id (#PCDATA)>
<!ELEMENT device-type (#PCDATA)>
<!ELEMENT hop-information (hop-type, ip-address?, port?, username?, password?)>
<!ELEMENT hop-type (#PCDATA)>
<!ELEMENT ip-address (#PCDATA)>
<!ELEMENT port (#PCDATA)>
<!ELEMENT username (#PCDATA)>
<!ELEMENT password (#PCDATA)>
<!ELEMENT NSM-DATA (cns-device-container*, cns-device-info*, cns-application-info*,
cns-group-info*)>
<!ATTLIST NSM-DATA
op-type (add) #REQUIRED
validate-data (true | false) #REQUIRED
>
<!ELEMENT cns-device-container (device-container-name+, parent-container?)>
<!-- This tag is to add the sub containers for devices-->
<!ELEMENT device-container-name (#PCDATA)>
<!ELEMENT parent-container (#PCDATA)>
<!-- This is an optional tag that specifies which container the dev. container object is
to be added-->
<!ELEMENT cns-device-info (cns-device-name, cns-extended-attr*, device-container?,
dev-image-information?)>
<!ELEMENT device-container (#PCDATA)>
<!-- This is an optional tag that specifies which container this object is to be added-->
<!ELEMENT cns-device-name (#PCDATA)>
<!ELEMENT cns-extended-attr (#PCDATA)>
<!ELEMENT dev-image-information (image-id, activation-template?, dev-image-info+)>
<!ELEMENT image-id (#PCDATA)>
<!ELEMENT activation-template (#PCDATA)>
<!ELEMENT dev-image-info (image-name, distribution)>
<!ELEMENT image-name (#PCDATA)>
<!ELEMENT distribution ( destination?, location)>
<!ATTLIST distribution
overwrite (yes | no) "no"
erase-flash (yes | no) "no"
activate (true | false) "false"
>
<!ELEMENT destination (#PCDATA)>
<!ELEMENT location (#PCDATA)>
<!ELEMENT cns-application-info (cns-application-name, cns-subject-mapping*,
application-container?)>
<!ELEMENT application-container (#PCDATA)>
<!-- This is an optional tag that specifies which container this object is to be added-->
<!ELEMENT cns-application-name (#PCDATA)>
<!ELEMENT cns-subject-mapping (cns-original-subject, cns-pub-mapping*, cns-sub-mapping*,
cns-pub-default, cns-sub-default, cns-extended-attr*)>
<!ELEMENT cns-original-subject (#PCDATA)>
<!ELEMENT cns-pub-mapping (#PCDATA)>
<!ELEMENT cns-sub-mapping (#PCDATA)>
<!ELEMENT cns-pub-default (#PCDATA)>
<!ELEMENT cns-sub-default (#PCDATA)>
<!ELEMENT cns-group-info (cns-group-name, cns-group-application-name*, cns-group-member*,
cns-extended-attr*, group-container?)>
<!ELEMENT group-container (#PCDATA)>
<!-- This is an optional tag that specifies which container this object is to be added-->
<!ELEMENT cns-group-name (#PCDATA)>
<!ELEMENT cns-group-application-name (#PCDATA)>
<!ELEMENT cns-group-member (#PCDATA)>
<!ATTLIST cns-group-application-name
application-container CDATA #IMPLIED
>
<!ATTLIST cns-group-member
device-container CDATA #IMPLIED
>
<!ATTLIST cns-extended-attr
name CDATA #REQUIRED
>
<!-- Here starts the definition for Image-data-->
<!ELEMENT IMAGE-DATA (image+)>
<!ATTLIST IMAGE-DATA
op-type (add) #REQUIRED
>
<!ELEMENT image (name, image-info)>
<!ELEMENT name (#PCDATA)>
<!ELEMENT image-info (img-name, img-chksum?, hdr-chksum?, software-version?,
system-description?, file-byte-size?, platform-family-name?, img-location*)>
<!ATTLIST image-info
image-type (IOS | pix-image | pdm | other) "IOS"
>
<!ELEMENT img-name (#PCDATA)>
<!ELEMENT img-chksum (#PCDATA)>
<!ELEMENT hdr-chksum (#PCDATA)>
<!ELEMENT file-byte-size (#PCDATA)>
<!ELEMENT system-description (#PCDATA)>
<!ELEMENT platform-family-name (#PCDATA)>
<!ELEMENT software-version (#PCDATA)>
<!ELEMENT img-location (#PCDATA)>
Uploading Bulk Data
Step 1 ![]() From the Bulk Data main menu, click Upload Bulk Data.
From the Bulk Data main menu, click Upload Bulk Data.
The Upload Bulk Data parameters page appears (see Figure 16-1).
Figure 16-1 Upload Bulk Data Parameters
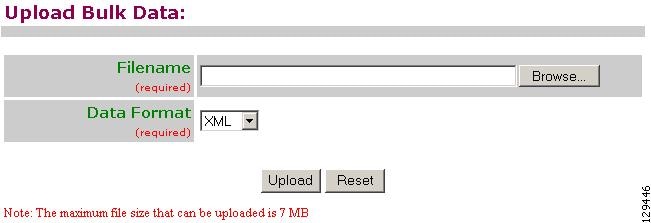
Step 2 ![]() If you know the filename of the data file you want to load, enter it in the Filename field, otherwise use the browse function.
If you know the filename of the data file you want to load, enter it in the Filename field, otherwise use the browse function.
Table 16-1shows the valid values for this field.
|
|
|
|
|---|---|---|
Filename |
Name of the file containing the data to be uploaded. |
a-z |
Step 3 ![]() Use the drop-down arrow to select the Data Format:
Use the drop-down arrow to select the Data Format:
•![]() XML
XML
•![]() CSV
CSV
Step 4 ![]() To clear this task, click Reset.
To clear this task, click Reset.
Step 5 ![]() To upload this data file, click Upload.
To upload this data file, click Upload.
Command-Line Upload of Bulk Data
You can also upload the XML file to the directory using a command line utility as follows:
Step 1 ![]() FTP the bulk upload XML file to the /opt/CSCOdat/scripts/ directory on the host system.
FTP the bulk upload XML file to the /opt/CSCOdat/scripts/ directory on the host system.
Step 2 ![]() Log into the box using Telnet
Log into the box using Telnet
Step 3 ![]() Go to: /opt/CSCOdat/scripts/
Go to: /opt/CSCOdat/scripts/
Step 4 ![]() Run the following command to invoke the bulk upload command line utility:
Run the following command to invoke the bulk upload command line utility:
./upload.sh <xml filename>
For example: ./upload.sh my_bulk_data.xml
This uploads the data to the LDAP directory.
Using Data Converter Utility
There is a data converter utility that you can use to convert bulk upload data on a system with a release prior to 2.0. This will allow you to do a bulk upload of data to Cisco Configuration Engine, 2.0.
You can find this utility in <install base dir>/ConfigEngine/CSCOdat/XMLTransform.
Creating Sample Data
Even though the DTD (see "XML DTD" section) outlines the structure of the input XML file, it does not convey the information about what values should be given for each tag. By looking at the sample data files in this section, you can get an idea of how the data should be arranged in the Bulk Upload XML file.
Step 1 ![]() From the Bulk Data main menu, click Add Bulk Data.
From the Bulk Data main menu, click Add Bulk Data.
The Upload Bulk Data page appears (see Figure 16-2).
Figure 16-2 Create Sample Data Page
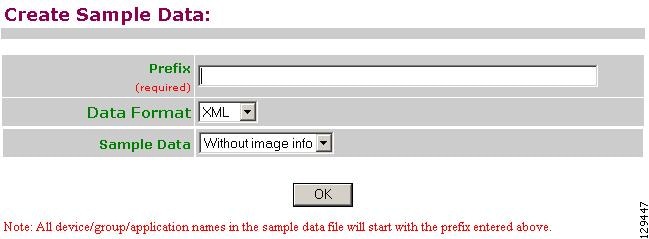
Step 2 ![]() Enter the prefix name for this sample in the Prefix field.
Enter the prefix name for this sample in the Prefix field.
Table 16-2 shows valid values for these fields.
Step 3 ![]() Select Sample Data.
Select Sample Data.
Step 4 ![]() To create this sample, click OK.
To create this sample, click OK.
NSM Data Sample
The following example shows an NSM data sample for bulk upload:
<?xml version="1.0" encoding="UTF-8" ?>
<!DOCTYPE cns-bulk-upload (View Source for full doctype...)>
- <cns-bulk-upload stop-on-error="false" version="1.5">
- <cns-element-data>
- <NSM-DATA op-type="add" validate-data="false">
- <cns-device-info dev-type="other">
<cns-device-name>pista1Device1</cns-device-name>
<cns-extended-attr
name="IOSconfigtemplate">DemoRouter.cfgtpl</cns-extended-attr>
<cns-extended-attr name="IOSConfigID">pista1Device1</cns-extended-attr>
<cns-extended-attr name="IOSEventID">pista1Device1</cns-extended-attr>
</cns-device-info>
- <cns-device-info dev-type="other">
<cns-device-name>pista1Device2</cns-device-name>
<cns-extended-attr
name="IOSconfigtemplate">DemoRouter.cfgtpl</cns-extended-attr>
<cns-extended-attr name="IOSConfigID">pista1Device2</cns-extended-attr>
<cns-extended-attr name="IOSEventID">pista1Device2</cns-extended-attr>
</cns-device-info>
- <cns-device-info dev-type="other">
<cns-device-name>pista1Device3</cns-device-name>
<cns-extended-attr
name="IOSconfigtemplate">DemoRouter.cfgtpl</cns-extended-attr>
<cns-extended-attr name="IOSConfigID">pista1Device3</cns-extended-attr>
<cns-extended-attr name="IOSEventID">pista1Device3</cns-extended-attr>
</cns-device-info>
- <cns-device-info dev-type="imgw">
<cns-device-name>pista1Device4</cns-device-name>
<cns-extended-attr
name="IOSconfigtemplate">DemoRouter.cfgtpl</cns-extended-attr>
<cns-extended-attr name="IOSConfigID">pista1Device4</cns-extended-attr>
<cns-extended-attr name="IOSEventID">pista1Device4</cns-extended-attr>
- <imgw-data>
<gateway-id>pista1IMGWGatewayID4</gateway-id>
<device-type>IOS</device-type>
<simulation-agent>CONFIGAGENT</simulation-agent>
- <hop-information>
<hop-type>IOS_LOGIN</hop-type>
<ip-address>0.0.0.0</ip-address>
<port>0000</port>
<username>pista1usr4</username>
<password>pista1pwd4</password>
</hop-information>
- <hop-information>
<hop-type>IOS_LOGIN</hop-type>
<ip-address>0.0.0.0</ip-address>
<port>0000</port>
<username>pista1user4</username>
<password>pista1passwd4</password>
</hop-information>
</imgw-data>
</cns-device-info>
- <cns-device-info dev-type="imgw">
<cns-device-name>pista1Device5</cns-device-name>
<cns-extended-attr
name="IOSconfigtemplate">DemoRouter.cfgtpl</cns-extended-attr>
<cns-extended-attr name="IOSConfigID">pista1Device5</cns-extended-attr>
<cns-extended-attr name="IOSEventID">pista1Device5</cns-extended-attr>
- <imgw-data>
<gateway-id>pista1IMGWGatewayID5</gateway-id>
<device-type>IOS</device-type>
<simulation-agent>IMAGEAGENT</simulation-agent>
- <hop-information>
<hop-type>IOS_LOGIN</hop-type>
<ip-address>0.0.0.0</ip-address>
<port>0000</port>
<username>pista1usr5</username>
<password>pista1pwd5</password>
</hop-information>
- <hop-information>
<hop-type>IOS_LOGIN</hop-type>
<ip-address>0.0.0.0</ip-address>
<port>0000</port>
<username>pista1user5</username>
<password>pista1passwd5</password>
</hop-information>
</imgw-data>
</cns-device-info>
- <cns-application-info>
<cns-application-name>pista1TestApp</cns-application-name>
- <cns-subject-mapping>
<cns-original-subject>pista1TestApp.Event1</cns-original-subject>
<cns-pub-mapping>pista1TestApp.Event1.cns-pub-mapping</cns-pub-mapping>
<cns-sub-mapping>pista1TestApp.Event1.cns-sub-mapping</cns-sub-mapping>
<cns-pub-default>1</cns-pub-default>
<cns-sub-default>1</cns-sub-default>
</cns-subject-mapping>
- <cns-subject-mapping>
<cns-original-subject>pista1TestApp.Event2</cns-original-subject>
<cns-pub-mapping>pista1TestApp.Event2.cns-pub-mapping</cns-pub-mapping>
<cns-sub-mapping>pista1TestApp.Event2.cns-sub-mapping</cns-sub-mapping>
<cns-pub-default>1</cns-pub-default>
<cns-sub-default>1</cns-sub-default>
</cns-subject-mapping>
</cns-application-info>
- <cns-group-info>
<cns-group-name>/pista1TestApp/pista1Group1</cns-group-name>
<cns-group-member type="DEV">pista1Device1</cns-group-member>
<cns-group-member type="GRP">pista1SubGroup1</cns-group-member>
</cns-group-info>
- <cns-group-info>
<cns-group-name>/pista1TestApp/pista1Group2</cns-group-name>
<cns-group-member type="DEV">pista1Device1</cns-group-member>
<cns-group-member type="DEV">pista1Device2</cns-group-member>
<cns-group-member type="GRP">pista1SubGroup2</cns-group-member>
</cns-group-info>
</NSM-DATA>
</cns-element-data>
</cns-bulk-upload>
NSM Data Sample With Image Information
The following example shows an NSM data sample with image information:
<?xml version="1.0" encoding="UTF-8" ?>
<!DOCTYPE cns-bulk-upload (View Source for full doctype...)>
- <cns-bulk-upload stop-on-error="false" version="1.5">
- <cns-element-data>
- <IMAGE-DATA op-type="add" validate-data="false">
- <image>
<name>pista2IMAGEObj1</name>
- <image-info image-type="IOS">
<img-name>c7200-js-mz1</img-name>
<img-chksum>0x1256faf245</img-chksum>
<software-version>12.2(8)T6</software-version>
<system-description>Cisco Network Operating System</system-description>
<file-byte-size>1040</file-byte-size>
<platform-family-name>7200</platform-family-name>
<img-location>tftp://test.com/c7200-js-mz1</img-location>
</image-info>
</image>
- <image>
<name>pista2IMAGEObj2</name>
- <image-info image-type="IOS">
<img-name>c7200-js-mz2</img-name>
<img-chksum>0x1256faf245</img-chksum>
<software-version>12.2(8)T6</software-version>
<system-description>Cisco Network Operating System</system-description>
<file-byte-size>1040</file-byte-size>
<platform-family-name>7200</platform-family-name>
<img-location>tftp://test.com/c7200-js-mz2</img-location>
</image-info>
</image>
- <image>
<name>pista2IMAGEObj3</name>
- <image-info image-type="IOS">
<img-name>c7200-js-mz3</img-name>
<img-chksum>0x1256faf245</img-chksum>
<software-version>12.2(8)T6</software-version>
<system-description>Cisco Network Operating System</system-description>
<file-byte-size>1040</file-byte-size>
<platform-family-name>7200</platform-family-name>
<img-location>tftp://test.com/c7200-js-mz3</img-location>
</image-info>
</image>
- <image>
<name>pista2IMAGEObj4</name>
- <image-info image-type="IOS">
<img-name>c7200-js-mz4</img-name>
<img-chksum>0x1256faf245</img-chksum>
<software-version>12.2(8)T6</software-version>
<system-description>Cisco Network Operating System</system-description>
<file-byte-size>1040</file-byte-size>
<platform-family-name>7200</platform-family-name>
<img-location>tftp://test.com/c7200-js-mz4</img-location>
</image-info>
</image>
- <image>
<name>pista2IMAGEObj5</name>
- <image-info image-type="IOS">
<img-name>c7200-js-mz5</img-name>
<img-chksum>0x1256faf245</img-chksum>
<software-version>12.2(8)T6</software-version>
<system-description>Cisco Network Operating System</system-description>
<file-byte-size>1040</file-byte-size>
<platform-family-name>7200</platform-family-name>
<img-location>tftp://test.com/c7200-js-mz5</img-location>
</image-info>
</image>
</IMAGE-DATA>
</cns-element-data>
</cns-bulk-upload>
NOTES
•![]()
For Bulk Upload of NSM devices with Image Info, make sure that the image objects referenced in the
dev-image-info
element tag already exist.
•![]()
The location given should be one of the multiple image locations specified with the image object.
•![]()
If there are errors while adding the devices, please check the error file provided as a result of the Upload operation. There can be an exception given as CISException, which points to the CISDevice creation failed, which could have occurred if you had ignored the checklist. In this case, just recheck the information provided in the
dev-image-information
element tag. Correct the file and upload it again.
Image Sample Data
The following example shows image data sample:
<?xml version="1.0" encoding="UTF-8" ?>
<!DOCTYPE cns-bulk-upload (View Source for full doctype...)>
- <cns-bulk-upload stop-on-error="false" version="1.5">
- <cns-element-data>
- <IMAGE-DATA op-type="add" validate-data="false">
- <image>
<name>pista3IMAGEObj1</name>
- <image-info image-type="IOS">
<img-name>c7200-js-mz1</img-name>
<img-chksum>0x1256faf245</img-chksum>
<software-version>12.2(8)T6</software-version>
<system-description>Cisco Network Operating System</system-description>
<file-byte-size>1040</file-byte-size>
<platform-family-name>7200</platform-family-name>
<img-location>tftp://test.com/c7200-js-mz1</img-location>
</image-info>
</image>
- <image>
<name>pista3IMAGEObj2</name>
- <image-info image-type="IOS">
<img-name>c7200-js-mz2</img-name>
<img-chksum>0x1256faf245</img-chksum>
<software-version>12.2(8)T6</software-version>
<system-description>Cisco Network Operating System</system-description>
<file-byte-size>1040</file-byte-size>
<platform-family-name>7200</platform-family-name>
<img-location>tftp://test.com/c7200-js-mz2</img-location>
</image-info>
</image>
- <image>
<name>pista3IMAGEObj3</name>
- <image-info image-type="IOS">
<img-name>c7200-js-mz3</img-name>
<img-chksum>0x1256faf245</img-chksum>
<software-version>12.2(8)T6</software-version>
<system-description>Cisco Network Operating System</system-description>
<file-byte-size>1040</file-byte-size>
<platform-family-name>7200</platform-family-name>
<img-location>tftp://test.com/c7200-js-mz3</img-location>
</image-info>
</image>
- <image>
<name>pista3IMAGEObj4</name>
- <image-info image-type="IOS">
<img-name>c7200-js-mz4</img-name>
<img-chksum>0x1256faf245</img-chksum>
<software-version>12.2(8)T6</software-version>
<system-description>Cisco Network Operating System</system-description>
<file-byte-size>1040</file-byte-size>
<platform-family-name>7200</platform-family-name>
<img-location>tftp://test.com/c7200-js-mz4</img-location>
</image-info>
</image>
- <image>
<name>pista3IMAGEObj5</name>
- <image-info image-type="IOS">
<img-name>c7200-js-mz5</img-name>
<img-chksum>0x1256faf245</img-chksum>
<software-version>12.2(8)T6</software-version>
<system-description>Cisco Network Operating System</system-description>
<file-byte-size>1040</file-byte-size>
<platform-family-name>7200</platform-family-name>
<img-location>tftp://test.com/c7200-js-mz5</img-location>
</image-info>
</image>
</IMAGE-DATA>
</cns-element-data>
</cns-bulk-upload>
 Feedback