- Preface
- Overview
- Before Installing Broadband Access Center
- Installation of Broadband Access Center on Solaris
- Installation of Broadband Access Center on Linux
- Post-Installation Activities
- Setting Up a Device Provisioning Engine
- Configuring the Syslog Utility to Receive Cisco BAC Alerts
- Network Registrar Configuration File Example
- Installation Worksheet
- Index
Post-Installation Activities
This chapter describes the tasks that you perform after installing Cisco Broadband Access Center (Cisco BAC):
Licensing Cisco BAC
This Cisco BAC release enables licensing using a service file. These licenses allow you to provision a set number of services using Cisco BAC. Each service translates to three IP addresses provisioned in the system; thus, a 10,000 service license equates to 30,000 IP addresses. The license file that you receive will contain the number of IP addresses that are licensed, not the number of services that you purchased.
Cisco BAC allows permanent and evaluation licenses in the RDU at the same time. It allows you to install an evaluation license along with your existing permanent license. The evaluation license expires in a stipulated time period.

You still require separate licenses for the following Cisco BAC components:
•![]() The DPE
The DPE
•![]() The KDC, if you configure your network to support voice technology
The KDC, if you configure your network to support voice technology
The DPE license is contained within the license file and licenses the DPE when you install the license file from the administrator user interface. The KDC license continues to be proprietary, as in previous Cisco BAC releases, and is licensed during Cisco BAC installation.
Obtaining a Permanent License
To request a permanent license, follow the procedure that Figure 1 depicts.
Figure 5-1
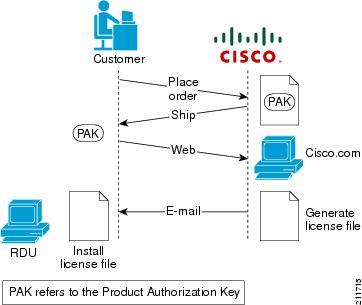
License Claim Process

Note ![]() With FlexLM licensing, you receive a Product Authorization Key (PAK) for each software CD package that you purchase. The PAK is affixed as a sticky label on the Software License Claim Certificate card that is included in your CD-ROM package.
With FlexLM licensing, you receive a Product Authorization Key (PAK) for each software CD package that you purchase. The PAK is affixed as a sticky label on the Software License Claim Certificate card that is included in your CD-ROM package.
To obtain a permanent license:
Step 1 ![]() Keep your PAK handy and access http://www.cisco.com/go/license. You must have a valid Cisco.com account to log in to this site.
Keep your PAK handy and access http://www.cisco.com/go/license. You must have a valid Cisco.com account to log in to this site.
Step 2 ![]() The Product License Registration website appears.
The Product License Registration website appears.
Step 3 ![]() Complete the steps detailed at the Product License Registration page.
Complete the steps detailed at the Product License Registration page.
Note ![]() During license registration, submit each PAK that you have received. For each PAK that you submit, a license file is generated and sent to you via e-mail.
During license registration, submit each PAK that you have received. For each PAK that you submit, a license file is generated and sent to you via e-mail.
Step 4 ![]() Once you receive your license file, install it using the procedure described in Installing Your License File.
Once you receive your license file, install it using the procedure described in Installing Your License File.
Obtaining an Evaluation License
For an evaluation license, contact your Cisco representative, who will generate the necessary key from the Cisco licensing website and e-mail it to you. Once you receive your license file, install it using the procedure described in Installing Your License File.
Installing Your License File
Before installing your license file, ensure that you back up your licenses in case you have to reinstall the Cisco BAC software.
To install your permanent or evaluation license:
Step 1 ![]() Once you receive your license file, save each file to the local system on which you intend to launch your web browser.
Once you receive your license file, save each file to the local system on which you intend to launch your web browser.
Step 2 ![]() Launch your web browser on that system.
Launch your web browser on that system.
Step 3 ![]() Enter the administrator's location using this syntax:
Enter the administrator's location using this syntax:
http://machine_name:port_number/
•![]() machine_name—Identifies the computer on which the RDU is running.
machine_name—Identifies the computer on which the RDU is running.
Note ![]() To access the administrator user interface via HTTP over SSL, also known as HTTPS, enter:
To access the administrator user interface via HTTP over SSL, also known as HTTPS, enter:https://machine_name:port_number/
•![]() port_number—Identifies the computer port on which the server side of the administrator application runs. The default port number is:
port_number—Identifies the computer port on which the server side of the administrator application runs. The default port number is:
–![]() 8100 for HTTP over TCP
8100 for HTTP over TCP
–![]() 8443 for HTTP over SSL
8443 for HTTP over SSL
The main login page appears.
Step 4 ![]() Enter the default username (admin) and password (changeme).
Enter the default username (admin) and password (changeme).
Note ![]() If you are logging in for the first time, the Change Password screen appears. Enter a new password and confirm it.
If you are logging in for the first time, the Change Password screen appears. Enter a new password and confirm it.
Step 5 ![]() Click Login.
Click Login.
The Main Menu page appears.
Step 6 ![]() Click the license link at the top of the Main Menu page, or choose Configuration > License Keys.
Click the license link at the top of the Main Menu page, or choose Configuration > License Keys.
The Manage License Keys page appears.
Step 7 ![]() In the License File field, enter the complete path to the location of the license file on your local system. Remember to include the name of the license file while specifying the pathname.
In the License File field, enter the complete path to the location of the license file on your local system. Remember to include the name of the license file while specifying the pathname.
Or, click Browse and navigate to the license file.
Step 8 ![]() Click Add. The details regarding the number of services and the DPEs that you are licensed to use appear.
Click Add. The details regarding the number of services and the DPEs that you are licensed to use appear.
Installing Your KDC License
Obtain a KDC license from your Cisco representative and then install it in the correct directory.
To install the KDC license file (bacckdc.license):
Step 1 ![]() Obtain your license file from your Cisco representative.
Obtain your license file from your Cisco representative.
Step 2 ![]() Log in to the Cisco BAC host as root or non-root.
Log in to the Cisco BAC host as root or non-root.
Step 3 ![]() Change to the <BPR_HOME>/kdc directory.
Change to the <BPR_HOME>/kdc directory.
Step 4 ![]() Copy the license file to this <BPR_HOME>/kdc directory.
Copy the license file to this <BPR_HOME>/kdc directory.
Do not copy KDC license files between operating systems because the transfer process may damage the file.
Step 5 ![]() To restart the KDC server and make the changes take effect, run the bprAgent restart kdc command from the /etc/init.d directory.
To restart the KDC server and make the changes take effect, run the bprAgent restart kdc command from the /etc/init.d directory.
Enabling a Cisco Network Registrar Spoofing DNS Server
A spoofing DNS server redirects all DNS requests to the same IP address. You can enable spoofing to enforce a self-provisioning flow for a new subscriber.
For example, assume that a DNS host is dns.example.com, and has an IP address of 10.10.10.5. Assume also that the web server with the self-provisioning flow is 10.10.10.6.
On the DNS server, set the following parameters in CNR:
nrcmd> zone . delete
nrcmd> zone . create primary dns.example.com postmaster.dns.example.com
nrcmd> zone . addrr * a 10.10.10.6
nrcmd> save
nrcmd> dns reload
When DNS reloads, the changes take effect.
On the DHCP server, set the following parameters in CNR:
nrcmd> policy unprovisioned setoption domain-name-servers 10.10.10.5
nrcmd> policy unprovisioned setoption domain-name example.com
nrcmd> save
nrcmd> dhcp reload
 Feedback