
New and changed information
The following table provides an overview of the significant changes up to this current release. The table does not provide an exhaustive list of all changes or of the new features up to this release.
| Release Version | Feature | Description |
|---|---|---|
|
Nexus Dashboard 4.1.1 |
Enhancements for endpoint security groups (ESGs) and external endpoint groups (EPGs) for ACI fabrics |
Nexus Dashboard added these enhancements for ESGs and EPGs for ACI fabrics.
|
Navigate to Segmentation and Security
Beginning with Nexus Dashboard release 4.1.1, the navigation and workflow for segmentation and security features in Nexus Dashboard ACI fabrics have been enhanced.
To view, edit, or create segmentation and security configurations for an ACI fabric:
-
Navigate to the main Fabrics window.
Manage > Fabrics
-
Locate the ACI fabric where you want to work with segmentation and security.
-
Single-click the appropriate ACI fabric.
The Summary window for that ACI fabric appears, with the Overview tab selected by default.
-
Click Segmentation and Security.
-
Determine the area in segmentation and security where you want to work.
View and manage certificates used by Nexus Dashboard
You can view and manage certificates used by Nexus Dashboard through the Security page.
To access the Security window, navigate to Admin > Users and Security > Security. Use these tabs to configure security in this window:
Security configuration
The Security configuration page allows you to configure authentication session timeouts and security certificates used by your Nexus Dashboard cluster.
-
You must have the keys and certificates you plan to use with Nexus Dashboard already generated.
Typically, this includes the following files:
-
Private key (
nd.key) -
Certificate Authority’s (CA) public certificate (
ca.crt) -
CA-signed certificate (
nd.crt)
Generating these files for self-signed certificates is described in the section "Generating a private key and self-signed certificate" in the Managing Certificates in your Nexus Dashboard.
-
-
We recommend creating a configuration backup of your Nexus Dashboard cluster before making changes to the security configurations.
For more information about backups, see "Backup and Restore" in Backing Up and Restoring Your Nexus Dashboard.
To edit security configuration:
-
Edit security configuration.
-
From the main navigation menu, choose Admin > Users and Security.
-
Click the Security tab.
-
In the main pane, click the Security configuration tab.
-
In the main pane, click the Edit icon.
-
-
In the Edit security configuration screen that opens, update one or more fields as required:
Note that uploading the keys and certificate files is not supported and you will need to paste the information in the following fields.
-
Update the Session timeout.
This field defines the duration of the API tokens with the default duration set to 20 minutes.
-
In the Domain name field, provide your domain.
-
Check the box in the Minimum TSL version: TLSV1.3 field if you want to set the minimum SSL version to TLSV1.3.
The minimum SSL version is set to TLSV1.2 by default. Checking this box to set the minimum version to TLSV1.3 will reject all clients using a TLSV1.2 connection request.
-
To disable Qualtrics integration from the browser at a system wide level, check the box in the Enforce strict content security policy field.
-
Click the SSL Ciphers field and choose any additional cipher suites you want to enable from the drop-down list or click the x icon on an existing cipher suite to remove it.
Cipher suites define algorithms (such as key exchange, bulk encryption, and message authentication code) used to secure a network connection. This field allows you to customize which cipher suites your Nexus Dashboard cluster will use for network communication and disable any undesired suites, such as the less secure TLS1.2 and TLS1.3.
-
In the Key field, provide your private key.
-
In the RSA Certificate field, provide the CA-signed or self-signed certificate.
-
In the Root Certificate field, provide the CA’s public certificate.
-
(Optional) If your CA provided an Intermediate Certificate, provide it in the Intermediate Certificate field.
-
Click Save to save the changes.
After you save your changes, the GUI will reload using the new settings.
-
Violation action
The Violation action window shows the number of unsuccessful attempted login actions.
To edit the information that is provided in the Violation action window:
-
From the main navigation menu, choose Admin > Users and Security.
-
Click the Security tab.
-
In the main pane, click the Violation action tab.
Information on unsuccessful attempted login actions is displayed.
-
Click Edit.
The Login attempt action window appears.
-
Edit the Login attempt action settings, if necessary.
-
In the Maximum login attempts field, set the maximum number of login attempts until the maximum action is triggered.
The default entry is 0.
-
In the Maximum password length field, set the maximum password length.
The default entry is 8.
-
In the Maximum login attempted action field, choose the action that will take place when the number of maximum login attempts has been surpassed.
-
In the Block for field, set the amount of time, in seconds, minutes, or hours, that a login block will take place when the number of maximum login attempts has been surpassed.
-
In the Block admin for field, set the amount of time, in seconds, minutes, or hours, that an admin login block will take place when the number of maximum login attempts has been surpassed.
-
-
-
Click Save.
Security domains
A restricted security domain allows an administrator to prevent a group of users from viewing or modifying any objects created by a group of users in a different security domain, even when users in both groups have the same assigned privileges.
For example, an administrator in restricted security domain (domain1) will not be able to see fabrics, services, cluster or user configurations in another security domain (domain2).
Note that a user will always have read-only visibility to system-created configurations for which the user has proper privileges. A user in a restricted security domain can be given a broad level of privileges within that domain without the concern that the user could inadvertently affect another group’s physical environment.
To create a security domain:
-
Create a new security domain.
-
From the main navigation menu, choose Admin > Users and Security.
-
Click the Security tab.
-
In the main pane, click the Security domains tab.
-
In the main pane, click Create security domain.
-
-
In the Create security domain screen that opens, provide the domain details.
-
Provide the Name for the domain.
-
(Optional) Provide a description for the domain.
-
Click Save to save the domain.
-
JWT keys
To create a JWT key:
-
From the main navigation menu, choose Admin > Users and Security.
-
Click the Security tab.
-
In the main pane, click the JWT keys tab.
-
Click Create JWT key.
The Create JWT key window appears.
-
Enter a service name for the JWT key in the Service name field.
-
Enter a JWT API key in the JWT API key field.
-
Enter a JWT public key in the JWT public key field.
-
Enter the remote ID claim information in the Remote ID claim field.
-
Click Create.
Credentials store
You can add an external Credentials store that allows you to store and retrieve network credentials from an external vault, such as the CyberArk vault, instead of a local storage system.
To add a credentials store:
-
From the main navigation menu, choose Admin > Users and Security.
-
Click the Security tab.
-
In the main pane, click the Credentials store tab.
-
Click Add credential store.
The Edit credential store page appears.
-
In the Store type field, choose a store type, such as CyberArk.
-
Enter the necessary information in the remaining fields, depending on the choice that you made in the Store type field.
For example, if you chose CyberArk in the Store type field, make the necessary choices in the following fields:
-
In the CyberArk CCP URL field, enter the CyberArk Central Credential Provider (CCP) URL.
For more information, see Central Credential Provider (CCP).
-
In the Certificate name field, choose the appropriate certificate from the dropdown list.
The Certificate name field lists the certificates that you configured in Admin > Certificate Management.

Ensure that the system certificate you configured is mapped to the CyberArk feature to use the certificate name here.
For more information on system certificates, see Managing Certificates in your Nexus Dashboard.
-
-
Click Resync/Save.
Validating peer certificates
You can import a fabric controller’s Certificate Authority (CA) root certificate chain into Nexus Dashboard. This allows you to verify that the certificates of hosts to which your Nexus Dashboard connects (such as fabric controllers) are valid and are signed by a trusted Certificate Authority (CA) when you add the fabrics.
Exporting a certificate chain from Cisco APIC
-
Log in to your Cisco APIC.
-
Check which key ring is being used for management access:
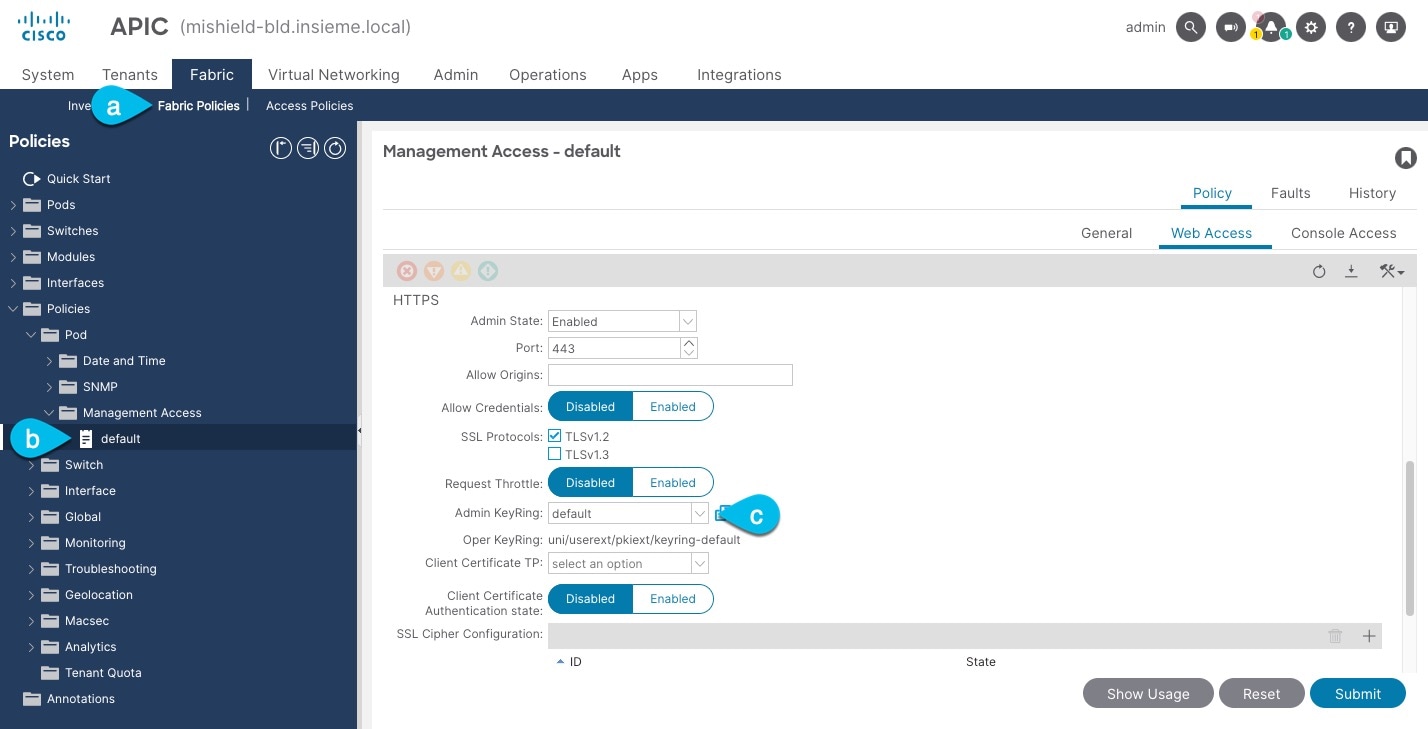
-
In the top navigation bar, choose Fabric > Fabric Policies.
-
In the left navigation menu, choose Policies > Pod> Management Access.
-
In the main pane, note the name in the Admin KeyRing field.
In the above example, the
defaultkey ring is being used. However, if you created a custom key ring with a custom certificate chain, the name of that key ring would be listed in the Admin KeyRing field.Custom security configuration for Cisco APIC is described in detail in Cisco APIC Security Configuration Guide for your release.
-
-
Export the certificate used by the key ring:
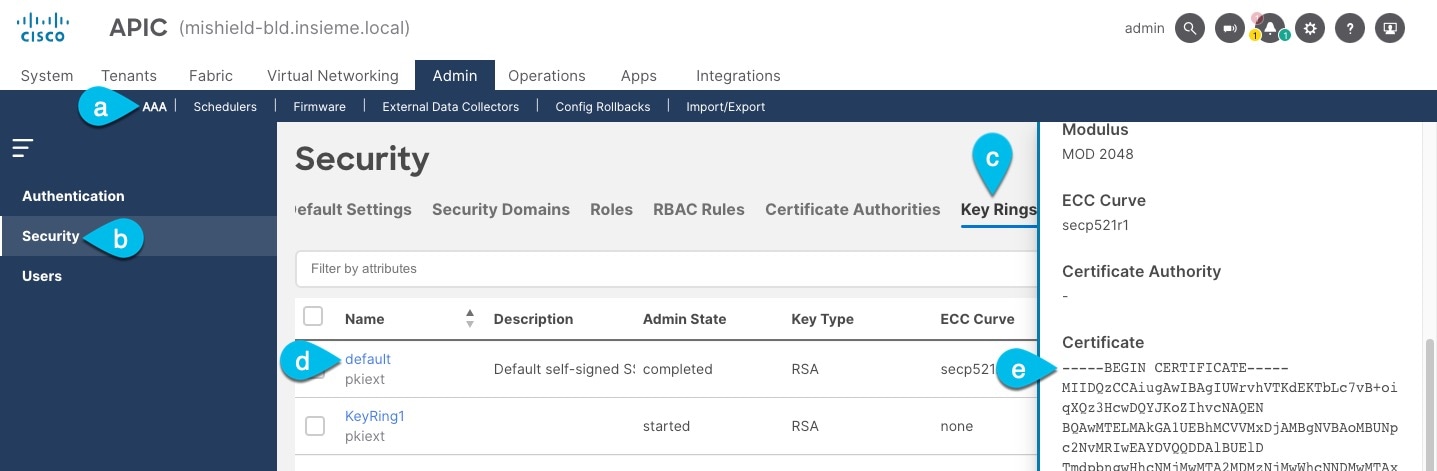
-
In the top navigation bar, choose Admin > AAA.
-
In the left navigation menu, choose Security.
-
In the main pane, choose the Key Rings tab.
-
Click the name of the key ring you found in the previous step and copy the Certificate.
The above example shows the
defaultkey ring from the previous step. However, if you had a custom key ring configured, choose the CA certificate chain used to create the key ring.You must include the
-----BEGIN CERTIFICATE-----and-----END CERTIFICATE-----in the text you copy, for example:-----BEGIN CERTIFICATE----- MIIDQzCCAiugAwIBAgIUWrvhVTKdEKTbLc7vB+oiqXQz3HcwDQYJKoZIhvcNAQEN [...] -----END CERTIFICATE-----
-
Importing certificates into Nexus Dashboard
-
Log in to your Nexus Dashboard where you plan to onboard the fabrics.
-
Import the certificate into Nexus Dashboard.
-
Log in to your Nexus Dashboard where you will onboard the fabrics.
-
From the main navigation menu, choose Admin > Certificate Management.
-
Click the CA Certificates tab.
-
Click Add CA certificate, provide a unique name for the certificate, and paste the certificate chain you copied from your fabric’s controller.
-
-
Proceed with adding the fabric as you typically would, but enable the Verify Peer Certificate option.
Note that if you enable the Verify Peer Certificate option but don’t import the valid certificate, fabric onboarding will fail.
Adding fabrics is described in Creating LAN and ACI Fabrics and Fabric Groups.
Working with tenants
Use the Tenants tab to view segmentation and security information at the tenant level.
-
In the Segmentation and security area, click the Tenants subtab.
-
Review the information in the Tenants window.
The Tenants window shows information on already-configured tenants.
View tenant information
-
Review the information provided in the Tenants window.
The table provides segmentation and security information on individual tenants in the fabric.
Tenants Table Fields and Description Field Description Name
Specifies the name of the tenant.
VRFs
Specifies the VRF that’s associated with the tenant.
ESGs
Shows the number of ESGs (security groups) that are associated with the tenant. Click the number in the ESGs column to bring up a slide-in pane with additional information on the ESGs associated with this tenant.
EPGs
Shows the number of EPGs (networks) that are associated with the tenant. Click the number in the EPGs column to bring up a slide-in pane with additional information on the EPGs associated with this tenant.
Application Profiles
Shows the number of application profiles that are associated with the tenant. Click the number in the Application Profiles column to bring up a slide-in pane with additional information on the application profiles associated with this tenant.
Working with VRFs
Use the VRFs tab to create, edit, delete, attach, detach, import, export, and deploy configurations for VRFs. You can create networks only after creating a VRF except when you use Layer 2 to create a network.
-
In the Segmentation and security area, click the VRFs subtab.
-
Review the information in the VRFs window.
The VRFs window shows information on already-configured VRFs.
View VRF information
-
Review the information provided in the VRFs window.
This table provides information on individual VRFs in the fabric.
VRFs Table Fields and Description Field Description Name
Specifies the name of the VRF.
Click the link in the VRF column to bring up a slide-in pane with additional information:
-
Tenant associated with the VRF.
-
Policy control enforcement preference (direction). The VRF instance (where an ESG is configured) can be configured either in ingress or egress policy enforcement mode.
-
Network profile associated with the VRF.
-
Properties for the VRF, such whether vzAny or preferred groups are used with this VRF.
Tenant
Specifies the tenant that’s associated with the VRF.
ESGs
Shows the number of ESGs (security groups) that are associated with the VRF. Click the number in the ESGs column to bring up a slide-in pane with additional information on the ESGs associated with this VRF.
L3Outs
Shows the number of L3Outs that are associated with the VRF. Click the number in the L3Outs column to bring up a slide-in pane with additional information on the L3Outs associated with this VRF.
EPGs
Shows the number of EPGs (networks) that are associated with the VRF. Click the number in the EPGs column to bring up a slide-in pane with additional information on the EPGs associated with this VRF.
Endpoints
Shows the number of endpoints that are associated with the VRF. Click the number in the Endpoints column to bring up a slide-in pane with additional information on the endpoints associated with this VRF.
Bridge Domains
Shows the number of bridge domains that are associated with the VRF. Click the number in the Bridge Domains column to bring up a slide-in pane with additional information on the bridge domains associated with this VRF.
-
-
Click the gear icon to the right of the table to change the columns in the table.
Click the toggle switch to enable or disable the column options, including these additional options:
-
Description
-
Default security tag
-
-
Click the table header to sort the entries in alphabetical order for the selected parameter.
Working with EPGs (networks)
-
In the Segmentation and security area, click the EPGs (Networks) subtab.
-
Review the information in the EPGs (Networks) window.
The EPGs (Networks) window shows information on already-configured EPGs.
View EPG information
-
Review the information provided in the EPGs (Networks) window.
The table provides information on individual EPGs in the fabric.
EPGs Table Fields and Description Field Description Name
Specifies the name of the EPG. Click the name in the Name column to bring up a slide-in pane with additional information on this EPG.
Tenant
Specifies the tenant that’s associated with the EPG.
Type
Specifies the type of EPG.
Application profile
Specifies the application profile that’s associated with the EPG.
Intra ESG isolation
Specifies the intra ESG isolation setting:
-
Enforced: Blocks communication within the ESG.
-
Unenforced: All endpoints within the same ESG are allowed to communicate freely.
VRF
Specifies the name of the VRF that’s associated with the EPG.
Bridge Domains
Shows the bridge domain that is associated with the EPG.
Inbound contracts
Shows the number of inbound contracts that are associated with the EPG. Click the number in the Inbound contracts column to bring up a slide-in pane with additional information on the inbound contracts associated with this EPG.
Outbound contracts
Shows the number of outbound contracts that are associated with the EPG. Click the number in the Outbound contracts column to bring up a slide-in pane with additional information on the outbound contracts associated with this EPG.
Endpoints
Shows the number of endpoints that are associated with the EPG. Click the number in the Endpoints column to bring up a slide-in pane with additional information on the endpoints associated with this EPG.
-
-
Click the gear icon to the right of the table to change the columns in the table.
Click the toggle switch to enable or disable the column options.
-
Click the table header to sort the entries in alphabetical order for the selected parameter.
Working with security groups (ESGs)
Endpoint Security Groups (ESGs) are a network security component in Cisco Application Centric Infrastructure (ACI). Although endpoint groups (EPGs) provide the network security in Cisco ACI, EPGs have to be associated to a single bridge domain and are used to define security zones within a bridge domain. This is because the EPGs define both forwarding and security segmentation at the same time. The direct relationship between the bridge domain and an EPG limits the possibility of an EPG to span more than one bridge domain. This limitation of EPGs is resolved by using ESG constructs.
An ESG is a logical entity that contains a collection of physical or virtual network endpoints. In addition, an ESG is associated to a single VRF (Virtual Routing and Forwarding) instance instead of a bridge domain. This allows the definition of a security zone that is independent of the bridge domains (the fourth column of Figure 1, illustrates this point). Just as the EPGs divide a bridge domain into security zones, the ESGs divide the VRF instance into security zones.
The EPG policy embeds both forwarding and security logic. For example, an EPG provides not only a security zone based on VLAN, but also a VLAN binding on leaf node interfaces. Also, a contract on the EPG is used to enforce the security and determine which leaf nodes the bridge domain subnet should be deployed on, and which subnets to be leaked to which VRF instance in the case of VRF route leaking (i.e. shared service). On the contrary, an ESG is used only to enforce security using the contracts while the forwarding logics are handled by other components. With an ESG, the routing logic such as bridge domain subnets deployment and VRF route leaking are moved to VRF level. The VLAN binding on leaf node interfaces are still handled at EPG level.
An ESG is a security construct that has certain match criteria to define which endpoint belongs to the ESG, and uses contracts or policies to define the security stance. The match criteria are called the ESG selectors that are based on attributes such as an IPv4 or IPv6 address spanning across bridge domains in the associated VRF instance, or a tag associated to endpoint MAC address.
The contract usage in the ESGs is the same as the EPGs. Endpoints that belong to the same ESG can communicate without the need for a contract. To enable communication between endpoints that belong to different ESGs, you need to configure contracts between the ESGs. For the communication with devices outside of the Cisco ACI fabric, you need to configure a contract between the L3Out external EPG (l3extInstP) and the ESG. You can also use a Layer 4 to Layer 7 service graph in conjunction with a contract between the ESGs. However, contracts between an EPG and an ESG are not supported.
View security group information
-
Review the information provided in the Security groups window.
The table provides information on individual security groups in the fabric.
Security Groups Table Fields and Description Field Description Name
Specifies the name of the ESG. Click the name in the Name column to bring up a slide-in pane with additional information on this ESG.
Admin State
Specifies the admin state of the ESG (active or inactive).
Tenant
Specifies the tenant that’s associated with the ESG.
VRF
Specifies the name of the VRF that’s associated with the ESG.
Application profile
Specifies the application profile that’s associated with the ESG.
Intra ESG isolation
Specifies the intra ESG isolation setting:
-
Enforced: Blocks communication within the ESG.
-
Unenforced: All endpoints within the same ESG are allowed to communicate freely.
Inbound contracts
Shows the number of inbound contracts that are associated with the ESG. Click the number in the Inbound contracts column to bring up a slide-in pane with additional information on the inbound contracts associated with this ESG.
Outbound contracts
Shows the number of outbound contracts that are associated with the ESG. Click the number in the Outbound contracts column to bring up a slide-in pane with additional information on the outbound contracts associated with this ESG.
Endpoints
Shows the number of endpoints that are associated with the ESG. Click the number in the Endpoints column to bring up a slide-in pane with additional information on the endpoints associated with this ESG.
-
-
Click the gear icon to the right of the table to change the columns in the table.
Click the toggle switch to enable or disable the column options.
-
Click the table header to sort the entries in alphabetical order for the selected parameter.
Working with L3Outs
Use the L3Outs tab to view segmentation and security information at the L3Out level.
-
In the Segmentation and security area, click the L3Outs subtab.
-
Review the information in the L3Outs window.
The L3Outs window shows information on already-configured L3Outs.
View L3Out information
-
Review the information provided in the L3Outs window.
The table provides segmentation and security information on individual L3Outs in the fabric.
L3Outs Table Fields and Description Field Description Name
Specifies the name of the L3Out.
Tenant
Specifies the tenant that’s associated with the L3Out.
Type
Specifies the type of L3Out.
VRF
Specifies the VRF that’s associated with the L3Out.
External EPGs
Shows the number of external EPGs that are associated with the L3Out. Click the number in the External EPGs column to bring up a slide-in pane with additional information on the sxternal EPGs associated with this L3Out.
Working with contracts
Security contracts are logical constructs in Nexus Dashboard that represent a set of security rules where each rule is comprised of Direction, Action, and Protocol. Contracts are associated with security groups within a VRF. These associated service contracts are applied to switches where the VRF is attached in the Nexus Dashboard.
Changing the firewall setup from two Application Resource Management (ARM) instances to one may cause service graph deployment failure due to retained old ARM configurations. We recommend removing, modifying, and reattaching the service device to the contract.
Modifying a deployed service device after changing the ARM configuration is restricted. To modify the service device, you must first undeploy the contract or redeploy without the service device.
-
In Segmentation and security, click Security contracts.
-
Review the information in the Security contracts page.
The Security contracts page shows information on already-configured security contracts.
View security contract information
-
Review the information provided in the Security contracts window.
This table provides information on individual security contracts in the fabric.
Security Contracts Table Fields and Description Field Description Name
Specifies the name of the security contract. Click the name in the Name column to bring up a slide-in pane with additional information on this security contract.
Tenant
Specifies the tenant that’s associated with the security contract.
Inbound ESGs
Shows the number of inbound ESGs that are associated with the security contract. Click the number in the Inbound ESGs column to bring up a slide-in pane with additional information on the inbound ESGs associated with this security contract.
Inbound EPGs
Shows the number of inbound EPGs that are associated with the security contract. Click the number in the Inbound EPGs column to bring up a slide-in pane with additional information on the inbound EPGs associated with this security contract.
Outbound ESGs
Shows the number of outbound ESGs that are associated with the security contract. Click the number in the Outbound ESGs column to bring up a slide-in pane with additional information on the outbound ESGs associated with this security contract.
Outbound EPGs
Shows the number of outbound EPGs that are associated with the security contract. Click the number in the Outbound EPGs column to bring up a slide-in pane with additional information on the outbound EPGs associated with this security contract.
Scope
Specifies the scope of security contract.
Type
Specifies the type of security contract.
L4-L7 Service Graph
Specifies the L4-L7 service graph that’s associated with the security contract.
-
Click the gear icon to the right of the table to change the columns in the table.
Click the toggle switch to enable or disable the column options.
-
Click the table header to sort the entries in alphabetical order for the selected parameter.