
New and changed information
The following table provides an overview of the significant changes up to this current release. The table does not provide an exhaustive list of all changes or of the new features up to this release.
| Release Version | Feature | Description |
|---|---|---|
|
Nexus Dashboard 4.1.1 |
Improved navigation and workflow when configuring users and security for Nexus Dashboard |
Beginning with Nexus Dashboard 4.1.1, the navigation and workflow when configuring users and security for Nexus Dashboard have been enhanced. |
|
Nexus Dashboard 4.1.1 |
Site Manager role includes Designer permission for managing change control |
Beginning with Nexus Dashboard 4.1.1, a Designer role, with access to all tenants within a fabric, can modify fabric and monitoring policies. This capability was previously reserved only for the Site Administrator. For more information, see Roles and permissions. |
|
Nexus Dashboard 4.1.1 |
Password complexity enhancements |
Beginning with Nexus Dashboard 4.1.1, this feature enhances security by enforcing a minimum password length of 8 characters and allowing all special characters. Ensures compatibility with existing passwords. Requires re-authentication with the current password when changing it to protect against any unauthorized access during unattended sessions. For more information, see Violation action. |
|
Nexus Dashboard 4.1.1 |
Multi-cluster primary as an authentication domain |
In Nexus Dashboard 4.1.1, you can now configure the multi-cluster primary cluster as an authentication domain. For more information, see Multi-cluster primary as an authentication domain. |
Roles and permissions
You can choose how the users logging into the Nexus Dashboard GUI are authenticated. This release supports local authentication as well as LDAP, RADIUS, and TACACS remote authentication servers. User roles and permissions are described in this section, remote authentication configuration is described in Remote authentication, and local user configuration is described in Users.
Cisco Nexus Dashboard allows user access according to roles defined by role-based access control (RBAC). Roles are used in both local and external authentication.
These sections describe the user roles available in Nexus Dashboard and their associated permissions within the platform. The same roles can be configured on a remote authentication server and the server can be used to authenticate the Nexus Dashboard users. Additional details about remote authentication are available in the Remote authentication section.
Roles and permissions in Nexus Dashboard 4.1.1
| User role | AV pair value | Description |
|---|---|---|
|
Super Administrator |
|
Users with this role have full access to all resources in every security domain. A user with this role can perform all operations on the Nexus Dashboard, including backup and restore processes. |
|
Fabric Administrator |
|
Users with this role have permissions for full fabric management, including creation of network policies, interface configurations and software upgrades. Users with this role and the |
|
Designer |
|
Users with this role can make changes to the configuration (the intent) but cannot deploy those changes to the network fabrics. |
|
Approver |
|
When change control is enabled, users with this role can perform operations related to the approval or denial of submitted configuration changes. |
|
Observer |
|
Primarily a read-only user. |
|
Support Engineer |
|
Users with this role are able to perform tasks related to support, such as collecting tech support, creating backups, deploying templates, and general troubleshooting. When change control is enabled, users with this role can also deploy and revert policy changes that were approved. Users with this role are not able to make configuration changes. |
Mapping roles from previous releases
Prior to Nexus Dashboard 4.1.1, there were roles provided at the Nexus Dashboard level and in the services running in Nexus Dashboard. These sections map those roles from the previous releases to the roles available in Nexus Dashboard 4.1.1.

The Insights service did not support RBAC (any account that could log in to the Nexus Dashboard had full access to Insights), so there is no role-mapping information from previous releases for Insights.
Mapping Nexus Dashboard and Orchestrator roles
| User Role in Previous Releases | User Role in Nexus Dashboard 4.1.1 |
|---|---|
|
admin (read-only) |
Observer |
|
Administrator |
Super Administrator |
|
Approver |
Approver |
|
Dashboard User |
Observer |
|
Deployer |
Support Engineer |
|
Power-User |
Super Administrator |
|
Site Administrator |
Fabric Administrator |
|
Site Manager |
Designer |
|
Tenant Manager |
Designer |
|
User Manager |
Super Administrator |
Mapping Nexus Dashboard Fabric Controller roles
| User Role in Previous Releases | User Role in Nexus Dashboard 4.1.1 |
|---|---|
|
NDFC Access Admin |
Fabric Administrator |
|
NDFC Change Approver |
Approver |
|
NDFC Change Deployer |
Support Engineer |
|
NDFC Device Upgrade Admin |
Fabric Administrator |
|
NDFC Network Admin |
Fabric Administrator |
|
NDFC Network Operator |
Observer |
|
NDFC Network Stager |
Designer |
Choosing a default authentication domain
By default, the login screen will select the local domain for user authentication; you can manually change the domain at login time by selecting any of the available login domains from the dropdown menu.
Alternatively, you can set a different default login domain to the most commonly used as follows:
The domain must already exist before you can set it as the default domain. Adding remote authentication domains is described in Remote Authentication.
-
Choose the default login domain.
-
From the main navigation menu, select Admin > Users and Security.
-
Click the Authentication tab.
-
In the top right of the Default authentication tile, click the Edit icon.
The Edit default authentication page opens.
-
-
In the Edit default authentication page that opens, choose the Login domain from the dropdown, then click Save.
Multi-factor authentication
You can configure your Nexus Dashboard to use multi-factor authentication (MFA) for user login.
When configuring multi-factor authentication:
-
You will configure each user in your MFA provider, as described in Configure an Okta account as an MFA provider
This release supports only Okta as an MFA provider.
-
You will establish MFA provider and client integration, as described in Configure an MFA client.
This release supports only Duo as MFA client.
-
You will add the MFA provider as an external authentication domain in Nexus Dashboard, as described in Add Okta as a remote authentication provider.
Configure an Okta account as an MFA provider
The following steps provide basic configuration required to enable MFA for Nexus Dashboard using Okta as a provider. Detailed Okta configurations are outside the scope of this document, see Okta documentation for all available options.
To configure Okta for Nexus Dashboard MFA:
-
Log in to your Okta account.
To create an account, browse to https://developer.okta.com.
-
Create a new app integration.
-
From the left navigation menu, select Applications > Applications.
-
Click Create App Integration.
-
For Sign-in method, select
OIDC - OpenID Connect. -
For Application Type, select
Web Application. -
Click Next.
-
Provide App integration name, for example,
nd-mfa.The following steps assume you used
nd-mfaas the app integration name. If you choose a different name, replacend-mfawhere appropriate. -
For Sign-in redirect URIs, enter https://<nd-node1-ip>/oidccallback.
Replace the
<nd-node1-ip>with your cluster node IP address, then click +Add URI to provide the URIs for all nodes in the cluster. -
For Controlled Access, choose
Skip group assignment for now. -
Leave other fields at their default values and click Save.
-
-
Add the required attributes to the default user.
-
From the left navigation menu, select Directory > Profile Editor.
-
Click the Okta User (default) profile.
-
Click +Add Attribute.
-
For Data type, choose
string. -
For Display name, Variable name, and Description, enter
CiscoAVPair. -
Ensure that Attribute required is
unchecked. -
Leave other fields at default values and click Save and Add Another.
-
For Data type, choose
string. -
For Display name, Variable name, and Description, enter
nduser. -
Ensure that Attribute required is
unchecked. -
Leave other fields at default values and click Save.
-
-
Add the required attributes to the
nd-mfauser you created.-
From the left navigation menu, select Directory > Profile Editor.
-
Click the nd-mfa User (default) profile.
-
Click +Add Attribute.
-
For Data type, choose
string. -
For Display name, Variable name, and Description, enter
CiscoAVPair. -
Ensure that Attribute required is
checked. -
Leave other fields at default values and click Save and Add Another.
-
For Data type, choose
string. -
For Display name, Variable name, and Description, enter
nduser. -
Ensure that Attribute required is
checked. -
Leave other fields at default values and click Save.
-
-
Map the attributes.
-
From the left navigation menu, select Directory > Profile Editor.
-
Click the nd-mfa User profile.
-
In the Attributes area of the main page, click Mappings.
The nd-mfa User Profile Mappings page opens.
-
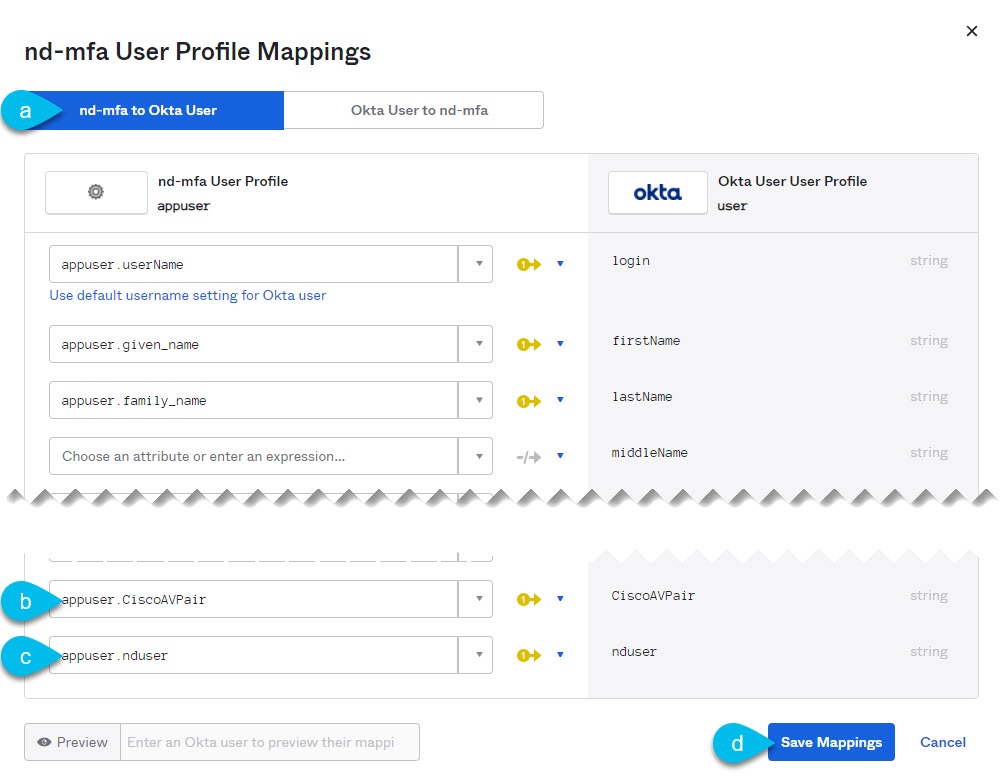
At the top of the nd-mfa User Profile Mappings page, click nd-mfa to Okta User.
-
Select
app.CiscoAVPairfrom the dropdown menu next toCiscoAVPair. -
Select
app.nduserfrom the dropdown menu next tonduser. -
Click Save Mappings.
-
Click Apply updates now.
-
-
Create users.
-
From the left navigation menu, select Directory > People.
-
Click +Add person.
-
Provide the user information.
-
Click Save and Add Another to add another user or click Save to finish.
You must add all users that you want to be able to log in to your Nexus Dashboard.
-
-
Assign users to the app.
-
From the left navigation menu, select Applications > Application.
-
Click the application you created (
nd-mfa). -
Select the Assignments tab.
-
Choose Assign > Assign to People.
The Assign nd-mfa to People page opens.
-
In the Assign nd-mfa to People page, click Assign next to the user you want to be able to log in to your Nexus Dashboard.
-
In the user details page that opens, provide a value for CiscoAVPair and nduser fields.
The CiscoAVPair values are described in the Configure a remote authentication server, for example
shell:domains=all/super-admin.The nduser value will be used as the username for this user when logging in to your Nexus Dashboard.
-
Click Save and Go Back.
-
Assign another user or click Done to finish.
You must add all users that you created in a previous step.
-
-
Configure Claims for the app.
-
From the left navigation menu, select Security > API.
-
Click the default name.
-
Select the Claims tab.
-
Click +Add Claim to add the
CiscoAVPairclaim. -
In the Name field, enter
CiscoAVPair. -
From the Include in token type dropdown, select
ID Token.We recommend using
ID Token, howeverAccess Tokenis also supported. -
In the Value field, enter
appuser.CiscoAVPair. -
Click Save.
-
Click +Add Claim to add the
nduserclaim. -
In the Name field, enter
nduser. -
From the Include in token type dropdown, select
ID Token.You must create both claims in the same token, mixing
ID TokenandAccess Tokenis not supported. -
In the Value field, enter
appuser.nduser. -
Click Save.
-
-
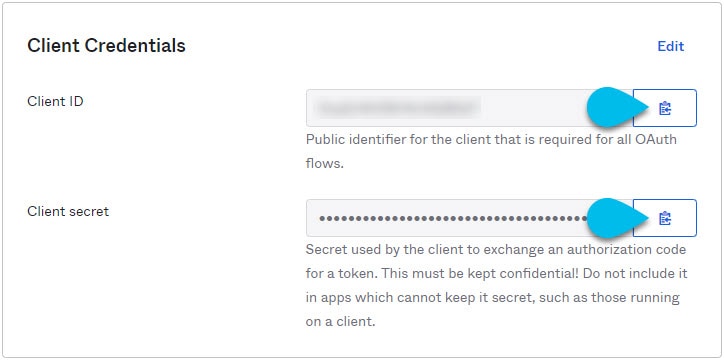
Gather the required Okta account information for adding it as authentication provider for your Nexus Dashboard.
-
From the left navigation menu, select Security > API.
-
Click the default name.
-
Note down the Issuer value.

-
From the left navigation menu, select Application > Applications.
-
Click the application you created (
nd-mfa). -
Note down the Client ID and Client Secret values.
-
Configure an MFA client
This release supports only Cisco Duo as MFA client.
The following steps provide basic configuration required to enable using Cisco Duo for Nexus Dashboard MFA. Detailed Duo configurations are outside the scope of this document, see Cisco Duo documentation for all available options.
To configure Duo:
-
Log in to your Okta account.
-
Add DUO as an MFA type.
-
From the left navigation menu, select Security > Multifactor.
-
In the Factor Types tab, select
Duo Security.If you do not have the
Duo Securityoption, you will need to open a support case with Okta from https://support.okta.com/help/s/opencase. -
In the Duo Security page, provide the required information.
For more information on how to obtain integration key, secret key, and API hostname, see https://duo.com/docs/okta.
Ensure that Duo Username Format is set to
Email. -
Click Save.
-
-
Create a Duo rule.
-
From the left navigation menu, select Applications > Application.
-
Click the application you created (
nd-mfa). -
Select the Sign On tab.
-
In the Sign On Policy area, click +Add Rule.
-
Provide the name for the rule.
-
In the Access area, enable Prompt for factor and select Every sign on.
-
Specify other options as required by your use case.
-
Click Save.
-
-
Configure Okta and Duo integration.
There are two ways you can allow the users you configured in Okta to use the Duo app for MFA — have the Duo admin add all the same users in Duo dashboard or have each individual user log in to Okta and self-enroll.
To configure users in Duo dashboard:
-
Log in to your Duo dashboard as admin user.
-
From the left navigation menu, select Users.
-
Click Add User and provide the details that match the user’s information in Okta.
-
Repeat this step for all users you added in Okta.
To self-enroll:
-
Instruct every user you created in Configure an Okta account as an MFA provider to log in to Okta on their own using your specific Okta domain.
You can determine the Okta domain to use by navigating to Application > Application, then clicking the
nd-mfaapplication you created and copying the Okta domain URL: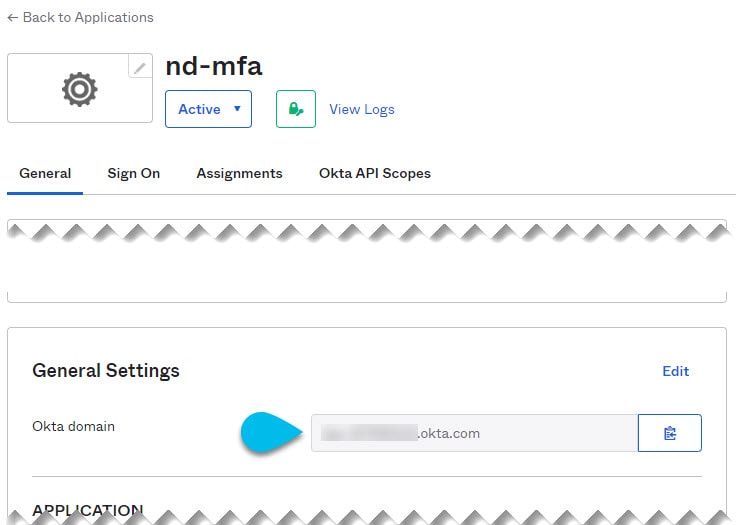
-
Once they’re logged in, they can navigate to the Settings page from the top right user menu.
-
Choose Duo Security Setup and follow the instructions on the screen.
-
Add Okta as a remote authentication provider
-
You must have at least one user already configured in Okta as described in Configure an Okta account as an MFA provider.
-
You must have the Client ID, Client Secret, and Issuer information from your Okta account available, which is described in the last step of Configure an Okta account as an MFA provider.
-
If you want to use a proxy to connect to your Okta account, the proxy must already be configured as described in Add a proxy server.
To add Okta as a remote authentication provider:
-
Add an authentication domain.
-
From the main navigation menu, select Admin > Users and Security.
-
Click the Authentication tab.
-
In the main pane, click Create login domain.
-
-
In the Create login domain screen that opens, provide domain details.
-
Provide the Name for the domain.
-
(Optional) Provide its Description.
-
From the Realm dropdown, select
OIDC. -
In the Client ID field, enter the client ID you obtained from your Okta account.
-
In the Client Secret field, enter the client secret you obtained from your Okta account.
-
In the Issuer field, enter the URI you obtained from your Okta account.
-
(Optional) Check the User Proxy option if you want to connect to Okta over a proxy.
-
Leave the Scopes options unchecked.
This release supports the
openidscope only.
-
-
Click Save to finish adding the domain.
Logging in to Nexus Dashboard using MFA
-
Navigate to one of your Nexus Dashboard IPs as your typically would.
-
From the Login Domain dropdown, select the OIDC domain that you created in Add Okta as a remote authentication provider.
The Username and Password fields will not be displayed.
-
Click Login.
You will be redirected to the Okta login page.
-
Log in using a user that was configured in Okta as described in Configure an Okta account as an MFA provider.
A push notification will be sent to your Duo client.
-
Approve the login using Duo.
You will be redirected back to the Nexus Dashboard UI and logged in using the Okta user.
Multi-cluster primary as an authentication domain
In Nexus Dashboard, you can configure the primary cluster as the authentication domain to support role-based access control (RBAC) across clusters, eliminating the need for a an external authentication provider, such as a AAA remote authentication server. Local users (with observer role) configured on the primary cluster can login as remote users from any clusters with a login domain in Multi-cluster realm type. For more information, see Log in using a multi-cluster domain.
A cluster can have only one multi-cluster authentication login domain of the Multi-cluster realm type.
You can create a multi-cluster login domain in Nexus Dashboard during onboarding. You can check the Enable multi-cluster authentication domain check box and provide a name for the multi-cluster login domain. For more information on creating multi-cluster login domain, see Onboard multi-cluster and enable primary cluster to act as an authentication domain.
Guidelines and limitations
-
When you enable a multi-cluster domain and provide a login name during creation (greenfield), the login domain is created for both primary and secondary clusters.
-
If you enable the multi-cluster domain during a subsequent onboarding, the login domain is created in the primary cluster and only on the new secondary cluster being onboarded. You must manually create the domain for all other secondary clusters.
-
If a multi-cluster domain login already exists during onboarding, attempting to create it using the Enable multi-cluster authentication domain check box will result in no action.
-
Upgrades from previous Nexus Dashboard releases require manually creating a multi-cluster domain login. For example, if you are upgrading from Nexus Dashboard 3.2 to 4.1.1, you can manually create a multi-cluster domain login to use this feature. For more information, see Enable primary cluster to act as an authentication domain and create multi-cluster login domain manually
-
Disabling the multi-cluster domain login on a secondary cluster affects only that cluster, while disabling it on the primary cluster affects all clusters.
Onboard multi-cluster and enable primary cluster to act as an authentication domain
Follow these steps to onboard multi-cluster and enable primary cluster to act as an authentication domain.
-
Log in to the Nexus Dashboard of the cluster to designate it as the primary cluster.
-
Add the second cluster.
-
Navigate to Admin > System Settings.
-
Click Multi-cluster connectivity.
-
Click Connect Cluster.
-
In Select type, choose Nexus Dashboard.
-
Click Next.
-
In the Remote cluster settings page, enter these field values:
-
Hostname IP Address
-
Username
-
Password
-
Login domain
-
-
Check the Enable multi-cluster authentication domain check box.
-
Enter a name for Multi-cluster login domain name, for example, MulticlusterAuth.
-
Click Next to connect the clusters.
Enable primary cluster to act as an authentication domain and create multi-cluster login domain manually
Follow these steps to enable primary cluster to act as an authentication domain and create multi-cluster login domain manually.
-
From the main navigation menu, choose Admin > Users and Security.
-
Click the Authentication tab.
-
Check the check box next to the multi-cluster domain you created.
-
Choose Actions > Create login domain.
-
In the Create login domain, provide domain details.
-
Provide the Name for the domain.
-
(Optional) Add a description for the domain Description.
-
From the Realm drop-down list, choose
Multi-clusterrealm type.
-
-
Check the Enable multi-cluster authentication domain check box.
-
Click Save
You can use the Actions drop-down list to perform these actions.
-
Choose Actions > Set as default to set the multi-cluster domain as the default authentication provider.
-
Choose Actions > Edit to make changes to the login domain information.
-
Choose Actions > Delete to delete the multi-cluster domain.
-
Log in using a multi-cluster domain
Follow these steps to log in using a multi-cluster domain.
-
Navigate to one of your Nexus Dashboard IP addresses.
-
Enter your username and password in the Username and Password fields.
-
From the Login Domain drop-down list, choose multi-cluster domain name you created. For example,
Multi-clusterdomain. -
Click Login.
Users
The Users page allows you to view and manage all users that have access to the Nexus Dashboard.
The Local tab displays all local users while the Remote tab displays users that are configured on the remote authentication servers you have added as described in the Remote authentication section.
-
The default local
observeruser cannot be deleted. -
Single sign-on (SSO) between the Nexus Dashboard, fabrics, and applications is available for remote users only. For more information on configuring remote users, see Remote authentication.
Add local users
-
Create a new local user.
-
From the main navigation menu, select Admin > Users and Security.
-
Click the Users tab.
-
In the main pane, click Create local user.
-
-
In the Create local user screen that opens, provide user details.
-
Provide the User ID that will be used for logging in.
-
Provide and confirm the initial Password.
-
Provide the First Name, Last Name, and Email for the user.
-
Determine if you want to set the Remote user authentication field to Enabled or Disabled.
Remote user authentication is used for signing into Nexus Dashboard when using identity providers that cannot provide authorization claims. If you choose Enabled for this Remote user authentication field, the local user ID can’t be used to directly log in to the Nexus Dashboard.
-
Provide the Remote ID claim information.
-
Click + Add Security Domain and Roles.
-
In the Security Domain Name field, choose the security domain to associate with this user.
-
In the Role field, choose the role to associate with this user.
You can select one or more roles for each user. The available roles and their permissions are described in Roles and permissions.
For all of the user roles you select, you can choose to enable read-only or read-write access. In case of read-only access, the user will be able to view the objects and settings allowed by their user Role but unable to make any changes to them.
-
Click Create to save the user.
-
Edit local users
-
Open user details screen.
-
From the main navigation menu, select Admin > Users and Security.
-
Click the Users tab.
-
In the main pane, click on the user’s name.
-
In the details pane that opens, click the Details icon.
-
-
In the <user-name> details screen that opens, click the Edit icon.
-
In the Edit User screen that opens, update the settings as necessary.
View remote user information
To view remote users:
-
From the main navigation menu, select Admin > Users and Security.
-
Choose Users > Remote.
If you use remote authentication for TACACS or RADIUS, those remote users will appear on this page after their first login to Nexus Dashboard with their remote credentials.
Remote authentication
Cisco Nexus Dashboard supports a number of remote authentication providers, including LDAP, TACACS, and Radius.
When configuring external authentication servers:
-
You must configure each user on the remote authentication servers.
-
All LDAP configurations are case sensitive.
For example, if you have
OU=Cisco Userson the LDAP server andOU=cisco userson the Nexus Dashboard, the authentication will not work. -
For LDAP configurations, we recommend using
CiscoAVPairas the attribute string. If, for any reason, you are unable to use an Object ID1.3.6.1.4.1.9.22.1, an additional Object IDs1.3.6.1.4.1.9.2742.1-5can also be used in the LDAP server.Alternatively, instead of configuring the Cisco AVPair values for each user, you can create LDAP group maps in the Nexus Dashboard.
-
Single sign-on (SSO) between the Nexus Dashboard, fabrics, and applications is available for remote users only.
-
When using SSO to cross-launch into an APIC fabric from your Nexus Dashboard’s Fabrics page, the AV pairs defined for the Nexus Dashboard user are also used when logging into the APIC.
For example, a user defined as
observerfor the Nexus Dashboard cluster will also haveadminprivileges in the APIC.
Configure a remote authentication server
When configuring the remote authentication server for the Nexus Dashboard users, you must add a custom attribute-value (AV) pair, specifying the username and the roles assigned to them.
If you configure multiple custom AV pairs, the AV pair for Nexus Dashboard must be the first entry in the list. Nexus Dashboard 4.1.1 only reads the first custom AV pair and ignores any subsequent pairs.
The user roles and their permissions are the same as for the local users you would configure directly in the Nexus Dashboard GUI as described in Roles and permissions. See Roles and permissions in Nexus Dashboard 4.1.1 for a list of the Nexus Dashboard user roles and the AV pair you would use to define the roles on a remote authentication server, such as LDAP.
A typical string includes the domain, followed by the read-only roles using the slash (/) character; individual roles are separated by the pipe (|) character:
shell:domains=<domain1>/<Role1>|<Role2>,<domain2>/<Role2>|<Role3>
For example, the following string illustrates how to assign the Observer role to a user in all domains, and the Fabric Administrator role in domain_A:
shell:domains=all/observer,domain_A/fabric-admin
Add LDAP as the remote authentication provider
-
You must have at least one user already configured on the LDAP server as described in Configure a remote authentication server.
You will need to use an existing user for end-to-end verification of LDAP configuration settings.
To add an LDAP remote authentication provider:
-
Add an authentication domain.
-
From the main navigation menu, select Admin > Users and Security.
-
Click the Authentication tab.
-
In the main pane, click Create login domain.
-
-
In the Create login domain screen that opens, provide domain details.
-
Provide the Name for the domain.
-
(Optional) Provide its Description.
-
From the Realm dropdown, select
LDAP. -
Then click +Add Provider to add a remote authentication server.
The Add Provider page opens.
-
-
Provide the remote authentication server details.
-
Provide the Hostname or IP Address of the server.
-
(Optional) Provide the Description of the server.
-
Provide the Port number.
The default port is
389for LDAP. -
Provide the Base DN and Bind DN.
The Base DN and Bind DN depend on how your LDAP server is configured. You can get the Base DN and Bind DN values from the distinguished name of the user created on the LDAP server.
Base DN is the point from which the server will search for users. For example,
DC=nd,DC=local.Bind DN is the credentials used to authenticate against the server. For example,
CN=observer,CN=Users,DC=nd,DC=local. -
Provide and confirm the Key.
This is the password for your Bind DN user. Anonymous bind is not supported, so you must provide a valid value in these fields.
-
Specify the Timeout and number of Retries for connecting to the authentication server.
-
Provide the LDAP Attribute field for determining group membership and roles.
The following two options are supported:
-
ciscoAVPair(default) — used for LDAP servers configured with Cisco AVPair attributes for user roles. -
memberOf— used for LDAP servers configured with LDAP group maps. Adding a group map is described in a following step.
-
-
(Optional) Enable SSL for LDAP communication.
If you enable SSL, you must also provide the SSL Certificate and the SSL Certificate Validation type:
-
Permissive: Accept a certificate signed by any certificate authority (CA) and use it for encryption. -
Strict: Verify the entire certificate chain before using it.
-
-
Choose Default or Custom in the Filter Type field.
If you choose Custom LDAP filter, a sample of a working syntax is
(cn={username}). -
(Optional) Enable Server Monitoring.
If you choose to enable monitoring, you must also provide the Username and Password for it.
-
In the Validation fields, provide a Username and Password of a user already configured on the LDAP server you are adding.
Nexus Dashboard will use this user to verify the end-to-end authentication to ensure that the settings you provided are valid.
-
Click Save to complete provider configuration.
-
Repeat this step for any additional LDAP authentication servers you want to use with this domain.
-
-
(Optional) Enable and configure LDAP Group Map Rules.
If you want to authenticate your LDAP users using Cisco AV pair strings, skip this step.
-
In the LDAP Auth Choice, select
LDAP Group Map Rules. -
Click Add LDAP Group Map Rule.
The Add LDAP Group Map Rule page opens.
-
Provide the Group DN for the group.
The format depends on your LDAP tree. For example:
DN=xxx,OU=xxx,DC=xxxand so on. -
Select one or more Roles for the group.
-
Click Save to save the group configuration.
-
Repeat this step for any additional LDAP groups.
-
-
Click Save to finish adding the domain.
Add Radius or TACACS as the remote authentication provider
Beginning with Nexus Dashboard release 3.2.2m and later, the Message-Authenticator attribute is included in RADIUS Access-Accept, Access-Reject, and Access-Request packets sent to the RADIUS server. Due to this enforced behavior, the RADIUS server may require configuration changes to properly process the Message-Authenticator attribute. It is mandatory for the RADIUS server to enforce receiving this attribute. For additional security context, see Blast-RADIUS (CVE-2024-3596) Protocol Spoofing Mitigation.
-
You must have at least one user already configured on the remote authentication server as described in Configure a remote authentication server.
You will need to use an existing user for end-to-end verification of the provider configuration settings.
To add a RADIUS or TACACS+ remote authentication provider:
-
Add an authentication domain.
-
From the main navigation menu, select Admin > Users and Security.
-
Click the Authentication tab.
-
In the main pane, click Create login domain.
-
-
In the Create login domain screen that opens, provide domain details.
-
Provide the Name for the domain.
-
(Optional) Provide its Description.
-
From the Realm dropdown, select
RADIUSorTACACS+. -
Then click +Add Provider to add a remote authentication server.
The Add Provider page opens.
-
-
Provide the remote authentication server details.
-
Provide the Hostame or IP Address of the server.
-
(Optional) Provide the Description of the server.
-
Choose Authorization Protocol used by the server.
You can choose
PAP,CHAP, orMS-CHAP. -
Provide the Port number.
The default port is
1812for RADIUS and49for TACACS -
Provide and confirm the Key.
This is the password used for connecting to the provider server.
-
(Optional) Choose whether you want to enable Server Monitoring.
If you choose to enable monitoring, you must also provide the Username and Password for it.
-
In the Validation fields, provide a Username and Password of a user already configured on the remote server you are adding.
Nexus Dashboard will use this user to verify the end-to-end authentication to ensure that the settings you provided are valid.
-
Click Save to complete provider configuration.
-
Repeat this step for any additional remote authentication servers.
-
-
Click Save to finish adding the domain.
Edit remote authentication domains
If you want to make changes to a domain that you have created:
-
From the main navigation menu, select Admin > Users and Security.
-
Click the Authentication tab.
-
From the Actions menu for the domain, select Edit Login Domain.
You cannot change the name and the type of the authentication domain, but you can make changes to the description and provider configuration.
If you make any changes to the login domain, including simply updating the description, you must re-enter the
keyfor all existing providers.
Delete remote authentication domains
-
From the main navigation menu, select Admin > Users and Security.
-
Click the Authentication tab.
-
From the Actions menu for the domain, select Delete Login Domain.
-
In the Confirm Delete prompt, click OK to confirm.
AAA remote authentication passthrough
The authentication, authorization, and accounting (AAA) remote authentication passthrough feature allows authentication for remote users and eliminates the need to update user credentials manually. When the AAA remote authentication passthrough feature is enabled, it automatically saves discovery and device credentials for remote users after successful login. This feature enhances the workflow for managing fabrics and switches, as users no longer need to change credentials every time a password is changed or updated in the remote server.
Network administrators can enable the AAA remote passthrough feature in the Nexus Dashboard Admin > System Settings > Fabric Management. See Enable AAA remote passthrough for more information.
Discovery and device credentials
When a SAN fabric is created or discovered, information on Fabric Name, Seed Switch IP, username, and password are added to Nexus Dashboard. The username and password information entered at this time are called the SAN Discovery Credentials.
You can only have one discovery credential for a fabric.
The Nexus Dashboard discovery feature uses the discovery credentials entered at the time of fabric creation to get the latest state of switches and update the inventory information every 5 minutes.
For SAN devices, the device credentials are automatically saved after a user discovers a SAN fabric. Users who don’t discover a SAN fabric will need to manually enter credentials in the Nexus Dashboard Manage > Device credentials. The Nexus Dashboard will use the device credentials whenever the user tries to push the SAN configuration changes to the switches. Each user will have their own device credential for a fabric.
Certain switches with new organizationally unique IDs (OUIs) are not discovered during the Nexus Dashboard initial SAN discovery process. You can enter the OUI of the switch followed by 'Cisco m' in the Add New OUIs for Discovering Switch, End Device with Format field in Discovery. For example, for a switch with an OUI, 0x70a983, you can enter the value '0x70a983 Cisco m' in the Add New OUIs for Discovering Switch, End Device with Format field and save this information.
Enable AAA remote passthrough
The AAA remote passthrough feature is disabled by default.
Before enabling this feature, ensure that the Nexus Dashboard and switches are configured with the same remote authentication server. You must enable TAC support in Advanced Setting.
Follow these steps to enable the AAA remote passthrough:
-
Navigate to Admin > System Settings > Fabric Management > Discovery.
-
Check the Enable AAA Passthrough feature check box.
-
Choose a value for the auth privacy type in the AAA Passthrough Authentication / Privacy field.
-
Click Save.
Security
The Security page allows you to view and manage certificates used by the Nexus Dashboard. To access the Security page, navigate to Admin > Users and Security > Security. Use these tabs to configure security in this page:
Security configuration
The Security configuration page allows you to configure authentication session timeouts and security certificates used by your Nexus Dashboard cluster.
-
You must have the keys and certificates you plan to use with Nexus Dashboard already generated.
Typically, this includes the following files:
-
Private key (
nd.key) -
Certificate Authority’s (CA) public certificate (
ca.crt) -
CA-signed certificate (
nd.crt)
Generating these files for self-signed certificates is described in the section "Generating a private key and self-signed certificate" in the Managing Certificates in your Nexus Dashboard.
-
-
We recommend creating a configuration backup of your Nexus Dashboard cluster before making changes to the security configurations.
For more information about backups, see "Backup and Restore" in Backing Up and Restoring Your Nexus Dashboard.
To edit security configuration:
-
Edit security configuration.
-
From the main navigation menu, select Admin > Users and Security.
-
Click the Security tab.
-
In the main pane, click the Security configuration tab.
-
In the main pane, click the Edit icon.
-
-
In the Edit security configuration screen that opens, update one or more fields as required:
Note that uploading the keys and certificate files is not supported and you will need to paste the information in the following fields.
-
Update the Session timeout.
This field defines the duration of the API tokens with the default duration set to 20 minutes.
-
In the Domain name field, provide your domain.
-
Check the box in the Minimum TSL version: TLSV1.3 field if you want to set the minimum SSL version to TLSV1.3.
The minimum SSL version is set to TLSV1.2 by default. Checking this box to set the minimum version to TLSV1.3 will reject all clients using a TLSV1.2 connection request.
-
To disable Qualtrics integration from the browser at a system wide level, check the box in the Enforce strict content security policy field.
-
Click the SSL Ciphers field and select any additional cipher suites you want to enable from the dropdown or click the x icon on an existing cipher suite to remove it.
Cipher suites define agorithms (such as key exchange, bulk encryption, and message authentication code) used to secure a network connection. This field allows you to customize which cipher suites your Nexus Dashboard cluster will use for network communication and disable any undesired suites, such as the less secure TLS1.2 and TLS1.3.
-
-
In the Key field, provide your private key.
-
In the RSA Certificate field, provide the CA-signed or self-signed certificate.
-
In the Root Certificate field, provide the CA’s public certificate.
-
(Optional) If your CA provided an Intermediate Certificate, provide it in the Intermediate Certificate field.
-
Click Save to save the changes.
After you save your changes, the GUI will reload using the new settings.
Violation action
The Violation action page shows the number of unsuccessful attempted login actions.
To edit the information that is provided in the Violation action page:
-
From the main navigation menu, select Admin > Users and Security.
-
Click the Security tab.
-
In the main pane, click the Violation action tab.
Information on unsuccessful attempted login actions is displayed.
-
Click Edit.
The Login attempt action page appears.
-
Edit the Login attempt action settings, if necessary.
-
In the Maximum login attempts field, set the maximum number of login attempts until the maximum action is triggered.
The default entry is 0.
-
In the Maximum password length field, set the maximum password length.
The default entry is 8.
-
In the Maximum login attempted action field, choose the action that will take place when the number of maximum login attempts has been surpassed.
-
In the Block for field, set the amount of time, in seconds, minutes, or hours, that a login block will take place when the number of maximum login attempts has been surpassed.
-
In the Block admin for field, set the amount of time, in seconds, minutes, or hours, that an admin login block will take place when the number of maximum login attempts has been surpassed.
-
-
-
Click Save.
Security domains
A restricted security domain allows an administrator to prevent a group of users from viewing or modifying any objects created by a group of users in a different security domain, even when users in both groups have the same assigned privileges.
For example, an administrator in restricted security domain (domain1) will not be able to see fabrics, services, cluster or user configurations in another security domain (domain2).
Note that a user will always have read-only visibility to system-created configurations for which the user has proper privileges. A user in a restricted security domain can be given a broad level of privileges within that domain without the concern that the user could inadvertently affect another group’s physical environment.
To create a security domain:
-
Create a new security domain.
-
From the main navigation menu, select Admin > Users and Security.
-
Click the Security tab.
-
In the main pane, click the Security domains tab.
-
In the main pane, click Create security domain.
-
-
In the Create security domain screen that opens, provide the domain details.
-
Provide the Name for the domain.
-
(Optional) Provide a description for the domain.
-
Click Save to save the domain.
-
JWT keys
To create a JWT key:
-
From the main navigation menu, select Admin > Users and Security.
-
Click the Security tab.
-
In the main pane, click the JWT keys tab.
-
Click Create JWT key.
The Create JWT key page appears.
-
Enter a service name for the JWT key in the Service name field.
-
Enter a JWT API key in the JWT API key field.
-
Enter a JWT public key in the JWT public key field.
-
Enter the remote ID claim information in the Remote ID claim field.
-
Click Create.
Credentials store
You can add an external Credentials store that allows you to store and retrieve network credentials from an external vault, such as the CyberArk vault, instead of a local storage system.
To add a credentials store:
-
From the main navigation menu, select Admin > Users and Security.
-
Click the Security tab.
-
In the main pane, click the Credentials store tab.
-
Click Add credential store.
The Edit credential store page appears.
-
In the Store type field, choose a store type, such as CyberArk.
-
Enter the necessary information in the remaining fields, depending on the choice that you made in the Store type field.
For example, if you chose CyberArk in the Store type field, make the necessary choices in the following fields:
-
In the CyberArk CCP URL field, enter the CyberArk Central Credential Provider (CCP) URL.
For more information, see Central Credential Provider (CCP).
-
In the Certificate name field, choose the appropriate certificate from the dropdown list.
The Certificate name field lists the certificates that you configured in Admin > Certificate Management.
Ensure that the system certificate you configured is mapped to the CyberArk feature to use the certificate name here.
For more information on system certificates, see Managing Certificates in your Nexus Dashboard.
-
-
Click Resync/Save.
If there is a password change in CyberArk, whether automatically or manually, Nexus Dashboard will require approximately 10 minutes to reflect the updated password. To retrieve the updated password, navigate to the Credential Store and perform a Resync.
Validate peer certificates
You can import a fabric controller’s Certificate Authority (CA) root certificate chain into Nexus Dashboard. This allows you to verify that the certificates of hosts to which your Nexus Dashboard connects (such as fabric controllers) are valid and are signed by a trusted Certificate Authority (CA) when you add the fabrics.
Export a certificate chain from Cisco APIC
-
Log in to your Cisco APIC.
-
Check which key ring is being used for management access:
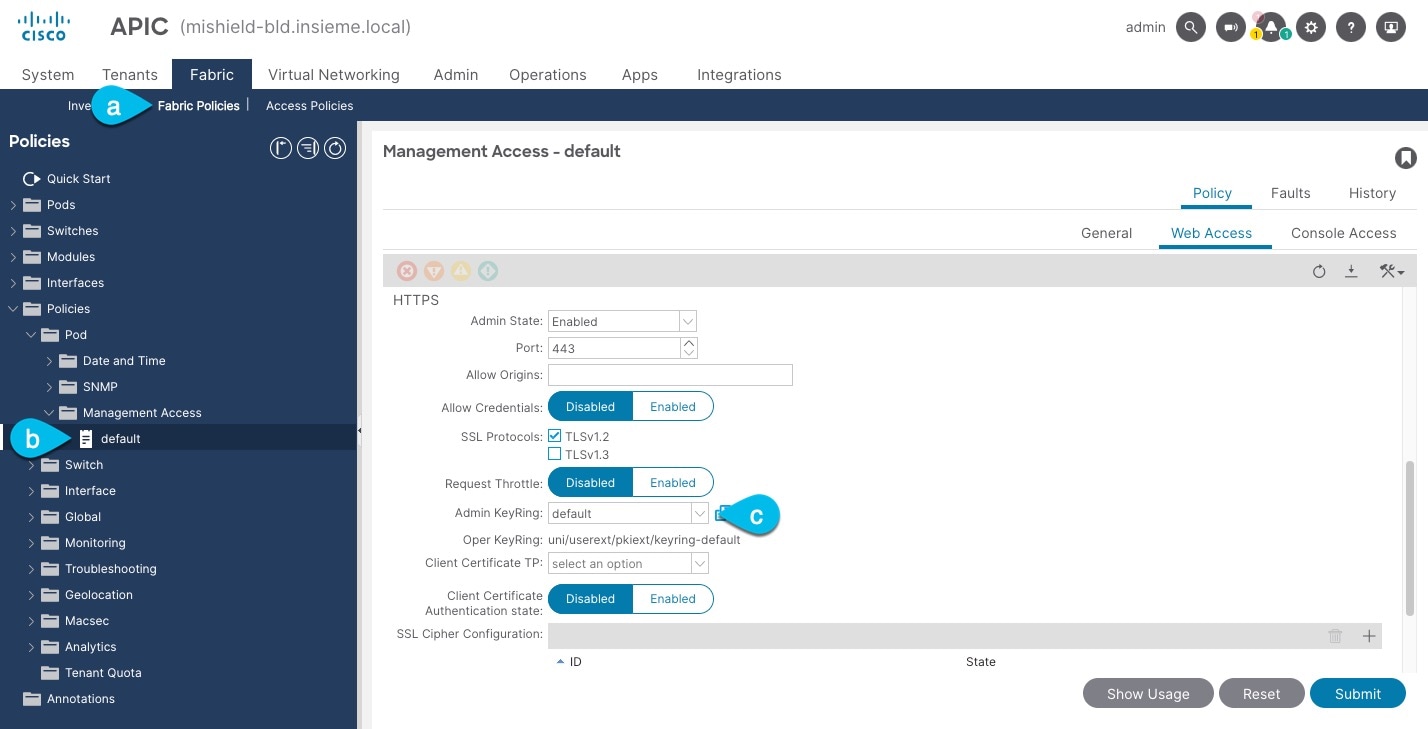
-
In the top navigation bar, choose Fabric > Fabric Policies.
-
In the left navigation menu, choose Policies > Pod> Management Access.
-
In the main pane, note the name in the Admin KeyRing field.
In the above example, the
defaultkey ring is being used. However, if you created a custom key ring with a custom certificate chain, the name of that key ring would be listed in the Admin KeyRing field.Custom security configuration for Cisco APIC is described in detail in Cisco APIC Security Configuration Guide for your release.
-
-
Export the certificate used by the key ring:
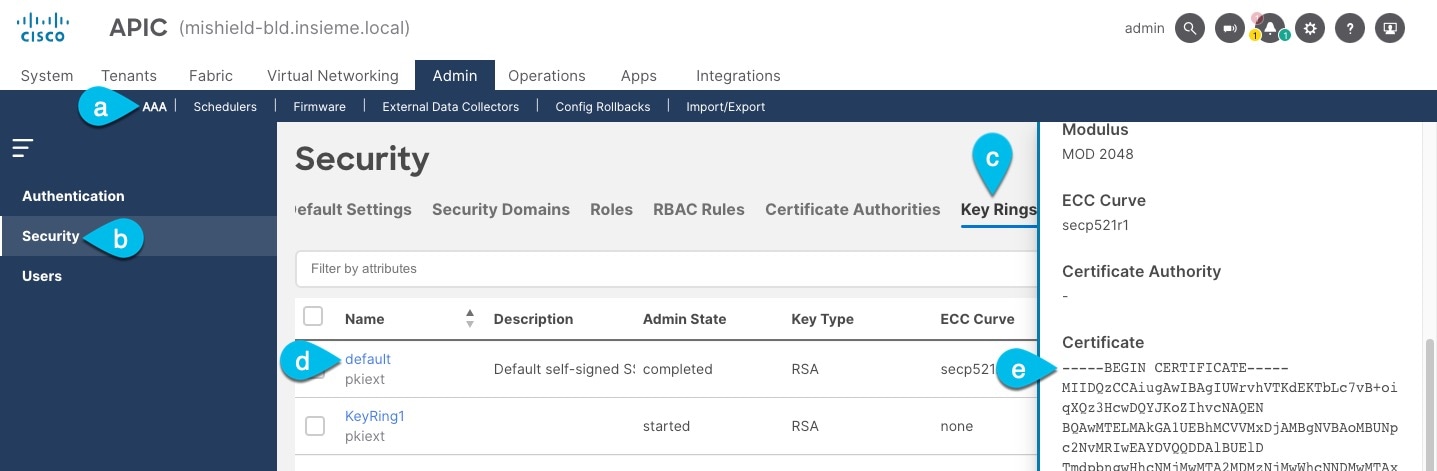
-
In the top navigation bar, choose Admin > AAA.
-
In the left navigation menu, choose Security.
-
In the main pane, choose the Key Rings tab.
-
Click the name of the key ring you found in the previous step and copy the Certificate.
The above example shows the
defaultkey ring from the previous step. However, if you had a custom key ring configured, choose the CA certificate chain used to create the key ring.You must include the
-----BEGIN CERTIFICATE-----and-----END CERTIFICATE-----in the text you copy, for example:-----BEGIN CERTIFICATE----- MIIDQzCCAiugAwIBAgIUWrvhVTKdEKTbLc7vB+oiqXQz3HcwDQYJKoZIhvcNAQEN [...] -----END CERTIFICATE-----
-
Import certificates into Nexus Dashboard
-
Log in to your Nexus Dashboard where you plan to onboard the fabrics.
-
Import the certificate into Nexus Dashboard.
-
Log in to your Nexus Dashboard where you will onboard the fabrics.
-
From the main navigation menu, select Admin > Certificate Management.
-
Click the CA Certificates tab.
-
Click Add CA certificate, provide a unique name for the certificate, and paste the certificate chain you copied from your fabric’s controller.
-
-
Proceed with adding the fabric as you typically would, but enable the Verify Peer Certificate option.
Note that if you enable the Verify Peer Certificate option but don’t import the valid certificate, fabric onboarding will fail.
Adding fabrics is described in Creating LAN and ACI Fabrics and Fabric Groups.
Add a proxy server
In certain deployment scenarios, you may have to access the Internet through a proxy.
Note that Nexus Dashboard uses two main route tables — one for the Management network and one for the Data network — and by default, it will use the routing table of the originating IP address. In other words, Nexus Dashboard will attempt to reach the proxy from the routing table of the POD/Service that is trying to use the proxy.
For example, if you configure a proxy and establish Intersight connectivity from your Nexus Dashboard and then attempt to configure the AppDynamics integration from the Insights service running in the cluster, you may get an error stating that the AppDynamics host is not reachable. This happens because the proxy is only accessible from the management interface, so in such cases you also need to add a management network route for the proxy IP address.
To add a proxy server:
-
Navigate to Admin > System Settings > General.
-
In the Proxy configuration area, click Edit.
-
Click + Add HTTP Server in the proxy configuration window.
-
From the Type dropdown, select the type of traffic that you want to be proxied.
-
In the Server field, provide the full address for the proxy server, including the port if required.
For example 'http://proxy.company.com:80'.
-
If the server requires login credentials, provide the Username and Password.
-
(Optional) Click + Add Ignore Host to provide any hosts that will ignore the proxy.
You can add one or more hosts with which the cluster will communicate directly bypassing the proxy.