Cisco Cloud APIC for AWS Installation Guide, Release 5.1(x)
Bias-Free Language
The documentation set for this product strives to use bias-free language. For the purposes of this documentation set, bias-free is defined as language that does not imply discrimination based on age, disability, gender, racial identity, ethnic identity, sexual orientation, socioeconomic status, and intersectionality. Exceptions may be present in the documentation due to language that is hardcoded in the user interfaces of the product software, language used based on RFP documentation, or language that is used by a referenced third-party product. Learn more about how Cisco is using Inclusive Language.
Performing a System Upgrade, Downgrade or Recovery
Important Notes
Following are important notes regarding the installation, upgrade or downgrade
procedures for the Cisco Cloud APIC:
When you downgrade from Release 5.0(x) to a previous release, as the CSRs
downgrade to a lower release, you could see some of the tunnels in a “down”
state in the CSRs. This could occur due to stale VPN resources in the AWS
accounts that did not get cleaned up.
To correct this issue, manually clean up the stale VPN connections.
As noted in Requirements for the AWS Public Cloud, the supported instance
type for the Cisco Cloud APIC deployment has changed for Release 5.0(x) or later:
For releases prior to Release 5.0(x), Cisco Cloud APIC is deployed using the M4.2xlarge instance.
For Release 5.0(x) and later, Cisco Cloud APIC is deployed using the M5.2xlarge instance.
When upgrading from a 4.2(x) release to Release 5.0(x) or later, policy-based
upgrades are not supported because you cannot change the instance type
through a policy-based upgrade; instead, for these upgrades, you must
upgrade using a migration procedure, as provided in Migration-Based Upgrade.
When upgrading from a 4.2(x) release to Release 5.0(x) or later, a
configuration import with the option of replace on atomic is not supported.
In the Restore Configuration area at this point in
the procedures, make these selections instead:
In the Restore Type field, choose
Merge.
In the Restore Mode field, choose
Best Effort.
This restriction applies only for upgrades from a 4.2(x) release to Release
5.0(x) or later; these restrictions do not apply when upgrading from Release
5.0(x) to a later release.
Upgrading the Software
The method that you use to upgrade your Cisco Cloud APIC software varies, depending on
the situation:
If you are upgrading from a 4.2(x) release to Release 5.0(x), you will use a
migration-based process to upgrade your software. Go to Migration-Based Upgrade for those instructions.
Note
The same migration-based procedures used for an upgrade can also be used for
a system recovery, as described in Performing a System Recovery.
If you are upgrading from Release 5.0(1) to Release 5.0(2), you will use a
policy-based process to upgrade your software. Go to Policy-Based Upgrade for those instructions.
Note
If the policy-based upgrade from Release 5.0(1) to Release 5.0(2) does not
work for some reason, you can upgrade from Release 5.0(1) to Release 5.0(2)
using the migration-based process as described in Migration-Based Upgrade.
Migration-Based Upgrade
The following section provides migration procedures, which will allow you to upgrade
from a 4.2(x) release to Release 5.0(x) or later without losing traffic flow.
Upgrading Your Cloud APIC Software Using Migration Procedures
This section provides the migration procedures that you will use if you want to
upgrade from a 4.2(x) release to Release 5.0(x) or later on your Cisco Cloud APIC. There should be no effect on traffic with this migration.
Procedure
Step 1
Enable the encryption passphrase control, if it is not enabled already.
In your Cloud APIC GUI, navigate to Infrastructure > System Configuration.
You should be underneath the General tab by
default; if not, click the General tab.
Determine if the encrypted passphrase control is enabled already.
In the Global AES Encryption area, if
you see Yes underneath the
Encryption and Key
Configured fields, then you have the
encrypted passphrase control enabled already. Go to Step 2.
If you do not see Yes underneath the
Encryption and Key
Configured fields:
Click the pencil icon at the upper right part of the
Global AES Encryption
area.
The Global AES Encryption
Settings window appears.
Click the box next to the Encryption:
Enabled area, enter a passphrase in
the Passphrase/Confirm
Passphrase fields, then click
Save at the bottom of the
window.
Step 2
Back up your existing Cloud APIC configuration.
There are a number of different ways that you can back up your Cloud APIC
configuration. See the Cloud APIC for AWS Users Guide for
more information. Note that if you want to use a remote backup, you will
also need to add a remote location first.
Step 3
Terminate the Cloud APIC EC2 instance from the AWS infra account.
Log into your Amazon Web Services account for the Cloud APIC infra
tenant and go to the AWS Management Console, if you are not there
already:
Go into Instances in the EC2 Dashboard in the
AWS Management Console.
Locate the Cloud APIC instance.
You should see m4.2xlarge listed as the
instance type for your Cloud APIC - this is the correct instance
type for pre-5.0(1) releases.
Check the box next to the Cloud APIC instance to select it, then click Actions > Instance State > Terminate.
In the Terminate Instances popup window,
select Yes, Terminate to terminate this
instance.
The Instances window reappears and the status
changes to shutting-down in the
Instance State row for the Cloud APIC
instance. Even though you are terminating the Cloud APIC instance
here, there should be no traffic drop for your Cloud APIC.
Software Version: Select the appropriate version of the Cloud
APIC software (for example, 5.0.1k)
Region: Region where Cloud APIC will be deployed
Step 8
Click the Continue to Launch button.
The Launch this software page appears, which shows a
summary of your configuration and lets you launch the cloud formation
template.
Step 9
In the Choose Action field, choose Launch
CloudFormation, then click Launch to go
directly to the CloudFormation service in the correct region, with the correct
Amazon S3 template URL already populated. The Specify
template page appears within the Create
stack page.
Step 10
In the Specify template page, make the following
selections:
Prerequisite - Prepare template field: Leave
the default Template is ready option
selected.
Specify template area:
In the Template source field, leave
the default Amazon S3 URL option
selected.
In the Amazon S3 URL field, leave the
automatically-generated entry as-is.
Click View in designer.
Step 11
In the template1 area in the lower half of the
screen:
Leave the Choose template language selection
as JSON.
Place your cursor at the very beginning of the text string on line 1,
press the Shift key and scroll down to the bottom of the window to
select the entire text string in the window, then copy all of the
text in this window (press Ctrl+C, or right-click and select
Copy).
Step 12
On your local computer, navigate to an appropriate folder and create a text
file, giving it a unique name, and paste the text string that you just copied
into the text file.
This will be the Cloud APIC CFT for Release 5.0(1), which has the M5.2xlarge
instance type.
Step 13
Save and close the text file.
Step 14
Upload the Cloud APIC CFT for Release 5.0(1) to AWS.
On the AWS CloudFormation dashboard, click your existing Cloud APIC
stack, then click Update.
In the Update Stack wizard, in the
Prepare template screen, select
Replace current template.
The Specify template area appears.
In the Update Stack wizard, on the
Specify template area, select
Upload a template file.
The Upload a template file option appears.
Click Choose file underneath the
Upload a template file option and navigate to
the area where you created the Cloud APIC CFT for Release 5.0(1).
Select the Cloud APIC CFT for Release 5.0(1), and then click
Next.
In the Specify stack details screen, verify that
the instance type shown in the Other parameters
area at the bottom of the screen is correctly set to
m5.2xlarge, then click
Next.
Do not change the instance type to m4.2xlarge
in this step.
In the Configure stack options screen, click
Next.
In the Review screen, click Update
stack.
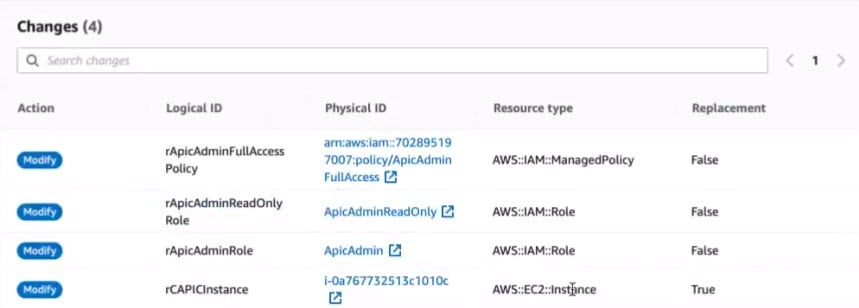
The following actions take place at this point:
The AWS infra detects three IAM resources that will be updated (shown
as False in the Replacement column).
The AWS infra detects one EC2 instance that will be replaced (shown
as True in the Replacement column).
This will bring up the new Cloud APIC instance with the Release 5.0(1) image,
with the same public IP address as you had previously. You can check the
progress of the new Cloud APIC instance coming up by navigating back to
Instances in the EC2 Dashboard in the AWS
Management Console.
Step 15
When you see the Instance State change to
running, you can then log into your Cloud APIC is you
did previously.
The Cloud APIC will come up with no configurations at this point.
Note
If you see an error message when you try to log in, such as
REST Endpoint user authentication datastore is not
initialized - Check Fabric Membership Status of this fabric
node, wait for several minutes, then try again after a
few minutes. You might also have to refresh the page in order to log
in.
Step 16
Enable the same encryption passphrase.
In your Cloud APIC GUI, navigate to Infrastructure > System Configuration.
You should be underneath the General tab by
default; if not, click the General tab.
In the Global AES Encryption area, click the
pencil icon at the upper right part of the Global AES
Encryption area.
The Global AES Encryption Settings window
appears.
Click the box next to the Encryption: Enabled
area, enter the same passphrase in the Passphrase/Confirm
Passphrase fields that you used in Step 1, then click Save
at the bottom of the window.
Step 17
Import the configuration that you backed up in Step 2.
If you configured a remote location when you backed up your configuration,
you might have to create the remote location again to access the backup.
In your Cloud APIC GUI, navigate to Operations > Backup & Restore.
In the Backup & Restore window, click the
Backups tab.
Click the Actions scrolldown menu, then choose
Restore Configuration.
The Restore Configuration window appears.
Enter the necessary information to restore the configuration that you
backed up in Step 2.
If you are upgrading from a 4.2(x) release to Release 5.0(x) or
later, for this particular backup restore, use the following
settings:
In the Restore Type field, choose
Merge.
In the Restore Mode field, choose
Best Effort.
Click Restore Configuration when you have
entered the necessary information in this window. Click the
Job Status tab in the Backup
& Restore window to get the status of the backup
restore.
Step 18
Run the CapicTenantRole update to change the set for all trusted tenants.
Locate the tenant role CFT.
The tenant role CFT is located in the S3 bucket in the AWS account
for the Cisco Cloud APIC infra tenant. The name of the S3 bucket is
capic-common-[capicAccountId]-data and the
tenant role CFT object is tenant-cft.json in
that bucket. The capicAccountId is the AWS account number for the
Cisco Cloud APIC infra tenant, which is the account in which Cloud
APIC is deployed.
Click the tenant role CFT link.
The Overview page for this tenant role CFT
appears.
Click the box next to the tenant-cft.json entry
on the Overview page.
A slide-in pane appears for this JSON-formatted tenant role CFT.
Click Download to download the tenant role CFT
to a location on your computer.
For security reasons, public access to this S3 bucket in AWS is not
allowed, so you must download this file and use it in the tenant
account.
In AWS, go to the user account of the trusted tenants, then click
CloudFormation.
On the AWS CloudFormation dashboard, locate the trusted tenant stack
and click on the stack name for that trusted tenant.
The stack properties page appears for this particular stack.
Click the Change sets tab.
In the Change sets area, click Create
change set .
In the Create change set window for this stack, click
Replace current template.
In the Specify template area, click the circle
next to Upload a template file, then click the
Choose File button.
Navigate to the location on your computer where you downloaded the
tenant role CFT and select that template file.
Click Next in the Create change set window for
this stack.
The Create Change Set pop-up appears.
Click Create Change Set in the Create
Change Set pop-up window.
The Status will show as CREATE_PENDING for a
period of time, then will change to
CREATE_COMPLETE.
Repeat these steps for each trusted tenant.
On each trusted tenant, use this
tenant-cft.json file to create a change
set and run that change set.
Step 19
In your Cloud APIC GUI, verify that all the configurations that you previously
had for your Cloud APIC prior to the migration are present now.
Note that the CSRs will also get upgraded, from the 16.x version to the 17.x
version. You can verify this by navigating to
Instances in the EC2 Dashboard in the AWS
Management Console and locating the CSR instances to verify that they are
also upgraded.
Policy-Based Upgrade
Use the procedures in the following sections to perform a policy-based upgrade of your
Cisco Cloud APIC software, if you are upgrading from Release 5.0(1) to Release
5.0(2).
Downloading an Image
Procedure
Step 1
Log in to your Cisco Cloud APIC, if you aren't logged in already.
Step 2
From the Navigation menu, choose Operations > Firmware Management.
The Firmware Management window appears.
Step 3
Click the Images tab in the Firmware
Management window.
Step 4
Click Actions, then choose Add Firmware
Image from the scroll-down menu.
The Add Firmware Image pop-up appears.
Step 5
Determine if you want to add the firmware image from a local or a remote
location.
If you want to add the firmware image from a local location,
click the Local radio button in the
Image Location field. Click the
Choose File button, then navigate to the
folder on your local system with the firmware image that you want to
import and select the file. Go to Step 6.
If you want to import the firmware image from a remote
location, click the Remote radio button in
the Image Location field, then perform the
following actions:
In the Protocol field, click either the
HTTP or the SCP radio
button.
In the URL field, enter the URL from where the
image will be downloaded.
If you selected the HTTP radio button
in the previous step, enter the http source that you want to
use to download the software image. An example URL is
10.67.82.87:/home/<username>/ACI/aci-apic-dk9.1.0.2j.iso.
Go to Step 6.
If you selected the SCP radio button
in the previous step, enter the Secure Copy Protocol (SCP)
source that you want to use to download the software image,
using the format <SCP
server>:/<path>. An example URL is
10.67.82.87:/home/<username>/ACI/aci-apic-dk9.1.0.2j.iso.
In the Username field, enter your username for
secure copy.
In the Authentication Type field, select the
type of authentication for the download. The type can be:
Password
SSH Key
The default is Password.
If you selected Password, in the
Password field, enter your password for
secure copy. Go to Step 6.
If you selected SSH Key, enter the following
information:
SSH Key Content — The SSH Key Content
is used to create the SSH Key File which is required when
creating a Remote location for the download.
Note
The public key is generated at the time of the transfer.
After the transfer the key files that were generated in
the background are deleted. The temporary key files are
stored in dataexport directory of the Cisco Cloud APIC.
SSH Key Passphrase — The SSH Key
Passphrase is used to create the SSH Key File which is
required when creating a Remote location for the download.
Note
The Passphrase field can remain empty.
Step 6
Click Select.
Wait for the Cisco Cloud APIC firmware images to download.
Upgrading the Software Using the Policy-Based Upgrade Process
Use the procedures in the following sections to perform a policy-based upgrade of
your Cisco Cloud APIC software, if you are upgrading from Release 5.0(1) to Release 5.0(2).
Before you begin
You have downloaded an image using the procedures provided in Downloading an Image.
Procedure
Step 1
In the Cloud APIC GUI, from the Navigation menu, choose the Operations > Firmware Management.
The Firmware Management window appears.
Step 2
Click Schedule Upgrade.
The Schedule Upgrade pop-up appears.
If you see a message that says that faults are present in your fabric, we
recommend that you resolve these faults before performing a upgrade. See
"Viewing Health Details Using the Cisco Cloud APIC GUI" in the Cisco
Cloud APIC for AWS User Guide for more information.
Step 3
In the Target Firmware field, choose a firmware image
from the scroll-down menu.
Step 4
In the Upgrade Start Time field, determine if you want
to begin the upgrade now or later.
Click Now if you want to schedule the upgrade
for now. Go to Step 5.
Click Later if you want to schedule the
upgrade for a later date or time, then select the date and time from
the pop-up calendar for the scheduled upgrade.
Step 5
In the Ignore Compatibility Check field, leave the
setting in the default off (unchecked) setting, unless you are specifically told
to disable the compatibility check feature.
In Cloud APIC, there is a compatibility check feature that verifies if an
upgrade path from the currently-running version of the system to a specific
newer version is supported or not. The Ignore Compatibility
Check setting is set to off by default, so the system
automatically checks the compatibility for possible upgrades by default.
Note
If you choose to disable the compatibility check feature by entering a
check mark in the box next to the Ignore Compatibility
Check field, you run the risk of making an unsupported
upgrade to your system, which could result in your system going to an
unavailable state.
Step 6
Click Schedule Upgrade.
You can monitor the progress of the upgrade in the main Firmware
Management window, under the Upgrade
Status area.
Downgrading the Software
The following sections provide the necessary information that you will need to
successfully downgrade your Cisco Cloud APIC software.
Downgrading the Software
Before you begin
The following prerequisites apply if you are downgrading from 5.0(2) to a release
prior to 5.0(2):
If your Cisco Cloud APIC has always been running on Release 5.0(2) [if you
never upgraded from a release prior to 5.0(2) to Release 5.0(2)], then you
cannot downgrade to a release prior to Release 5.0(2) on your Cisco Cloud
APIC. Downgrading to a release prior to 5.0(2) when your Cisco Cloud APIC
never ran on that prior release is not supported.
If you upgraded your Cisco Cloud APIC to Release 5.0(2) and you completed
certain Release 5.0(2)-specific configurations afterward, and you want to
downgrade to a release prior to Release 5.0(2), you will have to remove the
5.0(2)-specific configurations before downgrading.
Procedure
Step 1
Remove the 5.0(2)-specific configurations before downgrading, if
necessary.
Step 2
Download an image for the downgrade using the procedures provided in Downloading an Image.
Step 3
When the image is fully downloaded, from the Navigation
menu, choose the Operations > Firmware Management.
The Firmware Management window appears.
Step 4
Click Schedule Upgrade.
The Schedule Upgrade pop-up appears.
If you see a message that says that faults are present in your fabric, we
recommend that you resolve these faults before performing a downgrade. See
"Viewing Health Details Using the Cisco Cloud APIC GUI" in the Cisco
Cloud APIC for AWS User Guide for more information.
Step 5
In the Target Firmware field, choose a firmware image
from the scroll-down menu.
Step 6
In the Upgrade Start Time field, determine if you want
to begin the downgrade now or later.
Click Now if you want to schedule the
downgrade for now. Go to Step 7.
Click Later if you want to schedule the
downgrade for a later date or time, then select the date and time
from the pop-up calendar for the scheduled downgrade.
Step 7
In the Ignore Compatibility Check field, leave the
setting in the default off (unchecked) setting, unless you are specifically told
to disable the compatibility check feature.
In Cloud APIC, there is a compatibility check feature that verifies if an
downgrade path from the currently-running version of the system to a
specific newer version is supported or not. The Ignore
Compatibility Check setting is set to off by default, so the
system automatically checks the compatibility for possible downgrades by
default.
Note
If you choose to disable the compatibility check feature by entering a
check mark in the box next to the Ignore Compatibility
Check field, you run the risk of making an unsupported
downgrade to your system, which could result in your system going to an
unavailable state.
Step 8
Click Schedule Upgrade.
You can monitor the progress of the downgrade in the main Firmware
Management window, under the Upgrade
Status area.
Performing a System Recovery
The procedures for performing a system recovery is identical to the procedures for
performing a migration-based upgrade. Refer to the section Migration-Based Upgrade for those procedures.

 Feedback