Troubleshooting Cisco Modeling Labs
Guidelines for Troubleshooting
When troubleshooting issues in Cisco Modeling Labs, you should follow the guidelines described in the following table.
| Guideline | Description |
|---|---|
| Check the release notes to see if the issue is a known problem. | The release notes are accessible through the Cisco Cloud and Systems Management Documentation Roadmap available at the following URL: http://www.cisco.com/content/en/us/support/cloud-systems-management/modeling-labs/tsd-products-support-series-home.html |
| Generate a problem report. | The Cisco Modeling Labs client provides functionality that allows you to generate problem reports for any problems encountered in your topology. It is accessible from the menu under . See the Cisco Modeling Labs User Guide, Release 1.0.1 for more information. |
Troubleshooting Issues
| Problem | Probable Cause | Solution |
|---|---|---|
| Node shuts down immediately after initial boot up. | No VT-X extension support in the underlying hardware, VT-X extensions are not being enabled in BIOS, or VT-X extensions are not being enabled in the .vmx file. | Enable nested virtualization. See Enabling Nested Virtualization for more information. |
| Java Runtime Environment (JRE) or Java Development Kit (JDK) error is displayed. | Java executable is missing or not set in the PATH environment variable. | Install Java or add the Java executable to the PATH environment variable. See Java Issues for more information. |
| Error when applying multiple Cisco Modeling Labs licenses. | Licenses have been applied in the incorrect order. | Re-apply the licenses in the correct order. See Applying Licenses for more information. |
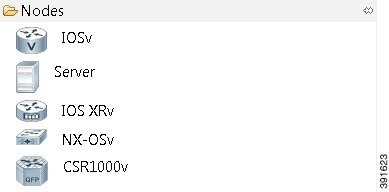
| Missing node subtypes (images) under the Nodes tab in the Palette view. | Fetch from server option not run. | Fetch available node subtypes from the Cisco Modeling Labs server. See Fetching Node Subtypes from the Cisco Modeling Labs Server for more information. |
- Enabling Nested Virtualization
- Java Issues
- Applying Licenses
- Fetching Node Subtypes from the Cisco Modeling Labs Server
Enabling Nested Virtualization
To use Cisco Modeling Labs, you must enable nested virtualization in your newly deployed nodes.
In the ESXi client, check the Virtualize Intel VT-x/EPT check box. Additionally, several updates must be made to the applicable configuration/vmx file for your particular vSphere version.
For ESXi 5.0
vhv.allow = “TRUE”
cpuid.1.ecx="----:----:----:----:----:----:--h-:----"
cpuid.80000001.ecx.amd="----:----:----:----:----:----:----:-h--"
cpuid.8000000a.eax.amd="hhhh:hhhh:hhhh:hhhh:hhhh:hhhh:hhhh:hhhh"
cpuid.8000000a.ebx.amd="hhhh:hhhh:hhhh:hhhh:hhhh:hhhh:hhhh:hhhh"
cpuid.8000000a.edx.amd="hhhh:hhhh:hhhh:hhhh:hhhh:hhhh:hhhh:hhhh"
monitor.virtual_mmu = "hardware"
monitor.virtual_exec = "hardware"
vcpu.hotadd = "FALSE"
 Note | A reboot is not required for the change to take effect. |
For ESXi versions 5.1 and 5.5
vhv.enable = “TRUE”
virtualHW.version = "9"
Verify that the string vcpu.hotadd = “FALSE” is also present in the file. You also need to enable promiscuous mode on the port group that will be used for network connectivity.
See the Cisco Modeling Labs Corporate Edition System Administrator Installation Guide, Release 1.0.1 for more information on planning your network configurations.
Java Issues
When installing the Cisco Modeling Labs client, ensure that you have the appropriate Java version installed and that the PATH environment variable contains the path for the Java binary.
Where mismatched architecture versions of Java 6 or Java 7 and the Cisco Modeling Labs client are installed, a Java runtime error is returned and the installation fails.
Where the Java binary is not on the PATH, you can update the CML.ini file to point to the full path of the Java binary (javaw.exe) file, as follows:
Applying Licenses
The order in which you apply your Cisco Modeling Labs license is important.
-
You must apply your base license (R-PID) first and then apply any remaining expansion license(s) (L-PID).
-
Applying an expansion license before a base license will result in an error.
To resolve this issue, remove all licenses and then re-apply them starting with your base license (R-PID).
Fetching Node Subtypes from the Cisco Modeling Labs Server
To fetch new node subtypes from the Cisco Modeling Labs server, perform the following tasks:
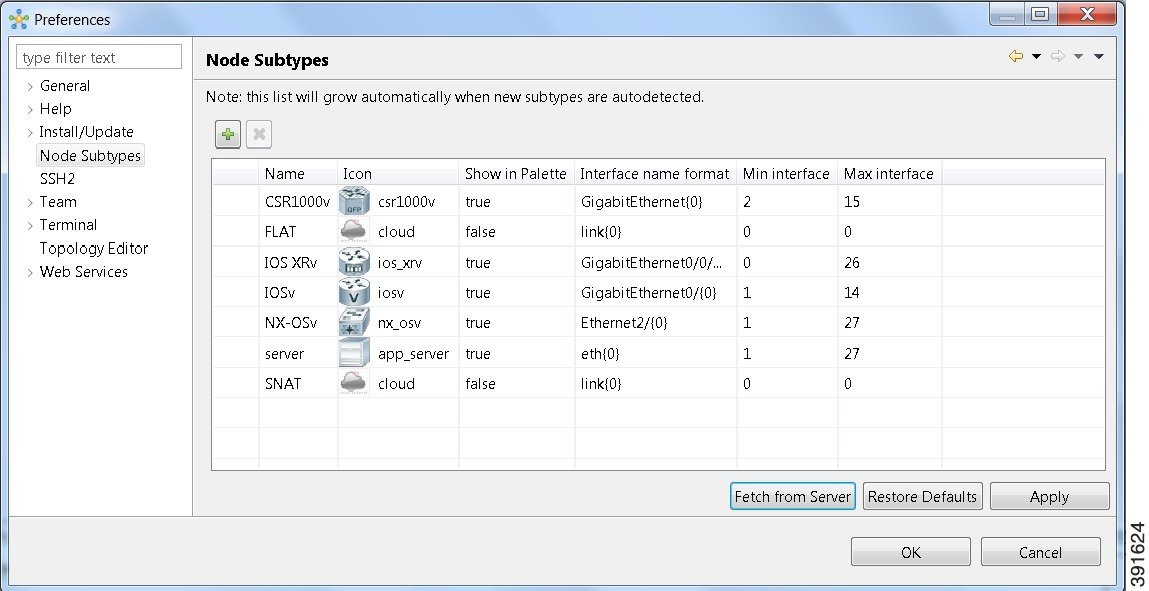
The updated list of node subtypes is available for use in the Palette view.
Contact your system administrator if a specific node subtype is missing from the list, as the system administrator is responsible for adding new node subtypes to the Cisco Modeling Labs server.
 Feedback