Configuring VMware vCloud Director for
Cisco ICFPP
- Configuring VMware vCloud Director
- Workflow for Integrating VCD with Cisco ICFPP
- Creating an External Network
- Adding a vShield Edge Gateway on an Org VDC
- Creating an Org VDC Internal Network
- Creating a Catalog
- Verifying NAT and Firewall Service Configuration
Configuring VMware vCloud Director
Installing Cisco ICFPP at a cloud provider site enables you to support a hybrid cloud environment with Cisco Intercloud Fabric for Business. For VMware vCloud Director (VCD) environments, Cisco ICFPP includes a built-in VCD adapter that enables Cisco ICFPP to integrate with the VCD platform. This VCD-Cisco ICFPP integration can be viewed as the infrastructure that binds the enterprise virtualization platform, such as VMware vCenter, to the provider cloud platform, VCD.
The following illustration depicts how Cisco Intercloud Fabric Director interfaces with the provider VCD platform through Cisco ICFPP.
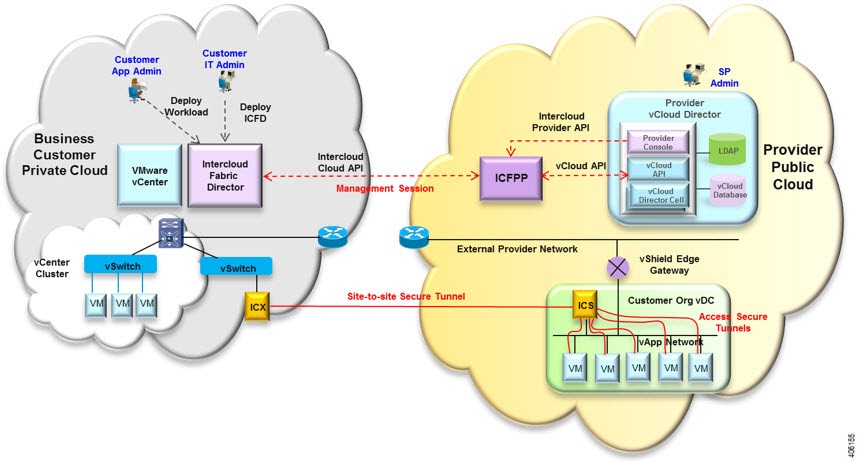
The secure site-to-site tunnel illustrated in the image is created between an Intercloud Fabric Switch (ICS) on the provider cloud and an Intercloud Fabric Extender (ICX) on the private cloud. In addition to providing secure communications between the private and provider clouds, this site-to-site tunnel enables Cisco Intercloud Fabric Secure Extender to integrate with VCD for each tenant network.
Before the ICS and ICX can communicate via the Internet, you must:
-
Assign a public IP address to the ICS so that the ICX can reach the ICS.
-
Ensure that the vShield Edge Gateway provides NAT functionality so that the ICS can connect to the Internet.
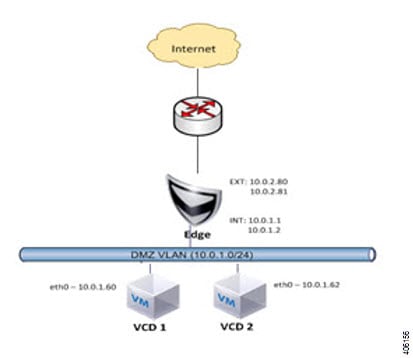
The following figure shows an example deployment:
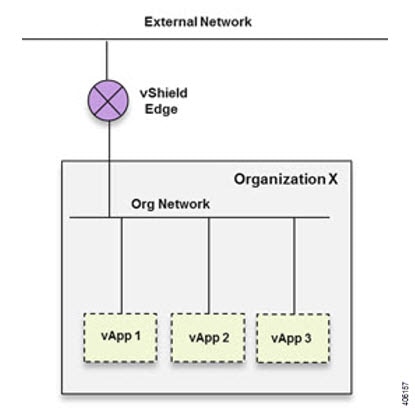
A vShield Edge Gateway is an interconnecting appliance which provides many edge network service features, including:
The following figure shows how Organization X connects the Org Network to an external network through a vShield Edge Gateway and directly to vApp networks.
Workflow for Integrating VCD with Cisco ICFPP
To integrate VCD with Cisco ICFPP, you must provision certain infrastructure resources in the target VCD platform. The following table identifies the tasks required to provision these resources:
|
Step |
Task |
Related Information |
|---|---|---|
|
1. |
Ensure that the following prerequisites are met: |
VMware VCD documentation |
|
2. |
Create an external network. |
|
|
3. |
Deploy the vShield Edge Gateway. |
|
|
4. |
Create an Org VDC network. |
|
|
5. |
Create a catalog. |
|
|
6. |
Ensure that NAT and firewall services are configured on the vShield Edge Gateway. |
For additional information on any of these topics, see your VMware documentation.
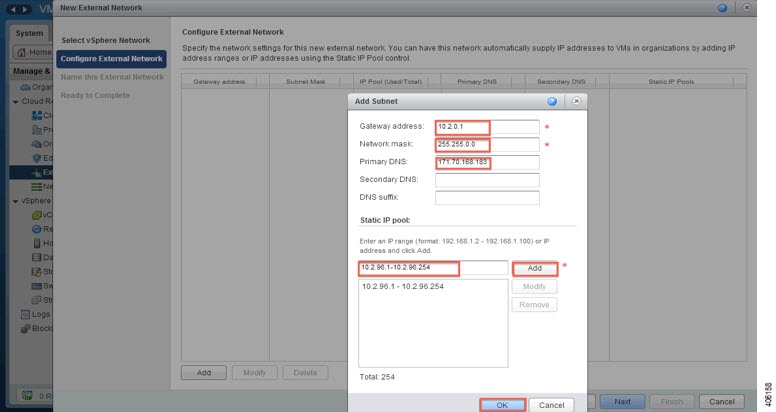
Creating an External Network
This procedure describes how to create an external network in a virtual data center (VDC).
Adding a vShield Edge Gateway on an Org VDC
You must add a vShield Edge Gateway to integrate the Provider VDC and Org VDC with Cisco ICFPP.
Confirm that the following have been configured:
| Step 1 | In the VCD GUI, choose . |
| Step 2 | In the Organization VDCs table, double-click the Org VDC where the vShield Edge Gateway is to be added. The screen is refreshed with information about the selected VDC. |
| Step 3 | Choose the Edge Gateways tab and click Add. The New Edge Gateway wizard opens, guiding you through the configuration process. |
| Step 4 | In the Configure Edge Gateway screen, configure the vShield Edge Gateway for connectivity with the external network as follows, and then click Next: |
| Step 5 | In the
External
Networks screen, choose the external network that you created in
Creating an External Network
and click
Add. If the external network is not listed, create a
new external network.
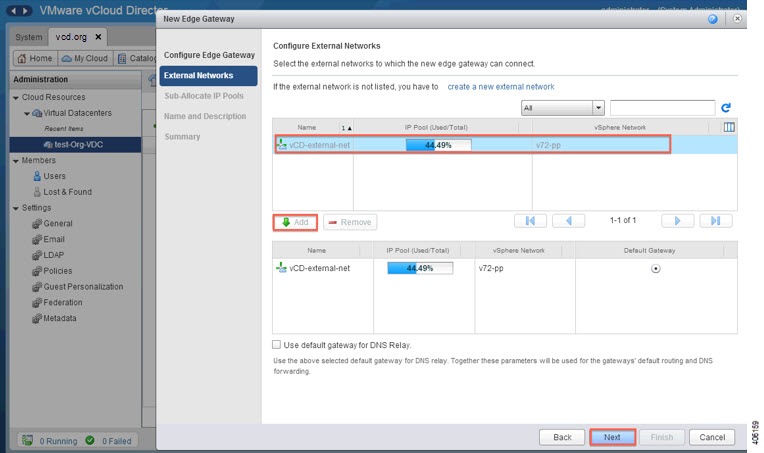 |
| Step 6 | After the external network is added to the list of networks in the lower portion of the screen, click Next. |
| Step 7 | In the Sub-Allocate IP Pools screen, identify the range of IP addresses allocated for each externally-connected interface on the external network, and click Next. |
| Step 8 | In the Name and Description screen, enter the edge gateway name and description, and then click Next. |
| Step 9 | In the Summary screen, review the information for accuracy and click Finish. |
Creating an Org VDC Internal Network
Use this procedure to create an internal network for the Org VDC.
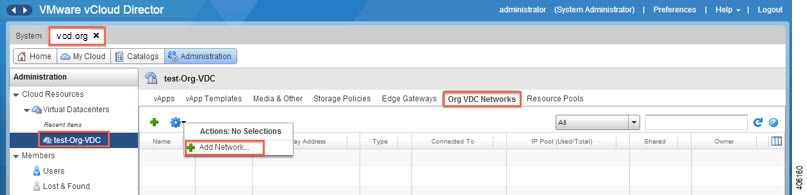
| Step 1 | In the VCD GUI, choose . |
| Step 2 | In the Organization VDCs table, double-click the Org VDC where you want to create the internal network. The screen is refreshed with information about the selected VDC. |
| Step 3 | In the
Org VDC
Networks tab, in the toolbar, choose
.
 |
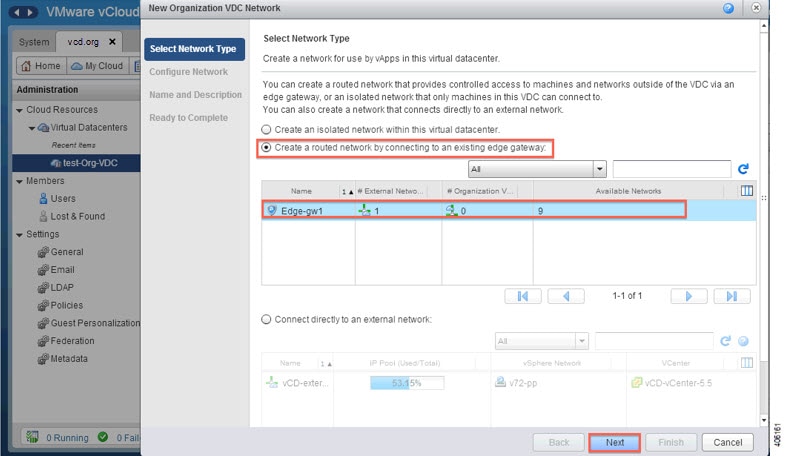
| Step 4 | In the
Select
Network Type screen:
|
| Step 5 | In the Configure Network
screen:
|
| Step 6 | In the Name and Description screen, enter a name and description (optional) for the Org VDC internal network. |
| Step 7 | In the Ready to Complete screen, review the information for accuracy and click Finish. |
Creating a Catalog
A catalog enables you to upload images from Cisco ICFPP to VCD.
For additional information about creating catalogs and selecting options, see your VMware vCloud Director documentation.
Verifying NAT and Firewall Service Configuration
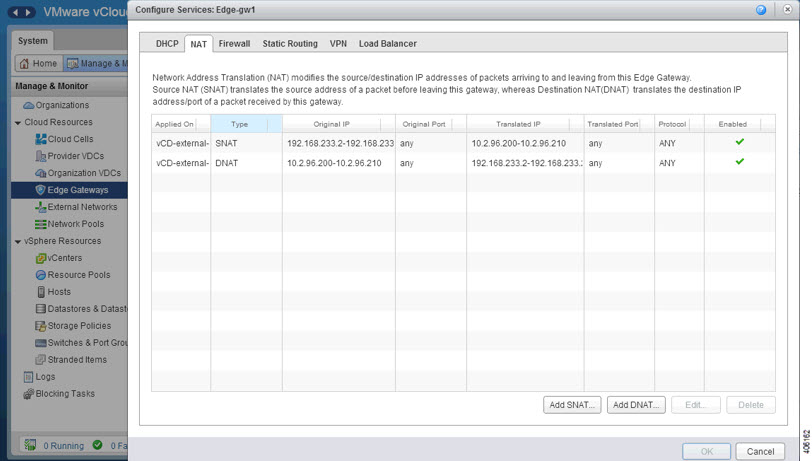
When VCD is integrated with Cisco ICFPP, NAT and firewall services are configured automatically, enabling the vShield Edge Gateway to communicate with the external network. This procedure enables you to confirm that NAT and firewall services have been configured on the vShield Edge Gateway as expected.
| Step 1 | In the VCD GUI, choose . |
| Step 2 | In the Organization VDCs table, double-click the Org VDC where you created the vShield Edge Gateway (Adding a vShield Edge Gateway on an Org VDC). The screen is refreshed with information about the selected VDC. |
| Step 3 | In the Edge Gateways tab, right-click the required edge gateway and choose Edge Gateway Services. |
| Step 4 | In the Configure Services dialog box, confirm the following: |

 Feedback