Installing the DN2-HW-APL Appliance

About the Appliance Installation

Cisco offers a physical appliance (DN2-HW-APL) that can be purchased on which you can install the Cisco APIC-EM. You can deploy this appliance within your network. The Cisco APIC-EM can be deployed as a single host (single appliance in standalone mode) or within a multi-host environment (multiple appliances in multi-host mode).


Important

We recommend that you install and deploy the Cisco APIC-EM in multi-host mode for enhanced scalability and redundancy. For information about multi-host support, see Multi-Host Support.


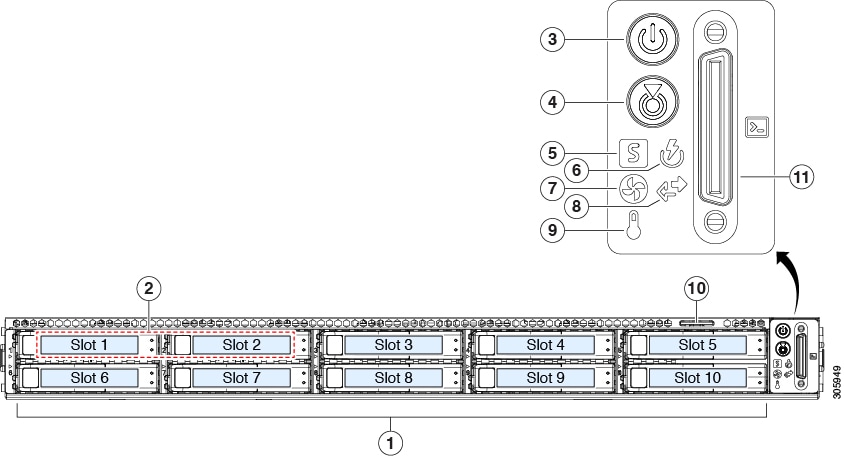
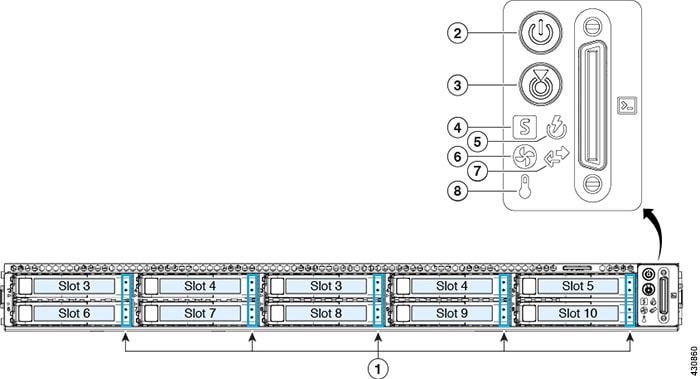
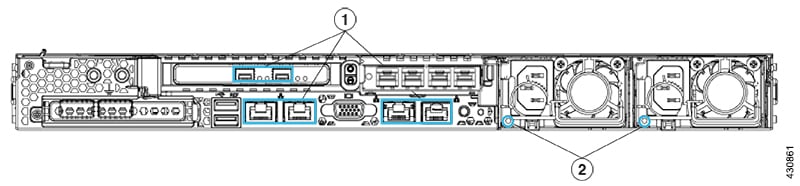
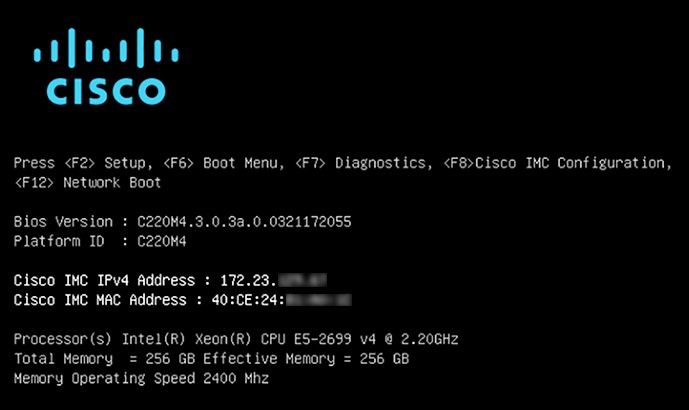
The following table lists the steps for installing the DN2-HW-APL appliance.

Table 1. DN2-HW-APL Appliance Installation

Step

Description

1

Review Appliance Features.

2

Plan the Deployment.

3

Install the Appliance.

4

Installing a New ISO on the Appliance

Review Appliance Features

Feature Summary

The rack-mountable appliance consists of a Cisco UCS C220 M5 small form-factor (SFF) chassis, with the addition of an Intel X710-DA2 network interface card (NIC) in PCIe slot 1. The following appliance is available:

  • 44 core appliance: Cisco part number DN2-HW-APL

The following tables summarize the appliance features.

Table 2. DN2-HW-APL Appliance Features: Cisco UCS C220 Appliance

Feature

Description

Chassis

One rack-unit (1RU) chassis.

Processors

Up to two CPUs from the Intel Xeon Processor Scalable Family. This includes CPUs from the following series:

  • Intel Xeon Bronze 3XXX Processors

  • Intel Xeon Silver 4XXX Processors

  • Intel Xeon Gold 5XXX Processors

  • Intel Xeon Gold 6XXX Processors

  • Intel Xeon Platinum 8XXX Processors

Memory

24 slots for registered DIMMs (RDIMMs), load-reduced DIMMs (LRDIMMs), or through silicon via (TSV) DIMMs.

Storage

10 2.5-inch Small Form Factor (SFF) SAS and SATA hard drives and solid state drives (SSD).

Disk Management (RAID)

  • Internal controllers: Cisco 12-Gbps Modular RAID Controller (PCIe 3.0) with 1- or 2-GB Flash-Backed Write Cache (FBWC), providing enterprise-class data protection for up to 10 SAS and SATA Hard-Disk Drives (HDDs), SSDs, or NVMe PCIe SSDs; or Cisco 12-Gbps Modular SAS Host Bus Adapter (HBA)

  • External controller: Cisco 12-Gbps 9400-8e SAS HBA

Network and Management I/O

Supported connectors:

  • Two 10 Gbps Ethernet ports on the Intel X710-DA2 NIC

  • One 1 Gbps RJ-45 management port (Marvell 88E6176)

  • Two 10GBase-T LOM ports (Intel X550 controller embedded on the motherboard)

The following connectors are available but not typically used in day-to-day operations:

  • One RS-232 serial port (RJ-45 connector)

  • One VGA (DB-15) connector

  • Two USB 3.0 connectors

  • One front-panel KVM connector that is used with the KVM cable, which provides two USB 2.0, one VGA (DB-15), and one serial port (RS-232) RJ-45 connector.

Note that the Intel X710-DA4 NIC, which provides four 10 Gbps Ethernet ports, has been disabled.

Power

Dual AC power supplies, 770 W AC each.

Redundant as 1+1.

Do not mix power supply types or watt ratings in the server.

Cooling

Seven hot-swappable fan modules for front-to-rear cooling.

Video

VGA video resolution up to 1920 x 1200, 16 bpp at 60 Hz, and up to 512 MB of video memory (8 MB is allocated, by default).

Front and Rear Panels

The following figures and tables describe the front and rear panels of the DN2-HW-APL appliance with the Cisco UCS C220 M5 chassis.

Figure 1. Appliance Front Panel

Component

Description

1

10 2.5-inch SAS/SATA hard drives and solid state drives (SSD). Each installed drive bay has a fault LED and an activity LED.

When the drive fault LED is:

  • Off—The drive is operating properly.

  • Amber—The drive has failed.

  • Amber, blinking—The drive is rebuilding.

When the drive activity LED is:

  • Off—There is no drive in the sled (no access, no fault).

  • Green—The drive is ready.

  • Green, blinking—The drive is reading or writing data.

2

Drive bays 1 and 2 support SAS/SATA and NVMe PCIe SSDs. Fault and activity LEDs and their states are the same for these drives as for the installed 2.5-inch SAS/SATA drives.

3

Power button/power status LED. When the LED is:

  • Off—There is no AC power to the appliance.

  • Amber—The appliance is in standby power mode. Power is supplied only to the CIMC and some motherboard functions.

  • Green—The appliance is in main power mode. Power is supplied to all server components.

4

Unit identification button and LED. When the LED is:

  • Off—Unit identification is inactive.

  • Blue—Unit identification is active.

5

System status LED. When the LED is:

  • Green—The appliance is running in a normal operating condition.

  • Green, blinking—The appliance is performing system initialization and memory checks.

  • Amber, steady—The appliance is in a degraded operational state, which may be due to one or more of the following causes:

    • Power supply redundancy is lost.

    • CPUs are mismatched.

    • At least one CPU is faulty.

    • At least one DIMM is faulty.

    • At least one drive in a RAID configuration failed.

  • Amber, 2 blinks—There is a major fault with the system board.

  • Amber, 3 blinks—There is a major fault with the memory DIMMs.

  • Amber, 4 blinks—There is a major fault with the CPUs.

6

Power supply status LED. When the LED is:

  • Green: All power supplies are operating normally.

  • Amber, steady: One or more power supplies are in a degraded operational state.

  • Amber, blinking: One or more power supplies are in a critical fault state.

7

Fan status LED. When the LED is:

  • Green—All fan modules are operating properly.

  • Amber, steady—One fan module has failed.

  • Amber, blinking—Critical fault, two or more fan modules have failed.

8

Network link activity LED. When the LED is:

  • Off: The Ethernet link is idle.

  • Green, blinking: One or more Ethernet LOM ports are link-active, with activity.

  • Green: One or more Ethernet LOM ports are link-active, but there is no activity.

9

Temperature status LED. When the LED is:

  • Green—The appliance is operating at normal temperature.

  • Amber, steady—One or more temperature sensors have exceeded a warning threshold.

  • Amber, blinking—One or more temperature sensors have exceeded a critical threshold.

10

Pull-out asset tag.

11

KVM connector. Used with a KVM cable that provides two USB 2.0, one VGA, and one serial connector.

Figure 2. Appliance Rear Panel

Component

Description

1

Modular LAN-on-motherboard (mLOM) card bay (x16)

2

USB 3.0 ports (two)

3

1Gbps/10Gbps Management Port (1, eth0, Network Adapter 1): This Ethernet port is embedded on the appliance motherboard and can support 1 Gbps and 10 Gbps, depending on the link partner capability. It is identified as 1 on the rear panel, and as eth0 and Network Adapter 1 in the Cisco APIC-EM Configuration Wizard. This port is required, as it allows access to theCisco APIC-EM GUI. Connect it to a switch providing access to your enterprise management network.

This port has a link status LED and a link speed LED. When the status LED is:

  • Off—No link is present.

  • Green, blinking—Traffic is present on the active link.

  • Green—Link is active but there is no traffic present.

When the speed LED is:

  • Off—link speed is 10 Mbps or less.

  • Green—link speed is 1 Gbps.

  • Amber—link speed is 100 Mbps.

4

1Gbps/10Gbps Cloud Port (2, eth1, Network Adapter 2): This Ethernet port is embedded on the appliance motherboard and can support 1 Gbps and 10 Gbps, depending on the link partner capability. It is identified as 2 on the rear panel, and as eth1 and Network Adapter 2 in the APIC-EM Configuration Wizard. This port is optional, used for connecting to the Internet when it is not possible to do so via the 10Gbps Enterprise Port. Connect to the Internet or a proxy server with connections to the Internet.

This port has a link status LED and a link speed LED. When the link status LED is:

  • Off—No link is present.

  • Green, blinking—Traffic is present on the active link.

  • Green—Link is active but there is no traffic.

When the speed LED is:

  • Off—link speed is 10 Mbps or less.

  • Green—link speed is 1 Gbps.

  • Amber—link speed is 100 Mbps.

5

VGA video port (DB-15).

6

1Gbps CIMC Port: This is the embedded port to the right of the VGA video port and to the left of the RJ45 serial port. It is assigned an IP address when you enable browser access to the appliance's CIMC GUI (see Configuring CIMC). This port is reserved for out-of-band management of the appliance chassis and software. Connect it to a switch providing access to your enterprise management network.

This port has a link status LED and a link speed LED. When the link status LED is:

  • Off—No link is present.

  • Green, blinking—Traffic is present on the active link.

  • Green—Link is active but there is no traffic present.

When the speed LED is:

  • Off—link speed is 10 Mbps or less.

  • Green—link speed is 1 Gbps.

  • Amber—link speed is 100 Mbps.

7

Serial port (RJ-45 connector)

8

Rear unit identification button/LED

9

Power supplies (up to two, redundant as 1+1). Each power supply has a power supply fault LED and an AC power LED.

When the fault LED is:

  • Off—The power supply is operating normally.

  • Amber, blinking—An event warning threshold has been reached, but the power supply continues to operate.

  • Amber, solid—A critical fault threshold has been reached, causing the power supply to shut down (for example, a fan failure or an over-temperature condition).

When the AC Power LED is:

  • Off—There is no AC power to the power supply.

  • Green, solid—AC power is OK, DC output is OK.

  • Green, blinking—AC power is OK, DC output is not enabled.

For more details, see Power Specifications.

10

Intel X710-DA4 network interface card (NIC), which is located in the appliance's PCIe riser 2/slot 2. Note that this card has been disabled in this release.

11

10Gbps Cluster Port (eth3, Network Adapter 4): This is the right-hand 10Gbps port on the Intel X710-DA2 NIC in the appliance PCIe riser 1/slot 1. It is identified as eth3 and Network Adapter 4 in the Cisco APIC-EM Configuration Wizard. Connect this port to a switch with connections to the other nodes in the cluster.

This port has a link status ("ACT") LED and a link speed ("LINK") LED.

When the link status LED is:

  • Off—No link is present.

  • Green, blinking—Traffic is present on the active link.

  • Green—Link is active but there is no traffic present.

When the link speed LED is:

  • Off—link speed is 100 Mbps or less.

  • Green—link speed is 10 Gbps.

  • Amber—link speed is 1 Gbps.

Note 
Although capable of operating at lower speeds, the Enterprise and Cluster ports are intended to operate at 10Gbps only.

12

10Gbps Enterprise Port (eth2, Network Adapter 3): This is the left-hand 10Gbps port on the Intel X710-DA2 NIC in the appliance PCIe riser 1/slot 1. It is identified as eth2 and Network Adapter 3 in the Cisco APIC-EM Configuration Wizard. Connect this port to an access switch with connections to the enterprise network.

This port has a link status ("ACT") LED and a link speed ("LINK") LED.

When the link status LED is:

  • Off—No link is present.

  • Green, blinking—Traffic is present on the active link.

  • Green—Link is active but there is no traffic present.

When the speed LED is:

  • Off—link speed is 100 Mbps or less.

  • Green—link speed is 10 Gbps.

  • Amber—link speed is 1 Gbps.

Note 
Although capable of operating at lower speeds, the Enterprise and Cluster ports are intended to operate at 10Gbps only.

13

Threaded holes for dual-hole grounding lug.

Physical Specifications

The following table lists the physical specifications for the appliance.

Table 3. Physical Specifications

Description

Specification

Height

1.7 in. (4.32 cm)

Width

  • Without handles: 16.9 in. (43.0 cm)

  • Including handles: 19.0 in. (48.3 cm)

Depth (length)

  • Without handles: 29.8 in. (75.6 cm)

  • Including handles: 30.98 in. (78.7 cm)

Front Clearance

3 in. (76 mm)

Side Clearance

1 in. (25 mm)

Rear Clearance

6 in. (152 mm)

Maximum weight (fully loaded chassis)

37.5 lb. (17.0 kg)

Environmental Specifications

The following table lists the environmental specifications for the appliance.

Table 4. Environmental Specifications

Description

Specification

Temperature, operating

41 to 95°F (5 to 35°C)

Derate the maximum temperature by 1°C per every 1000 ft. (305 meters) of altitude above sea level.

Temperature, non-operating (when the appliance is stored or transported)

–40 to 149°F (–40 to 65°C)

Humidity (RH), operating

10 to 90%, non-condensing at 82°F (28°C)

Humidity (RH), non-operating (when the appliance is stored or transported)

5 to 93% at 82°F (28°C)

Altitude, operating

0 to 10,000 ft. (0 to 3,048 m)

Altitude, non-operating (when the appliance is stored or transported)

0 to 40,000 ft. (0 to 12,192 m)

Sound power level, measure A-weighted per ISO7779 LwAd (Bels), operation at 73°F (23°C)

Cisco UCS C220: 5.5

Sound pressure level, measure A-weighted per ISO7779 LpAm (dBA), Operation at 73°F (23°C)

Cisco UCS C220: 40

Power Specifications

The specifications for the dual 770 W AC power supply (Cisco part number UCSC-PSU1-770W) provided with the appliance are listed in the table below.


Caution

Do not mix power supply types in the appliance. All power supplies must be identical.
Table 5. AC Power Supply Specifications

Description

Specification

AC input voltage

Nominal range: 100–120 VAC, 200–240 VAC

Range: 90–132 VAC, 180–264 VAC

AC input frequency

Nominal range: 50 to 60 Hz

(Range: 47–63 Hz)

Maximum AC input current

  • 9.5 A at 100 VAC

  • 4.5 A at 208 VAC

Maximum input volt-amperes

950 VA at 100 VAC

Maximum output power per PSU

770 W at 100–120 VAC

Maximum inrush current

15 A at 35° C

Maximum hold-up time

12 ms at 770 W

Power supply output voltage

12 VDC

Power supply standby voltage

12 VDC

Efficiency rating

Climate Savers Platinum Efficiency (80Plus Platinum certified)

Form factor

RSP2

Input connector

IEC320 C14

You can get more specific power information for your exact appliance configuration by using the Cisco UCS Power Calculator: http://ucspowercalc.cisco.com

Plan the Deployment

Planning Workflow

The following table details the planning and information-gathering tasks you must perform before attempting to install, configure, and set up your appliances. When you have completed the tasks in this table, you can continue by physically installing your appliances in the data center.

Table 6. Planning Tasks

Step

Description

1

Review the recommended cabling and switching requirements for standalone and cluster installations. See Required Interface Cable Connections and IP Addresses.

2

Gather the IP addressing, subnetting, and other IP traffic information that you will apply during appliance configuration. See Required Subnets and Additional IP Addresses.

3

Prepare a solution for required access to web-based resources. See Provide Secure Access to the Internet.

4

Reconfigure your firewalls and security policies for Cisco APIC-EM traffic. See Cisco APIC-EM Ports Reference.

Required Interface Cable Connections and IP Addresses

Connect the ports on the appliance to switches providing the following types of network access:

  • 1Gbps/10Gbps Management Port (1, eth0, Network Adapter 1): This port, labeled 1 on the rear panel, provides access to the Cisco APIC-EM GUI. Its purpose is to enable users to use the software on the appliance. Cable this port to an access switch with connections to your enterprise management network and configure one IP address with subnet mask for the port.

  • (Optional) 1Gbps/10Gbps Cloud Port (2, eth1, Network Adapter 2): This port, labeled 2 on the rear panel, is optional. Use it only if you cannot connect the appliance to the Internet (including to your Internet proxy server) using the 10Gbps Enterprise Port (eth2, Network Adapter 3). If you need to use the Cloud Port, cable it to an access switch with connections to your Internet proxy server and configure one IP address with subnet mask for the port.

  • 10Gbps Southbound Port (eth2, Network Adapter 3): This is the left-hand port on the Intel X710-DA2 NIC in the appliance PCIe riser 1/slot 1. Its purpose is to enable Cisco APIC-EM to communicate with and manage your network. Cable this port to an access switch with connections to the enterprise network and configure one IP address with subnet mask for the port.


    Note

    This port can be used as a NIC-bonded port.


  • 10Gbps Southbound Port (eth3, Network Adapter 4): This is the right-hand port on the Intel X710-DA2 NIC in the appliance PCIe riser 1/slot 1. Its purpose is to enable communications among the master and add-on nodes in a cluster. Cable this port to an access switch with connections to the other nodes in the cluster and configure one IP address with subnet mask for the port.


    Note

    This porrt can be used as a NIC-bonded port.


  • 1Gbps CIMC Port: This port provides browser access to the CIMC out-of-band appliance management interface and its graphic user interface. Its purpose is to allow you to manage the appliance and its hardware. Cable this port to an access switch with connections to your enterprise management network and configure one IP address with subnet mask for the port.

For more details on each of the ports, see the rear panel diagram and accompanying descriptions for your Cisco UCS C220 M5 chassis in Front and Rear Panels.


Note

Multi-node cluster deployments require all member nodes to be in the same network and at the same site. The appliance does not support distribution of nodes across multiple networks or sites.

When cabling the 10Gbps Enterprise and Cluster ports, note that the ports support the following media types only:

  • FP-10G-USR (Ultra short range, MMF)

  • SFP-10G-SR (Short range, MMF)

  • SFP-10G-LR (Long range, SMF)

  • 10GBASE-CU SFP+ Cable 1 Meter

  • 10GBASE-CU SFP+ Cable 3 Meter

  • 10GBASE-CU SFP+ Cable 5 Meter

  • 10GBASE-CU SFP+ Cable 7 Meter

  • SFP-10GB-ACU Cable 7 Meter

Required Subnets and Additional IP Addresses

Before beginning the installation, you must ensure that your network has sufficient IP addresses available to assign to each of the appliance ports (see Required Interface Cable Connections and IP Addresses) that you plan on using. You will also need the following additional IP addresses and dedicated IP subnets, which are prompted for and applied during configuration of the appliance:


Note

All of the IP addresses called for in these requirements must be valid, physical IPv4 addresses with valid IPv4 netmasks. Ensure that the addresses and their corresponding subnets do not overlap. Service communication issues can result if they do.


  1. Cluster Virtual IP Addresses: One virtual IP address per configured network interface per cluster. This requirement applies to three-node clusters and single-node clusters that will be converted into a three-node cluster in the future. You must supply a VIP for each configured network interface. Each VIP should be from the same subnet as the IP address of the corresponding configured interface. There are four interfaces on each appliance, and it is up to you to decide which interfaces you want to configure for use. An interface is considered configured if you supply an IP for that interface, along with a subnet mask and one or more associated default gateways or static routes. If you skip an interface entirely during configuration, that interface is considered as not configured.

    Note the following:

    If you have a single-node setup and do not plan to convert it into a three-node cluster in the future, you are not required to specify a virtual IP address. However, if you decide to do so, you must specify a virtual IP address for every configured network interface (just as you would for a three-node cluster).

  2. Default Gateway IP Address: The IP address for your network's preferred default gateway. If no other routes match the traffic, traffic will be routed through this IP address. Typically, you would assign the default gateway to the interface in your network configuration that accesses the internet.

  3. DNS Server IP Addresses: The IP address for one or more of your network's preferred DNS servers. During configuration, you can specify multiple DNS server IP addresses and netmasks by entering them as a space-separated list. Note that, due to an unresolved bug, you currently cannot change the list of DNS servers after configuration. If you find that you must change the list of DNS server IPs after configuration, contact the Cisco Technical Assistance Center (TAC).

  4. (Optional) Static Route Addresses: The IP addresses, subnet masks, and gateways for one or more static routes. During configuration, you can specify multiple static-route IP addresses, netmasks, and gateways by entering them as a space-separated list.

    You can set one or more static routes for any interface on the appliance. You should supply static routes when you want to route traffic in a specific direction other than the default gateway. Each of the interfaces with static routes will be set as the "device" the traffic will be routed through in the IP route command table. For this reason, it is important to match the static route directions with the interface though which the traffic will be sent.

    Static routes are not recommended in network device routing tables such as those used by switches and routers. Dynamic routing protocols are better for this. However, you should add them where needed to allow the appliance access to particular parts of the network that can be reached no other way.

  5. NTP Server IP Addresses: The DNS-resolvable hostname, or IP address, for at least one Network Time Protocol (NTP) server.

    During configuration, you can specify multiple NTP server IPs/masks or hostnames by entering them as a space-separated list. For a production deployment, we recommend that you configure a minimum of three NTP servers.

    You will specify these servers during pre-flight hardware synchronization and again during configuration of the software on each appliance in the cluster. Time synchronization is critical to the accuracy of data and coordination of processing across a multi-host cluster. Before deploying the appliance in production, make sure that the time on the appliance system clock is current and that the Network Time Protocol (NTP) servers you specified are keeping accurate time.

Provide Secure Access to the Internet

By default, the appliance is configured to access Cisco.com and other URLs via the Internet, in order to download software updates, licenses, and device software, as well as provide up-to-date map information, user feedback, and so on.

Providing Internet connections for these purposes is a mandatory requirement.

Using an HTTPS proxy server is a reliable way to access remote URLs securely. We recommend that you use an HTTPS proxy server to provide the appliance with the access it needs to URLs. During installation, you will be prompted to enter the URL and port number of the proxy server you want to use for this purpose, along with the proxy's login credentials (if the proxy requires them).

As of this release, the appliance supports communication with proxy servers over HTTP only. You may locate the HTTPS proxy server anywhere within your network. The proxy server can communicate with the Internet using HTTPS, while the appliance communicates with the proxy server via HTTP. For these reasons, ensure that you specify the proxy’s HTTP port when configuring the proxy during configuration.

If for any reason you need to change the proxy setting after configuration, you can do so from the GUI.

Cisco APIC-EM Ports Reference

The following tables list the Cisco APIC-EM ports that permit incoming traffic, as well as the Cisco APIC-EM ports that are used for outgoing traffic. You should ensure that these ports on the controller are open for both incoming and outgoing traffic flows.


Note

Ensure that proper protections exist in your network for accessing port 22. For example, you can configure a proxy gateway or secure subnets to access this port.


Table 7. Cisco APIC-EM Incoming Traffic Port Reference

Port Number

Permitted Traffic

Protocol (TCP or UDP)

22

SSH

TCP

80

HTTP

TCP

123

NTP

UDP

162

SNMP

UDP

443

1

HTTPS

TCP

500

ISAKMP

In order for deploying multiple hosts across firewalls in certain deployments, the IPSec ISAKMP (Internet Security Association and Key Management Protocol) UDP port 500 has to be allowed to be traversed.

UDP

16026

SCEP

TCP

1 You can configure the TLS version for this port using the Cisco APIC-EM. For more information, see the Cisco Application Policy Infrastructure Controller Enterprise Module Administrator Guide.
Table 8. Cisco APIC-EM Outgoing Traffic Port Reference

Port Number

Permitted Traffic

Protocol (TCP or UDP)

22

SSH (to the network devices)

TCP

23

Telnet (to the network devices)

TCP

53

DNS

UDP

80

Port 80 may be used for an outgoing proxy configuration.

Additionally, other common ports such as 8080 may also be used when a proxy is being configured by the Cisco APIC-EM configuration wizard (if a proxy is already in use for your network).

To access Cisco supported certificates and trust pools, you can configure your network to allow for outgoing IP traffic from the controller to Cisco addresses at the following URL:

http://www.cisco.com/security/pki/

TCP

123

NTP

UDP

161

SNMP agent

UDP

443

2

HTTPS

TCP

500

ISAKMP

In order for deploying multiple hosts across firewalls in certain deployments, the IPSec ISAKMP ( (Internet Security Association and Key Management Protocol) UDP port 500 has to be allowed to be traversed.

UDP

2 You can configure the TLS version for this port using the Cisco APIC-EM. For more information, see the Cisco Application Policy Infrastructure Controller Enterprise Module Administrator Guide.

Install the Appliance

Appliance Installation Workflow

The following table details the physical installation tasks and the order in which to perform them. Follow these steps for each DN2-HW-APL appliance you install. Be sure to install all of the appliances before configuring the first, master node.

Table 9. DN2-HW-APL Appliance Installation Tasks

Step

Description

1

Unpack and Inspect the Appliance.

2

Review the Installation Warnings and Guidelines.

3

Review the rack requirements and install the appliance in a rack. See Review the Rack Requirements.

4

Connect and Power On the Appliance.

5

Check the front- and back-panel LEDs to ensure the appliance is functional. See Check the LEDs.

Unpack and Inspect the Appliance


Caution

When handling internal appliance components, wear an ESD strap and handle modules by the carrier edges only.

Tip

Keep the shipping container in case the appliance requires shipping in the future.

Note

The chassis is thoroughly inspected before shipment. If any damage occurred during transportation or any items are missing, contact your customer service representative immediately.

Procedure


Step 1

Remove the appliance from its cardboard container and save all packaging material.

Step 2

Compare the shipment to the equipment list provided by your customer service representative. Verify that you have all items.

Step 3

Check for damage and report any discrepancies or damage to your customer service representative. Have the following information ready:

  • Invoice number of shipper (see the packing slip)

  • Model and serial number of the damaged unit

  • Description of damage

  • Effect of damage on the installation


Review the Installation Warnings and Guidelines


Warning

To prevent the system from overheating, do not operate it in an area that exceeds the maximum recommended ambient temperature of: 95°F (35°C). Statement 1047

Warning

The plug-socket combination must be accessible at all times, because it serves as the main disconnecting device. Statement 1019

Warning

This product relies on the building’s installation for short-circuit (overcurrent) protection. Ensure that the protective device is rated not greater than: 250 V, 15 A. Statement 1005

Warning

Installation of the equipment must comply with local and national electrical codes. Statement 1074

Caution

To ensure proper airflow it is necessary to rack the appliances using rail kits. Physically placing the units on top of one another or “stacking” without the use of the rail kits blocks the air vents on top of the appliances, which could result in overheating, higher fan speeds, and higher power consumption. We recommend that you mount your appliances on rail kits when you are installing them into the rack because these rails provide the minimal spacing required between the appliances. No additional spacing between the appliances is required when you mount the units using rail kits.

Caution

Avoid uninterruptible power supply (UPS) types that use ferroresonant technology. These UPS types can become unstable with systems such as the Cisco UCS, which can have substantial current-draw fluctuations due to fluctuating data traffic patterns.

When you are installing an appliance, follow these guidelines:

  • Plan your site configuration and prepare the site before installing the appliance. See the Cisco UCS Site Preparation Guide for help with recommended site planning and preparation tasks.

  • Ensure that there is adequate space around the appliance to allow for servicing the appliance and for adequate airflow. The airflow in this appliance is from front to back.

  • Ensure that the site air-conditioning meets the thermal requirements listed in Environmental Specifications.

  • Ensure that the cabinet or rack meets the requirements listed in Review the Rack Requirements.

  • Ensure that the site power meets the requirements listed in Power Specifications. If available, you can use a UPS to protect against power failures.

Review the Rack Requirements

For proper operation, the rack in which you install the appliance must meet the following requirements:

  • A standard 19-in. (48.3-cm) wide, four-post EIA rack, with mounting posts that conform to English universal hole spacing, per section 1 of ANSI/EIA-310-D-1992.

  • The rack post holes can be square 0.38-inch (9.6 mm), round 0.28-inch (7.1 mm), #12-24 UNC, or #10-32 UNC when you use the supplied slide rails.

  • The minimum vertical rack space per server must be one RU, equal to 1.75 in. (44.45 mm).

Connect and Power On the Appliance

This section describes how to power on the appliance and check that it is functional.

Procedure


Step 1

Attach the supplied power cord to each power supply in the appliance and then attach the power cords to a grounded AC power outlet. See Power Specifications for details.

Wait for approximately two minutes to let the appliance boot into standby power mode during the first boot up.

You can verify the power status by looking at the Power Status LED:

  • Off—There is no AC power present in the appliance.

  • Amber—The appliance is in standby power mode. Power is supplied only to the CIMC and some motherboard functions.

  • Green—The appliance is in main power mode. Power is supplied to all appliance components.

For more information on these and other appliance LEDs, see Front and Rear Panels.

Step 2

Connect a USB keyboard and VGA monitor to the server, using the supplied KVM cable connected to the KVM connector on the front panel. Alternatively, you can use the VGA and USB ports on the rear panel. You can only connect to one VGA interface at a time.


What to do next

Continue by following the procedure described in Check the LEDs.

Check the LEDs

After you have powered up the appliance, check the state of the front-panel and rear-panel LEDs and buttons to ensure it is functioning.

The following illustrations show the LEDs for a functional appliance after physical installation and first power-up and before configuration.

Figure 3. Front Panel LEDs

LED

Desired Status Indicator

1

  • Drive Fault LEDs: Off

  • Drive Activity LEDs: Green

2

Power Status: Green

3

Unit identification: Off

4

System Status: Green

5

Power Supply Status: Green

6

Fan Status: Green

7

Network Link Activity: Off

8

Temperature Status: Green

Figure 4. Rear Panel LEDs

LED

Desired Status Indicator

1

At initial power-up, all ports should have their Link Status and Link Speed LEDs showing as Off.

After network settings are configured and tested using the Maglev Configuration Wizard (see Configure the Master Node and Configure Add-on Nodes), the Link Status and Link Speed LEDs for all cabled ports should be Green. All uncabled port LEDs should be unchanged.

2

AC Power Supply Status LEDs: Green

If you see LEDs with colors other than those shown above, you may have a problem condition. See Front and Rear Panels for details on the likely causes of the status. Be sure to correct any problem conditions before proceeding to configure the appliance.

Installing a New ISO on the Appliance

Under certain circumstances, you may need to install a new or the latest Cisco APIC-EM ISO image on the appliance. This section describes the following procedures that you can use to perform this task:

  • Downloading the Cisco APIC-EM ISO image

  • Installing the Cisco APIC-EM ISO image on the DN2-HW-APL appliances using one of the following procedures:

    • Install the ISO image using the CIMC Remote Management Utility

    • Install the ISO image using a USB flash drive

Installing the ISO Image on the DN2-HW-APL Appliance

After you download the ISO image, you can perform a fresh installation on your DN2-HW-APL appliance by using any of the following methods:

  • Install the Cisco APIC-EM ISO image using the CIMC Remote Management Utility.

    1. Configure CIMC.

    2. Install the Cisco APIC-EM software release remotely.


    Important

    You must configure the CIMC to perform this remote installation. For information about configuring CIMC, see Configuring CIMC.


  • Install the ISO image using a USB flash drive.

    1. Create a bootable USB disk from the USB flash drive.

    2. Connect the bootable USB disk to the DN2-HW-APL appliance.

    3. Install the Cisco APIC-EM software release using the local KVM or remotely using the CIMC KVM.


    Note

    For information about creating a bootable USB disk from a USB flash drive, see Creating a Bootable USB Disk and Attaching the ISO.


Note

If your Cisco APIC-EM series appliance is running an earlier version of the controller software, you can upgrade it to the latest version by following the upgrade procedure using the GUI as described in the Release Notes for the Cisco Application Policy Infrastructure Controller Enterprise Module. Currently, reimaging your existing Cisco APIC-EM series appliance to perform an upgrade to the latest release is not supported.


Note

For installing the Cisco APIC-EM software release using a USB flash device, the CIMC configuration is optional. Choose one of these options if you do not prefer a remote installation.


Configuring CIMC

You can perform all operations on the DN2-HW-APL appliances using the CIMC. To do this, you must first configure an IP address and IP gateway to access the CIMC from a web-based browser.

Procedure

Step 1

Attach a keyboard and monitor to the USB ports on the rear panel of the appliance or by using a KVM cable and connector to access the appliance console.

Step 2

Plug in the power cord.

Step 3

Press the Power button to boot the server. Watch for the prompt to press F8 as shown in the following screen.

Figure 5. CIMC Opening Screen
Step 4

During bootup, press F8 when prompted to open the BIOS CIMC Configuration Utility. The following screen appears.

Figure 6. CIMC Configuration Utility
Step 5

In the Configuration Utility window, change the following fields as specified:

  • NIC mode—Select Dedicated.

  • IP (Basic)—Select IPV4.

  • CIMC IP—Enter the IP address of the CIMC.

  • Prefix/Subnet—Enter the subnet of the CIMC.

  • Gateway—Enter the Gateway address.

  • Pref DNS Server—Enter the preferred DNS server address, if available.

  • NIC Redundancy—None

Step 6

Press F1 to specify additional settings.

Step 7

Make the following changes on the Additional Settings window:

  • For Common Properties, enter a hostname for CIMC.

  • For Common Properties, turn off Dynamic DNS.

  • Turn off the Factory Defaults.

  • Enter the admin password. If you leave the password field blank, the default password is password.

  • Enter new Port Properties or accept the default.

  • Turn off the Port Profiles.

Step 8

Press F10 to save the settings.

Step 9

Press escape to exit and reboot the server.

Step 10

After the settings are saved, open a browser and enter the following URL:

https://CIMC_ip_address where CIMC_IP_address is the IP address that you entered in Step 5.


Create a RAID 10 Configuration

Before you can continue with installing Cisco APIC-EM on the DN2-HW-APL appliance, you must delete all the existing virtual drives, and create a RAID 10 configuration.


Note

Cisco recommends that you create a RAID 10 configuration of 3.2 TB.


See Cisco UCS Servers RAID Guide for information about how to create a RAID10 configuration.

Partitioning the Appliance

After you have created the RAID 10 configuration, you might be prompted to choose how the appliance should be partitioned. Complete the following steps to partition the appliance.

Procedure

Step 1

From the prompt to select the partitioning method, select Guided - use entire disk and set up LVM.

Step 2

From the prompt to select the disk to partition, select SCSI9 (2,2,0) (sdf) - 3.8 TB Cisco UCSC-RAID12G-2GB.

Note 

All the data on the disk you have selected will be erased.


What to do next

Creating a Bootable USB Disk and Attaching the ISO

Follow the procedure described below to create a bootable USB disk for the Cisco APIC-EM appliance.


Important

There are many ways to create a bootable USB disk and this procedure is only one example of such a process of creating a bootable USB disk. This procedure uses the Rufus freeware utility (version 2.6.818) to create a bootable USB disk using a Windows machine. The URL for the Rufus freeware utility download is located at: https://rufus.akeo.ie/.


Before you begin

The USB flash drive that you are using to create a bootable USB disk should have a minimum capacity of at least 8 GB.

Procedure

Step 1

Download a freeware utility to create a bootable USB disk to your Windows machine (laptop or desktop).

After download, open and install the utility.

Note 

The Rufus freeware utility will open and self-install.

Step 2

Connect your USB drive to your Windows machine where you downloaded the utility.

After connecting your USB drive, the utility GUI appears. Review the following default values from the drop-down menus for the bootable USB disk:

  • Partition scheme and target system type: MBR partition scheme for BIOS or UEFI

  • File system: FAT32

  • Cluster size: 4096 bytes

  • Quick format : (Checked)

  • Create a bootable disk using FreeDOS: (Checked)

  • Create extended label and icon files: (Checked)

Important 

Do not change any of the displayed default values in the GUI.

Step 3

Click the Click to select image icon located in the middle of the GUI.

The Click to select image icon is an image of a CD-ROM that is located in the middle of the GUI field. It is next to the Format Option, Create a bootable disk using, with FreeDOS selected from the drop-down menu.

Important 

Keep the drop-down menu set at FreeDOS.

Step 4

Navigate to the Cisco APIC-EM ISO image on your network and select it.

Step 5

Click Start to begin copying the ISO image to the USB drive.

This action creates the USB drive as a bootable USB disk with the Cisco APIC-EM ISO image installed.

Step 6

Remove the bootable USB disk from the laptop or desktop and use it wherever you will install the controller.


What to do next

Insert the bootable USB disk into the server or appliance where you will install the controller.

Using CIMC to Configure Cisco APIC-EM on the DN2-HW-APL Appliance

After you configure the CIMC for your appliance, you can use it to manage a DN2-HW-APL appliance. You can perform all operations including BIOS configuration through the CIMC.

Before you begin

Ensure that you have connected and powered up the appliance by following the recommended procedures in this guide.

Ensure that you have configured the CIMC on your appliance. See Configuring CIMC

Ensure that you have the Cisco APIC-EM ISO image on the client machine from which you are accessing the CIMC or you have a bootable USB with the image for installation.

Ensure that you have your Cisco APIC-EM program parameter information available and the requirements ready for deployment (for example, NTP servers).

Procedure

Step 1

Connect to the CIMC for appliance management.

Connect the Ethernet cables from the LAN to the appliance using the ports selected by the Network Interface Card (NIC) Mode setting. The active-active and active-passive NIC redundancy settings require you to connect to two ports.

Step 2

Use a browser and the IP address of the CIMC to log in to the CIMC Setup Utility.

The IP address is based on the CIMC configuration that you made.

The default username for the server is admin. The default password is password.
Step 3

Click Launch KVM Console in the CIMC GUI .

Step 4

Use your CIMC credentials to log into the KVM console.

Step 5

Click Virtual Media on the KVM Console menu bar.

Step 6

Click Activate Virtual Devices from the Virtual Media drop down menu.

Step 7

Navigate to the Cisco APIC-EM ISO image in the Virtual Media - Map CD/DVD window.

Step 8

Once the Cisco APIC-EM ISO image appears in the Drive/Image File field, click the Map Device button.

The Read Only check box should be checked in this window.

Step 9

Choose Macros | Static Macros | Ctrl-Alt-Del to boot the Cisco APIC-EM series appliance using the ISO image. A screen similar to the one shown in the following figure appears.

Figure 7. CIMC Window
Step 10

Press F6 to bring up the boot menu. A screen similar to the following one appears.

Figure 8. Boot Device Window
Step 11

Choose the DVD that you mapped and press Enter.

You may be prompted to download a GRUB boot loader to make the newly installed system bootable.

Step 12

When prompted, ensure the path to the device for boot loader installation is correct, and select Continue

After pressing Enter, the Cisco APIC-EM ISO software and files are installed on your appliance.

After these files are installed, the Ubuntu screen briefly appears. Next, the Cisco APIC-EM configuration wizard starts.

Step 13

Proceed to configure the Cisco APIC-EM using the wizard.

If the configuration wizard does not start, then enter the config_wizard command initiate the configuration process.

After you are done with the configuration wizard and have rebooted, the Cisco APIC-EM GUI Login window appears. The Cisco APIC-EM is now ready to use.


What to do next

At the Cisco APIC-EM GUI Login window, you are prompted to enter the web-based admin login credentials (username and password) to access the Cisco APIC-EM user interface. You can initially access the web interface by using the GUI admin user’s username and password that you defined during the setup process.

After you log in to the Cisco APIC-EM user interface, you can then configure your controller settings including discovery credentials, SNMP values, and certificates. See the Cisco Application Policy Infrastructure Controller Enterprise Module Administrator Guide, for information about configuring the controller settings.