Cisco Application Policy Infrastructure Controller Enterprise Module Administrator Guide, Release 1.4.x
Bias-Free Language
The documentation set for this product strives to use bias-free language. For the purposes of this documentation set, bias-free is defined as language that does not imply discrimination based on age, disability, gender, racial identity, ethnic identity, sexual orientation, socioeconomic status, and intersectionality. Exceptions may be present in the documentation due to language that is hardcoded in the user interfaces of the product software, language used based on RFP documentation, or language that is used by a referenced third-party product. Learn more about how Cisco is using Inclusive Language.
- Updated:
- February 21, 2017
Chapter: Backing Up and Restoring the Cisco APIC-EM
Backing Up and Restoring the Cisco APIC-EM
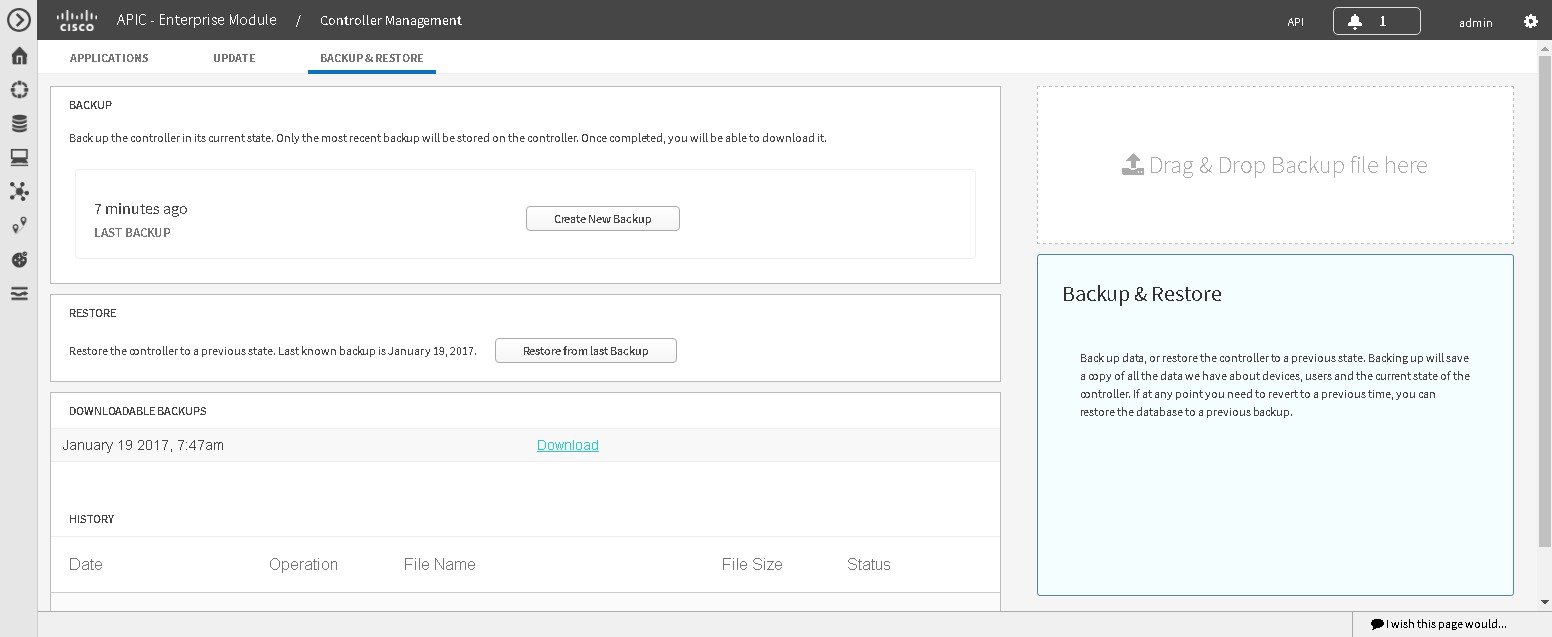
About Backup and Restore
The back up and restore procedure for the Cisco APIC-EM can be used for the following purposes:
-
To create a single backup file to support disaster recovery on the controller
-
To create a single backup file on one controller to restore to a different controller (if required for your network configuration)
When you perform a back up using the controller's GUI, you copy and export the controller's database and files as a single file to a specific location on the controller. When you perform a restore, you copy over the existing database and files on the controller using this single backup file.
 Note | The Cisco APIC-EM uses PostgreSQL as the preferred database engine for all network data. PostgreSQL is an open source object-relational database system. |
The following files and data are copied and restored when performing a back up and restore:
-
Cisco APIC-EM database
-
Cisco APIC-EM file system and files
-
X.509 certificates and trustpools
-
Usernames and passwords
-
Any user uploaded files (for example, any Network Plug and Play image files)
The database and files are compressed into a single .backup file when performing the back up and restore. The maximum size of the .backup file is 30GB. This number consists of a permitted 20GB maximum size for a file service back up and a 10GB permitted maximum size for the database back up.
Note | The .backup file should not be modified by the user. |
Only a single back up can be performed at a time. Performing multiple back ups at once are not permitted. Additionally, only a full back up is supported. Other types of back ups (for example, incremental back ups) are not supported.
Note | After saving the backup file, you can also download it to another location in your network. You can restore the backup file from its default location in the controller or drag and drop the backup file from its location in your network to restore. |
When performing a backup and restore, we recommend the following:
-
Perform a back up everyday to maintain a current version of your database and files.
-
Perform a back up and restore after making any changes to your configuration. For example, when changing or creating a new policy on a device.
-
Only perform a back up and restore during a low impact or maintenance time period.
When a back up is being performed, you will be unable to delete any files that have been uploaded to the file service and any changes you make to any files may not be captured by the back up process. When a restore is being performed, the controller is unavailable.
Note | You cannot schedule nor automate a back up and restore at this time. Additionally, once started you cannot manually cancel either the back up or restore process. |
Multi-Host Cluster Back Up and Restore
In a multi-host cluster, the database and files are replicated and shared across three hosts. When backing up and restoring in a multi-host cluster, you need to first back up on one of the three hosts in the cluster. You can then use that backup file to restore all three hosts in the cluster. However, you need not perform the restore operation on each of the hosts. You simply restore one of the hosts in the cluster. The controller replicates the restored data to the other hosts automatically.
Note | The back up and restore process in a multi-host cluster requires that the Cisco APIC-EM software and version must be the same for all three hosts. |
Backing Up the Cisco APIC-EM
You can back up your controller using the Backup & Restore window.
You must have successfully deployed the Cisco APIC-EM and it must be operational.
You must have administrator (ROLE_ADMIN) permissions and either access to all resources (RBAC scope set to ALL) or an RBAC scope that contains all of the resources that you want to group. For example, to create a group containing a specific set of resources, you must have access to those resources (custom RBAC scope set to all of the resources that you want to group).
For information about user permissions and RBAC scopes required to perform tasks using the Cisco APIC-EM, see "User Settings" in the chapter, "Configuring the Cisco APIC-EM Settings".
What to Do Next
When necessary and at an appropriate time, proceed to restore the backup file to the Cisco APIC-EM.
Restoring the Cisco APIC-EM
You can restore your controller using the Backup & Restore window.
The following restore options are available:
-
You can restore from the last know backup file on the controller.
-
You can also restore from an archived backup file that was saved and moved to another location on your network.
 Caution | The Cisco APIC-EM restore process restores the controller's database and files. The restore process does not restore your network state and any changes made by the controller since the last backup, including any new network policies that have been created, any new or updated passwords, or any new or updated certificates/trustpool bundles. |
Note | You can only restore a backup from a controller that is the same software version as the controller where the backup was originally taken from. |
You must have successfully deployed the Cisco APIC-EM and it must be operational.
You must have administrator (ROLE_ADMIN) permissions and either access to all resources (RBAC scope set to ALL) or an RBAC scope that contains all of the resources that you want to group. For example, to create a group containing a specific set of resources, you must have access to those resources (custom RBAC scope set to all of the resources that you want to group).
For information about user permissions and RBAC scopes required to perform tasks using the Cisco APIC-EM, see "User Settings" in the chapter, "Configuring the Cisco APIC-EM Settings".
You must have successfully performed a back up of the Cisco APIC-EM database and files following the steps in the previous procedure.
| Step 1 | In the Home window, click either admin or the Settings icon (gear) at the top right corner of the screen. | ||||
| Step 2 | Click the
App
Management link from the drop-down menu.
| ||||
| Step 3 | Click the Backup and Restore tab at the top of the window. | ||||
| Step 4 | To restore the
backup file, click on the
Restore
from last Backup button.
You can also drag and drop the backup file from its location in your network onto the Drag and Drop a backup file field in this window. During a restore, the backup file copies over the current database.
| ||||
| Step 5 | After the
restore process completes, log back into the controller's GUI.
If the restore process was successful, you will be logged out of the controller and its GUI. You will need to log back in.
To check whether the restore process was successful, you can either review the Backup History field of the Backup & Restore window or access the Grapevine root and to run the grape backup display command.
If the restore process was unsuccessful, you will receive an unsuccessful restore notification. Since the database may be in an inconsistent state, we recommend that you do not use the database and contact technical support for additional actions to take. | ||||
| Step 6 | (Optional) Using
a Secure Shell (SSH) client, log into the host (physical or virtual) with the
IP address that you specified using the configuration wizard.
| ||||
| Step 7 | (Optional) When prompted, enter your Linux username ('grapevine') and password for SSH access. | ||||
| Step 8 | (Optional) Enter
the
grape
backup display command at the prompt to confirm that the restore
process was completed and successful.
$ grape backup display Check the command output to ensure that the restore process was completed and successful. Look for the property operation marked "restore" in the command output, with the latest start_time and ensure that the status is marked as a "success". | ||||
| Step 9 | (Optional) Using the Secure Shell (SSH) client, log out of the appliance. | ||||
| Step 10 | Return to the
controller's GUI and review the
Backup
History field of the
Backup
& Restore window.
After the restore, information about it appears in the Backup History field of the Backup & Restore window. The following update data is displayed in this field:
|
 Feedback