Getting Started
Introduction
This chapter provides details on using the MRTG tool, the RRD tool, and the SNMP Real-time monitoring configuration utility.
This chapter consists of these sections:
•![]() Using MRTG and RRDTool for Real-Time SNMP Monitoring
Using MRTG and RRDTool for Real-Time SNMP Monitoring
•![]() Using the SCA BB Real-Time Monitoring Configuration Utility
Using the SCA BB Real-Time Monitoring Configuration Utility
•![]() Installing the rtmcmd Utility and the RTM Report Templates
Installing the rtmcmd Utility and the RTM Report Templates
Using MRTG and RRDTool for Real-Time SNMP Monitoring
To produce graphics to monitor your network in real time using MRTG and RRDTool, follow these general steps.
SUMMARY STEPS
1. ![]() Install MRTG (requires Perl installation) and RRDTool
Install MRTG (requires Perl installation) and RRDTool
2. ![]() Install cron or any other scheduling service
Install cron or any other scheduling service
3. ![]() Install a web server.
Install a web server.
4. ![]() Configure the web server to allow CGI script execution and automatic listings of directories. See "How to Install the CFG and CGI Files for Use by MRTG and RRDTool" section on page 3-8.
Configure the web server to allow CGI script execution and automatic listings of directories. See "How to Install the CFG and CGI Files for Use by MRTG and RRDTool" section on page 3-8.
5. ![]() Create the RTM directory under the web server web documents directory tree. See Chapter 1, "Overview".
Create the RTM directory under the web server web documents directory tree. See Chapter 1, "Overview".
6. ![]() For each SCE device that you want to monitor, create the necessary CFG and CGI files. The CFG and CGI files reflect the service configuration applied to the monitored SCE devices. Cisco Service Control provides a utility to create the files, necessary to produce a range of predefined reports, automatically. See Chapter 3, "Real-Time Monitoring Configuration Utility" and the "Real-Time Monitoring Configuration Overview" section on page 3-2.
For each SCE device that you want to monitor, create the necessary CFG and CGI files. The CFG and CGI files reflect the service configuration applied to the monitored SCE devices. Cisco Service Control provides a utility to create the files, necessary to produce a range of predefined reports, automatically. See Chapter 3, "Real-Time Monitoring Configuration Utility" and the "Real-Time Monitoring Configuration Overview" section on page 3-2.
7. ![]() Install the MRTG CFG and Report CGI files on the RTM setup.
Install the MRTG CFG and Report CGI files on the RTM setup.
8. ![]() Configure the cron job to invoke MRTG periodically on the MRTG CFG files created for each SCE device.
Configure the cron job to invoke MRTG periodically on the MRTG CFG files created for each SCE device.
9. ![]() Monitor the reports by using a web browser.
Monitor the reports by using a web browser.
DETAILED STEPS
Step 1 ![]() Install MRTG (requires Perl installation) and RRDTool.
Install MRTG (requires Perl installation) and RRDTool.
Step 2 ![]() Install cron or any other scheduling service.
Install cron or any other scheduling service.
Step 3 ![]() Install a web server.
Install a web server.
Step 4 ![]() Configure the web server to allow CGI script execution and automatic listings of directories. See "How to Install the CFG and CGI Files for Use by MRTG and RRDTool" section on page 3-8.
Configure the web server to allow CGI script execution and automatic listings of directories. See "How to Install the CFG and CGI Files for Use by MRTG and RRDTool" section on page 3-8.
Step 5 ![]() Create the RTM directory under the web server web documents directory tree. See Chapter 1, "Overview".
Create the RTM directory under the web server web documents directory tree. See Chapter 1, "Overview".
Step 6 ![]() For each SCE device that you want to monitor, create the necessary CFG and CGI files. The CFG and CGI files reflect the service configuration applied to the monitored SCE devices. Cisco Service Control provides a utility to create the files, necessary to produce a range of predefined reports, automatically. See Chapter 3, "Real-Time Monitoring Configuration Utility" and the "Real-Time Monitoring Configuration Overview" section on page 3-2.
For each SCE device that you want to monitor, create the necessary CFG and CGI files. The CFG and CGI files reflect the service configuration applied to the monitored SCE devices. Cisco Service Control provides a utility to create the files, necessary to produce a range of predefined reports, automatically. See Chapter 3, "Real-Time Monitoring Configuration Utility" and the "Real-Time Monitoring Configuration Overview" section on page 3-2.
Step 7 ![]() Install the MRTG CFG and Report CGI files on the RTM setup.
Install the MRTG CFG and Report CGI files on the RTM setup.
Step 8 ![]() Configure the cron job to invoke MRTG periodically on the MRTG CFG files created for each SCE device.
Configure the cron job to invoke MRTG periodically on the MRTG CFG files created for each SCE device.
Step 9 ![]() Monitor the reports by using a web browser.
Monitor the reports by using a web browser.
a. ![]() Browse to the root of the RTM directory and select an SCE device.
Browse to the root of the RTM directory and select an SCE device.
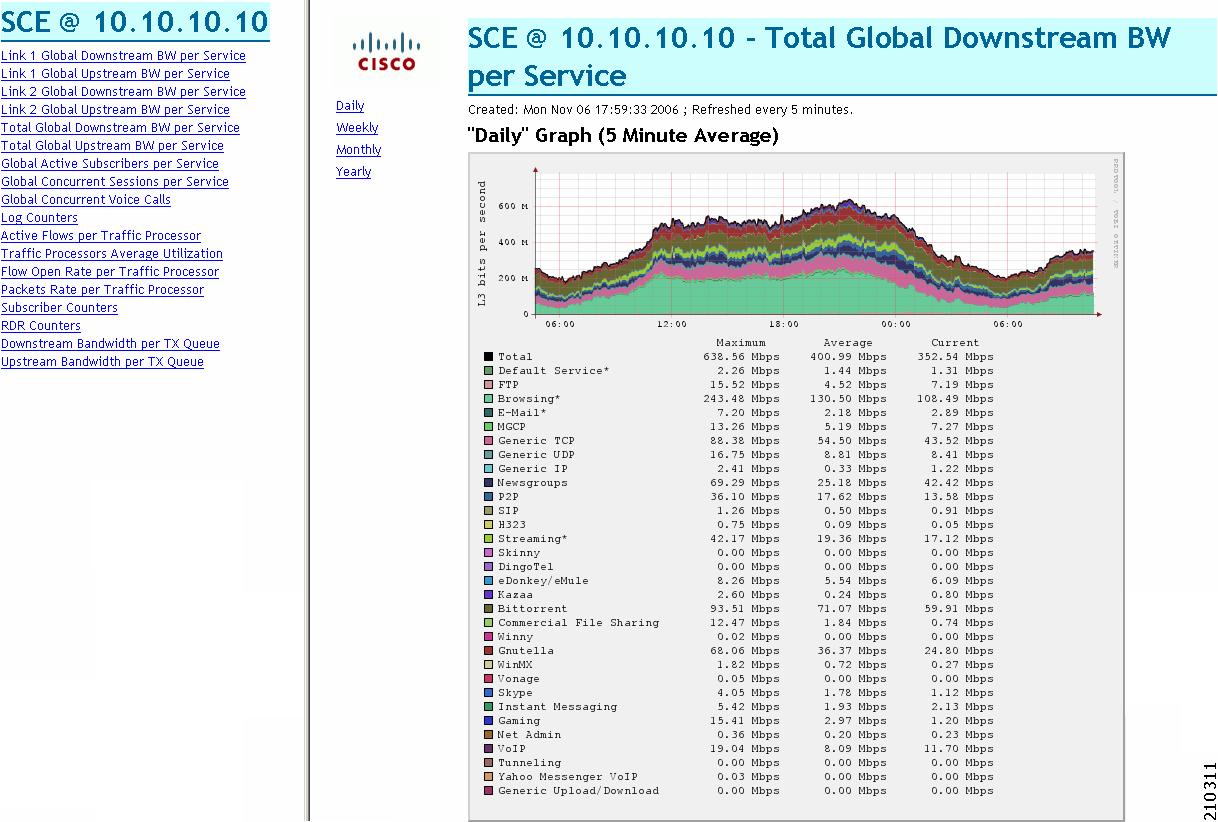
b. ![]() Select a report from the available reports listed on the left. Figure 2-1 is a screen shot taken after selecting an SCE device.
Select a report from the available reports listed on the left. Figure 2-1 is a screen shot taken after selecting an SCE device.
Figure 2-1 Report Selection
This guide focuses on Step 6, creating the CFG and CGI files for MRTG and RRDTool. The SCA BB Real-Time Monitoring Configuration utility creates the necessary files from the specified PQB file or service configuration.
The other steps in this process are explained in detail in the relevant MRTG and RRDTool documentation (see Chapter 1, "Overview").
Web Server Configuration
The web server configuration should be such that it enables the following two common web server features:
•![]() Executing CGI scripts—Reports are created on demand by browsing to a CGI script file that dynamically creates the report HTML page.
Executing CGI scripts—Reports are created on demand by browsing to a CGI script file that dynamically creates the report HTML page.
•![]() Enabling automatic listings of directories when there is no directory index (for example, index.html). This feature, when configured, enables the listing of the SCE platforms for which MRTG CFG file and report CGI files have been prepared.
Enabling automatic listings of directories when there is no directory index (for example, index.html). This feature, when configured, enables the listing of the SCE platforms for which MRTG CFG file and report CGI files have been prepared.
These features can be selectively enabled only for the RTM directory.
Apache Web Server Configuration
The following configuration steps for the Apache Web Server reflect the general guidelines provided in the "Web Server Configuration" section.
Step 1 ![]() Add a directory section for the RTM directory to the Apache configuration file, httpd.conf. Use the following example as a template for the newly created section:
Add a directory section for the RTM directory to the Apache configuration file, httpd.conf. Use the following example as a template for the newly created section:
Directory "<Apache installation directory>/htdocs/<rtm directory>">
Options Indexes FollowSymLinks ExecCGIAllowOverride Indexes
Order allow,deny
</Directory>
Step 2 ![]() Restart the Apache Web Server.
Restart the Apache Web Server.
Using the SCA BB Real-Time Monitoring Configuration Utility
To use rtmcmd to produce the files for MRTG and RRDTool, follow this procedure:
SUMMARY STEPS
1. ![]() If using rtmcmd for the first time, do the following:
If using rtmcmd for the first time, do the following:
a. ![]() Prepare a destination directory where the utility will save the CFG and CGI files. We recommend that you use a different directory than the RTM folder where the CFG and CGI files are installed.
Prepare a destination directory where the utility will save the CFG and CGI files. We recommend that you use a different directory than the RTM folder where the CFG and CGI files are installed.
b. ![]() Edit the user configuration file according to your setup (see the "User Configuration File" section on page 3-5). A sample configuration file (rtmcmf.cfg) is located in the bin directory in the utility installation directory.
Edit the user configuration file according to your setup (see the "User Configuration File" section on page 3-5). A sample configuration file (rtmcmf.cfg) is located in the bin directory in the utility installation directory.
2. ![]() Run rtmcmd, using the appropriate options and point it to the directories and configuration file you have prepared. See the "rtmcmd Utility—Overview" section on page 3-3).
Run rtmcmd, using the appropriate options and point it to the directories and configuration file you have prepared. See the "rtmcmd Utility—Overview" section on page 3-3).
3. ![]() Install CFG and CGI files into your RTM setup. See the "How to Install the CFG and CGI Files for Use by MRTG and RRDTool" section on page 3-8.
Install CFG and CGI files into your RTM setup. See the "How to Install the CFG and CGI Files for Use by MRTG and RRDTool" section on page 3-8.
DETAILED STEPS
Step 1 ![]() If using rtmcmd for the first time, do the following:
If using rtmcmd for the first time, do the following:
a. ![]() Install rtmcmd.
Install rtmcmd.
b. ![]() Extract the templates distribution to a directory.
Extract the templates distribution to a directory.
See the "Installing the rtmcmd Utility and the RTM Report Templates" section.
Step 2 ![]() Prepare a destination directory where the utility will save the CFG and CGI files. We recommend that you use a different directory than the RTM folder where the CFG and CGI files are installed.
Prepare a destination directory where the utility will save the CFG and CGI files. We recommend that you use a different directory than the RTM folder where the CFG and CGI files are installed.
Step 3 ![]() Edit the user configuration file according to your setup (see the "User Configuration File" section on page 3-5). A sample configuration file (rtmcmf.cfg) is located in the bin directory in the utility installation directory.
Edit the user configuration file according to your setup (see the "User Configuration File" section on page 3-5). A sample configuration file (rtmcmf.cfg) is located in the bin directory in the utility installation directory.
This step may not be required each time you run the utility if the directory locations have not been changed.
Step 4 ![]() Run rtmcmd, using the appropriate options and point it to the directories and configuration file you have prepared (see the "rtmcmd Utility" section on page 3-3).
Run rtmcmd, using the appropriate options and point it to the directories and configuration file you have prepared (see the "rtmcmd Utility" section on page 3-3).
rtmcmd writes the files to the specified destination directory. The destination directory contains:
•![]() A subdirectory for each SCE platform containing CGI report files, the index HTML file, and the reports index HTML file.
A subdirectory for each SCE platform containing CGI report files, the index HTML file, and the reports index HTML file.
•![]() A subdirectory for MRTG CFG files containing an MRTG CFG file for each SCE device.
A subdirectory for MRTG CFG files containing an MRTG CFG file for each SCE device.
•![]() Sample files for the configuration of the cron application. There is one sample file for Windows and one sample file for UNIX/Linux.
Sample files for the configuration of the cron application. There is one sample file for Windows and one sample file for UNIX/Linux.
•![]() A static directory containing CSS and image files.
A static directory containing CSS and image files.
•![]() An htaccess file—When using the Apache web server, this file is used to exclude files or folders from the automatic listings of a directory.
An htaccess file—When using the Apache web server, this file is used to exclude files or folders from the automatic listings of a directory.
The resulting CFG files are compatible with the SCA BB and SCE MIBs of releases 3.0.5 and later.
If rtmcmd fails, an error log is available at the following locations:
•![]() Linux—"<USERPROFILE>/.p-cube/servconf.log"
Linux—"<USERPROFILE>/.p-cube/servconf.log"
•![]() Windows—"<user folder>\.p-cube\servconf.log"
Windows—"<user folder>\.p-cube\servconf.log"
Step 5 ![]() Install CFG and CGI files into your RTM setup. See the "How to Install the CFG and CGI Files for Use by MRTG and RRDTool" section on page 3-8.
Install CFG and CGI files into your RTM setup. See the "How to Install the CFG and CGI Files for Use by MRTG and RRDTool" section on page 3-8.
Installing the rtmcmd Utility and the RTM Report Templates
To install the SCA BB rtmcmd utility and RTM report templates, install the Java Runtime Environment. See the "Installing the Java Runtime Environment" section.
Installing the Java Runtime Environment
To verify that the JRE is installed, run java -version at the command prompt; the Java version should start with 1.4 or 1.5.
The JRE can be downloaded from the Sun™ web site, at: http://www.oracle.com/technetwork/java/javase/download-138376.html
If a different version of JRE is also installed on the workstation, set the JAVA_HOME environment variable in servconf to point to the JRE 1.4 installation directory. For example:
JAVA_HOME=C:\Program Files\Java\j2re1.4.2_08
Step 1 ![]() Locate the file sca_bb_util.tgz file (located in the SCA BB distribution zip file), and copy it to a Windows or Linux workstation.
Locate the file sca_bb_util.tgz file (located in the SCA BB distribution zip file), and copy it to a Windows or Linux workstation.
Step 2 ![]() Unpack the file to a new folder.
Unpack the file to a new folder.
The SCA BB Real-Time Monitoring Configuration Utility, rtmcmd, is located under the bin folder.
Step 3 ![]() Locate the scabb_rtm_templates_v3.0.5A_b05.zip file.
Locate the scabb_rtm_templates_v3.0.5A_b05.zip file.
The file is located on the Software Download of Cisco Service Control Application Suite for Broadband page at http://www.cisco.com/cgi-bin/tablebuild.pl/scasbb.
Step 4 ![]() Download and copy the scabb_rtm_templates_v3.0.5A_b05.zip file to a Windows or Linux workstation.
Download and copy the scabb_rtm_templates_v3.0.5A_b05.zip file to a Windows or Linux workstation.
Step 5 ![]() Unpack the file to a new folder.
Unpack the file to a new folder.
 Feedback