Cisco Remote PHY Shelf 7200 Bring Up

Your software release may not support all the features that are documented in this module. For the latest feature information and caveats, see the release notes for your platform and software release. The Feature Information Table at the end of this document provides information about the documented features and lists the releases in which each feature is supported.

Use Cisco Feature Navigator to find information about platform support and Cisco software image support. To access Cisco Feature Navigator, go to http://tools.cisco.com/ITDIT/CFN/. An account on http://www.cisco.com/ is not required.

Hardware Compatibility Matrix for Cisco Remote PHY Shelf 7200


Note

Unless otherwise specified, the hardware components introduced in a given Cisco Remote PHY Shelf 7200 Software Release are supported in all subsequent releases.


Table 1. Hardware Compatibility Matrix for the Cisco Remote PHY Shelf 7200

Cisco CMTS Platform

Cisco Remote PHY Shelf 7200

Cisco cBR-8 Converged Broadband Router with Cisco IOS XE Gibraltar 16.10.1 and Later Releases

Cisco Remote PHY Shelf 7200 Software 1.1 and Later Releases

Cisco Remote PHY Shelf 7200

  • PID—HA-RPHY

Information about Bring Up

Bring up process is prerequisite to the operation of the remote PHY system, just like the cable modem bring up in a DOCSIS system.

How to Bring Up Cisco Remote PHY Shelf 7200

This section describes how to bring up Cisco Remote PHY Shelf 7200.

Configuring Cisco Remote PHY Shelf 7200

After powering up, user needs to configure host name, login password and management IP of the Cisco Remote PHY Shelf 7200. See the following examples:

HA-Shelf-FCC# configure terminal
HA-Shelf-FCC(config)# hostname prefix Shelf

Shlef(config)#login password Dp*14raR

Shlef(config)#mgmt ip 1.200.1.4 netmask 255.255.255.0 gateway 1.200.1.0

User also need to configure SFP+ port mode and eRPD trunk mode based on actual network topology. Refer to Cisco Remote PHY Shelf 7200 Backhaul Port Mapping and Link Redundancy Configuration and Cisco Remote PHY Shelf 7200 Trunk VLAN Configuration for more details.

Resetting Login Password

If the user forgets the login password of the Cisco Remote PHY Shelf 7200. Use the following steps to reset the password and set a new one.

  1. Power cycle the Cisco Remote PHY Shelf 7200 and wait for the FCC to boot up, press Ctrl+C to enter the FCC uboot when Hit Ctrl+c to stop autoboot in 10s is displayed:

    U-Boot 2016.01 (Oct 30 2018 - 05:09:48 +0000)
    SoC: LS1043E Rev1.1 (0x87920011)
    Clock Configuration:
    ......
    ## Starting application at 0xA0000000 ...
    7a:bd:44:a1:00:00
    ## Application terminated, rc = 0x0
    FM1@DTSEC2, FM1@DTSEC9 [PRIME]
    Hit Ctrl+c to stop autoboot in 10s
    
  2. Type rstpwd, and then follow the prompt, type sboot to boot up to the system.

    Hit Ctrl+c to stop autoboot in 10s
    => 
    => 
    => rstpwd
    Reset IOS CLI password flag is set,please run sboot/tftp booting up your IOS image,password will be auto reset.
    => sboot
    
    **************************************
    ************ boot imagea *************
    **************************************
    
  3. When the Password: prompts again, user is able to use the default password admin to log in to Cisco Remote PHY Shelf 7200 FCC command mode.

  4. Use login password command to change the password and save it correctly.

    HA-Shelf-FCC#config terminal
    HA-Shelf-FCC(config)#login password Dp*14raR
    Chassis login password configured successfully.
    HA-Shelf-FCC(config)#end
    HA-Shelf-FCC#
    HA-Shelf-FCC#write
    Building configuration...
    Write startup configuration successfully.
    HA-Shelf-FCC#
    

Configuring DHCP Server

You can choose to configure the DHCP server using any of the following methods.

Configuring DHCP Server using IPv4

To configure DHCP server using IPv4, follow the steps below:

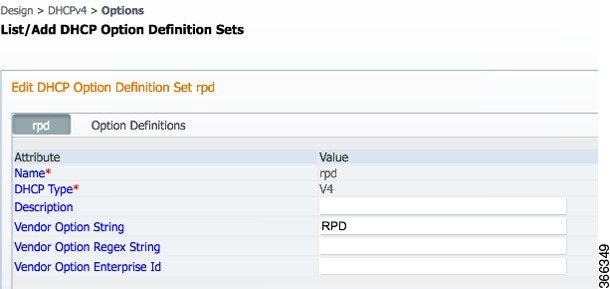
  1. Add option for CCAP-Core. Fill in the name, DHCP type, and vendor option string as shown in the figure below.

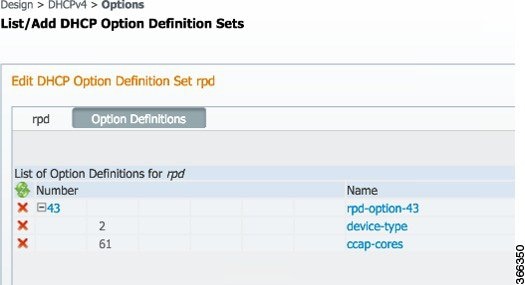
  2. Define option. Fill in the option number and name as shown in the figure below.

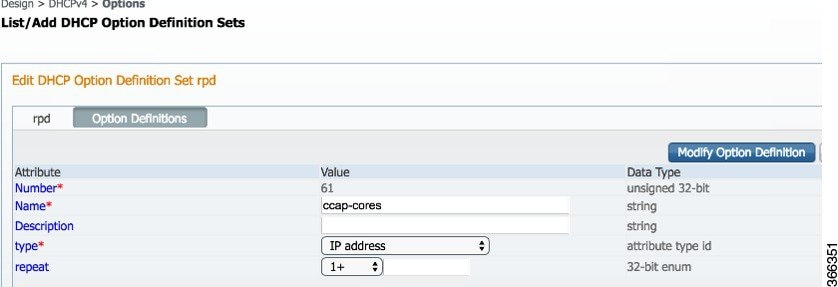
  3. Define suboption. Fill in the name, type and repeat of suboption 61 as shown in the following figure.

  4. Add the option into policy as shown in the following figure. Replace the IP address 120.102.15.1 in the figure to the DPIC port IP address.

Configuring DHCP Server using IPv6 Stateless

The Cisco Remote PHY System supports the Stateless Address Auto Configuration (SLAAC). IPv6 address assignment of the RPD is governed by the configuration bits set in the ICMPv6 Router Advertisement (RA) message and the presence of a valid prefix in the Prefix Information Option (PIO). For more information about RPD IPv6 address assignment, refer to section 6.7 of Remote PHY Specification.

To configure DHCP server using IPv6 Stateless and enable SLAAC, follow the steps below:

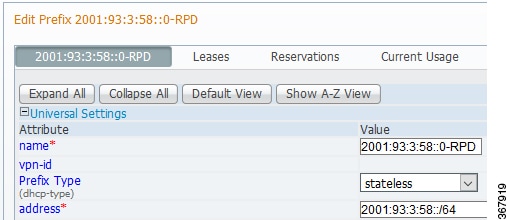
  1. Configure Prefix Type to “stateless” in CNR prefix.

  2. Configure ICMPv6 Router RA message M Bit=0 and O Bit =1.


Note

It is recommended that you follow the DHCP options listed in Table 2 - Router Advertisement M Bit and O Bit Settings For SLAAC of section 6.7.1 (CM-SP-R-PHY-I10) or 6.6.1 (CM-SP-R-PHY-I11) in the Remote PHY Specification.


To display the RPD get IPv6 address by SLAAC, use the show dhcp command.

R-PHY#show dhcp 
Interface  IP-Address                        Subnet-Mask            
vbh0       2001:93:3:58:1204:9fff:fec1:100  ffff:ffff:ffff:ffff::   

Details:
--------------------------------------------------------------------------------
Interface:                    vbh0
AddrType:                     IPv6<Stateless>
TimeServers:                  2001:20:1:1::33
TimeOffset:                   28800
LogServers:                   2001:20:1:1::33
CCAPCores:                    2001:93:3:58::1

Configuring DHCP Server using IPv6 Stateful

To configure DHCP server using IPv6 Stateful, follow the steps below:

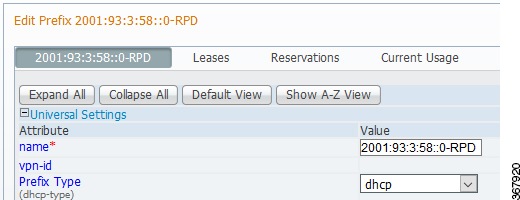
  1. Configure Prefix Type to “dhcp” in CNR prefix. See the following image.

  2. Configure ICMPv6 Router RA message M Bit=1.

To display the RPD get IPv6 address by Stateful method, use the show dhcp command.

R-PHY#show dhcp 
Interface  IP-Address                        Subnet-Mask            
vbh0       2001:93:3:58::d8  ffff:ffff:ffff:ffff:: 

Details:
--------------------------------------------------------------------------------
Interface:                    vbh0
AddrType:                     IPv6<Stateful>
TimeServers:                  2001:20:1:1::33
TimeOffset:                   28800
LogServers:                   2001:20:1:1::33
CCAPCores:                    2001:93:3:58::1

Configuring PTP

To configure PTP, use the following example as reference:

On cBR-8 router:


interface Loopback1588
  ip address 159.159.159.4 255.255.255.255
interface TenGigabitEthernet5/1/3   /* connect to ASR903 */
  ip address 192.104.10.4 255.255.255.0

ip route 10.90.3.93 255.255.255.255 192.104.10.93   /* route to ASR903 loopback ip */

ptp clock ordinary domain 0
  servo tracking-type R-DTI
  clock-port slave-from-903 slave
    delay-req interval -4
    sync interval -5
    sync one-step
    transport ipv4 unicast interface Lo1588 negotiation
    clock source 10.90.3.93   /* ASR903 loopback ip */

ptp r-dti 1
  ptp-domain 0   /* same domain number with ptp server */
  clock-port 1
    ethernet 1   /* default value is same index with clock-port index, for RPD, ethernet 1=vbh0, ethernet 2=vbh1 */
    clock-source 10.90.3.93 gateway 93.3.10.2   /* clock-source is ASR093 loopback ip, gateway is ASR903 BDI ID for node */

On ASR903 router as PTP primary:


ptp clock ordinary domain 0
 clock-port Master-to-all-cBR8 master
  sync interval -5
  sync one-step
  transport ipv4 unicast interface Lo1588 negotiation

interface Loopback1588
 ip address 10.90.3.93 255.255.255.255

interface GigabitEthernet0/3/5
 no ip address
 negotiation auto
 cdp enable
 service instance 31 ethernet   /* 31 is vlan id */
  encapsulation dot1q 31
  rewrite ingress tag pop 1 symmetric
  bridge-domain 31
 service instance 32 ethernet
  encapsulation dot1q 32
  rewrite ingress tag pop 1 symmetric
  bridge-domain 32
interface BDI31   /* for cBR, SUP PIC */
 ip address 192.104.10.93 255.255.255.0
 no shut
interface BDI32   /* For RPD */
 ip address 93.3.10.2 255.255.255.0 
 no shut 

ip route 159.159.159.4 255.255.255.255 192.104.10.48   /* route to cbr-8 loopback ip */

Configuring cBR-8

To configure the cBR-8 to bring up the RPD, use the following example as reference:


/* D-PIC TenGiga interface config */
interface TenGigabitEthernet0/1/0
  ip address 93.3.10.1 255.255.255.0
  ip helper-address 20.1.0.33

/* Downstream/Upstream controller profile */
cable downstream controller-profile 1
rf-chan 0 95
  type DOCSIS
  frequency 381000000
  rf-output NORMAL
  qam-profile 1
  docsis-channel-id 1

cable upstream controller-profile 2
  us-channel 0 channel-width 6400000 6400000
  us-channel 0 docsis-mode atdma
  us-channel 0 minislot-size 4
  us-channel 0 modulation-profile 221
  no us-channel 1 shutdown
  
/* RPD configuration */
cable rpd node1
  identifier 0004.9f03.0061
  type shelf
  core-interface Te0/1/0
   rpd-ds 0 downstream-cable 7/0/0 profile 1
   rpd-us 0 upstream-cable 7/0/0 profile 2 
   rpd-us 1 upstream-cable 7/0/8 profile 2
  r-dti 1
  rpd-event profile 0

Feature Information for Bring Up

Use Cisco Feature Navigator to find information about the platform support and software image support. Cisco Feature Navigator enables you to determine which software images support a specific software release, feature set, or platform. To access Cisco Feature Navigator, go to the https://cfnng.cisco.com/ link. An account on the Cisco.com page is not required.


Note

The following table lists the software release in which a given feature is introduced. Unless noted otherwise, subsequent releases of that software release train also support that feature.


Table 2. Feature Information for Bring Up

Feature Name

Releases

Feature Information

Login Password Reset

Cisco Remote PHY Shelf 7200 Software 1.2

This feature was introduced on the Cisco Remote PHY Shelf 7200.