Cisco Smart PHY 1.1 User Guide
Bias-Free Language
The documentation set for this product strives to use bias-free language. For the purposes of this documentation set, bias-free is defined as language that does not imply discrimination based on age, disability, gender, racial identity, ethnic identity, sexual orientation, socioeconomic status, and intersectionality. Exceptions may be present in the documentation due to language that is hardcoded in the user interfaces of the product software, language used based on RFP documentation, or language that is used by a referenced third-party product. Learn more about how Cisco is using Inclusive Language.
- Updated:
- February 20, 2018
Chapter: How to Install Cisco Smart PHY
- Installation Overview
- How to Deploy Cisco Smart PHY OVF Template through VMWare vCenter Server
- How to Deploy Cisco Smart PHY OVF Template through ESXi Host
- How to Install VMware Tools
- How to Install the Cisco Smart PHY
- How to Install the Mobile Application
- How to Upgrade the Cisco Smart PHY
- How to Uninstall the Cisco Smart PHY
How to Install Cisco Smart PHY
The task below describes how to install the Cisco Smart PHY application:
- Installation Overview
- How to Deploy Cisco Smart PHY OVF Template through VMWare vCenter Server
- How to Deploy Cisco Smart PHY OVF Template through ESXi Host
- How to Install VMware Tools
- How to Install the Cisco Smart PHY
- How to Install the Mobile Application
- How to Upgrade the Cisco Smart PHY
- How to Uninstall the Cisco Smart PHY
Installation Overview
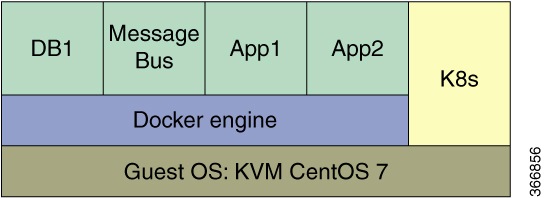
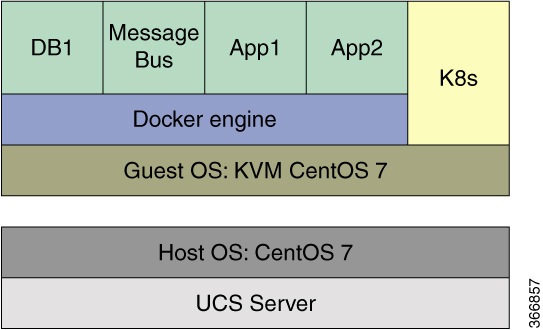
The Cisco Smart PHY application is based on next generation architecture including Kubernetes and Docker containers. It includes a platform that is extensible and scalable.
The Cisco Smart PHY installation is deployed as a self-contained package. The upgrade packages are also self-contained and will be made available periodically.
After the Cisco Smart PHY application is installated, it would include a KVM-based Guest OS running CentOS7 that runs Docker images orchestrated by Kubernetes.
The Cisco Smart PHY application is supported on both a bare metal server with a CentOS 7 host OS and an ESXi VM with VM-in-VM configuration.
 Note | You should have access to the Internet for installing the Cisco SmartPHY application. If necessary, use a proxy server. |
System Requirements
|
Requirement |
Description |
|---|---|
|
Operating system |
CentOS Linux 7 (core; English distributions only) |
|
CPE OS name |
cpe:/o:centos:centos:7 |
|
Kernel |
Linux 3.10.0-514.6.1.el7.x86_64 |
|
Architecture |
x86-64 |
|
Host version |
The Cisco Crosswork Network Automation VM runs on a CentOS 7.2 host Ubuntu 14.04 LTS is also supported Nested virtualization is not supported |
|
Memory |
80 GB |
|
Swap space |
4 GB |
|
Disk space |
600 GB |
|
CPU |
4 cores (16 CPUs) |
|
Interface |
Two physical interfaces:
|
|
Processor speed |
2.10 GHz or higher |
|
L1 cache |
32 K |
|
L2 cache |
256 K |
|
L3 cache |
30720 K |
Open Ports for Cisco Smart PHY
The following table lists the open ports that Cisco Smart PHY application uses to listen for connection requests from devices. For security hardening, this table also specifies whether it is safe to disable the port without any adverse effects to the product.
Disbale the ports that are not needed and are not secure.
|
Port |
Protocol |
Usage |
Safe to Disable? |
Procedure to Disable |
|---|---|---|---|---|
|
22 |
TCP |
To initiate SSH connections with the server, and to copy files to the Cisco Smart PHY server using SCP or SFTP. |
Depends |
This might be still needed by older managed devices that only supports TFTP and not SFTP or SCP. |
|
8162 |
UDP |
To receive SNMP traps from network devices. |
No |
- |
|
30604 |
TCP |
For browser access to the Cisco Smart PHY server via HTTPS. |
No |
- |
|
8514 |
UDP |
To receive syslog messages from network devices. |
No |
- |
|
8190 |
TCP |
To receive GCP messages from the RPD |
No |
- |
How to Deploy Cisco Smart PHY OVF Template through VMWare vCenter Server
| Step 1 | From the vCenter Server WebUI, navigate to Hosts and Clusters.  |
| Step 2 | Right click on the ESXi host where the VM is deployed and select Deploy OVF Template. 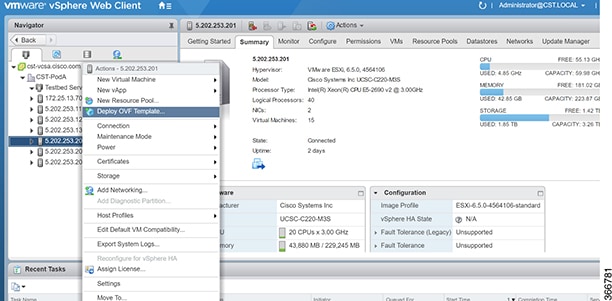 |
| Step 3 | Click Local File, then click Browse and navigate to the local folder containing the OVF files. 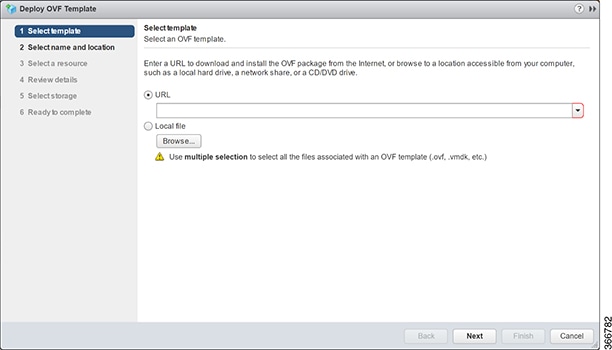 |
| Step 4 | Select SmartPHY-Deployment.ovf, SmartPHY-Deployment-1.vmdk, and SmartPHY-Deployment.mf files and click Open. 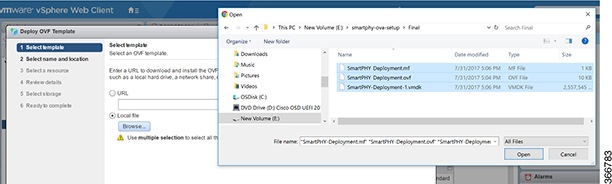 |
| Step 5 | Update the name of the Virtual Machine if needed and click Next. 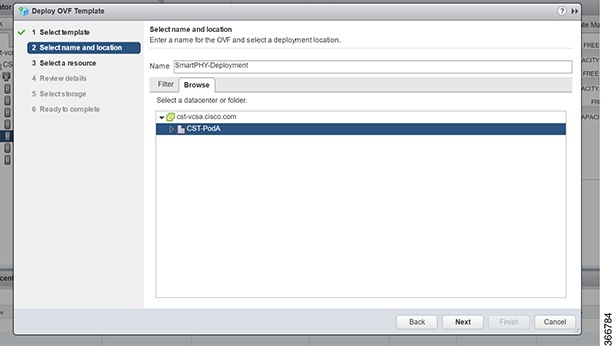 |
| Step 6 | Select the ESXi Host for deployment and click Next. 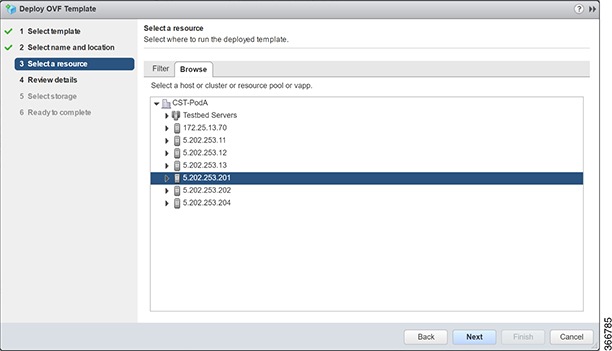 |
| Step 7 | Review details and click Next. 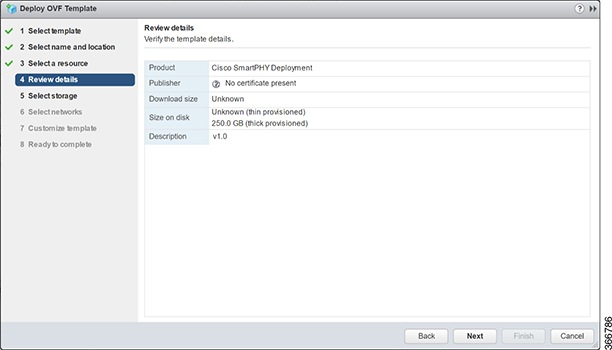 |
| Step 8 | Select the Disk Format. Choose Thick Provision Eager Zeroed and the Datastore and click Next. 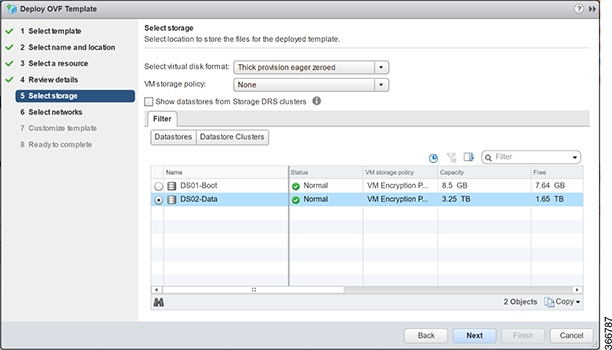 |
| Step 9 | Select Networks. Lab Network should map to the Destination Network associated with the Management Interface and the VM Network should map to the RPHY/CIN Interface. 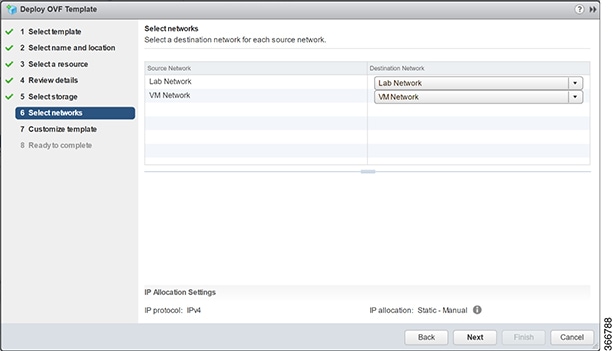 |
| Step 10 | Fill in the network information for the Primary Interface (Management), Secondary Interface (RPHY/CIN), and DNS Server. 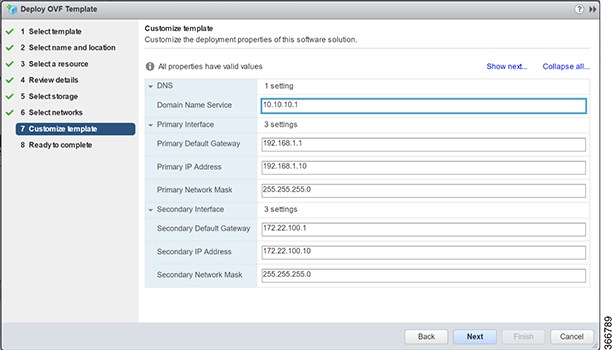 |
| Step 11 | Review the settings and select Finish. 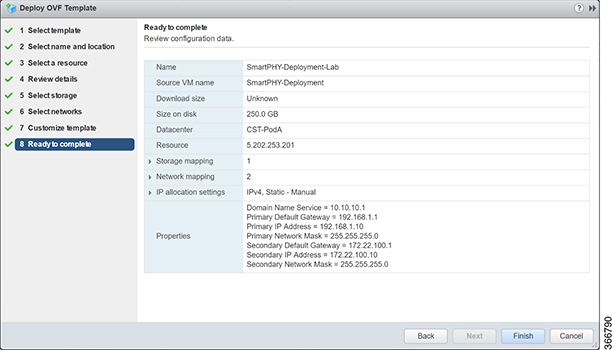 |
| Step 12 | Monitor the OVF deployment in the Recent Tasks pane. 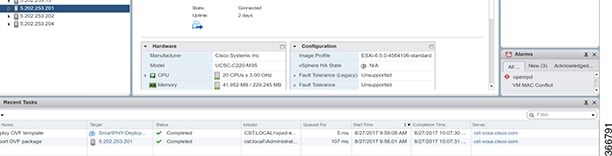 |
| Step 13 | After the OVF deployment task completes successfully, power on the new virtual machine. Right click on the VM and select Power and then Power On. 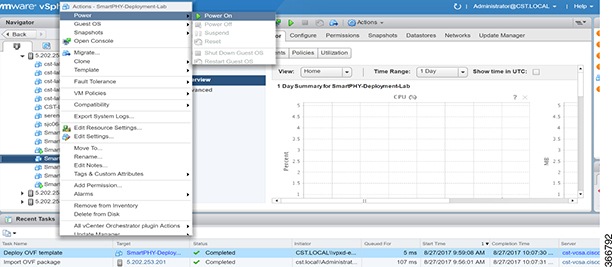 |
| Step 14 | Install the Cisco Smart PHY application on the VM.
Credentials for deploying: Login: spadmin Password: spadmin |
How to Deploy Cisco Smart PHY OVF Template through ESXi Host
| Step 1 | From the ESXi host WebUI, right click on Host in the Navigator pane and select Create/Register VM. 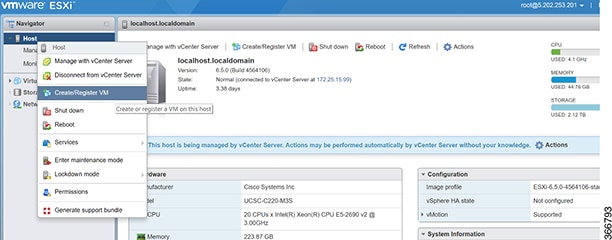 | ||
| Step 2 | Select Deploy a Virtual Machine from an OVF or OVA file in the Select Creation Type window and click Next.  | ||
| Step 3 | Enter the name of the new virtual machine. For example, "SmartPHY-Deployment-Lab1" and click on the Click to Select Files or drag/drop box. 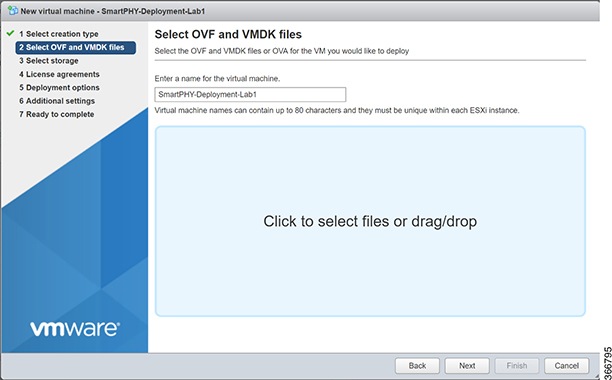 | ||
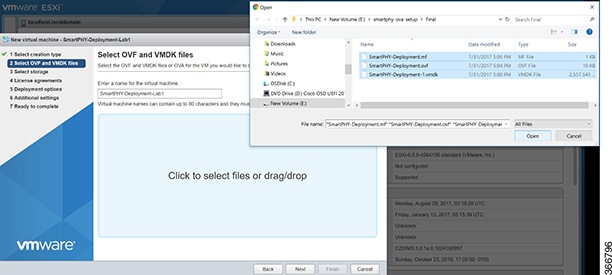
| Step 4 | Navigate to the folder containing the OVF files on the local system. Select SmartPHY-Deployment.ovf, SmartPHY-Deployment-1.vmdk, and SmartPHY-Deployment.mf files. Click Open, then click Next.
 | ||
| Step 5 | Select the Datastore for the VM.  | ||
| Step 6 | Select Networks and Storage Type. Lab Network should map to the Destination Network associated with the Management Interface and the VM Network should map to the RPHY/CIN Interface. Select Thick for Disk Provisioning and click Next. 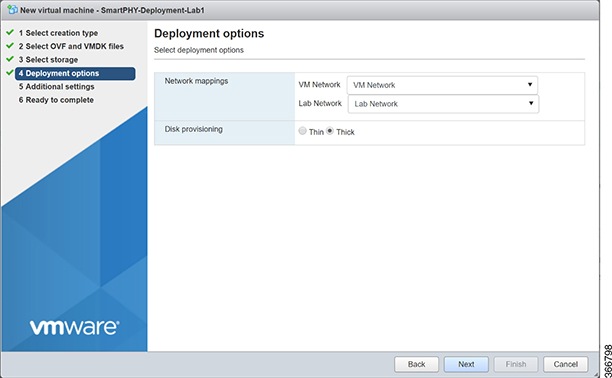 | ||
| Step 7 | In the Additional Settings configuration box, fill in the network information for the Primary Interface (Management), Secondary Interface (RPHY/CIN), and DNS Server and click Next. 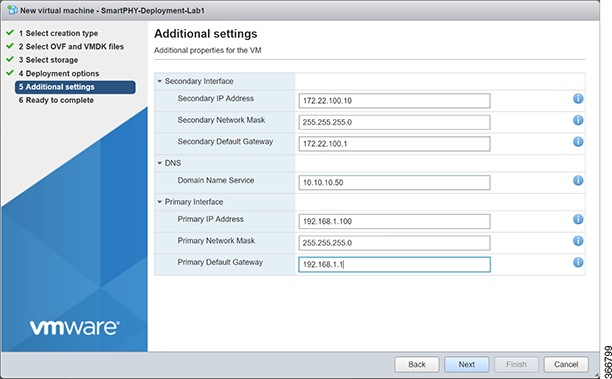 | ||
| Step 8 | Review the settings and select Finish. 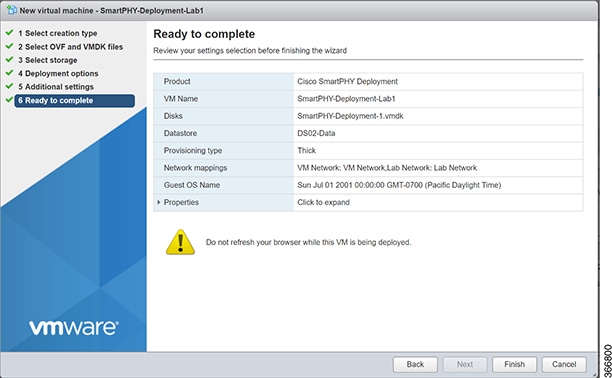 | ||
| Step 9 | Monitor the OVF deployment in the Recent Tasks pane. 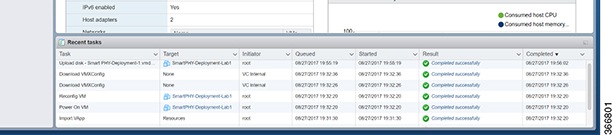 | ||
| Step 10 | The new Virtual Machine should power on automatically. However, if it does not, expand the Virtual Machines list in the Navigator pane and right click on the VM. Select Power and then Power On to start it. 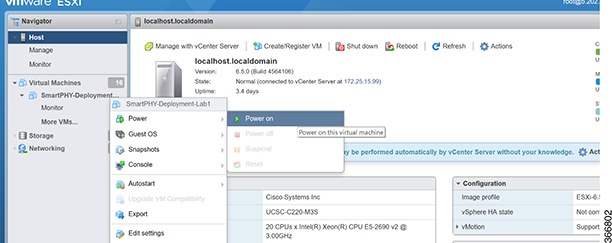 | ||
| Step 11 | Install the Cisco Smart PHY application on the VM.
Credentials for deploying: Login: spadmin Password: spadmin |
How to Install VMware Tools
| Step 1 | CentOS / Fedora based Installation
yum clean all yum install -y epel-release yum install -y open-vm-tools | ||
| Step 2 | Debian and Ubuntu based Installation
sudo aptitude install -y open-vm-tools
|
How to Install the Cisco Smart PHY
You must install CentOS7 on bare metal server. This ensures that the installation script spins a VM-based KVM and the required containers.
Bare Metal Solution
EXSi Solution

At a minimum, it is recommended that the server has the following attributes:
-
32 Gb RAM
-
16 virtual CPU Cores
-
250 GB of Disk
Note | Make sure that your VM has more than 30 GB (31457280) free memory. |
| Step 1 | Download the Cisco Smart PHY release image tarball (which is about 28 GB) from Cisco Software Central. | ||
| Step 2 | Unzip and untar the file:
tar -xvf smartphy-v1.1.14.180202120000.tar | ||
| Step 3 | Run the installer.
./install.sh <mysereno> The installer will automatically add a DNS entry in /etc/hosts to identify the new VM. | ||
| Step 4 | Add routes to the VM for both management and CIN network if applicable. Then, run the iptables.sh script individually for the management and CIN network as applicable.
./iptables.sh <HostOS_IP> <GuestOS_IP>
|
How to Install the Mobile Application
You can install the Cisco Smart PHY application on iOS and Android hand-held devices.
Minimum required versions:
-
iOS version 10
-
Android version 5
| Step 1 | Download the iOS version of the Cisco Smart PHY application from the App Store. Search for Cisco Smart PHY.
Or | ||
| Step 2 | Download the Android version (apk file) of the Cisco Smart PHY application from Cisco Software Central.
|
How to Upgrade the Cisco Smart PHY
The Cisco Smart PHY application will be upgraded periodically with newer features. To upgrade an existing installation:
| Step 1 | Download the upgrade image from Cisco Software Central. |
| Step 2 | Unzip and untar the file:
tar -xvf smartphy-v1.1.14.180202120000-upgrade.tar Or tar jxvf smartphy-v1.1.14.180202120000-upgrade.tar |
| Step 3 | Run the upgrade script. ./upgrade.sh <mysereno> Specific components of the Cisco Smart PHY guest OS will be updated. 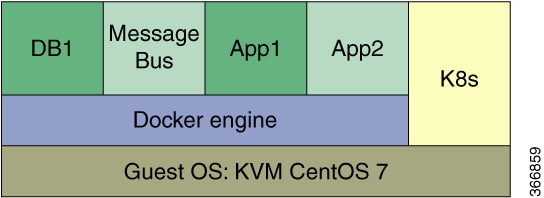 |
How to Uninstall the Cisco Smart PHY
Note | Be aware that this procedure removes all of your Cisco Smart PHY data. |
| Step 1 | (Recommended) Back up your current data. Uninstalling the Cisco Smart PHY application will permanently delete all data on the bare metal server. |
| Step 2 | On the bare metal server, enter the following commands to remove the VM:
sudo virsh destroy VM_name sudo virsh undefine VM_name |
| Step 3 | To remove the VM network, enter the following commands:
sudo virsh destroy VM_name sudo virsh undefine VM_name |
 Feedback