Cisco Smart PHY 1.1 User Guide
Bias-Free Language
The documentation set for this product strives to use bias-free language. For the purposes of this documentation set, bias-free is defined as language that does not imply discrimination based on age, disability, gender, racial identity, ethnic identity, sexual orientation, socioeconomic status, and intersectionality. Exceptions may be present in the documentation due to language that is hardcoded in the user interfaces of the product software, language used based on RFP documentation, or language that is used by a referenced third-party product. Learn more about how Cisco is using Inclusive Language.
- Updated:
- February 20, 2018
Chapter: How to Use Cisco Smart PHY
- How to Log In using a Browser
- How to Bring Up the RPD
- How to Add an RPD using Mobile Application
- How to Create a New Credential Profile
- How to Apply Device Credential from Credential Profiles
- How to Apply a Different Credential Profile to Existing Devices
- How to Apply Different Credential Profile in Bulk
- How to Delete a Device from the Inventory
- How to Create CSV File for Importing Devices
- How to Export Device Information to a CSV File
- How to Add Devices through GUI
- How to Import Device Information in Bulk
- How to Delete a Credential Profile
- How to Create a New Service Definition
- How to Specify RPD Assignment
- How to View RPD History
How to Use Cisco Smart PHY
The task below describes how to use the Cisco Smart PHY application:
- How to Log In using a Browser
- How to Bring Up the RPD
- How to Add an RPD using Mobile Application
- How to Create a New Credential Profile
- How to Apply Device Credential from Credential Profiles
- How to Apply a Different Credential Profile to Existing Devices
- How to Apply Different Credential Profile in Bulk
- How to Delete a Device from the Inventory
- How to Create CSV File for Importing Devices
- How to Export Device Information to a CSV File
- How to Add Devices through GUI
- How to Import Device Information in Bulk
- How to Delete a Credential Profile
- How to Create a New Service Definition
- How to Specify RPD Assignment
- How to View RPD History
How to Log In using a Browser
| Step 1 | Make sure that the iptables.sh script has been executed for the management interface. |
| Step 2 | Launch one of the supported browsers (see Supported Web Browsers). |
| Step 3 | In the browser's address bar, enter https://server_name:30604.
The Cisco Smart PHY web GUI displays the Login window. When you access Cisco Smart PHY for the first time, some browsers display a warning that the site is untrusted. When this happens, follow the prompts to add a security exception and download the self-signed certificate from the Cisco Smart PHY server. After you do this, the browser accepts the Cisco Smart PHY server as a trusted site in all future login attempts. 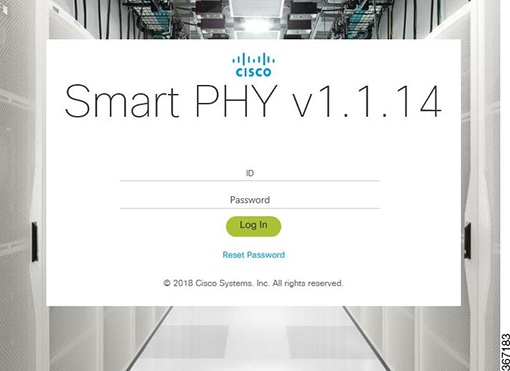 |
| Step 4 | Enter the web GUI username and password as specified when you installed the server, then click Log In.
The default username is admin and password is admin. |
| Step 5 | To exit the web GUI, close the browser window or click the Settings icon in the top right of the Cisco Smart PHY home page and choose Log out.
Exiting a Cisco Smart PHY web GUI session does not shut down Cisco Smart PHY on the server. If a system administrator stops the Cisco Smart PHY server during your Cisco Smart PHY session, your session ends. Your session does not reassociate to Cisco Smart PHY when the server restarts; you must start a new Cisco Smart PHY session. |
How to Bring Up the RPD
| Step 1 | Log into the Cisco Smart PHY application.
Go to https://<HostOS_IP>:30604. Username: admin Password: admin | ||
| Step 2 | Create Credential Profile.
 | ||
| Step 3 | Add the Cisco cBR router inventory and reference the credential profile. Device can be added manually or by importing from a CSV file.
 | ||
| Step 4 | Configure the Cisco cBR to send syslog messages to the Cisco Smart PHY application. The Cisco Smart PHY application uses syslog messages to monitor the state of the RPD on the Cisco cBR. Run the following command on the Cisco cBR router:
logging host <Smart PHY interface connected to the Cisco cBR> transport udp port 8514 | ||
| Step 5 | Create a Service Template.
 | ||
| Step 6 | Pair an RPD with a Cisco cBR router and service template.
| ||
| Step 7 | In the DHCP server, enter the IP address of the Smart PHY host OS in the CCAP Core field for the RPD.
After retrieving the IP address from the DHCP server, the RPDs are redirected to the Smart PHY application. When the RPD resets, it gets the new DHCP server attributes and values from the DHCP server and connects to the Smart PHY application. |

How to Add an RPD using Mobile Application
| Step 1 | Log into the Cisco Smart PHY mobile application. |
| Step 2 | Click Add.
Name is a mandatory field. |
| Step 3 | Scan the RPD barcode.
The RPD is listed in the Devices tab. |
| Step 4 | Register the device.
When you add or update an RPD by providing a street address, the detailed view does not show the street address. |
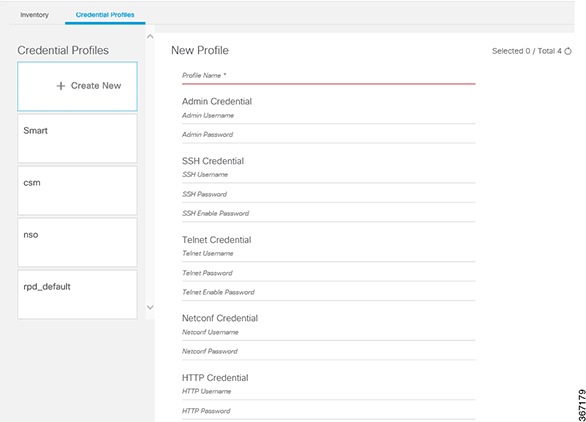
How to Create a New Credential Profile
Make sure that the SSH and SNMP are configured on Cisco cBR-8 router.
| Step 1 | Choose Inventory > Credential Profiles. |
| Step 2 | Click Create New. |
| Step 3 | Enter a profile name and description. If you will have many credential profiles, make the name and description as informative as possible because that information will be displayed on the Credential Profiles panel. |
| Step 4 | Enter the credentials for the profile. When a device is added or updated using this profile, the content you specify here is applied to the device. |
| Step 5 | Click Save. |
How to Apply Device Credential from Credential Profiles
Credential profiles are collections of device credentials for SNMP, Telnet/SSH, HTTP, and TL1 network devices. Using credential profiles lets you apply credential settings consistently across devices. When you add or import devices, you specify the credential profile the devices use. If you need to make a credential change, such as changing a device password, you can edit the profile to update the settings across all devices that use that profile.
| Step 1 | To view the existing profiles, choose Inventory > Credential Profiles. |
| Step 2 | Click the profile you want to view. Credential profiles can be shared by multiple devices. Large networks might have similar credentials for hundreds of devices.
The mandatory fields are:
|
How to Apply a Different Credential Profile to Existing Devices
You can use the Inventory user interface to edit device information, including changing the credential profile in the inventory record. This operation overwrites any existing association between a device and a credential profile. You can also use this operation to synchronize device configurations with new settings.
You need a credential profile to complete this task.
| Step 1 | To view inventory, choose Inventory > Inventory. |
| Step 2 | (Optional) In the Inventory section, filter the list of devices by entering text in the Search field or filtering on the individual headings. |
| Step 3 | Check the check boxes of the devices you want to change, and click the Edit icon. |
| Step 4 | Choose a different credential profile from the Credential Profile drop-down list, for example, or make other changes in the device records. |
| Step 5 | Click Save. |
How to Apply Different Credential Profile in Bulk
This is an alternative to changing the credential profile for devices within the Cisco Smart PHY Inventory Manager GUI. If you are changing the credential profile for a large number of devices, you may find it more efficient to make the change by using a CSV file rather than the Cisco Smart PHY UI. Export a CSV file, make the changes, and import the changed CSV file. This operation overwrites any existing association between a device and a credential profile. You can also use this operation to synchronize device configurations with new settings.
| Step 1 | (Optional) To review the contents of a credential profile, choose Inventory > Credential Profiles. Click the profile you want to use. Else, create a new profile. |
| Step 2 | To view device inventory, choose Inventory > Inventory. |
| Step 3 | Choose which device records to change by including them in the CSV file.
Do one of the following:
|
| Step 4 | Edit and save the new CSV file. Note: You must save the file opened in MS Excel as a CSV file only. |
| Step 5 | In the Import CSV File dialog box, click Browse, select the new CSV file, and click the Import icon. |
| Step 6 | In the Replace Existing Node dialog box, click Yes to All. |
| Step 7 | Click Save. |
How to Delete a Device from the Inventory
| Step 1 | Choose Inventory > Inventory. |
| Step 2 | (Optional) In the Inventory section, filter the device list by entering text in Search or filtering specific columns. |
| Step 3 | Check the check boxes for the devices you want to delete. |
| Step 4 | Click Delete. |
| Step 5 | In the confirmation dialog box, click Delete. |
How to Create CSV File for Importing Devices
To add information for multiple devices to Inventory Manager, create a CSV file. Inventory Manager contains a sample template CSV file. The GUI for adding individual devices contains field information that also applies to the contents of the CSV files that you create for device import.
| Step 1 | Choose Inventory > Inventory. |
| Step 2 | In the Inventory section, click Import.
You will be prompted to open or save the sample CSV file. Save the CSV file. |
| Step 3 | Edit the CSV file and save it as a CSV file on your system. Upload this CSV file to import devices.
|
How to Export Device Information to a CSV File
When you export the device list to a file, all device information is exported into a CSV file. The exported file includes device credentials, but does not include credential profiles.
 Caution | The CSV file lists all of the credentials for the exported devices. Handle the CSV file with care. Ensure that only users with special privileges can perform a device export. |
| Step 1 | Choose Inventory > Inventory. |
| Step 2 | (Optional) In the Inventory section, filter the device list by entering text in the Search field or filtering specific columns. |
| Step 3 | Check the check boxes for the devices you want to export. |
| Step 4 | Click Export. |
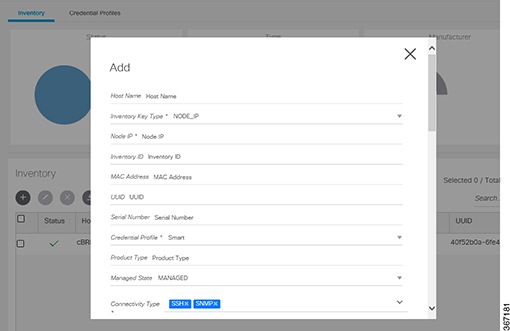
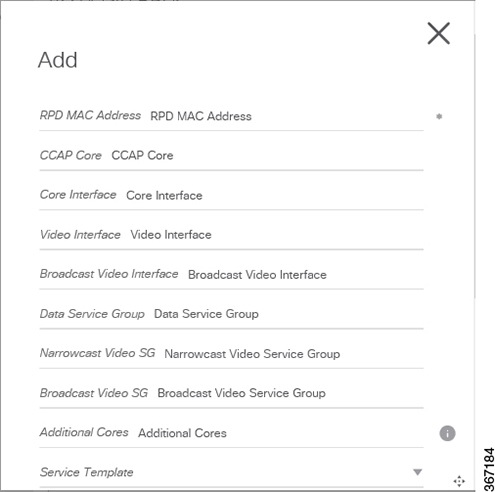
How to Add Devices through GUI
If you have many devices to add to the Inventory Manager, you may find it more efficient to put the information in a CSV file and import the file.
| Step 1 | Choose Inventory > Inventory. |
| Step 2 | In the Inventory section, click Add. |
| Step 3 | Enter the values for the device. The mandatory fields are:
|
| Step 4 | Click Save. |
| Step 5 | (Optional) Repeat to add more devices. |
How to Import Device Information in Bulk
Before starting this procedure, you need to create a CSV file that contains the device information.
| Step 1 | Choose Inventory > Inventory. |
| Step 2 | Click Import. |
| Step 3 | In the Import CSV File window, click Browse, select the CSV file, and click Import. If any primary keys are duplicates with existing device records, Inventory Manager alerts you. |
How to Delete a Credential Profile
To delete a credential profile from Inventory Manager, disassociate the profile from any devices. Inventory Manager displays an alert if you attempt to delete a credential profile that is associated with devices.
(Optional) Check whether any devices are using the obsolete credential profile and change the credential profile before attempting deletion.
-
Choose Inventory > Inventory.
-
In the Inventory section, enter the obsolete credential profile name in the Search field.
-
Check the check boxes for the devices that use the obsolete credential profile, and click Edit.
-
Choose a different credential profile from the Credential Profile drop-down list.
-
Click Save.
| Step 1 | Choose Inventory > Credential Profiles. |
| Step 2 | Click on a profile, and click Delete. 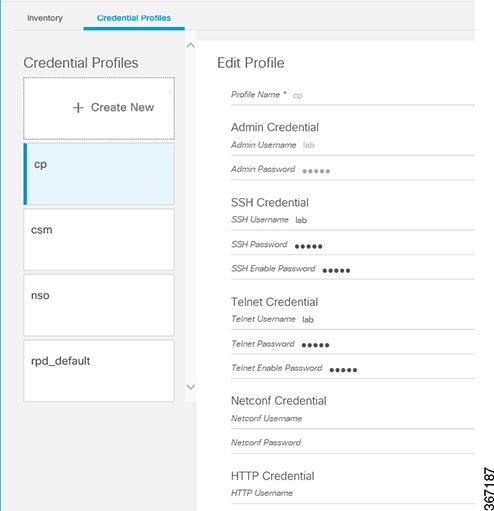 |
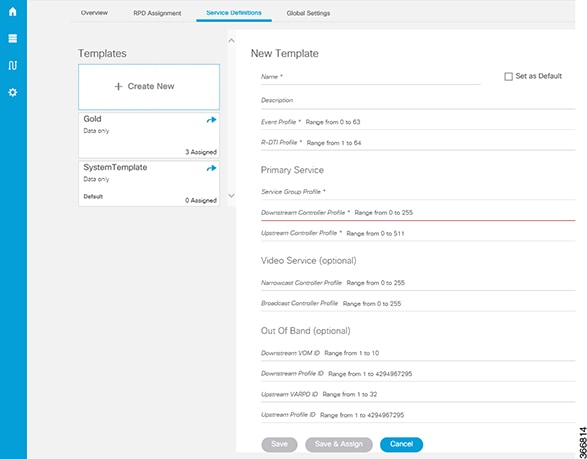
How to Create a New Service Definition
| Step 1 | Choose Cable RPD Automation > Service Definitions. |
| Step 2 | Click + Create New. |
| Step 3 | Enter a name and description. If you will have many service definitions, make the name and description as informative as possible because that information will be displayed on the RPD Assignment and Overview tabs. |
| Step 4 | (Optional) Check the Set as Default check box. |
| Step 5 | Enter the definitions for the service. See definitions. When a device is added or updated using this service definition, the content you specify here is applied to the device. All fields that are not marked as optional are mandatory. |
| Step 6 | Click Save or Save & Assign. |
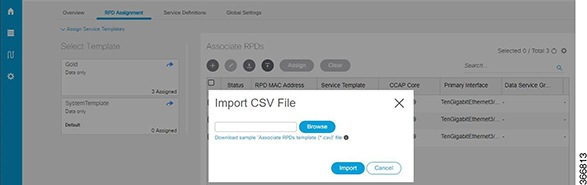
How to Specify RPD Assignment
| Step 1 | Choose Cable RPD Automation > RPD Assignment. |
| Step 2 | RPD Assignment can be specified manually or by importing a CSV file.
Click + to assign a service template to an RPD. Fill in all the fields. To upload a CSV file, click Upload, select the file and click Import. |
| Step 3 | Click Save. |
| Step 4 | Click Assign. |
How to View RPD History
| Step 1 | Choose Cable RPD Automation > RPD Assignment.. |
| Step 2 | Select the RPD and click the Details button.
The RPD window shows the RPD Summary, RPD State History, RPD CLI, and RPD Automation Errors. |
 Feedback