- Preface
- Introduction to Cisco WAAS
- Planning Your WAAS Network
- Using Device Groups and Device Locations
- Configuring AppNav
- Configuring Traffic Interception
- Configuring Network Settings
- Configuring Administrative Login Authentication, Authorization, and Accounting
- Creating and Managing Administrator User Accounts and Groups
- Creating and Managing IP Access Control Lists for WAAS Devices
- Configuring Other System Settings
- Configuring File Services
- Configuring Application Acceleration
- Configuring WAAS with Akamai Connect
- Maintaining Your WAAS System
- Monitoring Your WAAS Network
- Troubleshooting Your WAAS Network
- Configuring SNMP Monitoring
- Predefined Application Policies
- Transaction Log Format
- Index
Cisco Wide Area Application Services Configuration Guide (Software Version 6.4.1x)
Bias-Free Language
The documentation set for this product strives to use bias-free language. For the purposes of this documentation set, bias-free is defined as language that does not imply discrimination based on age, disability, gender, racial identity, ethnic identity, sexual orientation, socioeconomic status, and intersectionality. Exceptions may be present in the documentation due to language that is hardcoded in the user interfaces of the product software, language used based on RFP documentation, or language that is used by a referenced third-party product. Learn more about how Cisco is using Inclusive Language.
- Updated:
- January 13, 2014
Chapter: Configuring File Services
Configuring File Services
This chapter describes how to configure file services, which allows branch office users to access data stored at centralized data centers more efficiently. The file services feature overcomes the WAN latency and bandwidth limitations by caching data on Edge Wide Area Application Engines (WAEs) near branch office users. Cisco Wide Area Application Services (WAAS) file services use Server Message Block (SMB) application accelerators.

Note![]() Throughout this chapter, the term Cisco WAAS device is used to refer collectively to the Cisco WAAS Central Managers and WAEs in your network. The term WAE refers to WAE and Cisco Wide Area Virtualization Engine (WAVE) appliances, and Cisco Virtual WAAS (vWAAS) instances.
Throughout this chapter, the term Cisco WAAS device is used to refer collectively to the Cisco WAAS Central Managers and WAEs in your network. The term WAE refers to WAE and Cisco Wide Area Virtualization Engine (WAVE) appliances, and Cisco Virtual WAAS (vWAAS) instances.
About File Services
Enterprises today have remote offices in different parts of the country and around the world. Typically, these remote offices have their own file servers to store and manage the data needed by their local users.
The problem with this method of operation is that it is costly to purchase, manage, and upgrade file servers at each remote office. A great deal of resources and manpower must be dedicated to maintaining these file servers, especially to protect the data in case of server failure. To achieve the required level of data assurance, the remote office must devote resources to back up the data at the remote site and physically move it to a secure location, often at a considerable distance from the site. If you multiply this scenario by tens, hundreds, and thousands of remote offices, you can see that this approach to enterprise data management not only raises costs exponentially, it also greatly increases risks to critical data.
The logical solution is to move all of the enterprise’s important data to a central location containing the facilities, trained personnel, and storage mass required to manage the data properly. By having a data center provide backup and other storage-management facilities, the enterprise can achieve better utilization of both personnel and storage, as well as a higher level of data assurance and security.
The WAN between the enterprise’s data center and its remote offices tends to be unreliable and slow, with limited bandwidth and high latency. In addition, the WAN creates other obstacles to the implementation of the data center solution.
One obstacle is created by the file server protocols that operate over the WAN. Every file operation generates several exchanges of protocol messages between the client and the file server. This situation is usually not noticeable on the LAN, but quickly causes high latency over the WAN. Occasionally, this high latency breaks the file server protocol altogether.
Even in cases where the file server protocol is able to function correctly over the WAN, there are typically long delays between each transaction. These delays can often cause timeouts in user applications such as word-processing programs, image-editing programs, and design tools, which stops applications from functioning correctly.
All of these problems—unreliable WANs, file system protocol compatibility, and user application compatibility—contribute to an unfriendly work environment that negatively affects the user experience and diminishes productivity.
The WAAS File Services feature overcomes WAN latency and bandwidth limitations by caching data on Edge WAEs near the user. This data caching method allows branch office users to access centralized data at LAN-like speeds over the WAN. The solution is based on several key concepts:
- Use the WAN as little as possible—By minimizing the number of operations that need to traverse the WAN, WAAS effectively shields users from many of the obstacles that WANs create.
- Use the WAN optimally—The File Services feature uses sophisticated caching, compression, and network optimization technologies, which enable the system to use the WAN optimally.
- Preserve file system protocol semantics—Although WAAS software uses its own proprietary protocol over the WAN, it leaves the complete semantics of the standard file system protocol commands intact. This is essential to preserve the correctness and coherency of the data in the network.
- Make the solution transparent to users—The best solutions are the ones that do their jobs unnoticed, without interfering with end users’ operations or forcing users to change their ways of doing business. The WAAS file services solution does not require any software installations, either on the server side or at the client-side, and does not require a user to learn anything new. Users derive all the benefits of having a secure data center without needing to change any of their work habits.
By using the WAAS File Services feature, enterprises can consolidate their file servers to a data center that provides the facilities, IT personnel, and storage devices required to manage the data properly.
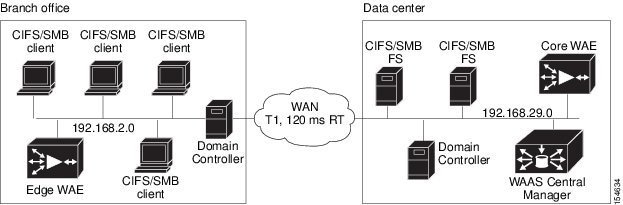
Figure 11-1 shows a typical deployment scenario after WAAS file services have been set up.
Figure 11-1 WAAS File Services Solution
Overview of the File Services Features
This section provides an overview of the WAAS File Services features and contains the following topics:
To accelerate SMB traffic, you can use the following accelerator:
- SMB—The SMB accelerator, introduced in WAAS Version 5.0.1, relies on automatic discovery, transparently accelerates traffic, support prepositioning of files. This accelerator has configuration options that you can fine-tune for specific needs.
This accelerator supports the SMB 1.0, 2.0, and 2.1 protocols for signed SMB traffic.
Note![]() Legacy-mode Cisco Wide Area File Services (WAFS) is no longer supported beginning with WAAS Version 4.4.1. Legacy WAFS users must migrate to the SMB accelerator before upgrading.
Legacy-mode Cisco Wide Area File Services (WAFS) is no longer supported beginning with WAAS Version 4.4.1. Legacy WAFS users must migrate to the SMB accelerator before upgrading.
Automatic Discovery
The automatic discovery feature allows you to enable SMB without having to register individual file servers in the WAAS Central Manager. With the automatic discovery feature, WAAS attempts to automatically discover and connect to a new file server when a SMB request is received.
Data Coherency
WAAS software ensures data integrity across the system by using two interrelated features – coherency, which manages the freshness of data, and concurrency, which controls the access to data by multiple clients.
Maintaining multiple copies of data files in multiple locations increases the likelihood that one or more of these copies will be changed, causing it to lose consistency or coherency with the others. Coherency semantics are used to provide guarantees of freshness (whether the copy is up-to-date or not) and the propagation of updates to and from the origin file server.
The WAAS software applies the following coherency semantics to its built-in coherency policies:
- Strict SMB behavior for intra-site—Users of the same cache are always guaranteed standard, strict SMB coherency semantics.
- Cache validation on SMB open—In SMB, the File Open operation is passed through to the file server. For coherency purposes, WAAS software validates the freshness of the file on every file that is open, and invalidates the cached file if a new version exists on the file server.
WAAS software validates data by comparing the time stamp of a file in the cache to the time stamp of the file on the file server. If the time stamps are identical, the cached copy in the Edge WAE is considered valid, and the user is permitted to open the file from the Edge WAE cache.
If the time stamps are different, the Edge WAE removes the file from its cache and requests a fresh copy from the file server.
- Proactive cache updating—WAAS software supports the use of change notifications in SMB environments as a way to keep cached data on the Edge WAEs up-to-date.
When a client makes a change to a directory or file, the Edge WAE sends a change notification to the file server. The file server then sends a change notification to all the Edge WAEs, which includes a list of the modified directories and files. Upon receiving the change notification, each Edge WAE checks its cache and invalidates the directories and files listed in the notification, and then updates its cache with the latest versions.
For example, if a user edits an existing Word document and saves the changes to the Edge WAE cache, the Edge WAE sends a change notification to the file server so that it knows that the file has been modified. The Edge WAE then sends the changed sections to the file server, and the file server proactively sends change notifications to the other Edge WAEs in the network. These Edge WAEs then update their cache so that the file is consistent across all access points.
This process is also applicable when you rename a directory, add a new subdirectory, rename a file, or create a new file in a cached directory.
- Flush on SMB close—In SMB, the File Close operation forces all the write buffers to be flushed to the file server, and the Close request is only granted after all the updates have been propagated to the file server. From a coherency standpoint, the combination of validate on file open and flush on file close ensures that well-behaved applications, such as Microsoft Office, operate in session semantics. The Open, Lock, Edit, Unlock, and Close commands are guaranteed to work correctly on the WAAS network.
This authorization process prevents users from accessing directories and files in the cache that they do not have permission to access on the file server.
Data Concurrency
Concurrency control is important when multiple users access the same cached data to read, or write, or both. Concurrency control synchronizes this access by establishing and removing file system locks. This file-locking feature ensures data integrity and provides the following benefits:
- Enables a client to aggressively cache file data so that it does not have to rely on retrieving data from the remote file server.
- Provides a performance boost in many applications running on existing CIFS client implementations.
- Preserves data integrity because only one user at a time can make changes to a section of a file.
WAAS software supports the CIFS oplocks feature, which allows a user to lock a file so that the user can safely read and write data to its local cache instead of using network bandwidth to perform these functions over the WAN on the file server. By using oplocks, a user can proactively cache read-ahead data because it knows that no other user is accessing the file, and therefore, there is no chance of the cached data becoming stale. The user can also write data to its local cache and does not have to update the file server until it closes the file or until another user requests that the same file be opened.
Oplocks only applies to files. The file server does not grant oplock requests on directories and named pipes.
File-Locking Process
When a user opens a file, it sends a lock request to the file server. The Edge WAE intercepts and forwards all lock requests from the user to the file server as well as all the responses from the file server to the user. If no other user has a lock on the file, the file server grants an exclusive lock request so that the user can safely cache the file.
If a second user requests that the same file be opened, the following actions occur:
- The file server revokes the exclusive file lock obtained by the first user.
- The first user performs the following actions:
–![]() Flushes any file changes stored in its cache to the file server. This action ensures that the second user opening the file receives the latest information from the file server.
Flushes any file changes stored in its cache to the file server. This action ensures that the second user opening the file receives the latest information from the file server.
–![]() Deletes any of its read-ahead buffers for the file because that data is no longer guaranteed to remain up-to-date since a second user will open the file.
Deletes any of its read-ahead buffers for the file because that data is no longer guaranteed to remain up-to-date since a second user will open the file.
Prepositioning
Note![]() Only the CIFS accelerator supports prepositioning.
Only the CIFS accelerator supports prepositioning.
The prepositioning feature allows system administrators to proactively push frequently used files from the central storage into the cache of selected Edge WAEs. This operation provides users with faster first-time file access, and makes more efficient use of available bandwidth. You can create preposition directives from the WAAS Central Manager GUI.
When an end user attempts to open a file that is not found in the Edge WAE cache, the Edge WAE retrieves it across the WAN from the file server where it is stored. Prepositioning is a feature that allows administrators to push large, frequently accessed files from file servers to selected Edge WAE caches according to a predefined schedule. Through the proper use of prepositioning, administrators can allow users to benefit from cache-level performance even during first-time access of these files. Prepositioning improves WAN bandwidth utilization by transferring heavy content when the network is otherwise idle, for example, at night, which frees up bandwidth for other applications during the day.
The WAAS Central Manager GUI allows administrators to create multiple, overlapping preposition policies (each with its own schedule), a list of target Edge WAEs, and defined time and size constraints.
Prepositioning includes the ability to configure multiple roots. See Creating a New Preposition Directive.
Preparing for File Services
Before enabling file services on your WAEs, ensure that you complete the following tasks:
- If you want to configure multiple devices with the same settings, ensure that you have created a device group that contains all the devices you want to enable with file services. For information on creating device groups, see Chapter3, “Using Device Groups and Device Locations”
- Identify the file servers that you want to export, and refer to Table 11-1 to verify that these file servers can operate with WAAS software.
Note![]() Other file servers may operate with WAAS, but only those listed in the table were tested. The file server must support opportunistic locking (oplocks) and CIFS notifications.
Other file servers may operate with WAAS, but only those listed in the table were tested. The file server must support opportunistic locking (oplocks) and CIFS notifications.
Note![]() The CIFS application accelerator does not support file servers that use the FAT32 file system. You can use the policy rules to exclude FAT32 file servers, if any, from CIFS accelerator optimization.
The CIFS application accelerator does not support file servers that use the FAT32 file system. You can use the policy rules to exclude FAT32 file servers, if any, from CIFS accelerator optimization.
Note![]() Certain combinations of operating systems and file systems on a file server can result in the server responding with different timestamp precision for different SMB commands. In such a situation, you may not get the highest possible CIFS optimization if the CIFS application accelerator avoids using cached files with mismatched timestamps in favor of preserving data coherency.
Certain combinations of operating systems and file systems on a file server can result in the server responding with different timestamp precision for different SMB commands. In such a situation, you may not get the highest possible CIFS optimization if the CIFS application accelerator avoids using cached files with mismatched timestamps in favor of preserving data coherency.
Using File Services on the Cisco WAAS Network Module (NME-WAE)
If you are running WAAS on a network module that is installed in a Cisco access router, there are specific memory requirements for supporting file services. The NME-WAE must contain at least 1 GB of RAM to support file services:
If you try to enable file services and the device does not contain enough memory, the WAAS Central Manager will display an error message.
You can check the amount of memory that a device contains in the Device Dashboard window. For details, see Device Dashboard Window of Chapter 15, “Monitoring Your WAAS Network.”
Configuring File Services
To accelerate CIFS traffic, you can enable and configurethe CIFS accelerators, as described below.
Configuring the CIFS Accelerator
The CIFS accelerator relies on automatic discovery and transparently accelerates CIFS traffic with no configuration needed.
Table 11-1 provides an overview of the steps that you must complete to configure the CIFS accelerator.
Table 11-1 Checklist for Configuring CIFS Accelerator
|
|
|
|---|---|
Prepare for file services. |
Provides the tasks that you need to complete before enabling and configuring file services on your WAAS devices. For more information, see Preparing for File Services. |
Enable SMB acceleration. |
Enables and configures the SMB accelerator. For more information, see Enabling and Disabling the Global Optimization Features of Chapter 12, “Configuring Application Acceleration.” |
(Optional) Identify dynamic shares. |
Identifies the dynamic shares on an exported file server. If your file server uses Access Based Enumeration (ABE) to give users different views of the share, you must configure the dynamic shares on the WAAS Central Manager. For more information, see Creating Dynamic Shares for the CIFS Accelerator |
(Optional) Create a preposition directive. |
Defines which files are proactively copied from an exported file server to the Edge WAE cache. For more information, see About Preposition Directives section. |
Creating Dynamic Shares for the CIFS Accelerator
Many file servers use dynamic shares, that is, multiple users can access the same share, but the share is then automatically mapped to a different directory based on a user’s credentials. Dynamic shares are most commonly used on file servers to set up user home directories. For example, a directory named Home can be set up as a dynamic share on a file server so that each user accessing that share is automatically redirected to their own personal directory.
If a file server contains a dynamic share or is using Access Based Enumeration (ABE), you must register that dynamic share with the WAAS Central Manager, as described in this section.
Defining a dynamic share in the WAAS Central Manager allows each user to see a different view of the share and allows the operation of ABE if it is configured on the Windows Server.
Note![]() Dynamic share configuration on the WAAS Central Manager overrides any dynamic share configuration set up directly on the WAE device using the CLI.
Dynamic share configuration on the WAAS Central Manager overrides any dynamic share configuration set up directly on the WAE device using the CLI.
Before adding a dynamic share, note the following limitations:
- Each dynamic share on a file server must be unique.
- You cannot add a dynamic share if that share has a preposition directive. You must remove the preposition policy before you can add the dynamic share.
- You can use the WAAS Central Manager GUI to define any directory as a dynamic share. However, if a directory is not set up as a dynamic share on the file server, all the users will read or write the same content from the same directory and will not be redirected to different directories based on their credentials.
To add a dynamic share for the CIFS accelerator, follow these steps:
Step 1![]() From the WAAS Central Manager menu, choose Configure > CIFS File Services > Dynamic Shares.
From the WAAS Central Manager menu, choose Configure > CIFS File Services > Dynamic Shares.
A list of dynamic shares appears. The Dynamic Shares window shows all the dynamic shares that are configured. From this window, you can perform the following tasks:
Step 2![]() Click the Create New Dynamic Share icon in the taskbar to add a new dynamic share.
Click the Create New Dynamic Share icon in the taskbar to add a new dynamic share.
The Creating a new Dynamic Share window appears.
Step 3![]() In the Name field, enter a name for the dynamic share.
In the Name field, enter a name for the dynamic share.
The following characters are not supported in the dynamic share name: /, \, :, *, ?, ", <, >, |. From the Assigned Domain drop-down list, choose the WAAS domain that you want to assign to the dynamic share. Only administrators who are also assigned to this WAAS domain have permission to edit the dynamic share configuration. The domain does not affect a client’s access to the dynamic share.
Note![]() A WAAS domain is not the same as a DNS domain or Windows domain. For more information on WAAS domains, see Working with Domains.
A WAAS domain is not the same as a DNS domain or Windows domain. For more information on WAAS domains, see Working with Domains.
This kind of WAAS domain does not use entities. When defining the WAAS domain, choose None for the Entity Type. The WAAS domain must be assigned to each WAAS admin user who needs to edit the dynamic share configuration (see Assigning a Domain to a User Account).
Step 4![]() In the File Server field, enter the name or IP address of the file server with the dynamic share.
In the File Server field, enter the name or IP address of the file server with the dynamic share.
If you specify the file server name, the Edge WAE resolves it to an IP address.
The registered file servers are displayed in a drop-down list.
Step 5![]() In the User name, Password, and Confirm Password fields, enter the username and password credentials for the file server. If the username is in a Windows domain, specify the domain name as part of the User name field, as follows: domain\username.
In the User name, Password, and Confirm Password fields, enter the username and password credentials for the file server. If the username is in a Windows domain, specify the domain name as part of the User name field, as follows: domain\username.
These credentials are used only to access the file server when you click Browse.
Step 6![]() In the Share Name field, specify the location of the dynamic share by doing one of the following tasks:
In the Share Name field, specify the location of the dynamic share by doing one of the following tasks:
Note![]() The Browse button appears only if you have at least one WAE device with the CIFS accelerator enabled and registered to the WAAS Central Manager.
The Browse button appears only if you have at least one WAE device with the CIFS accelerator enabled and registered to the WAAS Central Manager.
Step 7![]() Ensure that the status of the share is set to Enabled. If you change the status to Disabled, the share will not be set up as a dynamic share in your WAAS environment.
Ensure that the status of the share is set to Enabled. If you change the status to Disabled, the share will not be set up as a dynamic share in your WAAS environment.
The specified directory now functions as a dynamic share on the Edge WAE cache.
About Preposition Directives
A preposition directive allows you to determine which files should be proactively copied from CIFS file servers to the cache of selected Edge WAEs. Prepositioning enables you to take advantage of the idle time on the WAN to transfer frequently accessed files to selected WAEs, where users can benefit from cache-level performance even during first-time access of these files.
Prepositioning is supported on automatically discovered file servers in the transparent CIFS accelerator.
When defining a preposition directive, select the Edge WAEs that you want to be prepositioned with content from the file server, and then specify the root directories on the file server to be prepositioned. Initially, the preposition directive is in the unscheduled state. You must create a schedule that determines when and how often the content is prepositioned. Because content can be prepositioned on a regular basis, you can specify whether each new iteration of the task should copy all designated files, or only those files that have changed over a specified time interval.
In addition, you can specify time and size limits to prevent a preposition task from consuming too much bandwidth on the WAN or too much space on the Edge WAE cache. We strongly recommend that you use these limits to optimize network efficiency and prevent misuse of this feature.
When the activation time of a preposition directive arrives, a preposition task starts on the Edge WAE. Each preposition task can be monitored in the WAAS Central Manager GUI during and after processing. You can also terminate active preposition tasks, if required.
Prepositioning requires that the username and password needed to access the file server be specified. These items are specified directly in the Creating New Preposition Directive window, as described in Creating a New Preposition Directive.
Note![]() When preposition updates are sent to the Central Manager, if any preposition file server credentials cannot be decrypted, all further preposition updates are not sent from the WAE to the Central Manager, and decryption failure error messages are logged in errorlog/cms_log.current. You must reconfigure the preposition credentials from the CLI.
When preposition updates are sent to the Central Manager, if any preposition file server credentials cannot be decrypted, all further preposition updates are not sent from the WAE to the Central Manager, and decryption failure error messages are logged in errorlog/cms_log.current. You must reconfigure the preposition credentials from the CLI.
Prepositioning includes the ability to configure multiple roots. See Creating a New Preposition Directive.
When using prepositioning, both branch and data center WAEs are required (the same as for any other accelerated traffic). The branch WAE retrieves prepositioned files through an optimized connection. Verify that you have connectivity between the following network entities:
- Client to branch WAE
- Branch WAE to data center WAE
- Branch WAE to file server
- Data center WAE to file server
You will need to change any ACLs that might be blocking prepositioning traffic.
Note![]() Although preposition directives can be created and managed by using the CLI, we recommend that you use the Central Manager GUI because you can manage prepositioning for groups of WAEs from the Central Manager. If you mix GUI and CLI configuration, unpredictable results may occur because changes on one device can affect other devices.
Although preposition directives can be created and managed by using the CLI, we recommend that you use the Central Manager GUI because you can manage prepositioning for groups of WAEs from the Central Manager. If you mix GUI and CLI configuration, unpredictable results may occur because changes on one device can affect other devices.
The following topics describe how to create and manage a preposition directive:
Creating a New Preposition Directive
To create a preposition directive, follow these steps:
Step 1![]() From the WAAS Central Manager menu, choose Configure > CIFS File Services > Preposition.
From the WAAS Central Manager menu, choose Configure > CIFS File Services > Preposition.
The Preposition Directives window appears. This window displays the following information about preposition directives that exist on the system:
–![]() When the type is Full, all the files that match the other filters of the task and that are found on the file server are sent to the Edge to be compared with the cache.
When the type is Full, all the files that match the other filters of the task and that are found on the file server are sent to the Edge to be compared with the cache.
–![]() When the type is Differential, only the files that are found as changed since the last successful preposition are sent to the Edge cache. The time of the last successful preposition is taken from the Edge device, so ensure that the clock is synchronized with the file server. The first scan is always a full scan. If you change the preposition task, the last successful scan time is reset.
When the type is Differential, only the files that are found as changed since the last successful preposition are sent to the Edge cache. The time of the last successful preposition is taken from the Edge device, so ensure that the clock is synchronized with the file server. The first scan is always a full scan. If you change the preposition task, the last successful scan time is reset.
–![]() When the type is Since, only the files that are found as changed within a specified time period are sent to the Edge cache.
When the type is Since, only the files that are found as changed within a specified time period are sent to the Edge cache.
From the Preposition Directive window, you can perform the following tasks:
Step 2![]() Click the Create New Preposition Directive icon in the taskbar to create a new preposition directive.
Click the Create New Preposition Directive icon in the taskbar to create a new preposition directive.
The Creating New Preposition Directive window appears. (Figure 11-2)
Figure 11-2 Creating a New Preposition Directive Window
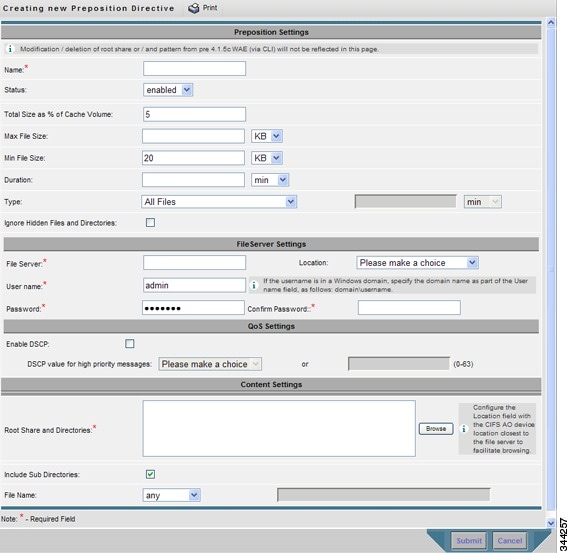
Step 3![]() Enter a unique name for the directive. The name cannot contain characters other than letters, numbers, period, hyphen, and underscore; the double quote (") character is not allowed in the name.
Enter a unique name for the directive. The name cannot contain characters other than letters, numbers, period, hyphen, and underscore; the double quote (") character is not allowed in the name.
Step 4![]() From the Status drop-down list, choose either enabled or disabled. (Disabled directives are not put into effect.)
From the Status drop-down list, choose either enabled or disabled. (Disabled directives are not put into effect.)
Step 5![]() (Optional) Define the time and size limitations using the provided fields.
(Optional) Define the time and size limitations using the provided fields.
Note![]() Table 11-3 describes the time and size limitation fields.If one of these limits is exceeded during a prepositioning task, the task is terminated and a message is sent to the Administrator log. Any remaining files are exported the next time the task is run. If a user requests one of the missing files before this happens, it is fetched over the WAN through WAAS software as usual.
Table 11-3 describes the time and size limitation fields.If one of these limits is exceeded during a prepositioning task, the task is terminated and a message is sent to the Administrator log. Any remaining files are exported the next time the task is run. If a user requests one of the missing files before this happens, it is fetched over the WAN through WAAS software as usual.
Step 6![]() (Optional) Check the Ignore Hidden Directories check box if you want to prevent hidden directories on the file server from being prepositioned. This check box is unchecked by default. If you leave this box unchecked, hidden directories are prepositioned.
(Optional) Check the Ignore Hidden Directories check box if you want to prevent hidden directories on the file server from being prepositioned. This check box is unchecked by default. If you leave this box unchecked, hidden directories are prepositioned.
Step 7![]() In the File Server field, enter the unique name of a file server to export. The name cannot contain characters other than letters, numbers, period, hyphen, and underscore; the double quote (") or forward slash (/) characters are not allowed in the name.
In the File Server field, enter the unique name of a file server to export. The name cannot contain characters other than letters, numbers, period, hyphen, and underscore; the double quote (") or forward slash (/) characters are not allowed in the name.
Step 8![]() From the Location drop-down list, choose the device location that will provide browsing services for the file server. Normally, this is the data center WAE. For the best browsing performance, specify a location that is close to the file server. The location is used only for browsing; each edge WAE will retrieve prepositioned files directly from the file server, not from this location. For more information on defining locations, see Working with Device Locations.
From the Location drop-down list, choose the device location that will provide browsing services for the file server. Normally, this is the data center WAE. For the best browsing performance, specify a location that is close to the file server. The location is used only for browsing; each edge WAE will retrieve prepositioned files directly from the file server, not from this location. For more information on defining locations, see Working with Device Locations.
Step 9![]() In the User name, Password, and Confirm Password fields, enter the username and password credentials for the file server. If the username is in a Windows domain, specify the domain name as part of the User name field, as follows: domain\username.
In the User name, Password, and Confirm Password fields, enter the username and password credentials for the file server. If the username is in a Windows domain, specify the domain name as part of the User name field, as follows: domain\username.
The access credentials that you enter must allow read access to the prepositioned root directories and to their parent directories.
Step 10![]() (Optional) Check the DSCP value for high priority messages check box if you want to assign a DSCP marking value to the prepositioning traffic. Choose a DSCP value from the drop-down list or enter a number from 0 to 63 in the text field.
(Optional) Check the DSCP value for high priority messages check box if you want to assign a DSCP marking value to the prepositioning traffic. Choose a DSCP value from the drop-down list or enter a number from 0 to 63 in the text field.
DSCP is a field in an IP packet that enables different levels of service to be assigned to the network traffic. Levels of service are assigned by marking each packet on the network with a DSCP code and associating a corresponding level of service. DSCP is the combination of IP Precedence and Type of Service (ToS) fields. For more information, see RFC 2474.
Step 11![]() In the Root Share and Directories field, enter the directories on the file server that you want to export. Use any of the following methods to identify a directory:
In the Root Share and Directories field, enter the directories on the file server that you want to export. Use any of the following methods to identify a directory:
- Manually enter one or more directory paths in the following format: protocol :// server / share or server\share, for example, cifs://win12srv/home or win12srv\home. You can enter multiple lines for multiple directories, with each full directory path on its own line. You cannot specify the root directory (/) as a root share.
When you define multiple root shares, the preposition sequence that is performed for a single root configuration is repeated for each root serially.
- Click Browse to browse the directories on the file server. To navigate to a directory, click the File Folder icon to the left of the directory name. Check the check box next to the directory that you want to export and then click Select Directory. The browse window allows you to choose multiple directories.
The browse function operates best when you choose the location of the nearest CIFS accelerator to the file server, from the Location drop-down list. If you do not choose a location, the browse request is sent to all the devices that have the CIFS accelerator enabled, and the request may time out.
- Check the Include Sub Directories check box to include all the subdirectories under the specified root directory. If this option is not selected, only the files in the specified root directory are prepositioned and you cannot select subdirectories when you are browsing.
- Narrow the policy definition to a particular type of file by choosing a pattern operator from the File Name drop-down list and entering the text that describes the pattern in the adjacent text box, for example, enter ends with.doc. Do not use a space or the following special characters:
|, :, >, <, ", ?, *, /, \.
The directive is saved and additional tabs appear at the top of the window.
Assigning Edge Devices to a Preposition Directive
After you create a preposition directive, you need to assign Edge WAEs or device groups to the directive. This task determines which Edge WAEs will store-preposition content in their cache.
Note![]() Prepositioning includes the ability to configure multiple roots. See Creating a New Preposition Directive.
Prepositioning includes the ability to configure multiple roots. See Creating a New Preposition Directive.
To assign an Edge WAE or device group to a preposition directive, follow these steps:
Step 1![]() From the WAAS Central Manager menu, choose Configure > CIFS File Services > Preposition.
From the WAAS Central Manager menu, choose Configure > CIFS File Services > Preposition.
The Preposition Directives window appears, which lists the preposition directives that exist on the system.
Step 2![]() Click the Edit icon next to the preposition directive that you want to assign to an Edge WAE or device group.
Click the Edit icon next to the preposition directive that you want to assign to an Edge WAE or device group.
Step 3![]() Click one of the following tabs at the top of the window:
Click one of the following tabs at the top of the window:
The Edge Device Assignments window or the Device Groups Assignments window appears, depending on the selected option.
For either view, the assignments window lets you filter your view of the items in the list. Filtering enables you to find items in the list that match the criteria that you set.
Step 4![]() Choose the Edge WAEs or device groups to assign to this preposition directive by doing either of the following:
Choose the Edge WAEs or device groups to assign to this preposition directive by doing either of the following:
 (Assign All) in the taskbar to assign all the available Edge WAEs or device groups to this directive.
 next to the individual Edge WAE or device group that you want to assign to this directive. The icon changes to
 when selected.
Note![]() If a device or device group is offline (identified by
If a device or device group is offline (identified by  ), then you cannot assign that device or group to this directive. The preposition directive, when assigned to a device group, is applied only to connected Edge devices in the assigned device group.
When assigning a CIFS accelerator preposition directive to a device group, the directive is applied only to those devices enabled for CIFS acceleration in the assigned device group.
The icon next to each edge device or device group you selected changes to  .
.
Note![]() If the CIFS accelerator is disabled on a WAE, the WAE is removed from any preposition directives to which it is assigned. Also, the preposition directive is removed from the device’s running configuration.
If the CIFS accelerator is disabled on a WAE, the WAE is removed from any preposition directives to which it is assigned. Also, the preposition directive is removed from the device’s running configuration.
Creating a New Preposition Schedule
After you create a preposition directive and assign WAEs to the directive, we recommend that you create a schedule that determines when and how often prepositioning occurs.
For example, you may want to schedule prepositioning to occur at night to minimize the amount of traffic during business hours, or, you may want to schedule prepositioning to occur on a recurring basis if the exported data changes often. This will help ensure that the WAEs assigned to this directive have the latest file updates in their cache.
When a preposition task is scheduled to begin at the same time for multiple Edge WAEs that are located in different timezones, the task will begin on the Edge WAEs based on the Core WAE timezone. If the clocks of the Edge WAE and the Core WAE are not synchronized, the task will not start on time.
To create a preposition schedule, follow these steps:
Step 1![]() From the WAAS Central Manager menu, choose Configure > CIFS File Services > Preposition.
From the WAAS Central Manager menu, choose Configure > CIFS File Services > Preposition.
The Preposition Directives window appears, which lists the preposition directives that exist on the system.
Step 2![]() Click the Edit icon next to the preposition directive for which you want to create a schedule.
Click the Edit icon next to the preposition directive for which you want to create a schedule.
Step 3![]() Click the Schedule tab at the top of the window.
Click the Schedule tab at the top of the window.
The Creating New Preposition Schedule window appears. By default, no schedule is configured.
Step 4![]() Choose one of the following scheduling options:
Choose one of the following scheduling options:
A Now schedule begins again each time you make a change to the preposition directive and click Submit button.
A Now schedule also begins again as soon as an Edge device that has been reloaded comes back online.
- Daily—Prepositioning occurs daily at the defined time.
- Date—Prepositioning occurs at the defined time and date.
- Weekly—Prepositioning occurs on the selected days of the week at the defined time.
- Monthly Days—Prepositioning occurs on the selected days of the month at the defined time.
- Monthly Weekdays—Prepositioning occurs on the defined day (as opposed to a defined date) and time during the month. For example, you can schedule prepositioning to occur on the second Tuesday of every month.
Step 5![]() Specify a start time for the prepositioning task.
Specify a start time for the prepositioning task.
The time is expressed in 24-hour format with 00:00 representing midnight. The time refers to the local time of the Edge WAE where the data is to be prepositioned. If there are multiple Edge WAEs in different time zones, the time refers to the local time of the Core WAE.
Note![]() You cannot schedule a start time for the Now option.
You cannot schedule a start time for the Now option.
The message Changes Submitted appears at the bottom of the window confirming that your schedule was saved.
Step 7![]() Verify that the preposition directive has completed successfully by checking the preposition status. For more information, see Checking the Preposition Status.
Verify that the preposition directive has completed successfully by checking the preposition status. For more information, see Checking the Preposition Status.
Checking the Preposition Status
After you create one or more preposition directives, you can verify the status of all the preposition tasks to ensure that they are completed successfully. If a task does not complete successfully, then some of the prepositioned files may have not been copied to the Edge WAE cache.
To check the status of a prepositioning task, follow these steps:
Step 1![]() From the WAAS Central Manager menu, choose Configure > CIFS File Services > Preposition.
From the WAAS Central Manager menu, choose Configure > CIFS File Services > Preposition.
The Preposition Directives window, which lists the preposition directives that exist on the system, appears.
Step 2![]() Click the Edit icon next to the preposition directive that you want to check.
Click the Edit icon next to the preposition directive that you want to check.
Step 3![]() Click the Preposition Status tab at the top of the window.
Click the Preposition Status tab at the top of the window.
The Preposition Status window displays the following information:
- WAE—The name of each Edge WAE that received the prepositioned files in its cache.
- Start Time—The time the preposition task started.
- Duration—The amount of time it took the preposition task to be completed.
- Amount Copied—The amount of data copied to the WAE cache, in bytes.
- Status—Whether the preposition task is completed successfully.
- Reason—The reason a preposition task failed.
Step 4![]() Ensure that the Status column shows Completed.
Ensure that the Status column shows Completed.
If this column shows Failure, look in the Reason column for an explanation that can help you troubleshoot why the preposition task failed. After resolving the issue, you can schedule the preposition task to run again now, or wait until the scheduled start time and verify the status again later.
Starting and Stopping Preposition Tasks
You can start or stop a preposition task from the Device Manager GUI.
Configuring the SMB Accelerator
Table 11-2 provides an overview of the steps that you must complete to configure the SMB accelerator.
|
|
|
|---|---|
Prepare for file services. |
Provides the tasks that you need to complete before enabling and configuring file services on your WAAS devices. For more information, see Preparing for File Services. |
Enable SMB acceleration. |
Enables and configures the SMB accelerator. For more information, see Enabling and Disabling the Global Optimization Features of Chapter 12, “Configuring Application Acceleration.” |
(Optional) Identify dynamic shares. |
Identifies the dynamic shares on an exported file server. If your file server uses Access Based Enumeration (ABE) to give users different views of the share, you must configure the dynamic shares on the WAAS Central Manager. For more information, see Creating Dynamic Shares for the SMB Accelerator. |
(Optional) Create a preposition directive. |
Defines which files are proactively copied from an exported file server to the Edge WAE cache. For more information, see About Preposition Directives |
About Preposition Directives
A preposition directive allows you to determine which files should be proactively copied from SMB file servers to the cache of selected Edge WAEs. Prepositioning enables you to take advantage of the idle time on the WAN to transfer frequently accessed files to selected WAEs, where users can benefit from cache-level performance even during first-time access of these files.
Note![]() Cisco SMB AO supports accelerating client connections to Microsoft DFS shares. However, Cisco SMB prepositioning does not support Microsoft DFS.
Cisco SMB AO supports accelerating client connections to Microsoft DFS shares. However, Cisco SMB prepositioning does not support Microsoft DFS.
Prepositioning of SMB v3 encrypted traffic is not supported in this release.
Prepositioning is supported on automatically discovered file servers in the SMB accelerator.
When defining a preposition directive, select the Edge WAEs that you want to be prepositioned with content from the file server, and then specify the root directories on the file server to be prepositioned. Initially, the preposition directive is in the unscheduled state. You must create a schedule that determines when and how often the content is prepositioned.
In addition, you can specify time and size limits to prevent a preposition task from consuming too much bandwidth on the WAN or too much space on the Edge WAE cache. We strongly recommend that you use these limits to optimize network efficiency and prevent misuse of this feature.
When the activation time of a preposition directive arrives, a preposition task starts on the Edge WAE. Each preposition task can be monitored in the WAAS Central Manager GUI during and after processing. You can also terminate active preposition tasks, if required.
Prepositioning requires that the username and password needed to access the file server be specified. These items are specified directly in the Creating New Preposition Directive window, as described in Creating a New Preposition Directive.
Note![]() When preposition updates are sent to the Central Manager, if any preposition file server credentials cannot be decrypted, all further preposition updates are not sent from the WAE to the Central Manager, and decryption failure error messages are logged in errorlog/cms_log.current. You must reconfigure the preposition credentials from the CLI.
When preposition updates are sent to the Central Manager, if any preposition file server credentials cannot be decrypted, all further preposition updates are not sent from the WAE to the Central Manager, and decryption failure error messages are logged in errorlog/cms_log.current. You must reconfigure the preposition credentials from the CLI.
Prepositioning includes the ability to configure multiple roots. See Creating a New Preposition Directive.
When using prepositioning, both branch and data center WAEs are required (the same as for any other accelerated traffic). The branch WAE retrieves prepositioned files through an optimized connection. Verify that you have connectivity between the following network entities:
- Client to branch WAE
- Branch WAE to data center WAE
- Branch WAE to file server
- Data center WAE to file server
You will need to change any ACLs that might be blocking prepositioning traffic.
Note![]() Although preposition directives can be created and managed by using the CLI, we recommend that you use the Central Manager GUI because you can manage prepositioning for groups of WAEs from the Central Manager. If you mix GUI and CLI configuration, unpredictable results may occur because changes on one device can affect other devices.
Although preposition directives can be created and managed by using the CLI, we recommend that you use the Central Manager GUI because you can manage prepositioning for groups of WAEs from the Central Manager. If you mix GUI and CLI configuration, unpredictable results may occur because changes on one device can affect other devices.
Note![]() We recommend that you configure not more than 25 preposition directives per device.
We recommend that you configure not more than 25 preposition directives per device.
If you want to enable DRE, you will need to select the SMB Preposition DRE settings checkbox, by navigating to the Device> Configure > Acceleration > SMB Preposition Settings. It is disabled by default.
Whenever DRE is enabled for the all prepositioning tasks, files are cached in Object Cache and DRE cache, particularly when the size of the prepositioned files is huge and this could affect the normal traffic. Else the files will be cached only in Object Cache.
The following topics describe how to create and manage a preposition directive:
Creating a New Preposition Directive
To create a preposition directive, follow these steps:
Step 1![]() From the WAAS Central Manager menu, choose Configure > SMB File Services > Preposition.
From the WAAS Central Manager menu, choose Configure > SMB File Services > Preposition.
The Preposition Directives window appears. This window displays the following information about preposition directives that exist on the system:
From the Preposition Directive window, you can perform the following tasks:
- Edit the configuration of an existing preposition directive by clicking the Edit icon next to the corresponding directive. You can then delete the preposition directive, or modify any of the settings.
- Assign the Device or Device Group (s) to the preposition operation by clicking the Assign Device/DeviceGroup(s) icon and select the appropriate one.
- Collect Preposition Status by clicking the Collect Preposition Status link.
- Add a new preposition directive, as described in the following steps.
Step 2![]() Click the Create New Preposition icon in the taskbar to create a new preposition directive.
Click the Create New Preposition icon in the taskbar to create a new preposition directive.
The Creating New Preposition Directive window appears. (Figure 11-3)
Figure 11-3 Creating a New Preposition Directive Window

Step 3![]() Under Preposition Settings, enter a unique name for the directive. The name cannot contain characters other than letters, numbers, period, hyphen, and underscore; the double quote (") character is not allowed in the name.
Under Preposition Settings, enter a unique name for the directive. The name cannot contain characters other than letters, numbers, period, hyphen, and underscore; the double quote (") character is not allowed in the name.
Step 4![]() Click the Enable Preposition check box. This denotes status of preposition. This is unchecked by default. If you disable it, preposition is not possible.
Click the Enable Preposition check box. This denotes status of preposition. This is unchecked by default. If you disable it, preposition is not possible.
Step 5![]() (Optional) Define the time and size limitations using the provided fields.
(Optional) Define the time and size limitations using the provided fields.
Table 11-3 describes the time and size limitation fields.
Note![]() If one of these limits is exceeded during a prepositioning task, the task is terminated and a message is sent to the Administrator log. Any remaining files are exported the next time the task is run. If a user requests one of the missing files before this happens, it is fetched over the WAN through WAAS software as usual.
If one of these limits is exceeded during a prepositioning task, the task is terminated and a message is sent to the Administrator log. Any remaining files are exported the next time the task is run. If a user requests one of the missing files before this happens, it is fetched over the WAN through WAAS software as usual.
Step 6![]() Under File Server Settings, check the SMBv2 checkbox to enable prepositioning of this traffic. This is disabled by default.
Under File Server Settings, check the SMBv2 checkbox to enable prepositioning of this traffic. This is disabled by default.
Step 7![]() In the File Server field, enter the unique name of a file server to export. The name cannot contain characters other than letters, numbers, period, hyphen, and underscore; the double quote (") or forward slash (/) characters are not allowed in the name.
In the File Server field, enter the unique name of a file server to export. The name cannot contain characters other than letters, numbers, period, hyphen, and underscore; the double quote (") or forward slash (/) characters are not allowed in the name.
Step 8![]() From the Nearest Device drop-down list, choose the device location that will provide browsing services for the file server. Normally, this is the data center WAE. For the best browsing performance, specify a location that is close to the file server. The location is used only for browsing; each edge WAE will retrieve prepositioned files directly from the file server, not from this location. For more information on defining locations, see Working with Device Locations.
From the Nearest Device drop-down list, choose the device location that will provide browsing services for the file server. Normally, this is the data center WAE. For the best browsing performance, specify a location that is close to the file server. The location is used only for browsing; each edge WAE will retrieve prepositioned files directly from the file server, not from this location. For more information on defining locations, see Working with Device Locations.
Step 9![]() In the User name, Password, and Confirm Password fields, enter the username and password credentials for the file server. If the username is in a Windows domain, specify the domain name in the Domain name field.
In the User name, Password, and Confirm Password fields, enter the username and password credentials for the file server. If the username is in a Windows domain, specify the domain name in the Domain name field.
The access credentials that you enter must allow read access to the prepositioned root directories and to their parent directories.
The following characters are not allowed to be used as username ; | && || : \ / * ? < > + =, [ ] “ ` !.
The following characters are not allowed to be used in server names ; | && ||, ~ : ! ` @ # $ % ^ & ‘ { } () _ “
The following characters are not allowed to be used as domain names ; | && || : \ / * ? < > “ ` !
Step 10![]() Under Content Settings, in the Root Share and Directories field, enter the directories on the file server that you want to export. Use any of the following methods to identify a directory:
Under Content Settings, in the Root Share and Directories field, enter the directories on the file server that you want to export. Use any of the following methods to identify a directory:
- Manually enter one or more directory paths in the following format: protocol :// server / share or server\share, for example, cifs://win12srv/home or win12srv\home. You can enter multiple lines for multiple directories, with each full directory path on its own line. You cannot specify the root directory (/) as a root share. Special characters like ; | && || : * ? < > “ ` ! [ ] + =, are not allowed for top level shares. Additionally, when you create subdirectories inside the shares, the following special characters are not allowed: ; | && || : * ? < > “ ` !
Note![]() Do not use the special character “;“ in files and directory names, else it will throw up errors. Additionally, we do not support extended Unicode characters in files and directories for release 6.2.1 and any such files or directories would be skipped and not prepositioned.
Do not use the special character “;“ in files and directory names, else it will throw up errors. Additionally, we do not support extended Unicode characters in files and directories for release 6.2.1 and any such files or directories would be skipped and not prepositioned.
When you define multiple root shares, the preposition sequence that is performed for a single root configuration is repeated for each root serially.
- Click Browse to browse the directories on the file server. To navigate to a directory, click the File Folder icon to the left of the directory name. Check the check box next to the directory that you want to export and then click Select Directory. The browse window allows you to choose multiple directories.
The browse function operates best when you choose the location of the nearest SMB accelerator to the file server, from the Location drop-down list. If you do not choose a location, the browse request is sent to all the devices that have the SMB accelerator enabled, and the request may time out.
- Check the Include Sub Directories check box to include all the subdirectories under the specified root directory. If this option is not selected, only the files in the specified root directory are prepositioned and you cannot select subdirectories when you are browsing.
- Narrow the policy definition to a particular type of file by choosing a pattern operator from the File Name drop-down list and entering the text that describes the pattern in the adjacent text box, for example, enter ends with.doc. Do not use a space or the following special characters:
; | && || : * ? < > \ / “ ` !
Step 11![]() By default, a Now schedule begins (if the status is enabled) again each time you make a change to the preposition directive page. A new schedule also begins again as soon as an edge device that has been reloaded comes back online. Under Schedule Settings, select the frequency of preposition from the Frequency drop-down list.
By default, a Now schedule begins (if the status is enabled) again each time you make a change to the preposition directive page. A new schedule also begins again as soon as an edge device that has been reloaded comes back online. Under Schedule Settings, select the frequency of preposition from the Frequency drop-down list.
–![]() Not-Scheduled- By default this option will be displayed to user.
Not-Scheduled- By default this option will be displayed to user.
–![]() Immediate- Prepositioning occurs within a few minutes after click on ok button in schedule dialog.
Immediate- Prepositioning occurs within a few minutes after click on ok button in schedule dialog.
–![]() Date - Prepositioning occurs at the defined time and date..
Date - Prepositioning occurs at the defined time and date..
–![]() Daily-Prepositioning occurs daily at the defined time.
Daily-Prepositioning occurs daily at the defined time.
–![]() Weekly-Prepositioning occurs on the selected days of the week at the defined time.
Weekly-Prepositioning occurs on the selected days of the week at the defined time.
–![]() Monthly Days-Prepositioning occurs on the selected days of the month at the defined time.
Monthly Days-Prepositioning occurs on the selected days of the month at the defined time.
–![]() Monthly WeekDays - Prepositioning occurs on the selected month weekdays at the defined time
Monthly WeekDays - Prepositioning occurs on the selected month weekdays at the defined time
Step 12![]() Specify the preposition start time from the Start Time drop-down list.
Specify the preposition start time from the Start Time drop-down list.
The time is expressed in 24-hour format with 00:00 representing midnight. The time refers to the local time of the Edge WAE where the data is to be prepositioned. If there are multiple Edge WAEs in different time zones, the time refers to the local time of the Core WAE.
The directive is saved and is added to the preposition directive table.
Assigning Edge Devices to a Preposition Directive
After you create a preposition directive, you need to assign Edge WAEs or device groups to the directive. This task determines which Edge WAEs will store-preposition content in their cache.
Note![]() Prepositioning includes the ability to configure multiple roots. See Creating a New Preposition Directive.
Prepositioning includes the ability to configure multiple roots. See Creating a New Preposition Directive.
To assign an Edge WAE or device group to a preposition directive, follow these steps:
Step 1![]() From the WAAS Central Manager menu, choose Configure > SMB File Services > Preposition.
From the WAAS Central Manager menu, choose Configure > SMB File Services > Preposition.
The Preposition Directives window appears, which lists the preposition directives that exist on the system.
Step 2![]() Select the appropriate Preposition Directive to assign it to the Device /Device Groups and click on Assign Devices/ Device Groups icon. The Assign Device/Device Groups Assignments window appears. The assignments window lets you filter your view of the items in the list. Filtering enables you to find items in the list that match the criteria that you set.
Select the appropriate Preposition Directive to assign it to the Device /Device Groups and click on Assign Devices/ Device Groups icon. The Assign Device/Device Groups Assignments window appears. The assignments window lets you filter your view of the items in the list. Filtering enables you to find items in the list that match the criteria that you set.
Step 3![]() Choose the Edge WAEs or device groups to assign to this preposition directive and click Assign. The Assigned Status column changes to Assigned next to the selected Device/Device Groups. You can also un-assign a Device/Device Group by clicking on Unassign. The Assigned Status column changes to Not Assigned accordingly.
Choose the Edge WAEs or device groups to assign to this preposition directive and click Assign. The Assigned Status column changes to Assigned next to the selected Device/Device Groups. You can also un-assign a Device/Device Group by clicking on Unassign. The Assigned Status column changes to Not Assigned accordingly.
Step 4![]() In case there is a delay in sending the preposition details to the device, the Assigned Status column displays NOTIFY UPDATES IN-PROGRESS for the Device/Device Group. Click on Refresh to see a change in status once the preposition changes have been made on the device.
In case there is a delay in sending the preposition details to the device, the Assigned Status column displays NOTIFY UPDATES IN-PROGRESS for the Device/Device Group. Click on Refresh to see a change in status once the preposition changes have been made on the device.
Note![]() If a device or device group is offline (identified by
If a device or device group is offline (identified by  ), then you cannot assign that device or group to this directive. The preposition directive, when assigned to a device group, is applied only to connected Edge devices in the assigned device group.
When assigning a SMB accelerator preposition directive to a device group, the directive is applied only to those devices enabled for SMB acceleration in the assigned device group.
Note![]() If the SMB accelerator is disabled on a WAE, the SMB accelerator preposition task will fail with error that SMB accelerator is not enabled on the WAE.
If the SMB accelerator is disabled on a WAE, the SMB accelerator preposition task will fail with error that SMB accelerator is not enabled on the WAE.
Creating a New Preposition Schedule
After you create a preposition directive and assign WAEs to the directive, we recommend that you create a schedule that determines when and how often prepositioning occurs.
For example, you may want to schedule prepositioning to occur at night to minimize the amount of traffic during business hours, or, you may want to schedule prepositioning to occur on a recurring basis if the exported data changes often. This will help ensure that the WAEs assigned to this directive have the latest file updates in their cache.
When a preposition task is scheduled to begin at the same time for multiple Edge WAEs that are located in different timezones, the task will begin on the Edge WAEs based on the Core WAE timezone. If the clocks of the Edge WAE and the Core WAE are not synchronized, the task will not start on time.
To create a preposition schedule, follow these steps:
Step 1![]() From the WAAS Central Manager menu, choose Configure > SMB File Services > Preposition.
From the WAAS Central Manager menu, choose Configure > SMB File Services > Preposition.
The Preposition Directives window appears, which lists the preposition directives that exist on the system.
Step 2![]() Click the Edit icon next to the preposition directive for which you want to create a schedule.
Click the Edit icon next to the preposition directive for which you want to create a schedule.
Step 3![]() Click the Schedule tab at the top of the window.
Click the Schedule tab at the top of the window.
The Creating New Preposition Schedule window appears. By default, no schedule is configured.
Step 4![]() Choose one of the following scheduling options:
Choose one of the following scheduling options:
A Now schedule begins again each time you make a change to the preposition directive and click Submit. A Now schedule also begins again as soon as an Edge device that has been reloaded comes back online.
- Daily—Prepositioning occurs daily at the defined time.
- Date—Prepositioning occurs at the defined time and date.
- Weekly—Prepositioning occurs on the selected days of the week at the defined time.
- Monthly Days—Prepositioning occurs on the selected days of the month at the defined time.
- Monthly Weekdays—Prepositioning occurs on the defined day (as opposed to a defined date) and time during the month. For example, you can schedule prepositioning to occur on the second Tuesday of every month.
Step 5![]() Specify a start time for the prepositioning task.
Specify a start time for the prepositioning task.
The time is expressed in 24-hour format with 00:00 representing midnight. The time refers to the local time of the Edge WAE where the data is to be prepositioned. If there are multiple Edge WAEs in different time zones, the time refers to the local time of the Core WAE.
Note![]() You cannot schedule a start time for the Now option.
You cannot schedule a start time for the Now option.
The message Changes Submitted appears at the bottom of the window confirming that your schedule was saved.
Step 7![]() Verify that the preposition directive has completed successfully by checking the preposition status. For more information, see Checking the Preposition Status.
Verify that the preposition directive has completed successfully by checking the preposition status. For more information, see Checking the Preposition Status.
Checking the Preposition Status
After you create one or more preposition directives, you can verify the status of all the preposition tasks to ensure that they are completed successfully. If a task does not complete successfully, then some of the prepositioned files may have not been copied to the Edge WAE cache.
To check the status of a prepositioning task, follow these steps:
Step 1![]() From the WAAS Central Manager menu, choose Configure > SMB File Services > Preposition.
From the WAAS Central Manager menu, choose Configure > SMB File Services > Preposition.
The Preposition Directives window, which lists the preposition directives that exist on the system, appears.
Step 2![]() Select the SMB preposition directive that you want to check and click the Collect Preposition Status tab at the top of the window.
Select the SMB preposition directive that you want to check and click the Collect Preposition Status tab at the top of the window.
The Preposition Status window displays the following information:
- WAE—The name of each Edge WAE that received the prepositioned files in its cache.
- Start Time—The time the preposition task started.
- Duration—The amount of time it took the preposition task to be completed.
- Amount Copied—The amount of data copied to the WAE cache, in bytes.
- Status—Whether the preposition task is completed successfully.
- Error Reason—The reason a preposition task failed.
Ensure that the Status column shows Completed.
If this column shows Failure, look in the Reason column for an explanation that can help you troubleshoot why the preposition task failed. After resolving the issue, you can schedule the preposition task to run again now, or wait until the scheduled start time and verify the status again later.
You can also export this data and save it to your local machine.
Creating Dynamic Shares for the SMB Accelerator
Many file servers use dynamic shares, which allow multiple users to access the same share but then be automatically mapped to a different directory based on the user’s credentials. Dynamic shares are most commonly used on file servers to set up user home directories. For example, a directory named Home can be set up as a dynamic share on a file server so each user accessing that share is automatically redirected to their own personal directory.
If a file server contains a dynamic share or is using Access Based Enumeration (ABE), you must register that dynamic share with the WAAS Central Manager as described in this section.
Defining a dynamic share in the WAAS Central Manager allows each user to see a different view of the share and allows the operation of ABE if it is configured on the Windows Server.
Note![]() Dynamic share configuration on the WAAS Central Manager overrides any dynamic share configuration set up directly on the WAE device using the CLI.
Dynamic share configuration on the WAAS Central Manager overrides any dynamic share configuration set up directly on the WAE device using the CLI.
Before adding a dynamic share, note the following limitations:
- Each dynamic share on a file server must be unique.
- You cannot add a dynamic share if that share has a preposition directive. You must remove the preposition policy before you can add the dynamic share.
- You can use the WAAS Central Manager GUI to define any directory as a dynamic share. However, if a directory is not set up as a dynamic share on the file server, all users will read or write the same content from the same directory and will not be redirected to different directories based on their credentials.
To add a dynamic share for SMB accelerator, follow these steps:
Step 1![]() From the WAAS Central Manager menu, choose Devices > Configure > SMB File Services > Dynamic Shares.
From the WAAS Central Manager menu, choose Devices > Configure > SMB File Services > Dynamic Shares.
A list of dynamic shares appears. The Dynamic Shares window shows all the dynamic shares configured. From this window, you can perform the following tasks:
Edit the configuration of an existing dynamic share by clicking the Edit icon next to the share. You can delete the dynamic share, or modify any of the dynamic share settings.
Add a new dynamic share definition, as described in the next steps.
Step 2![]() Click the Add Dynamic Share icon in the taskbar to add a new dynamic share. The Creating a new Dynamic Share window appears.
Click the Add Dynamic Share icon in the taskbar to add a new dynamic share. The Creating a new Dynamic Share window appears.
Step 3![]() In the File Server field, enter the name or IP address of the file server with the dynamic share.
In the File Server field, enter the name or IP address of the file server with the dynamic share.
If you specify the file server name, the edge WAE resolves it to an IP address.
The registered file servers are displayed in a drop-down list.
Step 4![]() In the Share name field, specify the location of the dynamic share by doing one of the following tasks:
In the Share name field, specify the location of the dynamic share by doing one of the following tasks:
Enter the name of the dynamic share on the file server. The following characters cannot be used in the share name: \ / : * ? “ < > |
Click Browse next to the Share Name field to navigate to the correct root directory.
Note![]() The Browse button appears only if you have at least one WAE device with the SMB accelerator enabled and registered to the WAAS Central Manager.
The Browse button appears only if you have at least one WAE device with the SMB accelerator enabled and registered to the WAAS Central Manager.
Step 5![]() Click OK to submit the changes.
Click OK to submit the changes.
The specified directory now functions as a dynamic share on the Edge WAE cache.
 Feedback