Software Installation and Data Migration: Cisco Vision Dynamic Signage Director Release 6.1 to Release 6.2
Available Languages
Software Installation and Data Migration: Release 6.1 to Release 6.2
Cisco Vision Dynamic Signage Director
Cisco Vision Dynamic Signage Director, Release 6.2.0-579
Last Modified: 2020-01-07
First Published: 2019-07-29
IMPORTANT: Release 6.2 will support a full ISO installation ONLY. There is no upgrade to this release.
Cisco Vision Director is installed within a virtual machine (VM) environment. With our 6.2 release, the VM environment will be used to migrate your data from Release 6.1. Release 6.2 includes a new operating system which requires complete installation. This means you create and configure a second instance of Cisco Vision Dynamic Signage Director to be a secondary, with a complete backup of the primary Cisco Vision Director software.
Note: The installation (full ISO) image of 6.2 is not posted on cisco.com. To obtain the 6.2 installation image, please send an email to cvupgrades@cisco.com and include your cisco.com user ID and the site being upgraded.
For additional information, please refer to the Cisco Vision Software Installation and Upgrade Guide, for Release 6.2.
Overview
IMPORTANT: If you have any data from Quest/NCR and/or Micros, remove this data from the Dynamic Menu Boards, including associations in the luxury suites. If there are widget data integrations (and widgets), that directly or indirectly use Quest/NCR and Micros Point of Sale (POS) data, remove them. Integration with Quest/NCR and Micros is not supported with Release 6.0.
o The recommended procedure involves using a primary and secondary server redundancy configuration.
o Release 6.1 system will back up the configuration to the Release 6.2 system using the regular primary/secondary backup copy mechanism.
o Setup the new Release 6.2 system as the secondary server, if not already present.
o Ensure the new primary Cisco Vision Director is performing as expected.
o Migrate the secondary Cisco Vision Director to Release 6.2.
WHAT IS IT
Migration of data from older Dynamic Signage Director (DSD) versions to the newest release. Unless you follow these steps, your previous data will be lost. This is a different procedure from an automated incremental upgrade. Release 6.2 contains a new operating system which requires a new installation and the data migration.
WHY USE IT
To preserve your data from a single or primary server running the most current Release 6.1 to a new or secondary server containing a fresh ISO installation of Release 6.2.
WHERE TO CONFIGURE IT
The following prerequisite conditions apply:
o Two virtual machines matching Cisco Vision Director requirements, the second VM will have Release 6.2
o Both machines have the ability to reach each other over the network
o One of the machines is an established Cisco Vision Director server running the latest Release 6.1 SP.
o You have a 6.2 FULL ISO file (see the first note on how to obtain)
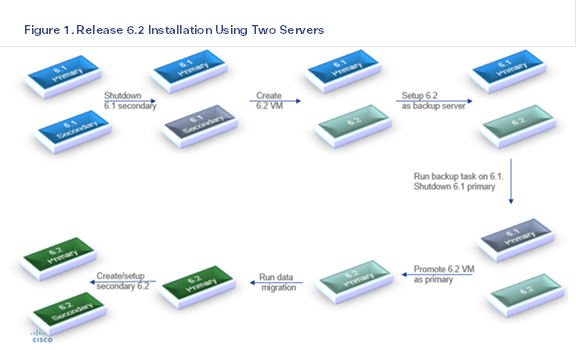
Figure 1 shows the installation flow. This procedure assumes the following:
o Release 6.1 Primary, Secondary (P1, S1) VM Server
o Release 6.2 Primary, Secondary (P2, S2) VM Server
Figure 1. Release 6.2 Installation Diagram Using Two Servers
IMPORTANT: Before you begin, generate and download any proof of play reports.
Note: Timezone and NTP must be configured per Release 6.2: Cisco Vision Dynamic Signage Director Administration Guide.
To generate Proof of Play reports:
1. Login to Dynamic Signage Director Release 6.1. Go to:
Tools > Control Panel > Setup > Proof of Play.
Perform a Full Install of Dynamic Signage Director Release 6.2
2. Refer to the Cisco Vision Software Installation and Upgrade Guide for Release 6.2 for complete instructions. Configure it with the same memory profile as Release 6.1 (standard or small configuration).
Enable Remote Access on Dynamic Signage Director Release 6.2
3. Login to the DSD TUI. Go to:
Main Menu > System Accounts > Change installer password (Figure 2).
Figure 2. Change Installer Password in TUI
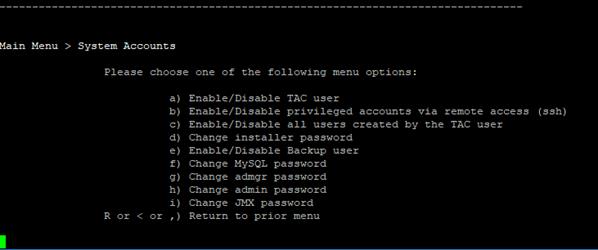
4. Choose a password and save it. Note this password safely, as Cisco TAC personnel cannot retrieve it.
5. From System Accounts menu, choose e) Enable/Disable Backup user. Follow screen prompts and set up the backup user key from the primary system to use it.
6. From System Accounts menu, choose b) Enable/Disable privileged accounts via remote access (ssh) (Figure 3).
Figure 3. Enable/Disable Privileged Accounts Over Remote (SSH)

Note: After completing the data migration, return here and disable remote access for added security.
Set Dynamic Signage Director Release 6.2 as Secondary Server
For simplicity, stop the services in Dynamic Signage Director Release 6.2.
7. Go to the TUI Main Menu. Choose c) Services Control > i) Dynamic Signage Director Services > a) All (Figure 4).
Figure 4. Stop Service on Dynamic Signage Director

8. Choose c) Stop Service.
Configure the Backup Server on Dynamic Signage Director Release 6.1
9. Use the Cisco Vision Director TUI to log in to DSD Release 6.1 as installer.
10. Go to:
Main Menu > Cisco Vision Server Administration > Setup automatic backup and restore.
11. For the inactive DSD server, enter the IP address of DSD Release 6.2 server (Figure 5).
Figure 5. Enter IP Address of DSD Release 6.2
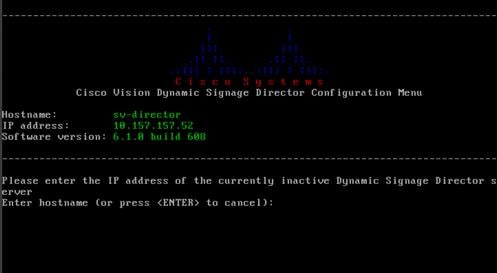
You will be prompted for the installer password of the backup server.
12. Enter the installer password for DSD Release 6.2 that you set up in step 4 (Figure 6).
Figure 6. Enter Installer Password for Backup Server
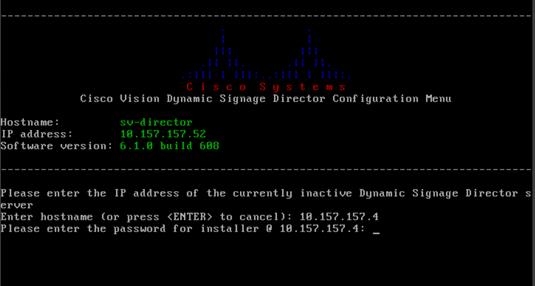
Note: This takes a few minutes. Wait for the setup process to complete.
Generate a Backup on DSD Release 6.1
13. Log in to DSD Release 6.1 as an administrator user.
14. Go to:
Tools > Management Dashboard > Tool drawer > Advanced tab > Run a Task.
15. In the right panel Parameters field, click Backup Task (Figure 7).
16. Click Apply. The backup may take some time to complete. Click Apply only once.
Figure 7. Run Backup Task
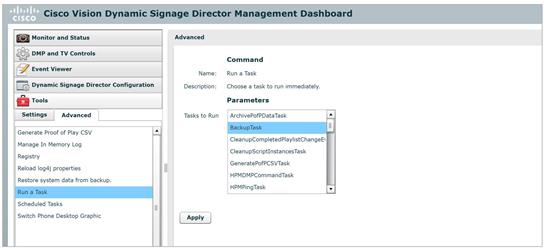
Note: Backup tasks may take a while to finish, particularly if there is a lot of content.
Restore and Migrate the DSD Release 6.1 Backup Server on DSD Release 6.2 Server
17. Login to Cisco Vision Director TUI.
18. Type d for Cisco Vision Server Administration.
19. Type o for Restore and Migrate Release 6.1 Backup (Figure 8).
Figure 8. Restore and Migrate Release 6.1 Backup
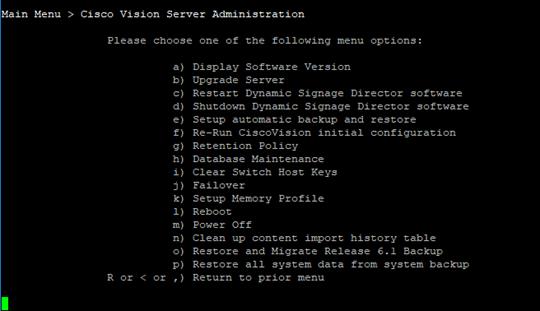
Note: Once migration starts, DO NOT press any keys on your keyboard until migration is done.
Note: The restore operation can only be performed once.
IMPORTANT: If the only option you see is 0, go up one level up the menu tree and come back in a few minutes.
20. Log into the TUI as installer using a directly-connected console or SSH client.
21. Type Services Control > i) Dynamic Signage Director Services > a) All.
22. Type b) Start Service.
The Cisco Vision Director services are started and configured to start automatically when a reboot occurs.
23. If the backup and transfer to DSD Release 6.2 completes, you will see an option 1. Select 1) option (Figure 9).
Figure 9. Option 1: Restore Backup

24. Press Y to start the data restore and migration (Figure 10).
The backup may appear to be migrated, but the copy operation may not be complete. If you see an error message saying “No such file or directory” or “Checksum is wrong!” after you press Y, wait until the copy process completes.
Figure 10. Start Restore and Backup Data from Release 6.1 and Migrate to Release 6.2 Process

25. Wait until process completes. You will see a screen similar to Figure 11.
Figure 11. Restore and Backup Complete

26. Reboot DSD server for changes to save.
Shut Down DSD Release 6.1 Server
27. Go to DSD Release 6.1 TUI Main Menu > d) Cisco Vision Server Administration.
28. Select m) Power Off.
Prepare to Setup DSD Release 6.2 as the Primary Server
29. Go to Cisco Vision Director TUI Main Menu > a) System Settings > a) Network Settings.
30. Select a) Setup Network Information.
31. Change the IP address of DSD Release 6.2 to the IP address of DSD Release 6.1.
32. Navigate to c) Edit hosts file to change the IP address.
33. Select d) Generate certificate file.
Note: Since you previously set DSD Release 6.2 as secondary/inactive in Set Dynamic Signage Director Release 6.2 as Secondary Server on page 4, promote DSD Release 6.2 to the primary/active server.
34. Go to:
Main Menu > d) Cisco Vision Server Administration > j) Failover > a) Promote as Primary/Active (Figure 12).
Figure 12. Promote DSD Release 6.2 Server to Primary

35. Navigate up to Main Menu > d) Cisco Vision Server Administration > l) Reboot.
36. Perform all system verifications.
Note: Contact your Cisco TAC representative to help you retrieve an offline backup, if necessary.
Setup the DSD Release 6.2 Server
Note: Skip this step if your deployment does not have a secondary server.
37. Perform a full installation of DSD Release 6.2 on a new VM. Use the same IP address as the DSD Release 6.1 server. See “Changing the IP Address on the Secondary Server” in Cisco Vision Administration Guide, Release 6.2.
38. Use the TUI to configure the DSD Release 6.2 server. See “Starting and Configuring the Services on the Secondary Server” in Cisco Vision Administration Guide, Release 6.2.
39. Use the TUI on the Release 6.2 primary server to configure automatic backup and restore to point to DSD Release 6.2 server. See “Setting up the Primary Server for Automatic Backup and Restore” in Cisco Vision Administration Guide, Release 6.2.
Access DSD Release 6.2 Server from a Browser
40. Clear your browser cache.
41. Enter the IP address of DSD Release 6.2 on your browser address bar.
42. Press Return (Enter).
Note: If you are performing this procedure long after the initial release of Cisco Vision DSD Release 6.2, use the standard incremental upgrade process to apply Service Packs. See the Cisco Vision Administration Guide, Release 6.2.
Obtaining Documentation and Submitting a Service Request
For information on obtaining documentation, using the Cisco Bug Search Tool (BST), submitting a service request, and gathering additional information, see What’s New in Cisco Product Documentation.
To receive new and revised Cisco technical content directly to your desktop, you can subscribe to the What’s New in Cisco Product Documentation RSS feed. The RSS feeds are a free service.
THE SPECIFICATIONS AND INFORMATION REGARDING THE PRODUCTS IN THIS MANUAL ARE SUBJECT TO CHANGE WITHOUT NOTICE. ALL STATEMENTS, INFORMATION, AND RECOMMENDATIONS IN THIS MANUAL ARE BELIEVED TO BE ACCURATE BUT ARE PRESENTED WITHOUT WARRANTY OF ANY KIND, EXPRESS OR IMPLIED. USERS MUST TAKE FULL RESPONSIBILITY FOR THEIR APPLICATION OF ANY PRODUCTS.
THE SOFTWARE LICENSE AND LIMITED WARRANTY FOR THE ACCOMPANYING PRODUCT ARE SET FORTH IN THE INFORMATION PACKET THAT SHIPPED WITH THE PRODUCT AND ARE INCORPORATED HEREIN BY THIS REFERENCE. IF YOU ARE UNABLE TO LOCATE THE SOFTWARE LICENSE OR LIMITED WARRANTY, CONTACT YOUR CISCO REPRESENTATIVE FOR A COPY.
The Cisco implementation of TCP header compression is an adaptation of a program developed by the University of California, Berkeley (UCB) as part of UCB’s public domain version of the UNIX operating system. All rights reserved. Copyright © 1981, Regents of the University of California.
NOTWITHSTANDING ANY OTHER WARRANTY HEREIN, ALL DOCUMENT FILES AND SOFTWARE OF THESE SUPPLIERS ARE PROVIDED “AS IS” WITH ALL FAULTS. CISCO AND THE ABOVE-NAMED SUPPLIERS DISCLAIM ALL WARRANTIES, EXPRESSED OR IMPLIED, INCLUDING, WITHOUT LIMITATION, THOSE OF MERCHANTABILITY, FITNESS FOR A PARTICULAR PURPOSE AND NONINFRINGEMENT OR ARISING FROM A COURSE OF DEALING, USAGE, OR TRADE PRACTICE.
IN NO EVENT SHALL CISCO OR ITS SUPPLIERS BE LIABLE FOR ANY INDIRECT, SPECIAL, CONSEQUENTIAL, OR INCIDENTAL DAMAGES, INCLUDING, WITHOUT LIMITATION, LOST PROFITS OR LOSS OR DAMAGE TO DATA ARISING OUT OF THE USE OR INABILITY TO USE THIS MANUAL, EVEN IF CISCO OR ITS SUPPLIERS HAVE BEEN ADVISED OF THE POSSIBILITY OF SUCH DAMAGES.
Any Internet Protocol (IP) addresses and phone numbers used in this document are not intended to be actual addresses and phone numbers. Any examples, command display output, network topology diagrams, and other figures included in the document are shown for illustrative purposes only. Any use of actual IP addresses or phone numbers in illustrative content is unintentional and coincidental.
All printed copies and duplicate soft copies are considered un-Controlled copies and the original on-line version should be referred to for latest version.
Cisco has more than 200 offices worldwide. Addresses, phone numbers, and fax numbers are listed on the Cisco website at www.cisco.com/go/offices.
Cisco and the Cisco logo are trademarks or registered trademarks of Cisco and/or its affiliates in the U.S. and other countries. To view a list of Cisco trademarks, go to this URL: www.cisco.com/go/trademarks. Third-party trademarks mentioned are the property of their respective owners. The use of the word partner does not imply a partnership relationship between Cisco and any other company. (1721R)
© 2020 Cisco Systems, Inc. All rights reserved.
Contact Cisco
- Open a Support Case

- (Requires a Cisco Service Contract)
 Feedback