- Preface
- DMB_get_started
- Overview of the Dynamic Menu Board Application
- Working with Stores in the DMB Application
- Working with Images in the DMB Application
- Working with the DMB Application User Interface
- Cisco Vision Director Dynamic Menu Board Configuration Guide
- Appendix A: DMB Default Menu Theme Reference
Release 6.3 and Later Releases: Cisco Vision Director Dynamic Menu Board and Store Configuration Guide
Bias-Free Language
The documentation set for this product strives to use bias-free language. For the purposes of this documentation set, bias-free is defined as language that does not imply discrimination based on age, disability, gender, racial identity, ethnic identity, sexual orientation, socioeconomic status, and intersectionality. Exceptions may be present in the documentation due to language that is hardcoded in the user interfaces of the product software, language used based on RFP documentation, or language that is used by a referenced third-party product. Learn more about how Cisco is using Inclusive Language.
- Updated:
- July 1, 2020
Chapter: Working with Stores in the DMB Application
Working with Stores
This module provides an overview of stores and describes the tasks for configuring and updating store content in Cisco Vision Director for use in menus. Users who are defined with administrator or concessionaire roles in Cisco Vision Director can perform store-related tasks within the DMB application.
This module includes the following topics:
■![]() Information About Stores in Cisco Vision Director
Information About Stores in Cisco Vision Director
■![]() How to Configure Stores in Cisco Vision Director
How to Configure Stores in Cisco Vision Director
■![]() Modifying the Schedule of PosGetMenuTask
Modifying the Schedule of PosGetMenuTask
Information About Stores in Cisco Vision Director
Cisco Vision Director makes content available for dynamic menus through the configuration of stores, which are collections of items available for sale that can be linked to appear on one or more menu boards.
Menu content for the Dynamic Menu Board (DMB) application in Cisco Vision Director comes from within the Cisco Vision Director software by defining what’s referred to as a Cisco store.
Cisco stores are used when you want to populate menus with different items from a single data source. Only Cisco stores are defined within the DMB application. However, use of Cisco stores do not support live in-suite ordering using an IP phone.
Cisco Store Configuration
Cisco Stores have hierarchical groupings of items:
■![]() Family Groups— Family Groups in the correspond to the top-level options on the menu such as Food, Beverages, Merchandise.
Family Groups— Family Groups in the correspond to the top-level options on the menu such as Food, Beverages, Merchandise.
■![]() Major Groups— Major Groups correspond to the sub-menus for family groups, such as Snacks, Meals, Non-Alcoholic Beverages.
Major Groups— Major Groups correspond to the sub-menus for family groups, such as Snacks, Meals, Non-Alcoholic Beverages.
■![]() Items— Items correspond to the individual items and prices for the items under each sub-menu such as Shrimp Salad, Hotdog, Cisco Cola.
Items— Items correspond to the individual items and prices for the items under each sub-menu such as Shrimp Salad, Hotdog, Cisco Cola.
Images can be added to menus, sub-menus, and items, and must be available in the Asset Library to be used. For more information, see Working with Images.
The groups, items, and images for Cisco stores are configured through the Dynamic Menu Board application interface.
For more detailed information about integrating data from external sources into Cisco Vision Director, see the Release 6.2: Cisco Vision Content Planning and Specifications Guide.
How to Configure Stores in Cisco Vision Director
An administrator or concessionaire must configure the store in the Cisco Vision Director DMB application.
For more detailed information about integrating data from external sources into Cisco Vision Director, see the Release 6.2: Cisco Vision Content Planning and Specifications Guide.
Configuring Cisco Stores From the DMB Application
You might use different store identifiers for different areas or levels in a venue to identify the location of the store that services a given set of suites. For example, a large stadium might be configured with multiple pantries, each servicing a distinct area of the stadium. Each of these needs to be configured as a separate store in Cisco Vision Director to enable assignment of the appropriate suites to the corresponding store/pantry/printer.
■![]() Adding Family Groups, Major Groups, and Items to a Cisco Store
Adding Family Groups, Major Groups, and Items to a Cisco Store
Prerequisites
If you plan to use any images other than those already provided in the Dynamic Menu Board Image Gallery, then be sure that those images are created in the appropriate format and uploaded. For more information, see Working with Images.
Creating New Cisco Stores
1.![]() As an administrator or concessionaire, log in to Cisco Vision Director.
As an administrator or concessionaire, log in to Cisco Vision Director.
2.![]() Click More > Dynamic Menu Board.
Click More > Dynamic Menu Board.
4.![]() In the Stores panel, click Add (+ icon) to add a new store (Figure 1). The Create Store dialog box appears.
In the Stores panel, click Add (+ icon) to add a new store (Figure 1). The Create Store dialog box appears.
5.![]() Type a Name in the field (required).
Type a Name in the field (required).
6.![]() Type a Description in the filed (optional).
Type a Description in the filed (optional).
Figure 1 Adding a Store Using Dynamic Menu Board Interface
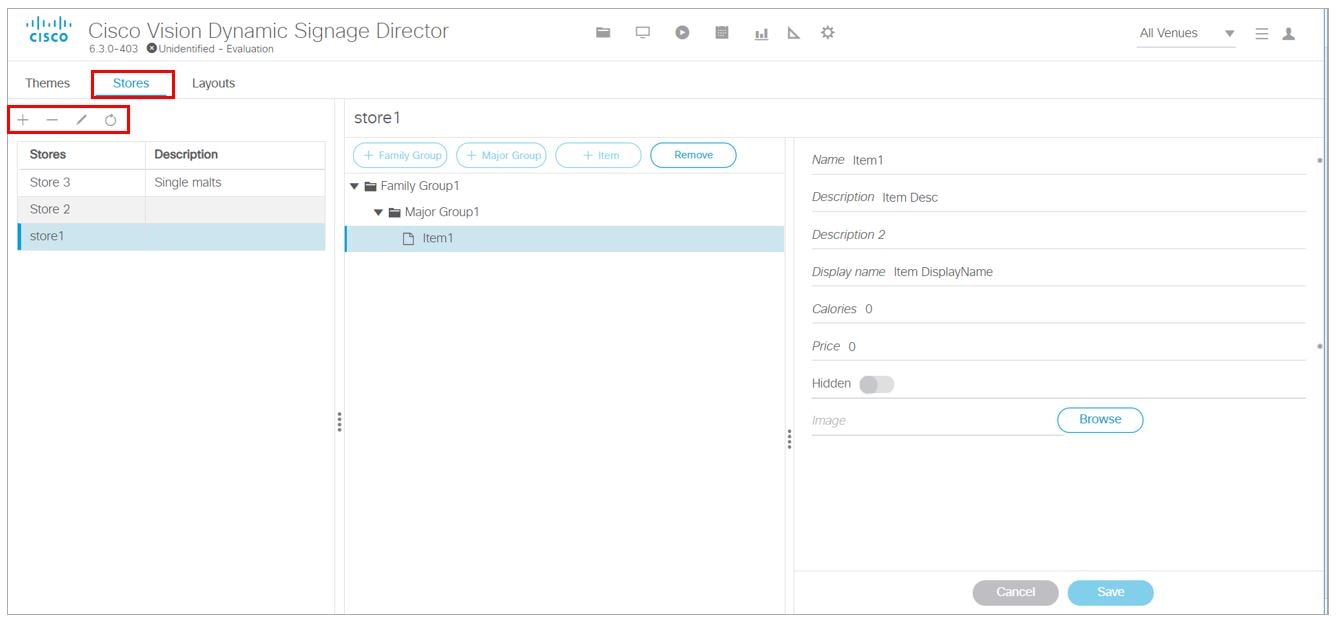
This example also shows Family Groups, Major Groups and Items in the center panel.
When adding a Store, the Store name in the dialog box must be unique or you get a red text error in the dialog box. Also, you should see a dialog box flash: store has been successfully created and it appears in left panel.
Adding Family Groups, Major Groups, and Items to a Cisco Store
Cisco Stores have the following hierarchical groupings of items:
■![]() Family Groups—Correspond to the top-level options on the menu such as Food, Beverages, or Merchandise.
Family Groups—Correspond to the top-level options on the menu such as Food, Beverages, or Merchandise.
■![]() Major Groups—Correspond to the sub-menus for the top-level family groups, such as Snacks, Meals, or Non-Alcoholic Beverages.
Major Groups—Correspond to the sub-menus for the top-level family groups, such as Snacks, Meals, or Non-Alcoholic Beverages.
■![]() Items—Correspond to the individual items and prices for the items under each sub-menu such as Shrimp Salad, Hotdog, or Cisco Cola.
Items—Correspond to the individual items and prices for the items under each sub-menu such as Shrimp Salad, Hotdog, or Cisco Cola.
This section includes the following tasks:
■![]() Adding Family Groups (required)
Adding Family Groups (required)
■![]() Adding Major Groups Under a Family Group (required)
Adding Major Groups Under a Family Group (required)
■![]() Adding Items Under Major Groups (required)
Adding Items Under Major Groups (required)
Adding Family Groups
1.![]() In the Stores panel, select the Cisco store where you want to add a family group.
In the Stores panel, select the Cisco store where you want to add a family group.
2.![]() Click + Family Group. The right panel changes to display new fields to populate.
Click + Family Group. The right panel changes to display new fields to populate.
3.![]() Specify the Name (required), Description, and Display name fields (Figure 2).
Specify the Name (required), Description, and Display name fields (Figure 2).
Note: The Name field is an internal identifier for use on the Theme and must be unique within the Theme. If the Name is not unique, a red text error message will prompt you to change it. The Display name is what is shown on the menu board and does not need to be unique on this theme.
Figure 2 Family Group Configuration
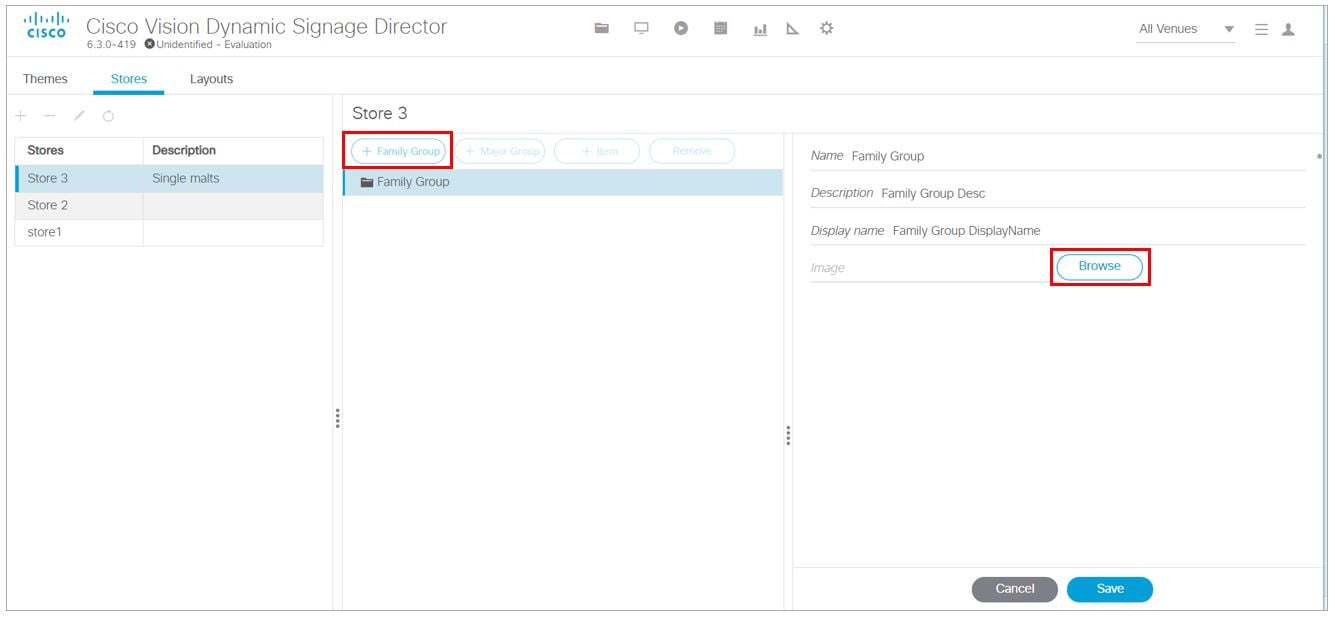
4.![]() (Optional) To assign an image to the group, click Browse to see thumbnails of available images. The Select Image dialog box appears.
(Optional) To assign an image to the group, click Browse to see thumbnails of available images. The Select Image dialog box appears.
Note: The images shown are from the Asset Library.
Note: You cannot save the Family Group until you change at least one area of information from the defaults that were created. A small confirmation box flashes “Item has been successfully created.”
Adding Major Groups Under a Family Group
Major groups are added as sub-groups to family groups in a Cisco store to further organize items.
To add a Major Group under a Family Group:
1.![]() In the Cisco store, select the Family Group level where you want to add a major group as a sub-group.
In the Cisco store, select the Family Group level where you want to add a major group as a sub-group.
The Major Group button is enabled.
2.![]() Click + Major Group. The right panel changes to display new fields to populate.
Click + Major Group. The right panel changes to display new fields to populate.
3.![]() Specify the Name (required), Description, and Display name fields.
Specify the Name (required), Description, and Display name fields.
4.![]() (Optional) To assign an image to the group, click Browse to see thumbnails of available images. The Select Image dialog box appears.
(Optional) To assign an image to the group, click Browse to see thumbnails of available images. The Select Image dialog box appears.
Note: The images shown are from the Asset Library.
Note: You cannot save the Major Group until you change at least one area of information from the defaults that were created. A small confirmation box flashes “Item has been successfully created.”
Adding Items Under Major Groups
Individual items are added under major groups in a Cisco store.
To add Items under Major Groups:
1.![]() In the Cisco store, select the Major Group level where you want to add individual items.
In the Cisco store, select the Major Group level where you want to add individual items.
3.![]() Specify the following fields:
Specify the following fields:
–![]() Description and Description2—optional
Description and Description2—optional
4.![]() (Optional) To hide a configured item from display on a menu board, click the Hidden slider.
(Optional) To hide a configured item from display on a menu board, click the Hidden slider.
Note: This option allows you to remove a group or item from displaying on the menu board, perhaps for just the current event, but retain it on the menu board for subsequent events by changing the hidden attribute again.
5.![]() (Optional) To assign an image to the group, click Browse to see thumbnails of available images. The Select Image dialog box appears.
(Optional) To assign an image to the group, click Browse to see thumbnails of available images. The Select Image dialog box appears.
Note: The images shown are from the Asset Library.
Note: You cannot save the item until you change at least one area of information from the defaults that were created. A small confirmation box flashes “Item has been successfully created.”
Modifying the Schedule of PosGetMenuTask
By default, the PosGetMenuTask is configured for a value of “periodic-300-seconds.” This means that a process in Cisco Vision Director runs every 5 minutes to check if any stores require an update, based on the last update time and the synchronization interval for that store.
Be sure that the schedule for this task is sufficiently frequent to ensure that any configured synchronization intervals for stores in the system can be met. For example, if a store is set to synchronize (update) every 30 minutes, but you set the PosGetMenuTask to run every hour in the Cisco Vision Director system, then the PoS server update for that store cannot occur on a scheduled basis any faster than every hour.
To modify the schedule of the PosGetMenuTask:
1.![]() Log into Cisco Vision Director as an administrator.
Log into Cisco Vision Director as an administrator.
2.![]() Click Configuration > System Configuration > Scheduled Tasks.
Click Configuration > System Configuration > Scheduled Tasks.
3.![]() In the Scheduled Task box, scroll to find the PosGetMenuTask. Click Edit (pencil icon). The Schedule Task – Edit dialog box appears.
In the Scheduled Task box, scroll to find the PosGetMenuTask. Click Edit (pencil icon). The Schedule Task – Edit dialog box appears.
4.![]() In the Task Time field, type periodic-xxxx-seconds, where xxxx is the number of seconds that specify the frequency with which you want to check if PoS server updates are due. The minimum frequency value is 5 seconds, and the maximum is the number of seconds in one day (24 hours).
In the Task Time field, type periodic-xxxx-seconds, where xxxx is the number of seconds that specify the frequency with which you want to check if PoS server updates are due. The minimum frequency value is 5 seconds, and the maximum is the number of seconds in one day (24 hours).
Note: Be sure that this value is less than the synchronization interval for stores, which is 24 hours by default. Otherwise, the PosGetMenuTask will not run regularly enough to ensure that the desired synchronization interval configured in the DMB application is met.
 Feedback