- Preface
- DMB_get_started
- Overview of the Dynamic Menu Board Application
- Working with Stores in the DMB Application
- Working with Images in the DMB Application
- Working with the DMB Application User Interface
- Cisco Vision Director Dynamic Menu Board Configuration Guide
- Appendix A: DMB Default Menu Theme Reference
Release 6.3 and Later Releases: Cisco Vision Director Dynamic Menu Board and Store Configuration Guide
Bias-Free Language
The documentation set for this product strives to use bias-free language. For the purposes of this documentation set, bias-free is defined as language that does not imply discrimination based on age, disability, gender, racial identity, ethnic identity, sexual orientation, socioeconomic status, and intersectionality. Exceptions may be present in the documentation due to language that is hardcoded in the user interfaces of the product software, language used based on RFP documentation, or language that is used by a referenced third-party product. Learn more about how Cisco is using Inclusive Language.
- Updated:
- August 5, 2020
Chapter: Cisco Vision Director Dynamic Menu Board Configuration Guide
Creating and Updating Menu Boards
This module describes how to create and modify menu boards for display on TVs. It includes the following topics:
■![]() How to Create and Update Dynamic Menu Boards
How to Create and Update Dynamic Menu Boards
Workflow Summary
The following steps summarize the overall workflow to create menus and display that content on a TV. This process is completely done in Cisco Vision Director.
Dynamic Menu Board —Themes Tab
1.![]() To access the DMB application from Cisco Vision Director, click More > Dynamic Menu Board (Figure 1).
To access the DMB application from Cisco Vision Director, click More > Dynamic Menu Board (Figure 1).
3.![]() Create a new theme or copy an existing one. Use the Action icons (in red box).
Create a new theme or copy an existing one. Use the Action icons (in red box).
4.![]() Configure the theme attributes.
Configure the theme attributes.
5.![]() Specify the menu content, as applicable.
Specify the menu content, as applicable.
Figure 1 Dynamic Menu Board Interface in Cisco Vision Director
Configuration > Data Integration
7.![]() Click Configuration > Data Integration.
Click Configuration > Data Integration.
8.![]() Create a data source with type Menu Theme (Figure 2).
Create a data source with type Menu Theme (Figure 2).
Figure 2 Create Menu Theme Data Source

9.![]() In the Data Integration interface Configuration tab on the right panel, enter the Theme Name where you want menu information to come from. Also, change the polling interval as necessary. Normally, a minimum of 30 seconds is sufficient in most cases (Figure 3).
In the Data Integration interface Configuration tab on the right panel, enter the Theme Name where you want menu information to come from. Also, change the polling interval as necessary. Normally, a minimum of 30 seconds is sufficient in most cases (Figure 3).
Figure 3 Add Menu Theme Information and Polling Interval

11.![]() Click Field Mapping tab, drag and drop the input fields that you want to use in the menu board display onto the Output Field. When all fields have been selected, save the data source (Figure 4).
Click Field Mapping tab, drag and drop the input fields that you want to use in the menu board display onto the Output Field. When all fields have been selected, save the data source (Figure 4).
Figure 4 Data Source Field Mapping

12.![]() Deploy the newly created menu theme data source (Figure 5).
Deploy the newly created menu theme data source (Figure 5).
Figure 5 Deploy the New Data Source

13.![]() Restart the data integration application.
Restart the data integration application.

14.![]() Once the integration application starts, you will see data being populated. You can click on the blue text under the Data preview column to examine that data being received.
Once the integration application starts, you will see data being populated. You can click on the blue text under the Data preview column to examine that data being received.
Widget Designer Interface
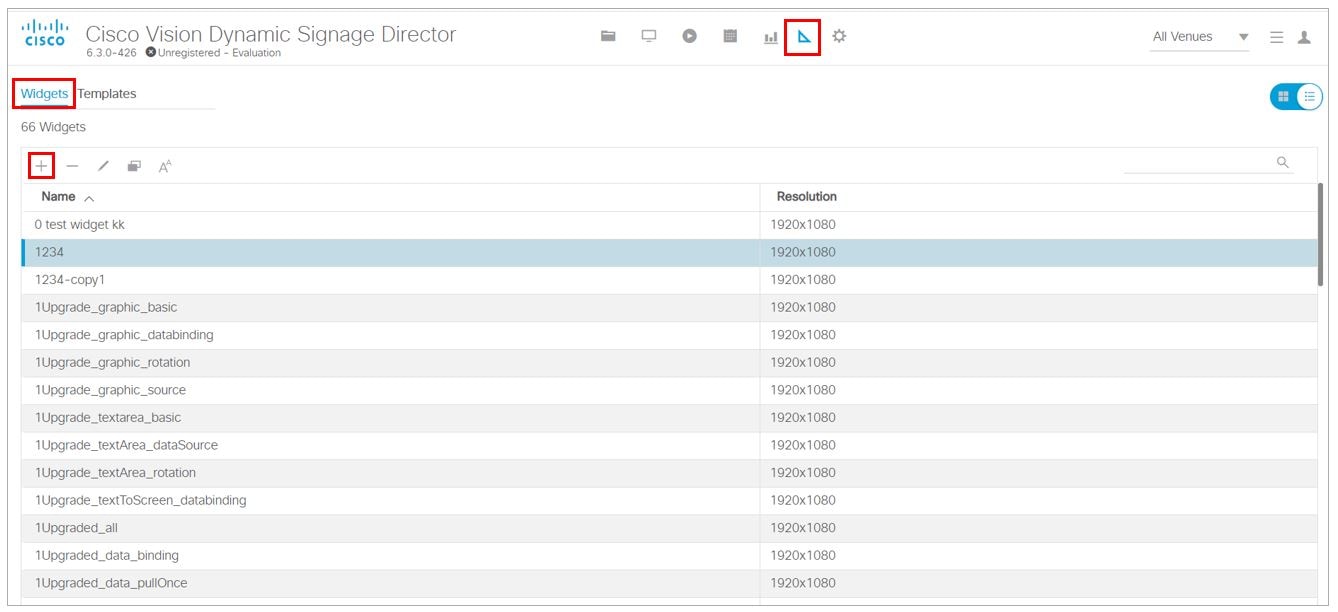
15.![]() Click Designer. Click Widgets tab.
Click Designer. Click Widgets tab.
16.![]() Create or add a new widget (Figure 6).
Create or add a new widget (Figure 6).
17.![]() Build the menu board using the WYSIWYG widget Designer. See Release 6.3: Cisco Vision Dynamic Signage Director Operations Guide.
Build the menu board using the WYSIWYG widget Designer. See Release 6.3: Cisco Vision Dynamic Signage Director Operations Guide.
Asset Library Interface
18.![]() From the Asset Library menu, select Playlist on the left panel.
From the Asset Library menu, select Playlist on the left panel.
19.![]() Create a new playlist (Figure 7).
Create a new playlist (Figure 7).
20.![]() Configure the playlist attributes.
Configure the playlist attributes.
21.![]() Add the DMB widget you created above to the playlist.
Add the DMB widget you created above to the playlist.
Figure 7 Create a Playlist in Library

Script Management Interface
23.![]() Create an event script to run the playlist. See Release 6.3: Cisco Vision Dynamic Signage Director Operations Guide.
Create an event script to run the playlist. See Release 6.3: Cisco Vision Dynamic Signage Director Operations Guide.
24.![]() Schedule the script to display the content on a TV. See Release 6.3: Cisco Vision Dynamic Signage Director Operations Guide.
Schedule the script to display the content on a TV. See Release 6.3: Cisco Vision Dynamic Signage Director Operations Guide.
How to Create and Update Dynamic Menu Boards
This section includes the following tasks:
■![]() Copying an Existing Theme (recommended)
Copying an Existing Theme (recommended)
■![]() Creating a New Theme (optional)
Creating a New Theme (optional)
■![]() Specifying Menu Content (required)
Specifying Menu Content (required)
■![]() Modifying the Attributes of a Menu Theme (optional)
Modifying the Attributes of a Menu Theme (optional)
■![]() Managing User Access to Themes (optional)
Managing User Access to Themes (optional)
Copying an Existing Theme
Once you create an appealing theme successfully, make a copy of it. Open the copy to make menu board changes, thereby preserving your baseline theme.
Restrictions
Consider the following restrictions before you copy a theme:
■![]() You cannot change the layout of a copied theme.
You cannot change the layout of a copied theme.
■![]() You cannot make any changes to the store selection in a copied theme. If a store has already been selected in the original theme, then that store will be specified for the copied theme and cannot be changed. If no store has been selected, then you cannot assign a store.
You cannot make any changes to the store selection in a copied theme. If a store has already been selected in the original theme, then that store will be specified for the copied theme and cannot be changed. If no store has been selected, then you cannot assign a store.
Procedure
1.![]() Log into Cisco Vision Director as an administrator or concessionaire.
Log into Cisco Vision Director as an administrator or concessionaire.
2.![]() Click More > Dynamic Menu Board.
Click More > Dynamic Menu Board.
4.![]() Select the name of the theme that you want to copy.
Select the name of the theme that you want to copy.
5.![]() From the action icons above the list of themes, click the Copy Theme icon (Figure 8).
From the action icons above the list of themes, click the Copy Theme icon (Figure 8).

6.![]() When the Copy Theme dialog box opens, change one or more of the following fields (Figure 9):
When the Copy Theme dialog box opens, change one or more of the following fields (Figure 9):
Figure 9 Copy Theme Dialog Box

■![]() Currency format —Determines how a Price field is displayed on a menu board. Click the arrow to open the drop-down list box to select the desired format for displaying prices on the menu. The default is Do not format. Note: Price formatting can be done in the Widget Designer.
Currency format —Determines how a Price field is displayed on a menu board. Click the arrow to open the drop-down list box to select the desired format for displaying prices on the menu. The default is Do not format. Note: Price formatting can be done in the Widget Designer.
■![]() Background image—(Optional). Click the arrow to open the drop-down list box to select the desired image.
Background image—(Optional). Click the arrow to open the drop-down list box to select the desired image.
Note: All images currently stored in the Asset Library default directory are available in the drop-down list. The image must have been imported first, before it is available here. For more information, see Working with Images.
Note: If you select a new background image, be aware that the format of your menu will be determined by the layout for the default theme that you copied. See Appendix A: DMB Default Menu Theme Reference for the detailed characteristics of the menu themes and layouts to be sure that your background graphic fits with the predefined columns, headers, and items for that layout.
From here, follow the Workflow Summary to:
■![]() Create a new data source for the copied Theme and deploy it.
Create a new data source for the copied Theme and deploy it.
■![]() Create a DMB widget. The Widget Designer provides a live preview of the menu board.
Create a DMB widget. The Widget Designer provides a live preview of the menu board.
Creating a New Theme
You can create a new theme based on the supported layouts that are predefined in Widget Designer.
Prerequisites
Before you create a new theme, be sure that any new images have been uploaded to the Asset Library.
Procedure
1.![]() Log into Cisco Vision Director as an administrator or concessionaire.
Log into Cisco Vision Director as an administrator or concessionaire.
2.![]() Click More > Dynamic Menu Board.
Click More > Dynamic Menu Board.
4.![]() From the action icons, click Add (+ icon) to create a new theme (Figure 10).
From the action icons, click Add (+ icon) to create a new theme (Figure 10).

5.![]() In the New Theme dialog box (Figure 11), complete the following information for the new menu theme:
In the New Theme dialog box (Figure 11), complete the following information for the new menu theme:
Figure 11 New Theme Dialog Box
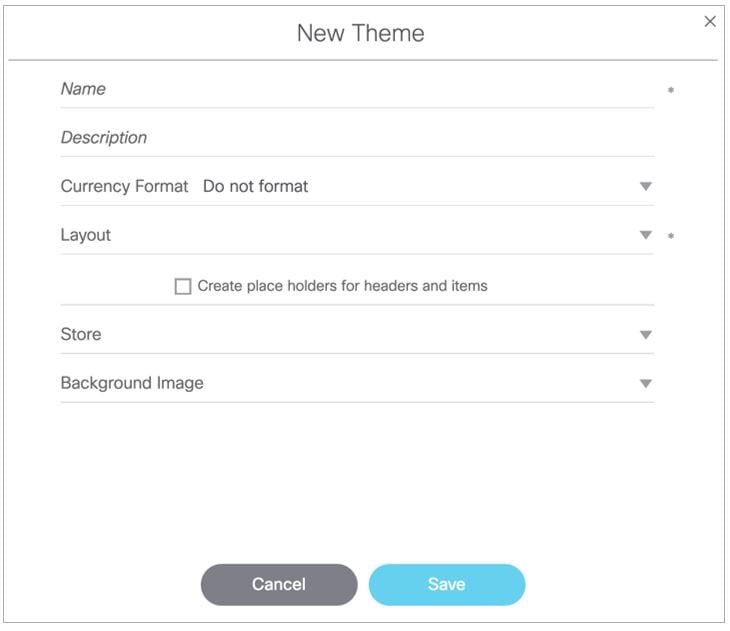
■![]() Currency format —Determines how a Price field is displayed on a menu board. Click the arrow to open the drop-down list box to select the desired format for displaying prices on the menu. The default is Do not format. Note: Price formatting can be done in the Widget Designer.
Currency format —Determines how a Price field is displayed on a menu board. Click the arrow to open the drop-down list box to select the desired format for displaying prices on the menu. The default is Do not format. Note: Price formatting can be done in the Widget Designer.
■![]() Layout —Refer to Appendix A: DMB Default Menu Theme Reference to choose the default layout that you want to base your new menu theme on, or refer to your site’s local reference for any customized layouts that might be installed.
Layout —Refer to Appendix A: DMB Default Menu Theme Reference to choose the default layout that you want to base your new menu theme on, or refer to your site’s local reference for any customized layouts that might be installed.
■![]() Create placeholders for headers and items—Recommended. Select the checkbox to specify that temporary labels are shown in the interface to help you identify the configurable elements.
Create placeholders for headers and items—Recommended. Select the checkbox to specify that temporary labels are shown in the interface to help you identify the configurable elements.
■![]() (Optional) Select Store—Click the arrow to open the drop-down list box to select a store that you want to link items from for this menu.
(Optional) Select Store—Click the arrow to open the drop-down list box to select a store that you want to link items from for this menu.
■![]() (Optional) Select image for background—Click the arrow to open the drop-down list box to select the desired image.
(Optional) Select image for background—Click the arrow to open the drop-down list box to select the desired image.
Specifying Menu Content
1.![]() On the left side of the Themes screen, select the menu that you want to configure.
On the left side of the Themes screen, select the menu that you want to configure.
–![]() In the action icons, click Expand to open all levels at once.
In the action icons, click Expand to open all levels at once.
–![]() Click the arrows beside the menu theme name to expand the column, header, and item levels individually.
Click the arrows beside the menu theme name to expand the column, header, and item levels individually.
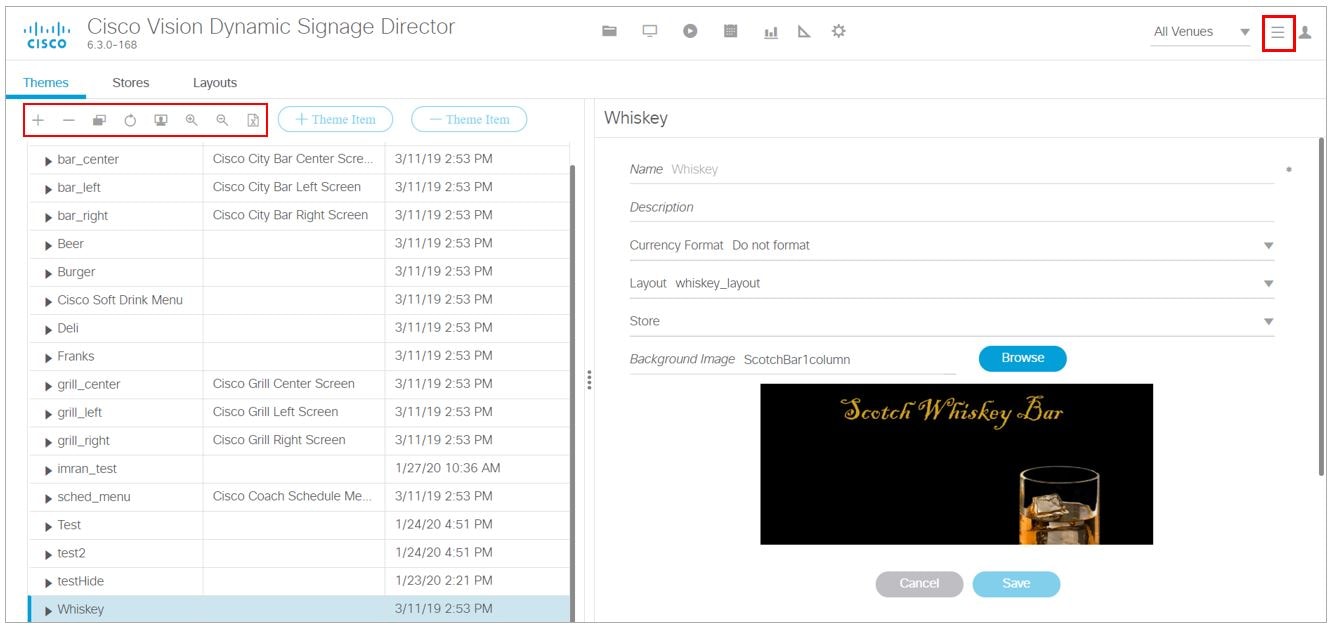
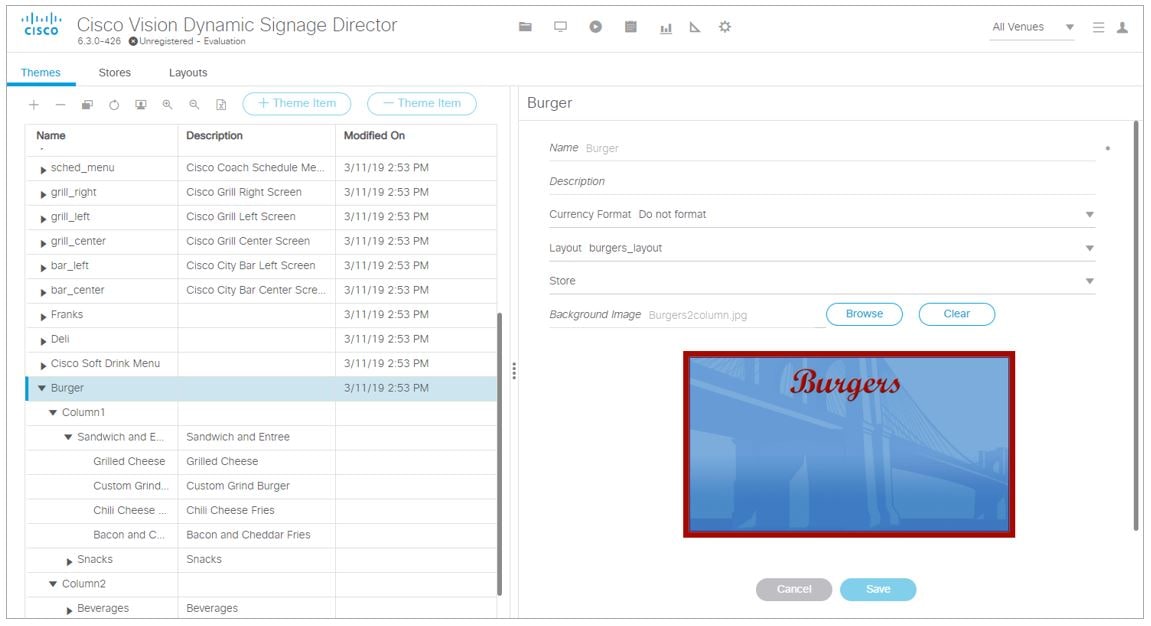
Figure 12 shows an example of a sample theme based on the Burgers 2-column layout.
Figure 12 Expanded Menu Theme Columns, Headers, and Items
3.![]() Refer to Appendix A: DMB Default Menu Theme Reference to look up information about the layout that your theme is using to identify the configurable areas, or refer to documentation at your site for any customized layouts that have been installed on your system.
Refer to Appendix A: DMB Default Menu Theme Reference to look up information about the layout that your theme is using to identify the configurable areas, or refer to documentation at your site for any customized layouts that have been installed on your system.
Figure 13 shows an excerpt of the reference information available that describes the layout details of the Burgers 2-column layout. At its simplest, this layout supports configuration of the Menu item Name and Price fields.
Figure 13 Burgers Layout Theme Reference
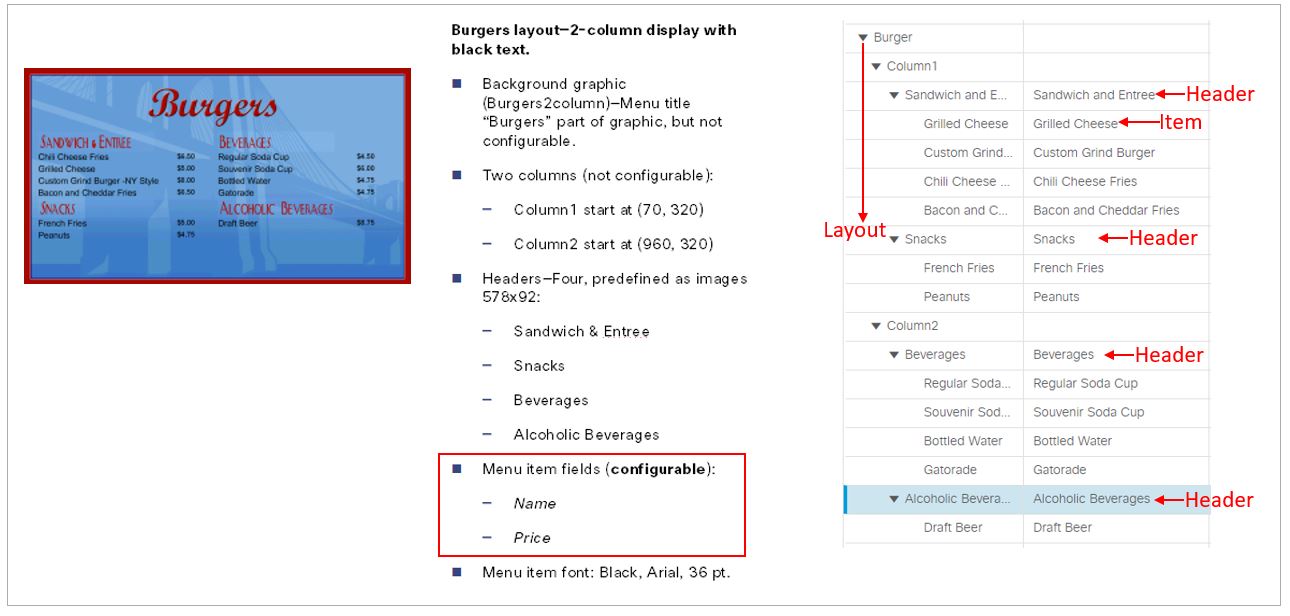
Note: Any of the graphics placeholders can also be replaced in a menu theme by uploading new images or selecting from existing images from the Asset Library.
When you copy a default theme, all of the graphics included with that default theme are also copied. When you create a new theme using a default layout, the same format of the default theme applies, but the images are not automatically included. However, you must still assign images to these headers, whether they are the default images from the Asset Library or new images.
For example, notice that the headers for the Burgers layout are implemented as images, not text. Figure 13 shows the menu design with the default header graphics.
4.![]() (Optional) If Headers are supported for your theme and you want to change them, do one of the following:
(Optional) If Headers are supported for your theme and you want to change them, do one of the following:
–![]() If the field is text-based, type a new name in the Name* field.
If the field is text-based, type a new name in the Name* field.
–![]() If the field is an image, select a new image for the Image field.
If the field is an image, select a new image for the Image field.
5.![]() For Items, specify the attributes that are supported by your layout:
For Items, specify the attributes that are supported by your layout:
■![]() Use a store item —Click the arrow to open the drop-down list to select an item from a store.
Use a store item —Click the arrow to open the drop-down list to select an item from a store.
■![]() Name* —Configurable for all menu themes.
Name* —Configurable for all menu themes.
■![]() Description —Configurable for a limited number of items in some themes.
Description —Configurable for a limited number of items in some themes.
■![]() Calories —Not supported for any default themes in Cisco Vision Director. Requires a customized widget layout.
Calories —Not supported for any default themes in Cisco Vision Director. Requires a customized widget layout.
■![]() Price —Configurable for all menu themes.
Price —Configurable for all menu themes.
■![]() Display on menu —Yes or No. Specify No when you want to hide an item from being displayed.
Display on menu —Yes or No. Specify No when you want to hide an item from being displayed.
■![]() Move up when hidden? —Specifies if the items are readjusted in the display to eliminate the space created by a hidden item.
Move up when hidden? —Specifies if the items are readjusted in the display to eliminate the space created by a hidden item.
■![]() Image —Click the arrow to open the drop-down list box to select a graphic by name from the Asset Library or click Browse to see thumbnail images.
Image —Click the arrow to open the drop-down list box to select a graphic by name from the Asset Library or click Browse to see thumbnail images.
Modifying the Attributes of a Menu Theme
To modify the attributes of a menu theme:
1.![]() On the left side of the Themes screen, select the menu that you want to modify.
On the left side of the Themes screen, select the menu that you want to modify.
Managing User Access to Themes
You can assign permissions to menu access using the Manage User Access feature.

Prerequisites
The user roles already must be configured in Configuration > Users in Cisco Vision Director.
Procedure
To manage user access to themes:
1.![]() On the left side of the Themes screen, select the menu that you want to modify.
On the left side of the Themes screen, select the menu that you want to modify.
2.![]() Click Manage user access. The Manage user access dialog box appears (Figure 14).
Click Manage user access. The Manage user access dialog box appears (Figure 14).
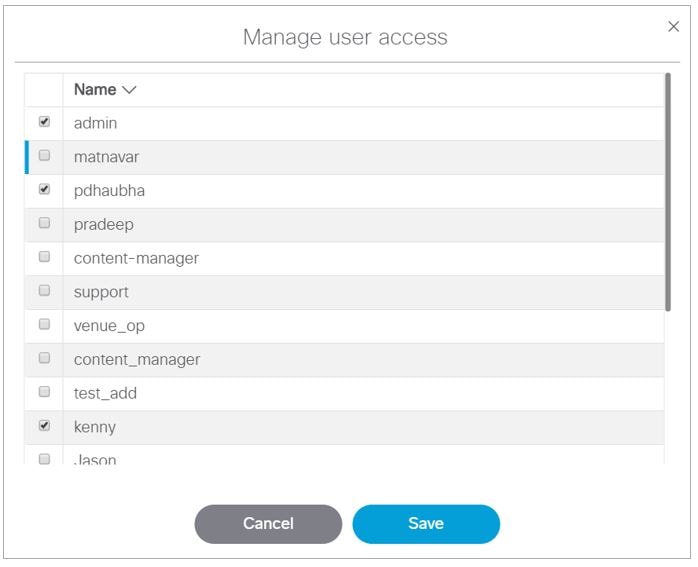
3.![]() In the Manage user access dialog box, select the users to whom you want to give menu access.
In the Manage user access dialog box, select the users to whom you want to give menu access.
You can define all Users under Configuration > Users, but you can only associate venues to Venue Administrators or Venue Operators under the Venues interface. The Users interface is not venue aware.
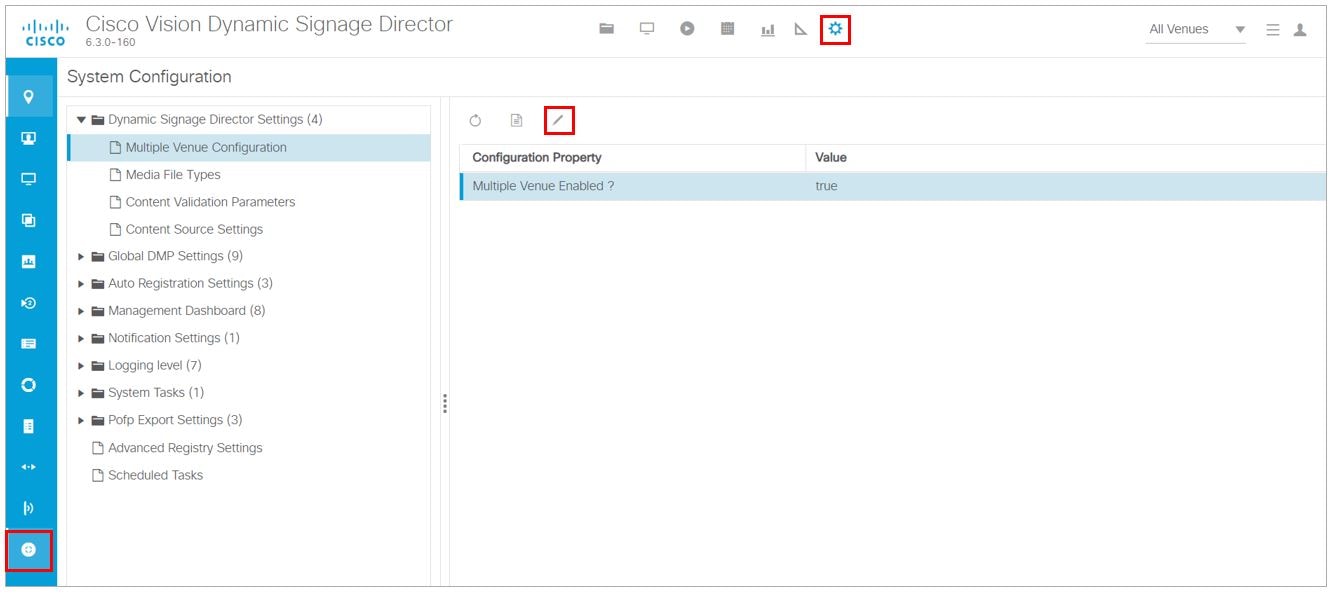
1.![]() Click Configuration > System Configuration > Dynamic Signage Director Settings.
Click Configuration > System Configuration > Dynamic Signage Director Settings.
2.![]() Click Multiple Venue Configuration from the left panel (Figure 15).
Click Multiple Venue Configuration from the left panel (Figure 15).
3.![]() Click Edit (pencil icon). The Edit Configuration dialog box appears.
Click Edit (pencil icon). The Edit Configuration dialog box appears.
Figure 15 Enable Multiple Venues
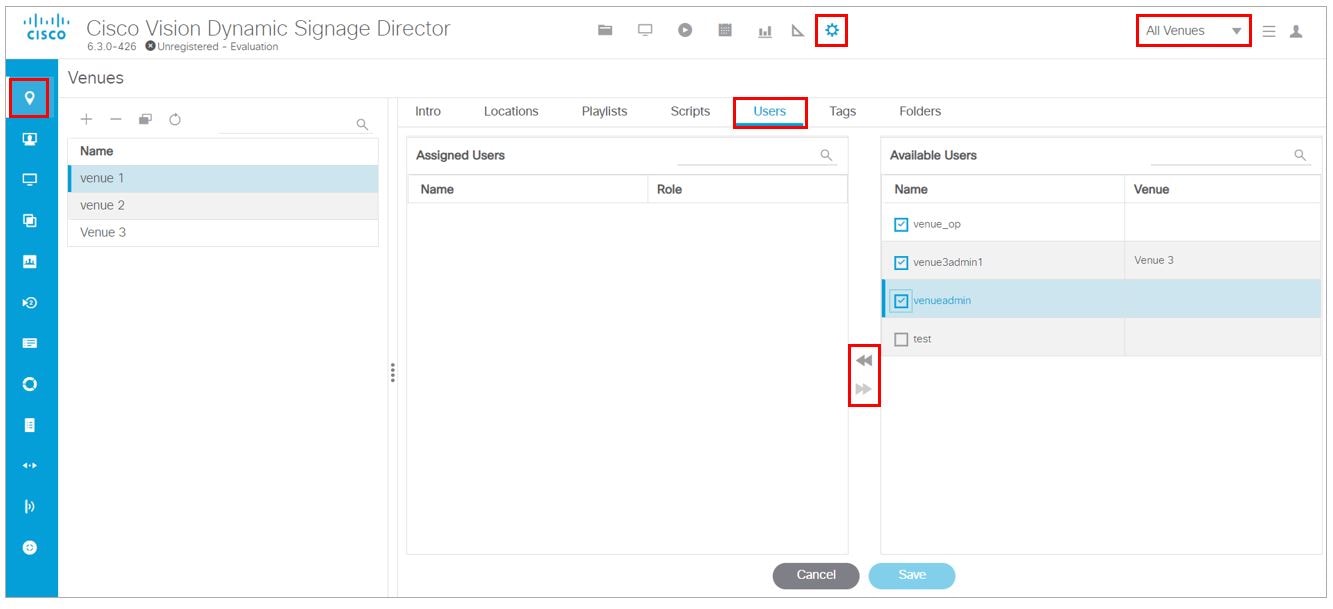
1.![]() Click Configuration > Venue.
Click Configuration > Venue.
2.![]() Click the Users tab (Figure 16).
Click the Users tab (Figure 16).
3.![]() The Available Users are visible on the right panel. Use the check boxes to select the users.
The Available Users are visible on the right panel. Use the check boxes to select the users.
4.![]() Click motion arrows to move the selected users to the Assigned Users panel.
Click motion arrows to move the selected users to the Assigned Users panel.
Figure 16 Assign Users to a Venue
7.![]() Select folders you want those users to have access to and move them using the motion arrows.
Select folders you want those users to have access to and move them using the motion arrows.
What to Do Next
After you have completed creating and publishing a menu theme, complete the following steps to configure it for display:
9.![]() Create a new playlist (Figure 7).
Create a new playlist (Figure 7).
10.![]() Create an event script to run the playlist. See Release 6.3: Cisco Vision Dynamic Signage Director Operations Guide.
Create an event script to run the playlist. See Release 6.3: Cisco Vision Dynamic Signage Director Operations Guide.
11.![]() Schedule the script to display the content on a TV. See Release 6.3: Cisco Vision Dynamic Signage Director Operations Guide.
Schedule the script to display the content on a TV. See Release 6.3: Cisco Vision Dynamic Signage Director Operations Guide.
 Feedback