- About This Guide
- Getting Started Installing or Upgrading Cisco Vision Dynamic Signage Director
- Installing Cisco Vision Dynamic Signage Director for the First Time
- Using the Software Manager to Upgrade Cisco Vision Dynamic Signage Director Software, Language Packs, and Fonts
- Verifying the Upgrade
- Upgrading the SV-4K and DMP-2K Media Player Firmware
- Appendix A: Post-Upgrade Checklist
- Appendix B: Port Reference
- Appendix C: CIMC Configuration and Firmware Upgrade Guidelines on the Cisco UCS C220 Server
Cisco Vision Software Installation and Upgrade Guide: Dynamic Signage Director (StadiumVision Director) Release 5.0
Bias-Free Language
The documentation set for this product strives to use bias-free language. For the purposes of this documentation set, bias-free is defined as language that does not imply discrimination based on age, disability, gender, racial identity, ethnic identity, sexual orientation, socioeconomic status, and intersectionality. Exceptions may be present in the documentation due to language that is hardcoded in the user interfaces of the product software, language used based on RFP documentation, or language that is used by a referenced third-party product. Learn more about how Cisco is using Inclusive Language.
- Updated:
- October 10, 2016
Chapter: Verifying the Upgrade
- Clearing the Browser Cache
- Clearing Expired Flash SWZ Files From Browser
- Importing the Security Certificate
- Logging Into Cisco Vision Dynamic Signage Director
- Verifying the Control Panel and Other Menus
- Verifying that Services are Running
- Configuring the Media Player for VLAN Compliance Checking
- Upgrading the DMP Firmware
- Rebooting the DMPs
- Verifying Media Players, Groups, and Zones in the Management Dashboard
- Verifying the Multicast Configuration
- Setting Up the Quest Venue Manager to Send Updates to Cisco Vision Dynamic Signage Director Server
- Completing the Post-Upgrade Checklist and Testing
Verifying the Upgrade
This module describes how to verify that the upgrade process was successful.
To verify the upgrade, complete the following tasks:
■![]() Clearing the Browser Cache (mandatory)
Clearing the Browser Cache (mandatory)
■![]() Clearing Expired Flash SWZ Files From Browser (required)
Clearing Expired Flash SWZ Files From Browser (required)
■![]() Importing the Security Certificate (required)
Importing the Security Certificate (required)
■![]() Logging Into Cisco Vision Dynamic Signage Director (required)
Logging Into Cisco Vision Dynamic Signage Director (required)
■![]() Verifying the Control Panel and Other Menus (required)
Verifying the Control Panel and Other Menus (required)
■![]() Verifying that Services are Running (required)
Verifying that Services are Running (required)
■![]() Configuring the Media Player for VLAN Compliance Checking (required)
Configuring the Media Player for VLAN Compliance Checking (required)
■![]() Upgrading the DMP Firmware (required)
Upgrading the DMP Firmware (required)
■![]() Rebooting the DMPs (required)
Rebooting the DMPs (required)
■![]() Verifying Media Players, Groups, and Zones in the Management Dashboard (required)
Verifying Media Players, Groups, and Zones in the Management Dashboard (required)
■![]() Verifying the Multicast Configuration (required)
Verifying the Multicast Configuration (required)
■![]() Setting Up the Quest Venue Manager to Send Updates to Cisco Vision Dynamic Signage Director Server (required if using Quest for commerce integration)
Setting Up the Quest Venue Manager to Send Updates to Cisco Vision Dynamic Signage Director Server (required if using Quest for commerce integration)
■![]() Completing the Post-Upgrade Checklist and Testing (required)
Completing the Post-Upgrade Checklist and Testing (required)
Clearing the Browser Cache
Caution: It is critical that all Cisco Vision Dynamic Signage Director users clear their browser cache to prevent permanent database corruption and to be sure that you are running the latest version of Cisco Vision Dynamic Signage Director. Be sure to notify all users of the Cisco Vision Dynamic Signage Director system to clear their browser cache before using the system after an upgrade.
To clear the browser cache in Mozilla FireFox, complete the following steps:
1.![]() From the menu bar, go to Tools > Clear Recent History.
From the menu bar, go to Tools > Clear Recent History.
The Clear Recent History dialog box appears.
Note: You can also press Ctrl + Shift + Delete to open the Clear Recent History dialog box.
2.![]() In the “Time range to clear:” box, select Everything.
In the “Time range to clear:” box, select Everything.
3.![]() Open the Details drop-down list and select the Cache checkbox if it does not have a checkmark.
Open the Details drop-down list and select the Cache checkbox if it does not have a checkmark.
Clearing Expired Flash SWZ Files From Browser
This section includes the following tasks:
■![]() Clearing the Flash Player Cache
Clearing the Flash Player Cache
■![]() Deleting Other Cached Files From Flash
Deleting Other Cached Files From Flash
Clearing the Flash Player Cache
To clear the Flash player cache, complete the following steps:
1.![]() Go to Control Panel > Flash Player.
Go to Control Panel > Flash Player.
2.![]() In the Flash Player Manager Settings dialog box (Storage tab), click Delete All.
In the Flash Player Manager Settings dialog box (Storage tab), click Delete All.
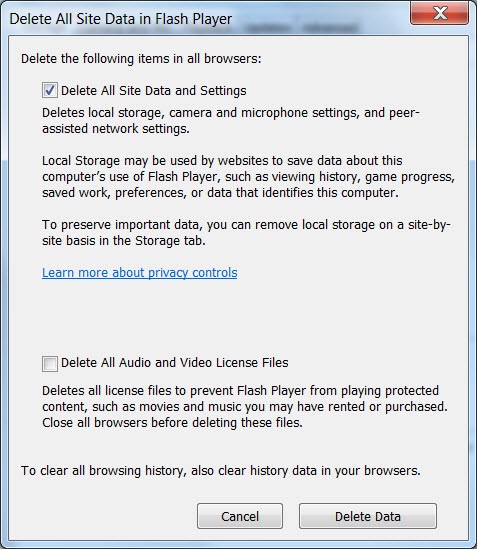
3.![]() Select Delete All Site Data and Settings (Figure 1).
Select Delete All Site Data and Settings (Figure 1).
Figure 1 Delete All Site Data in Flash Player Dialog Box—Windows Client Example
Deleting Other Cached Files From Flash
To delete other cached files from Flash, complete the following steps:
2.![]() Delete cached files in the following paths for your browser application, and depending on your laptop client:
Delete cached files in the following paths for your browser application, and depending on your laptop client:
C:\Users\username\AppData\Local\Google\Chrome\User Data\Default\Pepper Data\Shockwave Flash\CacheWritableAdobeRoot\AssetCache
C:\Users\username\AppData\Local\Mozilla\Firefox\Profiles
Note: The AppData folder is a hidden folder in Microsoft Windows. If you cannot view it, go to Control Panel > Folder Options and verify the option is set to display hidden files and folders.
From an Apple Mac OS X client:
/Users/username/Library/Application Support/Google/Chrome/Default/Pepper Data/Shockwave Flash/CacheWritableAdobeRoot/AssetCache/
/Users/username/Library/Application Support/Firefox/Profiles/
Importing the Security Certificate
When you access a Cisco Vision Dynamic Signage Director server for the first time using Mozilla Firefox, a security certificate warning will appear. Some Cisco Vision Dynamic Signage Director functionality requires that the certificate is imported.
Adding a Security Exception for Mozilla Firefox
To add the security exception for Mozilla Firefox, complete the following steps:
1.![]() When you see the warning page with the title “This Connection is Untrusted,” click the “ I Understand the Risks ” option.
When you see the warning page with the title “This Connection is Untrusted,” click the “ I Understand the Risks ” option.
3.![]() In the Add Security Exception dialog box, click Confirm Security Exception.
In the Add Security Exception dialog box, click Confirm Security Exception.
4.![]() Close all Mozilla Firefox windows.
Close all Mozilla Firefox windows.
You should now be able to access the Cisco Vision Dynamic Signage Director server using Mozilla Firefox without any security certificate warnings.
Logging Into Cisco Vision Dynamic Signage Director
To verify that the upgrade was successful, and that Cisco Vision Dynamic Signage Director is up and operating, complete the following steps:
1.![]() Open a browser window and type the URL for the Cisco Vision Dynamic Signage Director server, in the following sample format, where x.x.x.x is the IPv4 address of the server:
Open a browser window and type the URL for the Cisco Vision Dynamic Signage Director server, in the following sample format, where x.x.x.x is the IPv4 address of the server:
The Cisco Vision Dynamic Signage Director login screen appears.
2.![]() Verify that the correct version is displayed.
Verify that the correct version is displayed.
Note: If your window is not displaying the correct version, be sure that you have cleared the browser cache as described in Clearing the Browser Cache.
3.![]() Type your Cisco Vision Dynamic Signage Director administrator login credentials and click Log In.
Type your Cisco Vision Dynamic Signage Director administrator login credentials and click Log In.
Note: When you first log into Cisco Vision Dynamic Signage Director, the default administrator username and password is admin.
The Cisco Vision Dynamic Signage Director Main Menu screen appears.
Verifying the Control Panel and Other Menus
To verify the control panel, complete the following steps:
1.![]() From the Cisco Vision Dynamic Signage Director Main Menu, click Control Panel.
From the Cisco Vision Dynamic Signage Director Main Menu, click Control Panel.
After a few moments of loading resources, the Cisco Vision Dynamic Signage Director Control Panel Setup screen will open in a new window.
2.![]() Confirm the version and build number of your Cisco Vision Dynamic Signage Director software in the lower right corner of the Control Panel window.
Confirm the version and build number of your Cisco Vision Dynamic Signage Director software in the lower right corner of the Control Panel window.
Note: If your window is not displaying the appropriate version and build that you loaded, be sure that you have cleared the browser cache as describe in Clearing the Browser Cache.
3.![]() Verify that you can open the other Cisco Vision Dynamic Signage Director screens and menus.
Verify that you can open the other Cisco Vision Dynamic Signage Director screens and menus.
Verifying that Services are Running
After you upgrade, go to the Management Dashboard to verify that all of the primary Cisco Vision Dynamic Signage Director services are running.
To verify that services are running, complete the following steps:
1.![]() From the Management Dashboard, expand the Service Alerts pane.
From the Management Dashboard, expand the Service Alerts pane.
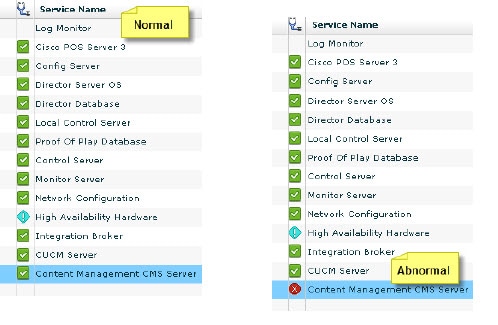
2.![]() Verify that all of the primary services—in particular the Content Management CMS Server—are in “Normal” (green) state without any service alerts.
Verify that all of the primary services—in particular the Content Management CMS Server—are in “Normal” (green) state without any service alerts.
Figure 2 Verifying Normal Service States
3.![]() If the CMS server or another service in the above list is not in Normal state but should be, use the TUI services menu to restart it.
If the CMS server or another service in the above list is not in Normal state but should be, use the TUI services menu to restart it.
Configuring the Media Player for VLAN Compliance Checking
After you upgrade, you need to go to the Management Dashboard and change the Assigned VLAN property according to your VLAN configuration for the media players if you want to perform VLAN compliance checking.
Note: Setting the assigned VLAN property for the media players is only recommended if all devices are located on the same VLAN. When a value is set, it is checked against what is being sent by the media player. Otherwise, you should configure $svd_ignore, which is the default.
To configure the Assigned VLAN property, complete the following steps:
1.![]() From the Management Dashboard, go to Dynamic Signage Director Configuration > System Configuration > Global DMP Settings.
From the Management Dashboard, go to Dynamic Signage Director Configuration > System Configuration > Global DMP Settings.
2.![]() Do the following depending on your media player model:
Do the following depending on your media player model:
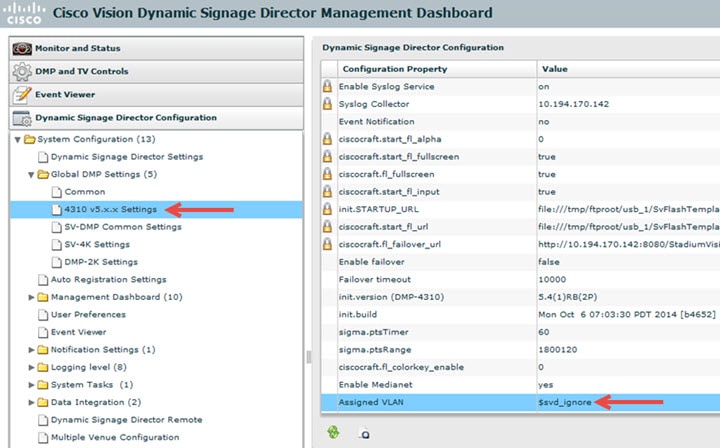
■![]() For the DMP 4310G—Go to 4310 v5.x.x Settings (Figure 3).
For the DMP 4310G—Go to 4310 v5.x.x Settings (Figure 3).
Figure 3 Assigned VLAN Property Configuration for the Cisco DMP 4310G
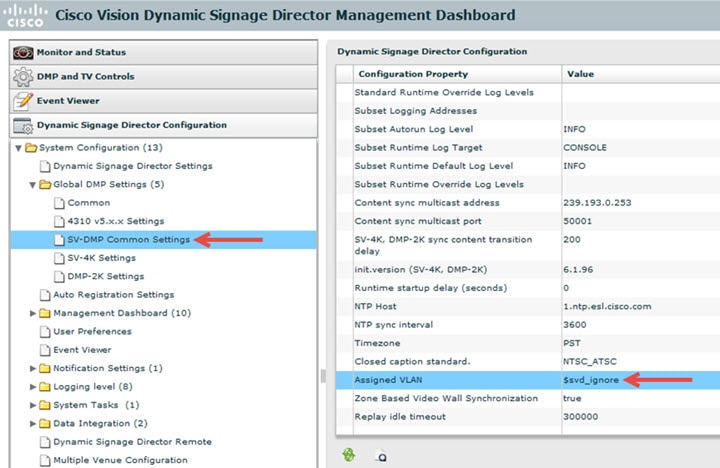
■![]() For the SV-4K and DMP-2K—Go to SV-DMP Common Settings (Figure 4).
For the SV-4K and DMP-2K—Go to SV-DMP Common Settings (Figure 4).
Figure 4 Assigned VLAN Property Configuration for the SV-4K and DMP-2K
3.![]() Find the Assigned VLAN property, and do the following:
Find the Assigned VLAN property, and do the following:
■![]() If all of your DMPs are located on the same VLAN (recommended)—Type the number of the VLAN.
If all of your DMPs are located on the same VLAN (recommended)—Type the number of the VLAN.
■![]() If all of your DMPs are not located on the same VLAN, or you want to bypass any VLAN compliance checking—Type “ $svd_ignore.”
If all of your DMPs are not located on the same VLAN, or you want to bypass any VLAN compliance checking—Type “ $svd_ignore.”
Caution: Cisco DMP 4310 auto-registration support requires that the VLAN value is correctly set or “$svd_ignore” is used.
Upgrading the DMP Firmware
Verify whether your DMPs require a firmware upgrade and follow the steps in the corresponding modules of this guide to upload and install the required version(s) for your Cisco Vision Dynamic Signage Director release.
Note: If this is the initial upgrade of your system to Cisco Vision Dynamic Signage Director Release 5.0 software, a new firmware upgrade and configuration for the SV-4K and DMP-2K firmware is required. Follow the steps in Upgrading the SV-4K and DMP-2K Firmware.
Rebooting the DMPs
After an upgrade of the Cisco Vision Dynamic Signage Director software, the SV-4K and DMP-2K must be restarted to get the latest version of the runtime software.
■![]() If this is the initial upgrade of your system to Release 5.0 and you have just performed a DMP firmware upgrade, then the DMPs have already rebooted and this step is not needed.
If this is the initial upgrade of your system to Release 5.0 and you have just performed a DMP firmware upgrade, then the DMPs have already rebooted and this step is not needed.
■![]() If this an upgrade from Release 5.0 to another version of Release 5.0 without a DMP firmware upgrade, then you must reboot the SV-4K and DMP-2K to also update the DMP’s runtime software.
If this an upgrade from Release 5.0 to another version of Release 5.0 without a DMP firmware upgrade, then you must reboot the SV-4K and DMP-2K to also update the DMP’s runtime software.
To verify the system runtime on the DMP, see Verifying Media Players, Groups, and Zones in the Management Dashboard.
Verifying Media Players, Groups, and Zones in the Management Dashboard
Note: Before you verify media player status, be sure that you have set the Assigned VLAN property so that the VLAN compliance check can be performed. For more information, see Configuring the Media Player for VLAN Compliance Checking.
To check media players, groups, and zones after you upgrade your software, complete the following steps:
1.![]() Go to the Management Dashboard and verify that all of your groups, zones and media players are present and in the green state.
Go to the Management Dashboard and verify that all of your groups, zones and media players are present and in the green state.
2.![]() From the DMP and TV Controls dashboard drawer, run the Get Status command on all devices to update Cisco Vision Dynamic Signage Director’s record of MAC addresses:
From the DMP and TV Controls dashboard drawer, run the Get Status command on all devices to update Cisco Vision Dynamic Signage Director’s record of MAC addresses:
DMP and TV Controls > Monitoring > Get Status.
3.![]() Run Get Status to confirm that all devices have successfully rebooted and are in good health.
Run Get Status to confirm that all devices have successfully rebooted and are in good health.
Note: This will also update the MAC address for the media players.
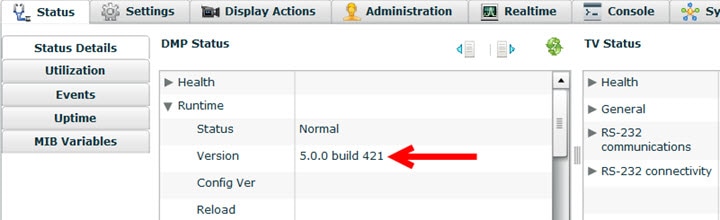
4.![]() Verify that the correct Cisco Vision Dynamic Signage Director runtime version is loaded on the DMP:
Verify that the correct Cisco Vision Dynamic Signage Director runtime version is loaded on the DMP:
a.![]() Select the DMP(s) that you want to verify.
Select the DMP(s) that you want to verify.
b.![]() Go to Status > Status Details.
Go to Status > Status Details.
c.![]() In the DMP Status panel, expand the Runtime status and verify the Version reported.
In the DMP Status panel, expand the Runtime status and verify the Version reported.
5.![]() (Optional) Change the DMP State of healthy DMPs to “Production” using the following dashboard command path:
(Optional) Change the DMP State of healthy DMPs to “Production” using the following dashboard command path:
DMP and TV Controls > Auto Registration > Change DMP State.
6.![]() Run Get Status to check the device state after the change.
Run Get Status to check the device state after the change.
Verifying the Multicast Configuration
Cisco Vision Dynamic Signage Director uses both unicast and multicast communications for DMP control-plane operation. The Cisco Connected Stadium design requires that Cisco Vision Dynamic Signage Director uses the 239.193.0.0 multicast group address range.
The multicast group address for Cisco Vision Dynamic Signage Director is configured in the “MulticastHostPort” registry.
For more information about multicast configuration, see the “Configuring Multicast Ports for Cisco StadiumVision Director” topic in the “Configuring the Cisco StadiumVision Director Server System Settings” module of the Cisco Vision Server Administration Guide: Dynamic Signage Director.
To verify or configure the multicast addressing for Cisco Vision Dynamic Signage Director, complete the following steps:
1.![]() From the Management Dashboard, select Tools > Advanced > Registry.
From the Management Dashboard, select Tools > Advanced > Registry.
2.![]() Scroll to the “MulticastHostPort” registry key in the Parameters list and confirm the entry for the registry.
Scroll to the “MulticastHostPort” registry key in the Parameters list and confirm the entry for the registry.
3.![]() To change the value, click on the value field and specify a multicast address in the range 239.193.0.0/24.
To change the value, click on the value field and specify a multicast address in the range 239.193.0.0/24.
Note: Be sure to use the value that is configured in your Cisco Connected Stadium network and include the : port. The recommended default is :50001.
Setting Up the Quest Venue Manager to Send Updates to Cisco Vision Dynamic Signage Director Server
Note: This task is only required if you are using the Quest Point of Sale system.
The steps described in this section assume that Quest has the notification service installed and enabled.
After you upgrade, you need to set up the Quest Venue Manager to support sending updates to the Cisco Vision Dynamic Signage Director server when menu items change.
To set up the Quest Venue Manager to send updates to the Cisco Vision Dynamic Signage Director server, complete the following steps:
2.![]() Go to the C:\Program Files\Quest POS\Quest Venue Manager\Services directory.
Go to the C:\Program Files\Quest POS\Quest Venue Manager\Services directory.
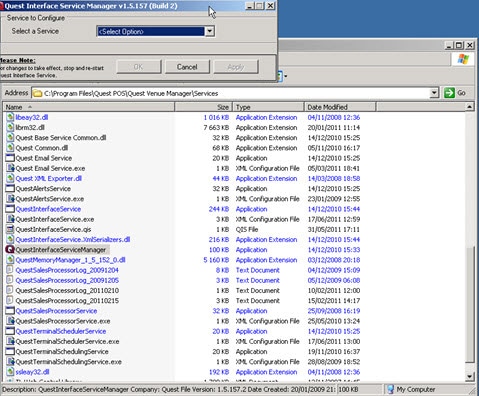
3.![]() Start the executable application program named “QuestInterfaceServiceManager” (Figure 5).
Start the executable application program named “QuestInterfaceServiceManager” (Figure 5).
Figure 5 QuestInterfaceServiceManager Application
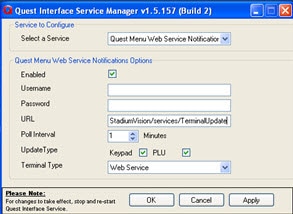
4.![]() When the Quest Interface Service Manager application window opens, specify the following options (Figure 6):
When the Quest Interface Service Manager application window opens, specify the following options (Figure 6):
a.![]() In the Select a Service box, choose the Quest Menu Web Service Notification.
In the Select a Service box, choose the Quest Menu Web Service Notification.
b.![]() Select the Enabled checkbox so a checkmark appears.
Select the Enabled checkbox so a checkmark appears.
c.![]() In the URL box, enter “ http://svd:8080/StadiumVision/services/TerminalUpdate ”.
In the URL box, enter “ http://svd:8080/StadiumVision/services/TerminalUpdate ”.
d.![]() In the Poll Interval box, select 1 minute.
In the Poll Interval box, select 1 minute.
e.![]() Select the Keypad and PLU update checkboxes so a checkmark appears.
Select the Keypad and PLU update checkboxes so a checkmark appears.
f.![]() In the Terminal Type box, select Web Service.
In the Terminal Type box, select Web Service.
Figure 6 Select a Service to Configure
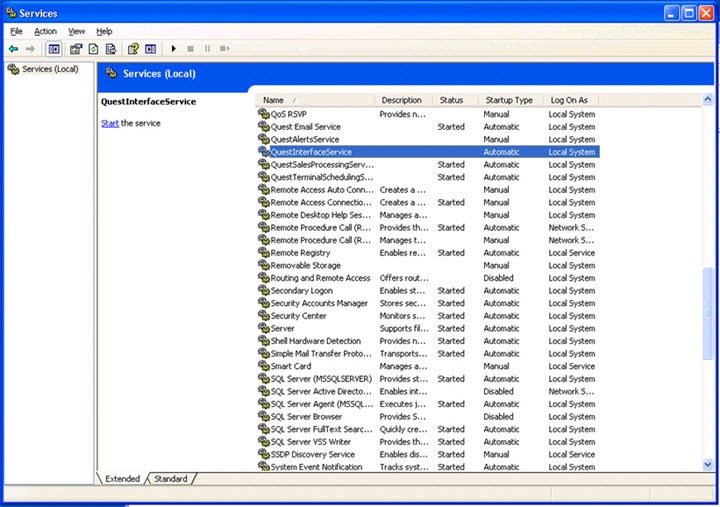
6.![]() Restart the windows service to implement the configuration by completing the following steps:
Restart the windows service to implement the configuration by completing the following steps:
a.![]() From the Quest Server, click Start > Run...
From the Quest Server, click Start > Run...
b.![]() When the Run dialog box opens, type “ services.msc ”.
When the Run dialog box opens, type “ services.msc ”.
c.![]() Find the Quest Interface Service and restart it (Figure 7).
Find the Quest Interface Service and restart it (Figure 7).
Figure 7 Restart the Quest Interface Service
Completing the Post-Upgrade Checklist and Testing
Use the Appendix A: Post-Upgrade Checklist to be sure that you have completed the required verification steps.
 Feedback