Introduction
This document describes a solution to adapt the calling number based on the current site, for emergency calls only.
Prerequisites
Requirements
- Jabber for Windows
- Cisco Unified Communications Manager (CUCM) 14SU2.
- Device Mobility.
Components Used
- Jabber for Windows
- Cisco Unified Communications Manager 14SU2.
The information in this document was created from the devices in a specific lab environment. All of the devices used in this document started with a cleared (default) configuration. If your network is live, ensure that you understand the potential impact of any command.
Background Information
In such cases when a situation arises, a user must dial an emergency number, by default calling number transmitted would be of user’s base site. Such scenarios cause emergency responses to be dispatched at the incorrect location.
Configure
Functional Overview
- Jabber logs in at Visiting Site with new ip address belonging to visiting site.
- CUCM compares physical location with new ip address to determine roaming state to for Jabber for windows Client.
- CUCM continues to process all other call attempts using native device pool configuration.
- CUCM allocates Roaming Device pool of visiting site, as Device has been provisioned with Device Mobility=On Parameters.
- When Jabber dials 911 – Emergency Services, as Route pattern is ELIN enabled, it checks associated and ELIN Group configuration.
- Based on ELIN Group configuration, appropriate calling party number is selected for emergency calls.
- Based on calling party transformation applied on trunk, number gets translated to appropriate number for ANI Authentication as well as callback functionality for Emergency Response Dispatch.
Proposed solution is tested to be working in Centralized PSTN breakout as well as Site specific PSTN exit. Each of the sites use their own range of DID numbers.
- Device Mobility Group (DMG)
- Device Mobility Info (DMI)
- Emergency Location (ELIN)
- Calling Party Transformation.
- Local Route Group (LRG)
- Physical Location.
After jabber log in to visiting site, CUCM validates registered IP Address (Jabber for Windows) against DMI configuration. Based on the Physical Location and DMI, it marks jabber as roaming. Then, assign device pool of visiting site as Roaming Device Pool.
When Jabber makes an emergency call, while doing digit analysis call manger, it notices call is going through ELIN enabled Translation Pattern / Route Pattern. As a result, calling number would be selected as per associated ELIN group of visiting sites.
Once call is extended to Trunk / Gateway, appropriate Calling Party Transformation is applied when routing calls to PSTN. Recommendation is to use always on / always manned number to be published for Emergency Calls.
Network Diagram
Configurations
Task List
- Create Device Mobility Info (DMI) for Site A and Site B.
- Create Device Mobility Group for Site and Site B.
- Create Physical location for Site A and Site B.
- Create Local Route Group for Site A and Site B. (Optional for Centralized PSTN Breakout)
- Create Route List with Standard Local Route Group for Emergency dialing. (Optional for Centralized PSTN Breakout.)
- Enable Emergency Location (ELIN) Support.
- Create ELIN Groups for each site.
- Enable Emergency dialing Route Patterns by Checking, Is an Emergency Services Number (used by Emergency Call Handler) check box.
Device Mobility Group Configuration
Step 1: Log in to call manager.
Step 2: Navigate to System > Device Mobility > Device Mobility Group.
Step 3: Click Add New.
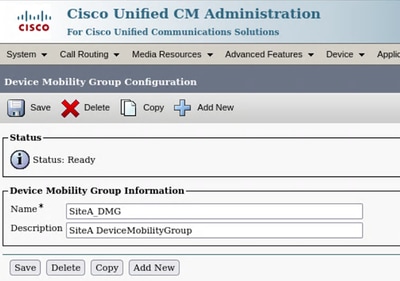
Step 4: Click Save.
Step 5: Repeat same procedure for Site B as well.
Device Mobility Info Configuration
Step 1: Log in to call manager.
Step 2: Navigate to System > Device Mobility > Device Mobility Info.
Step 3: Click Add New.
|
Name
|
Subnet ( ipv4 / ipv6 )
|
Device Pool
|
|
SiteA_DMI
|
192.168.1.0/24
|
SiteA_DP
|
|
SiteB_DMI
|
192.168.2.0/24
|
SiteB_DP
|
Step 4: Take reference from screen shot.
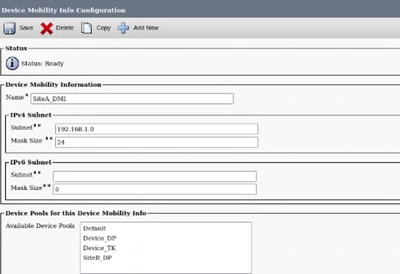
Step 5: Click Save.
Step 6: Repeat same procedure for Site B.
Physical Location Configuration
Step 1: Log in to call manager.
Step 2: Navigate to System > Physical Location.
Step 3: Click Add New.
Step 4: Enter fields as per screen shot.
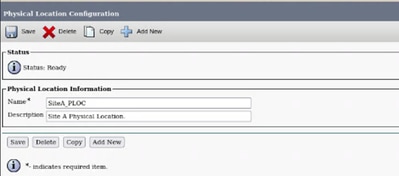
Step 5: Click Save.
Step 6: Repeat same procedure for Site B.
Local Route Group Configuration
This Step is optional if centralized PSTN breakout is in use. For site specific PSTN, existing local route group configuration is required. In specific PSTN breakout, all sites use a common route pattern / route list for making emergency calls. For centralized PSTN breakout, route group can be specified in device pool configuration, as that is mandatory for ELIN configuration to work.
Emergency Location Configuration
In this section, enable Emergency Location and configuration emergency location groups.
Step 1: Log in to call manager.
Step 2: Navigate to Call Routing > Emergency Location > Emergency Location Configuration.
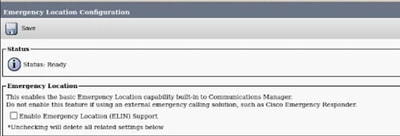
Step 3: Check Enable Emergency Location (ELIN ) Support box.
Step 4: Click Save.
Step 5: Navigate to Call Routing > Emergency Location > Emergency Location ( ELIN ) Groups.
Step 6: Click Add New.
ELIN Group configuration requires unassigned directory numbers to be used for emergency calling. Specify range of numbers for each Group configuration.
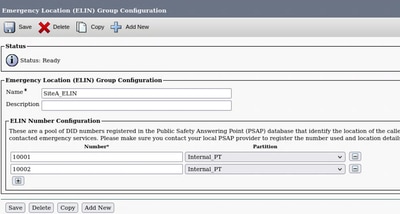
Step 7: Click Save to complete configuration.
Step 8: Repeat step 6 for remaining sites.
Device Pool Update
Step 1: Log in to call manager.
Step 2: Navigate to System > Device Pool
Step 3: Create / Update device pools.
|
Name
|
Physical Location
|
Device Mobility Group
|
ELIN Group
|
Local Route Group
|
|
SiteA_DP
|
SiteA
|
SiteA_DMG
|
SiteA_ELIN
|
SiteA_LRG
|
|
SiteB_DP
|
SiteA
|
SiteB_DMG
|
SiteB_ELIN
|
SiteB_LRG
|
Route Pattern Update for Emergency Calling

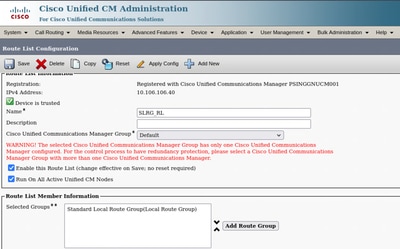
Note: For decentralized PSTN breakout, it is best to use a common route pattern for emergency services for example 911 / 9.911 for all sites. Leverage Standard Local Route Group (SLRG) enabled route list as destination for route pattern.
Note: For Centralized PSTN breakout also, LRGs are required, however, common route group can be used as local route group in device pool, containing common PSTN trunk applicable to each site. LRGs are required for ELIN functionality.
Step 1: Log in to call manager.
Step 2: Navigate to Call Routing > Route / Hunt > Route Pattern.
Step 3: Example shows common pattern to be used by all sites for emergency services with SLRG enabled route list.
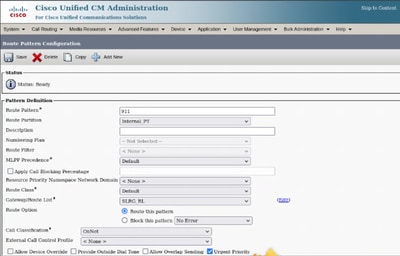

Step 4: Click Save to complete configuration.
Verify
Simulate two site scenarios with two PCs, where each PC presents a site.
Test 1:
- Log into Jabber for Windows on PC1.
- Make a Test call to Dummy 911 pattern.
- Calling number presented is native extension assigned to Jabber Client.
Test 2:
To simulate Jabber roaming status, Modify Device Mobility information configuration to reflect PC1 IP address as site B subnet. Jabber Device has remaining configuration intact that of Site A.
- Reset Jabber Client and log in again.
- Now Jabber would show registered ip address as subnet of site B.
- CUCM would find a mismatch with Physical Location and DMI (Device Mobility Information).
- Due to Roaming Status, CUCM assigns Roaming Device Pool of Site B to Jabber Client.
- Due to Roaming device pool, CUCM uses ELIN group configuration of Site B, in case of jabber client making an emergency call.
- Jabber does not use a different calling number (as per ELIN Group Configuration) for emergency calls.
Note: Now Jabber sends different numbers from range of Site B for emergency calls.
As Emergency calling is a simulated environment, calling number usage requires to be validated by traces using some other placed holder number which is routable from test cluster.
Troubleshoot
Roaming Device Pool not applied to Jabber for Windows:
- Jabber must be enabled for Device Mobility.
- Physical location must be configured and assigned to device pool assigned to Jabber.
For more details on troubleshooting methods, refer to Feature Configuration Guide for Cisco Unified Communications Manager, Release 12.5(1)
 Feedback