Introduction
This document describes how to configure visual voicemail with Jabber and Webex Unified Communications Manager (UCM).
Prerequisites
Requirements
Cisco recommends that you have knowledge of these topics:
- Cisco Unified Communications Manager (CUCM)
- Cisco Unity Connection (CUXN)
- Cisco Jabber
- Cisco Webex
Components Used
This document is not restricted to specific software and hardware versions.
The information in this document was created from the devices in a specific lab environment. All of the devices used in this document started with a cleared (default) configuration. If your network is live, ensure that you understand the potential impact of any command.
Background Information
The clients like Cisco Jabber and Cisco Webex can communicate with CUXN in order to get visual voicemail capabilities, which allow you to:
- Choose and play voicemail messages regardless of order.
- Perform visible message count.
- Notifiy incoming voice messages.
- Enable user to listen to voicemails from within jabber.
- Enable a call back option to the person who left the voice mail.
Configure
It is assumed that the basic configurations between the CUCM and CUXN are already in place.
CUCM Configuration
Step 1. Navigate to the CUCM Administration Page > User Management > User Settings > UC Service.
Create a Jabber-Config service if is has not been created; otherwise, open the one that is used by your Jabber or Webex users.
Configure it UC Service with these parameters:
- policies: voicemail_ enabled
- voicemail: VoicemailPrimaryServer: IP of the CUCXN Publisher
- voicemail: VoicemailSecondaryServer: IP of the CUXN Subscriber
 Jabber-Config UC Service
Step 2. Navigate to the CUCM Administration page > User Management > User Settings > Service Profile.
Voicemail Profile: Keep the Primary, Secondary and Tertiary CUXN Servers Configured
Set the Credentials Source for voicemail service to Unified CM - IM and Presence
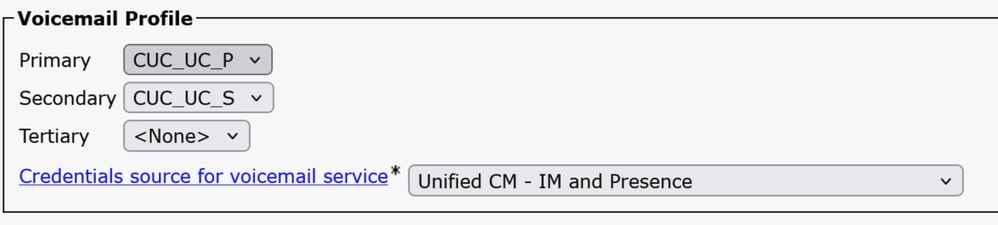 Voicemail Profile Configuration from the Service Profile

Tip: If you have Single Sign-On (SSO) configured, the voicemail source credentials require to be configured as Not Set.

Warning: If you have SSO with Webex UCM, the voicemail source credentials require to be configured as Unified CM - IM and Presence.
Add the Jabber-Config UC Service to the Service Profile that is assigned to your Jabber users.
Cisco Unity Configuration
Make sure the userid in CUCM matches the alias in the CUXN, a discrepancy here makes the feature to stop working.
Make sure the Phone Service Password or End User Password is the same as the Web Application Password in CUXN for the users.
Refresh Login Configuration
When OAuth with Refresh login is enabled on the CUCM, it requires to be enabled on the CUXN server as well.
1. Navigate to the CUCM Administraiton webpage > System > Enterprise Parameters > SSO and OAuth Configuration and validate the OAuth with Refresh Login Flow, confirm if it is Enabled.
2. Navigate to the CUXN Administration webpage > System Settings > Enterprise Parameters > SSO and OAuth Configuration and validate the OAuth with Refresh Login Flow, confirm if it is Enabled.
3. Confirm the Authz servers are configured on the CUXN server.
Step 1: Navigate to the CUXN Administration webpage > System Settings > Authz Servers > Add New:
- Display Name: Any Name you want to add
- Authz Server: CUCM Publisher IP Address or Fully Qualified Domain (FQDN)
- Port: 8443
- Username and Password: Are the ones you use to log in to the CUCM Administration Page.
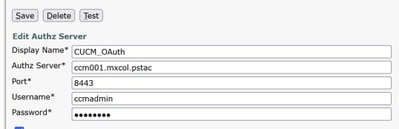 Authz Server Configuration from Cisco Unity Connection
Step 2. Once saved, confirmed the keys are synced.
 Authz Server Keys on Cisco Unity Connection are Synced
Verify
There is currently no verification procedure available for this configuration.
Troubleshoot
This section provides information you can use in order to troubleshoot your configuration.
If SSO with OAuth is enabled, and the voicemail credentials are not retrieved correctly by Jabber or Webex, confirm the Authz Keys are configured and Sync. If those are not Synced or the last time those were synced has been several weeks ago, click the Sync Keys button and confirm the keys are resynced.
 Feedback