Introduction
This document describes how to troubleshoot packet loss using Nexus interface counters.
Prerequisites
Requirements
Cisco recommends that you have knowledge of these topics:
Components Used
| Name |
Paltform |
Version |
| N9K1 |
N9K-C93108TC-EX |
9.3(10) |
| N9K2 |
N9K-C93108TC-EX |
9.3(10) |
| N9K3 |
N9K-C93108TC-EX |
9.3(10) |
The information in this document was created from the devices in a specific lab environment. All of the devices used in this document started with a cleared (default) configuration. If your network is live, ensure that you understand the potential impact of any command.
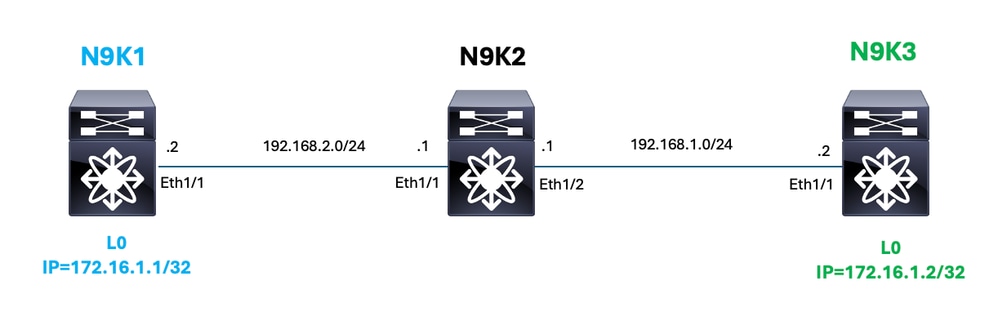
Topology
Background
In certain environments, traditional packet capture methods like ELAM or SPAN can not be feasible options for diagnosing network issues. However, Nexus interface packet counters provide a valuable alternative for troubleshooting packet drops. It is important to note that the availability of specific counters can vary depending on the network configuration, so this method of troubleshooting can not be universally applicable.
In this example, it is demonstrated how to utilize Nexus interface counters to troubleshoot connectivity issues between the loopback interfaces of N9K1 ( 172.16.1.1 ) and N9K3 ( 172.16.1.2 ).
Identifying interfaces
For each device the ingress and egress interface must be identified, in order to identify this interfaces for this example command: show ip route is utilized.
Routes in N9K1
N9K1# sh ip route 172.16.1.2
<Snipped>
172.16.1.2/32, ubest/mbest: 1/0
   *via 192.168.2.1, Eth1/1, [1/0], static
For nexus N9K1, interface Eth1/1 is used.
Routes in N9K2
N9K2# sh ip route 172.16.1.1
<Snipped>
172.16.1.1/32, ubest/mbest: 1/0 time
   *via 192.168.2.2, Eth1/1, [1/0], static

N9K2# sh ip route 172.16.1.2
<Snipped>
172.16.1.2/32, ubest/mbest: 1/0 time
   *via 192.168.1.2, Eth1/2, [1/0], static
For nexus N9K1, interfaces Eth1/1 and Eth1/2 are used.
Routes in N9K3
N9K3# sh ip route 172.16.1.1
<Snipped>
172.16.1.1/32, ubest/mbest: 1/0 time
   *via 192.168.1.1, Eth1/1, [1/0], static
For nexus N9K1, interface Eth1/1 is used.
Identifying Packet size
In order to troubleshot packet drops using interface counters, a counter that is not increasing needs to be identified.
In the next example, command sh interface e1/1 counter detailed was run twice, were it can be observed that counter Packets from 512 to 1023 bytes did not increase for RX and TX.
This process needs to be done in all the involved devices between source and destination.
N9K1# sh interface e1/1 counters detailed
Ethernet1/1
 Rx Packets: 31774
 Rx Unicast Packets: 8419
 Rx Multicast Packets: 23784
 Rx Broadcast Packets: 3
 Rx Bytes: 8115383
 Rx Packets from 0 to 64 bytes: 322
 Rx Packets from 65 to 127 bytes: 22822
 Rx Packets from 128 to 255 bytes: 3393
 Rx Packets from 256 to 511 bytes: 1652
 Rx Packets from 512 to 1023 bytes: 63
 Rx Packets from 1024 to 1518 bytes: 3522
 Tx Packets: 26430
 Tx Unicast Packets: 7351
 Tx Multicast Packets: 19509
 Tx Broadcast Packets: 2
 Tx Bytes: 5114894
 Tx Packets from 0 to 64 bytes: 90
 Tx Packets from 65 to 127 bytes: 20724
 Tx Packets from 128 to 255 bytes: 2243
 Tx Packets from 256 to 511 bytes: 1642
 Tx Packets from 512 to 1023 bytes: 10
 Tx Packets from 1024 to 1518 bytes: 1766

N9K1# sh interface e1/1 counters detailed
Ethernet1/1
 Rx Packets: 31821
 Rx Unicast Packets: 8437
 Rx Multicast Packets: 23817
 Rx Broadcast Packets: 3
 Rx Bytes: 8125733
 Rx Packets from 0 to 64 bytes: 329
 Rx Packets from 65 to 127 bytes: 22878
 Rx Packets from 128 to 255 bytes: 3468
 Rx Packets from 256 to 511 bytes: 1670
 Rx Packets from 512 to 1023 bytes: 63
 Rx Packets from 1024 to 1518 bytes: 3544
 Tx Packets: 26467
 Tx Unicast Packets: 7367
 Tx Multicast Packets: 19534
 Tx Broadcast Packets: 2
 Tx Bytes: 5121572
 Tx Packets from 0 to 64 bytes: 95
 Tx Packets from 65 to 127 bytes: 20768
 Tx Packets from 128 to 255 bytes: 2290
 Tx Packets from 256 to 511 bytes: 1657
 Tx Packets from 512 to 1023 bytes: 10
 Tx Packets from 1024 to 1518 bytes: 1798

Caution: In a production enviroment, interfaces counters can be cleared in order to identify which counter is not increasing. For interfaces that have MTU set to maximum, counters greater than 1518 can be found. If packets with specific size are not crossing the nexus, a counter is not going to appear.
Performing the test
For this test, because a controlled environment is used, counter Packets from 1024 to 1518 is used in all the devices. Counters of all interfaces are cleared before the test:
N9K1# clear counters interface e1/1
N9K2# clear counters interface e1/1-2
N9K3# clear counters interface e1/1
In all nexus, the next command can be run to verify that no traffic with desired packet size is passing through the nexus; the expectation is to not see anything;
N9K1# sh int e1/1 cou detailed | i i " 1024 to 1518"
N9K2# sh int e1/1-2 cou detailed | i i " 1024 to 1518"
N9K3# sh int e1/1 cou detailed | i i " 1024 to 1518"
Now that all counters are clear, a ping can be generated , specifying a packet size between 1024-1518 with DF-BIT set.
N9K1# ping 172.16.1.2 source 172.16.1.1  packet-size 1050 df-bit
PING 172.16.1.2(172.16.1.2) from 172.16.1.1: 1050 data bytes
1058 bytes from 172.16.1.2: icmp_seq=0 ttl=254 time=1.102 ms
1058 bytes from 172.16.1.2: icmp_seq=1 ttl=254 time=0.668 ms
1058 bytes from 172.16.1.2: icmp_seq=2 ttl=254 time=0.644 ms
1058 bytes from 172.16.1.2: icmp_seq=3 ttl=254 time=0.626 ms
1058 bytes from 172.16.1.2: icmp_seq=4 ttl=254 time=0.631 ms

--- 172.16.1.2 ping statistics ---
5 packets transmitted, 5 packets received, 0.00% packet loss
round-trip min/avg/max = 0.626/0.734/1.102 ms
Verify ICMP Request
In the next example, you can observe how counters are increasing in TX/RX direction on the involved devices for the ICMP request from N9K1 to N9K3.
| N9K1 |
N9K2 |
N9K3 |
N9K1# sh int e1/1 cou detailed | i i " 1024 to 1518"
  Rx Packets from 1024 to 1518 bytes: 0
  Tx Packets from 1024 to 1518 bytes: 5
|
N9K2# sh int e1/1 cou detailed | i i " 1024 to 1518"
  Rx Packets from 1024 to 1518 bytes: 5
  Tx Packets from 1024 to 1518 bytes: 0
N9K2# sh int e1/2 cou detailed | i i " 1024 to 1518"
  Rx Packets from 1024 to 1518 bytes: 0
  Tx Packets from 1024 to 1518 bytes: 5
|
N9K3# sh int e1/1 cou detailed | i i " 1024 to 1518"
  Rx Packets from 1024 to 1518 bytes: 5
  Tx Packets from 1024 to 1518 bytes: 0
|
| It can be observed that N9K1 sent 5 packets on interface e1/1 |
It can be observed that N9K2 received 5 packets on interface e1/1 and sent 5 packets on interface e1/2 |
It can be observed that N9K3 received 5 packets on interface e1/1 |
Verify ICMP Reply
Once ICMP request patch is validated, you can proceed to review ICMP reply.
In the next example you can observe how counters ar increasing in TX/RX direction on the involved devices for the ICMP reply from N9K3 to N9K1
| N9K1 |
N9K2 |
N9K3 |
N9K1# sh int e1/1 cou detailed | i i " 1024 to 1518"
  Rx Packets from 1024 to 1518 bytes: 5
  Tx Packets from 1024 to 1518 bytes: 5
|
N9K2# sh int e1/1 cou detailed | i i " 1024 to 1518"
  Rx Packets from 1024 to 1518 bytes: 5
  Tx Packets from 1024 to 1518 bytes: 5
N9K2# sh int e1/2 cou detailed | i i " 1024 to 1518"
  Rx Packets from 1024 to 1518 bytes: 5
  Tx Packets from 1024 to 1518 bytes: 5
|
N9K3# sh int e1/1 cou detailed | i i " 1024 to 1518"
  Rx Packets from 1024 to 1518 bytes: 5

  Tx Packets from 1024 to 1518 bytes: 5
|
| It can be observed that N9K1 receive 5 packets on interface e1/1 |
It can be observed that N9K2 sent 5 packets on interface e1/1 and received 5 packets on interface e1/2 |
It can be observed that N9K3 sent 5 packets on interface e1/1 |
With this test, it can be confirmed that the traffic flowed correctly across the 3 switches. If one of the nexus have a discrepancy on counter, either RX or TX that is where the traffic can be dropped.
 Feedback