Configure and Troubleshoot Single Sign On in AppDynamics
Available Languages
Download Options
Bias-Free Language
The documentation set for this product strives to use bias-free language. For the purposes of this documentation set, bias-free is defined as language that does not imply discrimination based on age, disability, gender, racial identity, ethnic identity, sexual orientation, socioeconomic status, and intersectionality. Exceptions may be present in the documentation due to language that is hardcoded in the user interfaces of the product software, language used based on RFP documentation, or language that is used by a referenced third-party product. Learn more about how Cisco is using Inclusive Language.
Contents
Introduction
This document describes how to configure Single Sign On (SSO) in AppDynamics and troubleshoot issues.
Prerequisites
Requirements
Cisco recommends that you have knowledge of these topics:
- To Configure Single Sign On, User must haveAccount Owner (Default)role or a custom role with Administration, Agents, Getting Started Wizard permission.
- Admin access to yourIdPaccount.
- The metadata or configuration details from AppDynamics (for example, Entity ID, ACS URL).
Components Used
The information in this document is based on these software and hardware versions:
- AppDynamics Controller
The information in this document was created from the devices in a specific lab environment. All of the devices used in this document started with a cleared (default) configuration. If your network is live, ensure that you understand the potential impact of any command.
Background Information
Single Sign-On (SSO) is an authentication mechanism that allows users to log in once and gain access to multiple applications, systems, or services without needing to authenticate again for each one.
Security Assertion Markup Language (SAML) is one of the technologies used to implement SSO. It provides the framework and protocols that enable SSO by securely exchanging authentication and authorization data between an Identity Provider (IdP), and a Service Provider (SP).
SAML Assertion
- The XML-based messages exchange between the IdP and SP.
- It provides three types of assertions:
- Authentication Assertions: Confirms the user has been authenticated.
- Attribute Assertions: Shares user attributes, such as username or roles.
- Authorization Decision Assertions: Indicates what the user is authorized to do.
Key Roles in SAML
- Identity Provider (IdP)
- Verifies the identity of the User.
- Generate the SAML Assertion that contains identify information of the user.
- Service Provider (SP)
- The Application or System that the user wants to access.
- Relies on the IdP to authenticate the user.
- Accepts the SAML assertion to grant the user access to its resources or application.
- User (Principal)
- The actual user initiating the request, or trying to access a resource from the Service Provider.
- Interacts with both the IdP (Authentication) and the SP.

Note: AppDynamics support both IdP initiated and SP initiated SSO.
SP Initiated Flow:
- The user navigates to the Service Provider by typing the URL of the application (for example, AppDynamics) or clicking a link.
- The SP checks for an existing session. If no session exists, the SP recognizes the user is not authenticated and initiates the SSO process.
- The SP generates a SAML Authentication Request and redirects the user to the IdP for authentication.
- This request includes:
- Entity ID: Service Provider unique identifier.
- Assertion Consumer Service (ACS) URL: where the IdP send the SAML Assertion after authentication.
- Metadata about the SP and security details (for example, signed request, encryption requirements).
- This request includes:
- The user is redirected to the IdP login page.
- The IdP authenticates the user (for example, via username/password or multi-factor authentication).
- After successful authentication, the IdP generates a SAML Assertion (security token).
- The SAML Assertion is sent back to the SP via the user browser using HTTP POST Binding (in most cases) or HTTP Redirect Binding.
- The SP validates the SAML Assertion to ensure:
- It was issued by the trusted IdP.
- It is addressed to the SP (via the SP Entity ID).
- It has not expired or been tampered with (validated using the IdP public key).
- If the SAML Assertion is valid, the SP creates a session for the user.
- The user is granted access to the application or resources.
IdP initiated Flow:
- The user navigates to the IdP log in portal and enters their credentials.
- The IdP authenticates the user (for example, with a username/password combination, multi-factor authentication).
- After authentication, the IdP presents the user with a list of available applications or services (SPs) they can access.
- The user selects the desired SP (for example,, AppDynamics).
- The IdP generates a SAML Assertion for the selected SP.
- The IdP redirects the user to the SP Assertion Consumer Service (ACS) URL and sends the SAML Assertion along with it (using HTTP POST Binding or HTTP Redirect Binding).
- The SP receives the SAML Assertion and validates it:
- Ensures the assertion is issued by a trusted IdP.
- Verifies the assertion integrity and expiration.
- Confirms the user identity and other attributes.
- If the SAML Assertion is valid, the SP creates a session for the user.
- The user is granted access to the application or resources.
Configure
The AppDynamics Controller can use the Cisco Customer Identity or an external SAML identity provider (IdP) to authenticate and authorize users.
Supported Identity Providers
AppDynamicscertifies support for these identity providers (IdPs):
- Okta
- Onelogin
- Ping Identity
- Azure AD
- IBM Cloud Identity
- Active Directory Federation Service (AD FS)
Other IdPs supporting HTTP POST binding are also compatible with AppDynamics SAML authentication.
Steps to Configure SAML in AppDynamics
Step 1. Collect AppDynamics Controller Details
- Entity ID (SP Entity ID): A unique identifier for the AppDynamics (for example, https://<controller-host>:<port>/controller).
- Syntax: https://<controller_domain>/controller
- example: https://<your_controller_domain>/controller
- Reply URL (Assertion Consumer Service, ACS URL): The endpoint on the Service Provider (for example, AppDynamics) where the IdP send the SAML response after authentication.
- Syntax: https://<controller_domain>/controller/saml-auth?accountName=<account_name>
- example: https://your_controller_domain/controller/saml-auth?accountName=youraccountname
Note: In case of On-Prem controller the default account name is customer1 unless you have a multitenant controller with different accountName.
- Single Logout URL (Optional):The endpoint on the SP to handle SAML logout requests (for example, https://<controller_domain>/controller).
Step 2. Create a new Application in IdP and Download the Metadata
- Locate the application creation area: This is usually within the IdP administrative console or dashboard, often labeled something like Applications, Web and Mobile Apps, Enterprise Applications, or Relying Parties.
- Add a custom or generic SAML application: Select an option that allows you to configure a custom SAML application or a generic SAML service provider integration.
- Provide application details: Give the application a name and potentially upload an icon for identification (Optional).
- Add attribute mappings (Username, displayName, email, or roles) to pass user information to AppDynamics.
- Download the IdP metadata file, or alternatively, note down these details:
- IdP login URL
- Logout URL
- Attribute Names
- Certificate
Step 3. Configure SAML Authentication in AppDynamics Controller
- Log in to theController UIas anAccount Owner Roleor a role with Administration, Agents, Getting Started Wizard permission.
- Click your User Name(Top Right Corner)> Administration > Authentication Provider > Select SAML.
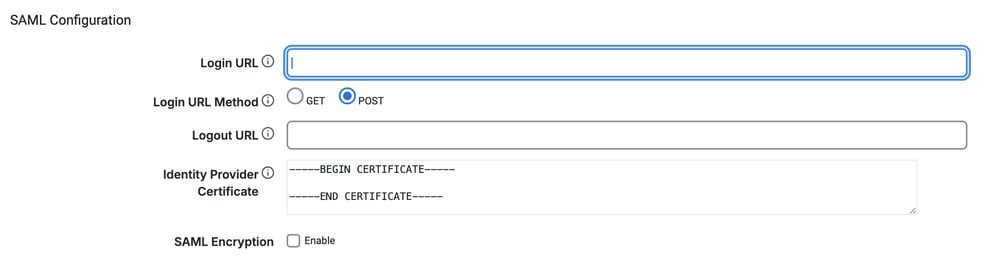
- In SAML Configuration section, add these details:
-
Login URL: The IdP Login URL where AppDynamics Controller routes Service Provider (SP)-initiated login requests.
-
Logout URL (Optional): The URL where AppDynamics Controller redirects users after they log out. If you do not specify a logout URL, users get the AppDynamics login screen when they log out.
-
Certificate: The X.509 certificate from IdP. Paste the certificate between the BEGIN CERTIFICATE and END CERTIFICATE delimiters. Avoid duplicating BEGIN CERTIFICATE and END CERTIFICATE delimiters from the source certificate itself.
- SAML Encryption (Optional): You can improve the security of the SAML authentication by encrypting the SAML response from the IdP to the service provider. To encrypt SAML responses in AppDynamics, you need to configure your Identity Provider (IdP) to encrypt the SAML assertion and then configure the AppDynamics Controller to use a specific certificate and private key for decryption.
-
- In SAML Attribute Mappings section, map the SAML attributes (example: Username, DisplayName, Email) to their corresponding fields in AppDynamics.
Note: AppDynamics displays the username, email, and display name of a SAML user. By default, it uses the NameID attribute from the SAML response to create a username, which is also used as the displayName. This behavior can be customized by including the username, email and displayname attributes in the SAML response. While configuring the IdP settings in AppDynamics, the user can specify these attribute names. During log in, AppDynamics checks if attribute mapping is configured. If mappings are configured and matching attributes are present in the SAML response, AppDynamics uses those attribute values to set the username, email and displayname.

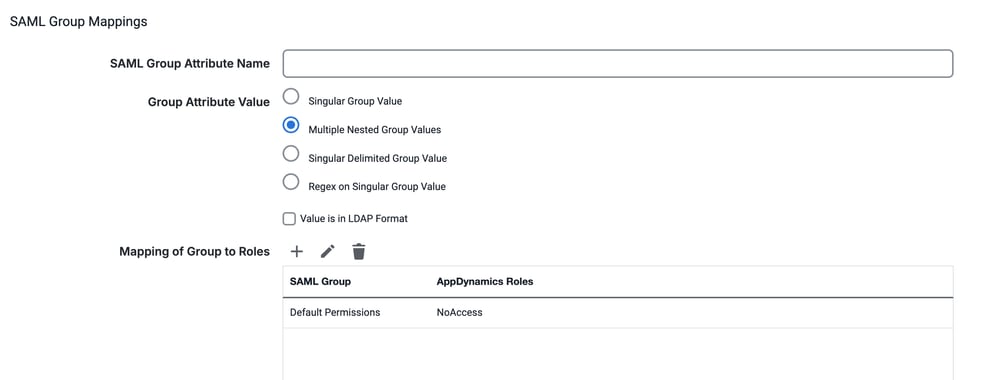
- In the SAML Group Mappings section, add these details.
- SAML Group Attribute Name: Enter the name of the SAML attribute that contains the group information. This is typically Groups, or group or roles, or Roles or group-membership.
- Group Attribute Value: Select the appropriate value format for the group attribute. Common options include Multiple Nested Group Values or Single Value depending on how your IdP structures the group information.
Note: Select Value is in LDAP Format if group information is coming in LDAP (Lightweight Directory Access Protocol) format.
- Mapping of Group to Roles: Click the + button to add a new mapping.
- SAML Group: Enter the name of the SAML group (as defined in your IdP) that you want to map to an AppDynamics role.
- Role(s): Select the corresponding AppDynamics role(s) from the available list that you want to assign to users belonging to the SAML group.
- Default Permissions: If SAML group mapping is not configured or if a user SAML assertion does not include group information, AppDynamics fall back to using default permissions.
Note: It is recommended to assign a role with minimum permissions to Default Permissions.
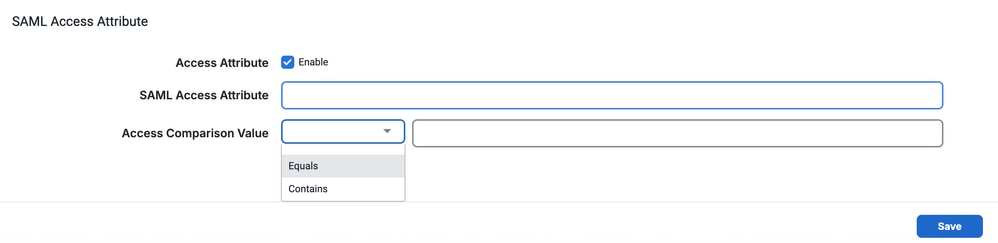
- In SAML Access Attribute section, add these details (Optional):
- SAML Access Attribute: Enter the name of the attributes from the SAML response. This is going to be used for access validation.
- Access Comparison Value: There are two options available:
- Equal: Access is granted only if the attribute value in the SAML response exactly matches the value specified in the configuration.
- Contains: Access is granted if the attribute value in the SAML response contains the value specified in the configuration.
- How It Works if enabled:
- AppDynamics retrieves the attribute specified in the SAML Access Attribute field from the SAML response.
- It compares the value of the attribute with the user-defined Access Comparison Value based on the selected method (Equal or Contains).
- If the comparison is successful, the user is granted access.
- If the comparison fails, the log in attempt is denied.
- Click Save (Bottom right corner) to save the Configuration.
Verify
- Open a browser and navigate to AppDynamics Controller. The Log in dialog for your 3rd-party IdP service appears.
- Click Log in with Single Sign-On. The system redirects you to your IdP.
- Enter and submit your credentials.
- After successfully authentication, The IdP redirects you to your AppDynamics Controller.
Common Problems and Solution
400 Bad Request
- Issue: Users encounter a 400 Bad Request error when attempting to log in to AppDynamics Controller.
- Sample Error:
HTTP status 400 - Bad Request Message: Error while processing SAML Authentication Response - see server log for details Description: The request sent by the client was syntactically incorrect. - Common Root Causes:
- Invalid SAML Certificate
- SAML Response is larger than max length
- Invalid Entity ID or ACS URL
- Solution:
- Invalid SAML Certificate
- Ensure that the certificate provided by the Identity Provider (IdP) is valid and up-to-date.
- Verify the expiration date of the IdP certificate. If it has expired, obtain a new certificate from the IdP.
- If the certificate has been updated on the IdP side, ensure the new certificate is uploaded and configured in AppDynamics.
- Steps to update the certificate in AppDynamics:
- Log in to the Controller UI as an Account Owner Role or a role with Administration, Agents, Getting Started Wizard permission.
- Click your User Name(Top Right Corner)> Administration > Authentication Provider > Select SAML.
- In the SAML Configuration section, locate the certificate field and replace the old certificate with the new one provided by the IdP.
- Click Save to update the SAML configuration.
- SAML Response is larger than the max length.
- This issue arises when the controller is moved from GlassFish to Jetty Server, starting with Controller version 23.11 and above. In Jetty Server, there is a property named -Dorg.eclipse.jetty.server. Request.maxFormContentSize located in the .../appserver/jetty/start.d/start.ini file. If the SAML response size exceeds the value set for this property, the controller rejects the payload and return a 400 Bad Request error.
- Causes of Large SAML Responses:
- Excessive Attributes: Too many attributes included in the SAML assertion.
- Signed or Encrypted SAML Responses: Signing or encryption increases the response size.
- Additional User or Group Data: The Identity Provider (IdP) has extra user or group data.
- There are two ways to solve this issue. By implementing one or both of these solutions, you can resolve the issue and prevent the payload from being rejected.
- Increase the maxFormContentSize Value
- For On-Prem Controllers: Update the -Dorg.eclipse.jetty.server.Request.maxFormContentSize property in the .../appserver/jetty/start.d/start.ini file to a larger value and restart the controller.
- For SaaS Controllers: File a support ticket to have this issue addressed by the support team.
-
Optimize the SAML Response
Work with your Identity Provider (IdP) to reduce the size of the SAML response by making these adjustments:
- Exclude Unnecessary Attributes: Remove unused or redundant attributes from the SAML assertion via the IdP configuration.
- Disable Encryption (if permissible): Encryption increases the SAML response size. If the connection is already secured via HTTPS, consider disabling encryption to reduce the size.
- Increase the maxFormContentSize Value
- This issue arises when the controller is moved from GlassFish to Jetty Server, starting with Controller version 23.11 and above. In Jetty Server, there is a property named -Dorg.eclipse.jetty.server. Request.maxFormContentSize located in the .../appserver/jetty/start.d/start.ini file. If the SAML response size exceeds the value set for this property, the controller rejects the payload and return a 400 Bad Request error.
- Invalid Entity ID or ACS URL
- On the Idp:
- Confirm that the Entity ID is https://your_controller_domain/controller. If the Entity ID is different, update it.
- Confirm that the ACS URL is https://your_controller_domain/controller/saml-auth?accountName=youraccountname. If the ACS URL is different, update it accordingly.
Note: accountName must match your AppDynamics account name. (for example, customer1)
- On the Idp:
- Invalid SAML Certificate
-
Missing User Permissions
- Issue: You have successfully logged in to the controller. However, you did not receive the intended roles and permissions.
- Example Configuration & SAML Response:
- In the SAML user the Group attribute, name is Groups with values AppD_Admin & AppD_Power_User.
<saml:Attribute NameFormat="urn:oasis:names:tc:SAML:2.0:attrname format:basic" Name="Groups"> <saml:AttributeValue xmlns:xsi="http://www.w3.org/2001/XMLSchema-instance" xsi:type="xs:string">AppD_Admin</saml:AttributeValue> <saml:AttributeValue xmlns:xsi="http://www.w3.org/2001/XMLSchema-instance" xsi:type="xs:string">AppD_Power_User</saml:AttributeValue> </saml:Attribute> - In the AppDynamics, under SAML Group Mappings section, these are configured.
- SAML Group Attribute Name: Groups
- Group Attribute Value: Multiple Nested Group Values
- Mapping to Group Roles:
SAML Group AppDynamics Roles AppD_Account_Owner Account Owner (Default) Default Permissions No Access
No Access is a custom role with no permissions.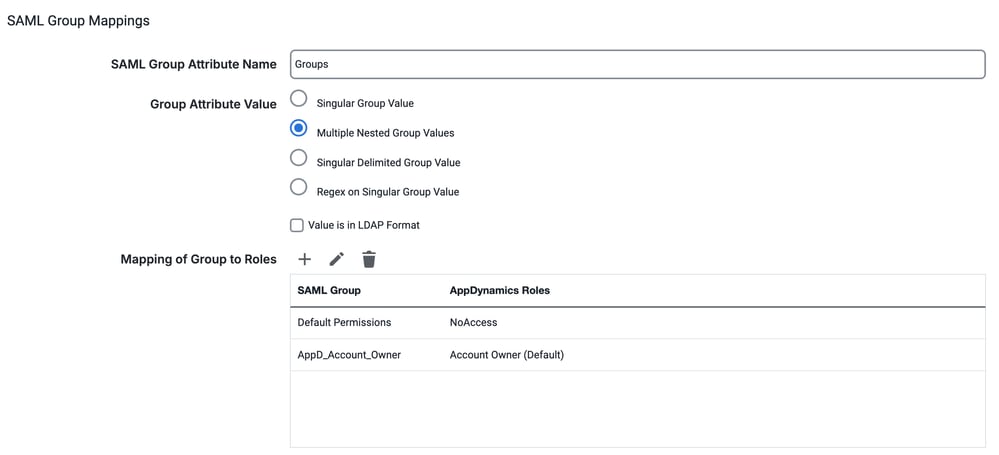
- In the SAML user the Group attribute, name is Groups with values AppD_Admin & AppD_Power_User.
- Common Issues and Solution
- No Group attributes found in SAML response.
- The SAML response from the IdP is missing the required group attributes or the attribute name for groups in the SAML response is set as Roles while in AppDynamics, it is configured as Groups.
- When no group attributes are provided, the user is automatically assigned the roles associated with Default Permissions in AppDynamics.
- To resolve this, ensure that the IdP is configured to include the correct group attributes in the SAML response and the attribute name for groups is matches the configuration in AppDynamics.
- There is no corresponding SAML group mapping configured in AppDynamics for the user groups provided in the SAML response.
- In the SAML response, the Groups attribute contains the values AppD_Admin and AppD_Power_User. However, in AppDynamics, group mappings exist only for the AppD_Account_Owner group.
- As there is no corresponding mapping for AppD_Admin or AppD_Power_User, the user is not assigned any roles or permissions.
- To resolve this, add the missing group mappings (for example, AppD_Admin and AppD_Power_User) in AppDynamics to ensure proper role and permission assignment.
- No Group attributes found in SAML response.
Note: Default permissions only get applied to the SAML users when the SAML Group Attribute Name configured in the AppDynamics is not same as the Groups attributes in the SAML response.
-
Missing or Incorrect Email and/or Name for SAML Users
- Issue: This usually happens when the Attribute configuration in AppDynamics is not matching with the attributes coming in the SAML response.
- Example SAML Response: Attributes In the SAML response are: User.email, User.fullName, and Groups
<saml2:Attribute Name="User.email" NameFormat="urn:oasis:names:tc:SAML:2.0:attrname-format:uri"> <saml2:AttributeValue xmlns:xs="http://www.w3.org/2001/XMLSchema" xmlns:xsi="http://www.w3.org/2001/XMLSchema-instance" xsi:type="xs:string">example@domain.com </saml2:AttributeValue> </saml2:Attribute> <saml2:Attribute Name="User.fullName" NameFormat="urn:oasis:names:tc:SAML:2.0:attrname-format:uri"> <saml2:AttributeValue xmlns:xs="http://www.w3.org/2001/XMLSchema" xmlns:xsi="http://www.w3.org/2001/XMLSchema-instance" xsi:type="xs:string">FirstName LastName </saml2:AttributeValue> </saml2:Attribute> <saml:Attribute NameFormat="urn:oasis:names:tc:SAML:2.0:attrname format:basic" Name="Groups"> <saml:AttributeValue xmlns:xsi="http://www.w3.org/2001/XMLSchema-instance" xsi:type="xs:string">AppD_Admin</saml:AttributeValue> <saml:AttributeValue xmlns:xsi="http://www.w3.org/2001/XMLSchema-instance" xsi:type="xs:string">AppD_Power_User</saml:AttributeValue> </saml:Attribute> -
Example SAML Attribute Mappings in AppDynamics
- Username Attribute: User.name
- Display Name Attribute: User.firstName or blank
- Email Attribute: User.userPrincipal or blank

- Root Cause: The Display Name and Email attributes configured in AppDynamics do not match any of the attributes provided in the SAML response.
- As a result:
- The email is set to blank.
- The display name defaults to the username.
- As a result:
- Solution: Ensure that the Display Name and Email attributes configured in AppDynamics match the corresponding attributes in the SAML response.
- For Example :
- Update the Display Name attribute to User.fullName.
- Update the Email attribute to User.email.
- For Example :
-
HTTP 404 Error
- Issue: The user is unable to log in to the controller and getting 404 not found error.
- Sample Error: In Controller logs (Only for On-Prem Controller) you see this error:
[#|2025-01-10T21:16:35.222+0000|SEVERE|glassfish 4.1|com.singularity.ee.controller.auth.saml.SAMLAuthenticationServlet|_ThreadID=53;_ThreadName=http-listener-1(4);_TimeMillis=1736543795222;_LevelValue=1000;|Error while creating SAML Authentication request
com.appdynamics.platform.services.auth.exception.SamlException: Requested url validation failed
    at com.appdynamics.platform.services.auth.impl.saml.SamlRequestResponseHandler.validateRequestedUrl(SamlRequestResponseHandler.java:576)
    at com.appdynamics.platform.services.auth.impl.saml.SamlRequestResponseHandler.getSamlAuthenticationRequest(SamlRequestResponseHandler.java:132)
- Root Cause: This error usually occurs when the Controller URL configured in the Controller database does not match with the Controller URL used to Log in or the URL configured on the IdP
- Solution:
- For On-Prem Controllers:
- Run this command to update the Controller URL. (Recommended).
curl -k --basic --user root@system --header "Content-Type: application/json" --data '{ "controllerURL": "https://<NEW_CONTROLLER_URL>/controller" }' http://<controller_domain>/controller/rest/accounts/<youraccountname>/update-controller-url - Alternatively, you can run these commands in the controller database to update the Controller URL.
UPDATE controller.account SET controller_url ='<NEW_CONTROLLER_URL>' WHERE id=<ACCOUNT_ID>; UPDATE mds_auth.account SET controller_url='<NEW_CONTROLLER_URL>' WHERE name='<youraccountname>';- Run this command to get the <ACCOUNT_ID>.
Select id from controller.account where name = '<youraccountname>';
Note: Run curl -X POST -u root@system https://<controller_domain>/controller/api/controllermds/syncAll if you still observe the same issue.
- Replace:
- <NEW_CONTROLLER_URL> with the actual controller URL that you are using to access the Controller.
- <controller_domain> with your controller domain.
- <youraccountname> with your account name.
- Run this command to get the <ACCOUNT_ID>.
- Run this command to update the Controller URL. (Recommended).
- For SaaS Controllers: File a support ticket to have this issue addressed by the support team.
- For On-Prem Controllers:
Need Further Assistance
If you have a question or experiencing issues, please create a support ticket with these details:
- Error Details or Screenshot: Provide specific error message or a screenshot of the problem.
- SAML Response: Collect SAML-Trace and HAR File
- Controller Server.log (On-Prem only): If applicable, provide the controller server logs from <controller-install-dir>/logs/server.log
Related Information
Revision History
| Revision | Publish Date | Comments |
|---|---|---|
1.0 |
25-Jun-2025 |
Initial Release |
Contributed by Cisco Engineers
- Amit GoyalSoftware Consulting Engineering Technical Leader
 Feedback
Contact Cisco
- Open a Support Case

- (Requires a Cisco Service Contract)