Troubleshoot GuestShell on Catalyst 9K Platforms
Available Languages
Download Options
Bias-Free Language
The documentation set for this product strives to use bias-free language. For the purposes of this documentation set, bias-free is defined as language that does not imply discrimination based on age, disability, gender, racial identity, ethnic identity, sexual orientation, socioeconomic status, and intersectionality. Exceptions may be present in the documentation due to language that is hardcoded in the user interfaces of the product software, language used based on RFP documentation, or language that is used by a referenced third-party product. Learn more about how Cisco is using Inclusive Language.
Contents
Introduction
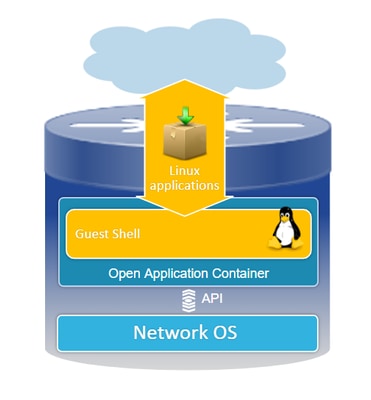
This document describes how to troubleshoot issues with the Guest Shell on Cat9K switches.
Prerequisites
Requirements
- Basic understanding of Cisco IOS® XE Software
- Linux File Systems
- Linux commands
Components Used
The information in this document is based on these software and hardware versions:
- Catalyst 9200
- Catalyst 9300
- Catalyst 9400
- Catalyst 9500
- Catalyst 9600
- Cisco IOS XE 17.9.1 and later versions
The information in this document was created from the devices in a specific lab environment. All of the devices used in this document started with a cleared (default) configuration. If your network is live, ensure that you understand the potential impact of any command.
Background Information
Guest Shell Overview
- The Guest Shell offers an isolated execution environment operating within a Linux Container (LXC).
- Network Access: Administrators can connect to the network via Linux network interfaces, enabling robust connectivity and management.
- Bootflash Access: Direct access to bootflash storage is available, facilitating efficient file management and system operations.
- Cisco IOS CLI Access: Administrators have the ability to interact directly with the Cisco IOS Command-Line Interface, allowing for seamless integration and control.
- Script Execution: The environment supports the installation and execution of Python scripts, enabling automation and customization.
- Application Support: Both 32-bit and 64-bit Linux applications can be installed and run, offering flexibility and a wide range of functional possibilities.
Troubleshooting
.
Configuration
1. Enable IOX.
Switch#conf terminal
Switch(config)#iox
Switch(config)#
Wait 1–5 minutes for IOX to initialize. Ensure that IOX is operational. You can check the messages displayed during the CLI session or by reviewing the output from the show command.
*Mar 10 15:35:40.206: %UICFGEXP-6-SERVER_NOTIFIED_START: Switch 1 R0/0: psd: Server iox has been notified to start
*Mar 10 15:35:51.186: %IOX-3-PD_PARTITION_CREATE: Switch 1 R0/0: run_ioxn_caf: IOX may take upto 5 mins to be ready. Wait for iox to be ready before installing the apps
*Mar 10 15:37:56.643: %IOX-3-IOX_RESTARTABITLITY: Switch 1 R0/0: run_ioxn_caf: Stack is in N+1 mode, disabling sync for IOx restartability
*Mar 10 15:38:05.835: %IM-6-IOX_ENABLEMENT: Switch 1 R0/0: ioxman: IOX is ready.
Switch#show iox-service

IOx Infrastructure Summary:
---------------------------
IOx service (CAF)              : Running
IOx service (HA)               : Running
IOx service (IOxman)           : Running
IOx service (Sec storage)      : Running
Libvirtd 5.5.0                 : Running
Dockerd v19.03.13-ce           : Running
Sync Status                    : Disabled
2. Network configuration.
This example uses the AppGigabitEthernet interface to provide network access.
!
interface AppGigabitEthernet1/0/1
 switchport trunk allowed vlan 50
 switchport mode trunk
!
app-hosting appid guestshell
 app-vnic AppGigabitEthernet trunk
  vlan 50 guest-interface 0
   guest-ipaddress 192.168.10.10 netmask 255.255.255.0
 name-server0 192.168.10.254
end
!

Note: GuestShell uses a static IP address since it does not include the DHCP client service by default. You can install the DHCP client service to obtain an IP address dynamically.
This example uses the Management interface (Gi0/0) to provide network access. In Management Mode, guestshell uses Management port for Networking Cisco IOS configured Management Port IP address acts as Gateway.
!
app-hosting appid guestshell
 app-vnic management guest-interface 0
 name-server0 8.8.8.8
!
Note: When you use the Management interface, the default configuration for the Guestshell eth0 interface is hardcoded to the IP address 192.168.30.2.
You can configure Virtual Port Group interface:
- Virtual Port Group Configuration: Establish a Virtual Port Group with a static IP address.
- Internet Connectivity: Ensure the front port interface is connected to the Internet to allow for external access.
- NAT Configuration: Set up NAT between the Virtual Port Group and the front port to facilitate network address translation.
- GuestShell IP Assignment: Assign an IP address to the GuestShell within the same subnet as the Virtual Port Group interface.
!
interface VirtualPortGroup0
 ip address 192.168.35.1 255.255.255.0
 ip nat inside
!
interface GigabitEthernet1/0/3
 no switchport
 ip address 192.168.100.10 255.255.255.0
 ip nat outside
!
ip route 0.0.0.0 0.0.0.0 192.168.100.254
ip route vrf Mgmt-vrf 0.0.0.0 0.0.0.0 192.168.10.254
ip nat inside source static tcp 192.168.35.2 7023 192.168.100.10 7023 extendable
!
!
ip access-list standard NAT_ACL
 10 permit 192.168.0.0 0.0.255.255
!
app-hosting appid guestshell
 app-vnic gateway1 virtualportgroup 0 guest-interface 0
  guest-ipaddress 192.168.35.2 netmask 255.255.255.0
 app-default-gateway 192.168.35.1 guest-interface 0
 name-server0 8.8.8.8
end
3. Enable guestshell.
Switch#guestshell enable
Interface will be selected if configured in app-hosting
Please wait for completion
guestshell installed successfully
Current state is: DEPLOYED
guestshell activated successfully
Current state is: ACTIVATED
guestshell started successfully
Current state is: RUNNING
Guestshell enabled successfully
Note: The guestshell enable command is the only way to install guestshell. Using App-hosting CLI activate/connect/deactivate can be used to control guestshell. It is recommended that you use guestshell exec CLI instead.
Guestshell Life Cycle
Guestshell disable: Disable guesthell removes access to guestshell and kills current sessions. Files/data are preserved, you can use guestshell enable to restore access.
Switch#guestshell disable
Guestshell disabled successfully
Guestshell destroy: This deletes the guest shell file system irreversibly. All files/data/scripts/settinguestshell/ installed packages and modules.
Switch#guestshell destroy
Guestshell destroyed successfully
Note: When you run this command, all data is irreversibly lost.
Guestshell Run: Guestshell runs the command guestshell run bash to create a shell within the Guest Shell, allowing you to use any Linux binary under /bin and /sbin.
Switch#guestshell run bash
[guestshell@guestshell ~]$ ping 192.168.10.1
PING 192.168.10.1 (192.168.10.1) 56(84) bytes of data.
64 bytes from 192.168.10.1: icmp_seq=2 ttl=254 time=0.517 ms
64 bytes from 192.168.10.1: icmp_seq=3 ttl=254 time=0.552 ms
64 bytes from 192.168.10.1: icmp_seq=4 ttl=254 time=0.447 ms
64 bytes from 192.168.10.1: icmp_seq=5 ttl=254 time=0.549 ms
Guestshell run python: Use this command to start interactive python interpreter.
Switch#guestshell run python3
Python 3.6.8 (default, Dec 22 2020, 19:04:08)
[GCC 8.4.1 20200928 (Red Hat 8.4.1-1)] on linux
Type "help", "copyright", "credits" or "license" for more information.
>>>
Validations
You can use these commands to validate the Guestshell:
Switch#show app-hosting detail appid guestshell
App id                 : guestshell
Owner                  : iox
State                  : RUNNING
Application
  Type                 : lxc
  Name                 : GuestShell
  Version              : 3.3.0
  Description          : Cisco Systems Guest Shell XE for x86_64
  Author               : Cisco Systems
  Path                 : /guestshell/:guestshell.tar
  URL Path             :
  Multicast            : yes
Activated profile name : custom

Resource reservation
  Memory               : 256 MB
  Disk                 : 1 MB
  CPU                  : 800 units
  CPU-percent          : 11 %
  VCPU                 : 1

Platform resource profiles
  Profile Name                  CPU(unit)  Memory(MB)  Disk(MB)
  --------------------------------------------------------------

Attached devices
  Type              Name               Alias
  ---------------------------------------------
  serial/shell     iox_console_shell   serial0
  serial/aux       iox_console_aux     serial1
  serial/syslog    iox_syslog          serial2
  serial/trace     iox_trace           serial3

Network interfaces
   ---------------------------------------
eth0:
   MAC address         : 52:54:dd:5b:c4:b8
   IPv4 address        : 192.168.30.2
   IPv6 address        : ::
   Network name        : mgmt-bridge200

Port forwarding
  Table-entry  Service  Source-port  Destination-port
  ---------------------------------------------------
  Switch#show app-hosting list
App id                                   State
---------------------------------------------------------
guestshell                               RUNNING
Switch#guestshell run sudo ifconfig
eth0: flaguestshell=4163<UP,BROADCAST,RUNNING,MULTICAST>  mtu 1500
        inet 192.168.10.10  netmask 255.255.255.0  broadcast 192.168.10.255
        inet6 fe80::5054:ddff:fece:a7c9  prefixlen 64  scopeid 0x20
        ether 52:54:dd:ce:a7:c9  txqueuelen 1000  (Ethernet)
        RX packets 3  bytes 266 (266.0 B)
        RX errors 0  dropped 0  overruns 0  frame 0
        TX packets 9  bytes 726 (726.0 B)
        TX errors 0  dropped 0 overruns 0  carrier 0  collisions 0

lo: flaguestshell=73<UP,LOOPBACK,RUNNING>  mtu 65536
        inet 127.0.0.1  netmask 255.0.0.0
        inet6 ::1  prefixlen 128  scopeid 0x10
        loop  txqueuelen 1000  (Local Loopback)
        RX packets 338  bytes 74910 (73.1 KiB)
        RX errors 0  dropped 0  overruns 0  frame 0
        TX packets 338  bytes 74910 (73.1 KiB)
        TX errors 0  dropped 0 overruns 0  carrier 0  collisions 0
Resource Resizing
!
app-hosting appid guestshell
 app-vnic management guest-interface 0
 app-resource profile custom
  cpu 1000
  memory 512
  persist-disk 200
!
You need to disable and then enable the Guest Shell for the changes to take effect.
Switch#guestshell disable
Guestshell disabled successfully
Switch#guestshell enable
*Mar 11 01:17:46.841: %SYS-5-CONFIG_I: Configured from console by coguestshell enable
Interface will be selected if configured in app-hosting
Please wait for completion
guestshell activated successfully
Current state is: ACTIVATED
guestshell started successfully
Current state is: RUNNING
Guestshell enabled successfully
Switch#show app-hosting detail appid guestshell | sec Resource reservation
Resource reservation
  Memory               : 512 MB
  Disk                 : 200 MB
  CPU                  : 1110 units
  CPU-percent          : 15 %
  VCPU                 : 1
Note: On switches, resource resizing is allowed up to the max limitations by the platform, please refer to Cisco Catalyst 9000 Platform Hardware Resources for Applications.
Common Scenarios
DHCP Configuration
Problem: DHCP client binary (DHCLIENT) is not present.
Solution
You can install the DHCP client by using the Yum utility with the command sudo yum install dhcp-client. However, please note that the repositories for CentOS Stream 8 are no longer available.
1. You must avoid setting the IP address in the app-hosting to allow DHCP to function.
!
interface AppGigabitEthernet1/0/1
 switchport trunk allowed vlan 50
 switchport mode trunk
!
app-hosting appid guestshell
 app-vnic AppGigabitEthernet trunk
  vlan 50 guest-interface 0
name-server0 8.8.8.8
!
2. Change mirrorlist to baseurl vault in yum repo.
Switch#guestshell run bash
[guestshell@guestshell ~]$ sudo find /etc/yum.repos.d/ -type f -exec sed -i 's/mirrorlist=/#mirrorlist=/g' {} +
[guestshell@guestshell ~]$ sudo find /etc/yum.repos.d/ -type f -exec sed -i 's/#baseurl=/baseurl=/g' {} +
[guestshell@guestshell ~]$ sudo find /etc/yum.repos.d/ -type f -exec sed -i 's/mirror.centos.org/<centos vault URL>/g' {} +
[guestshell@guestshell ~]$ cat /etc/yum.repos.d/CentOS-Stream-RealTime.reporepo
# CentOS-Stream-RealTime.repo
# The mirrorlist system uses the connecting IP address of the client and the
# update status of each mirror to pick current mirrors that are geographically
# close to the client.  You should use this for CentOS updates unless you are
# manually picking other mirrors.
#
# If the mirrorlist does not work for you, you can try the commented out
# baseurl line instead.

[rt]
name=CentOS Stream $releasever - RealTime
#mirrorlist=http://mirrorlist.centos.org/?release=$stream&arch=$basearch&repo=RT&infra=$infra
baseurl=http://<centos vault URL>/$contentdir/$stream/RT/$basearch/os/
gpgcheck=1
enabled=0
gpgkey=file:///etc/pki/rpm-gpg/RPM-GPG-KEY-centosofficial
3. Install the packages.
guestshell@guestshell ~]$ sudo yum install dhcp-client
ast metadata expiration check: 0:50:34 ago on Wed Mar 12 17:44:46 2025.
Dependencies resolved.
================================================================================
 Package                Architecture Version                 Repository    Size
================================================================================
Installing:
 dhcp-client            x86_64       12:4.3.6-50.el8         baseos       319 k
Installing dependencies:
 bind-export-libs       x86_64       32:9.11.36-13.el8       baseos       1.1 M
 dhcp-common            noarch       12:4.3.6-50.el8         baseos       208 k
 dhcp-libs              x86_64       12:4.3.6-50.el8         baseos       148 k

Transaction Summary
================================================================================
Install  4 Packages

Total download size: 1.8 M
Installed size: 3.9 M
Is this ok [y/N]: y
Downloading Packages:
(1/4): dhcp-client-4.3.6-50.el8.x86_64.rpm      284 kB/s | 319 kB     00:01
(2/4): dhcp-common-4.3.6-50.el8.noarch.rpm      171 kB/s | 208 kB     00:01
(3/4): dhcp-libs-4.3.6-50.el8.x86_64.rpm        572 kB/s | 148 kB     00:00
(4/4): bind-export-libs-9.11.36-13.el8.x86_64.r 577 kB/s | 1.1 MB     00:02
--------------------------------------------------------------------------------
Total                                           908 kB/s | 1.8 MB     00:02
CentOS Stream 8 - BaseOS                        1.6 MB/s | 1.6 kB     00:00
Importing GPG key 0x8483C65D:
 Userid     : "CentOS (CentOS Official Signing Key) <CentOS Official Signing Key>"
 Fingerprint: 99DB 70FA E1D7 CE22 7FB6 4882 05B5 55B3 8483 C65D
 From       : /etc/pki/rpm-gpg/RPM-GPG-KEY-centosofficial
Is this ok [y/N]: y
Key imported successfully
Running transaction check
Transaction check succeeded.
Running transaction test
Transaction test succeeded.
Running transaction
  Preparing        :                                                        1/1
  Installing       : dhcp-libs-12:4.3.6-50.el8.x86_64                       1/4
  Installing       : dhcp-common-12:4.3.6-50.el8.noarch                     2/4
  Installing       : bind-export-libs-32:9.11.36-13.el8.x86_64              3/4
  Running scriptlet: bind-export-libs-32:9.11.36-13.el8.x86_64              3/4
  Installing       : dhcp-client-12:4.3.6-50.el8.x86_64                     4/4
  Running scriptlet: dhcp-client-12:4.3.6-50.el8.x86_64                     4/4
  Verifying        : bind-export-libs-32:9.11.36-13.el8.x86_64              1/4
  Verifying        : dhcp-client-12:4.3.6-50.el8.x86_64                     2/4
  Verifying        : dhcp-common-12:4.3.6-50.el8.noarch                     3/4
  Verifying        : dhcp-libs-12:4.3.6-50.el8.x86_64                       4/4

Installed:
  bind-export-libs-32:9.11.36-13.el8.x86_64  dhcp-client-12:4.3.6-50.el8.x86_64
  dhcp-common-12:4.3.6-50.el8.noarch         dhcp-libs-12:4.3.6-50.el8.x86_64

Complete!
Note: (FOR CALO) It is possible to configure a proxy for Yum. This allows Yum to connect through a proxy server for package downloads:
[guestshell@guestshell ~]$ echo "proxy=http://<IP_address:port>/" | sudo tee -a /etc/yum.conf > /dev/null
4. .Request a DHCP IP address for eth0.
[guestshell@guestshell ~]$ sudo dhclient eth0
5. Verify if the DHCP client is working by checking the IP address assignment.
Switch#guestshell run ifconfig
eth0: flags=4163<UP,BROADCAST,RUNNING,MULTICAST>  mtu 1500
        inet 192.168.10.2  netmask 255.255.255.0  broadcast 192.168.10.255
        inet6 fe80::5054:ddff:fea0:4aef  prefixlen 64  scopeid 0x20
        ether 52:54:dd:a0:4a:ef  txqueuelen 1000  (Ethernet)
        RX packets 1516  bytes 2009470 (1.9 MiB)
        RX errors 0  dropped 0  overruns 0  frame 0
        TX packets 687  bytes 54603 (53.3 KiB)
        TX errors 0  dropped 0 overruns 0  carrier 0  collisions 0

lo: flags=73<UP,LOOPBACK,RUNNING>  mtu 65536
        inet 127.0.0.1  netmask 255.0.0.0
        inet6 ::1  prefixlen 128  scopeid 0x10
        loop  txqueuelen 1000  (Local Loopback)
        RX packets 773  bytes 90658 (88.5 KiB)
        RX errors 0  dropped 0  overruns 0  frame 0
        TX packets 773  bytes 90658 (88.5 KiB)
        TX errors 0  dropped 0 overruns 0  carrier 0  collisions 0
DNF Packet Manager Update Failed
Problem: Unable to complete sudo dnf update -y on Guestshell due to error:
[guestshell@guestshell ~]$ sudo dnf upgrade --refresh
Warning: failed loading '/etc/yum.repos.d/CentOS-Base.repo', skipping.
Solution
1. Reinstall and upgrade RPM packages.
! Clean packages

[guestshell@guestshell ~]$ sudo dnf clean all

! Reinstall and update the tpm2-tss package:

[guestshell@guestshell ~]$ sudo dnf install tpm2-tss-2.3.2-3.el8
[guestshell@guestshell ~]$ sudo dnf upgrade rpm
2. Install git package separately.
[guestshell@guestshell ~]$ sudo dnf install git -y
Guestshell Acess Lost After the Upgrade
Problem: After the upgrade to version 17.08.01 or higher, the Guest Shell becomes inaccessible, resulting in the inability to execute scripts.
Switch#guestshell run bash
Switch#
Solution
The issue is related to Cisco bug ID CSCwi63075  , which is triggered during an upgrade when FIPS is enabled on the switch.
1. Disable FIPS.
Switch#configure terminal
Switch(config)#no fips authorization-key
FIPS: Authorization-key erased ONLY from the  Flash.
But the authorization-key is still operational. Use "reload" command for complete removal of key and to enter into non fips-mode.
Make sure to remove fips key from all the members of the stack individually
2. You can upgrade to one of the versions that include the fix, version 17.12.04 or any later release.
Restrict IPv6 Addressing
Problem: The issue involves unintended IPv6 addresses appearing on interfaces within the Cisco Guestshell environment. Although, not configured intentionally.
The configuration observed on the Switch with IPV4 is:
!
app-hosting appid guestshell
 app-vnic AppGigabitEthernet trunk
  vlan 50 guest-interface 0
   guest-ipaddress 192.168.20.10 netmask 255.255.255.0  <-- IPv4 address configured
 app-default-gateway 192.168.20.1 guest-interface 0
 app-resource profile custom
 name-server1 192.168.20.1
 !
When running the ifconfig command within the Guestshell environment, both IPv4 and IPv6 addresses become visible.
lat1-2-ssw01.gts#guestshell run bash
[guestshell@guestshell ~]$ sudo ifconfig
eth0: flags=4163  mtu 1500
        inet 192.168.20.10  netmask 255.255.255.0 broadcast 192.168.20.255
        inet6 2620:119:5022:515:5054:ddff:fe41:c643  prefixlen 64  scopeid 0x0
        inet6 fe80::5054:ddff:fe41:c643  prefixlen 64  scopeid 0x20
        ether 52:54:dd:41:c6:43  txqueuelen 1000  (Ethernet)
        RX packets 7829  bytes 1750981 (1.6 MiB)
        RX errors 0  dropped 0  overruns 0  frame 0
        TX packets 5551  bytes 744320 (726.8 KiB)
        TX errors 0  dropped 0 overruns 0  carrier 0  collisions 0

lo: flags=73  mtu 65536
        inet 127.0.0.1  netmask 255.0.0.0
        inet6 ::1  prefixlen 128  scopeid 0x10
        loop  txqueuelen 1000  (Local Loopback)
        RX packets 292  bytes 63812 (62.3 KiB)
        RX errors 0  dropped 0  overruns 0  frame 0
        TX packets 292  bytes 63812 (62.3 KiB)
        TX errors 0  dropped 0 overruns 0  carrier 0  collisions 0
Solution
Step 1: Disable IPv6 routing and addressing in Guestshell.
lat1-2-ssw01.gts#guestshell run bash
[guestshell@guestshell ~]$ sudo sysctl -w net.ipv6.conf.all.disable_ipv6=1
[guestshell@guestshell ~]$ sudo sysctl -w net.ipv6.conf.default.disable_ipv6=1
[guestshell@guestshell ~]$ sudo sysctl -w net.ipv6.conf.lo.disable_ipv6=1
Step 2: Verify that IPv6 is disabled.
[guestshell@guestshell ~]$ /sbin/ifconfig
eth0: flags=4163  mtu 1500
        inet 192.168.20.10  netmask 255.255.255.0 broadcast 192.168.20.255
        ether 52:54:dd:41:c6:43  txqueuelen 1000  (Ethernet)
        RX packets 7829  bytes 1750981 (1.6 MiB)
        RX errors 0  dropped 0  overruns 0  frame 0
        TX packets 5551  bytes 744320 (726.8 KiB)
        TX errors 0  dropped 0 overruns 0  carrier 0  collisions 0

lo: flags=73  mtu 65536
        inet 127.0.0.1  netmask 255.0.0.0
        loop  txqueuelen 1000  (Local Loopback)
        RX packets 292  bytes 63812 (62.3 KiB)
        RX errors 0  dropped 0  overruns 0  frame 0
        TX packets 292  bytes 63812 (62.3 KiB)
        TX errors 0  dropped 0 overruns 0  carrier 0  collisions 0
Disk Space Errors While Running Python Scripts
Problem: The issue involves a Python script running on an Embedded Event Manager (EEM) within the Guestshell. Script fails due to running out of disk space with the error:
guestshell run python3 /flash/guest-share/monitoring.py -rt True -bgp True
---- pushing bgp status ----
OSError: [Errno 28] No space left on device

During handling of the above exception, another exception occurred:

Traceback (most recent call last):
  File "/flash/guest-share/monitoring_periodic_tasks.py", line 18, in
    print(bgp_status())
  File "/bootflash/guest-share/monitoring_bgp_status.py", line 15, in bgp_status
    vrf = cli.cli('show vrf')
  File "/usr/lib/python3.6/site-packages/cli/__init__.py", line 311, in cli
    _log_to_file("CLI execution invoked for '" + command + "'")
  File "/usr/lib/python3.6/site-packages/cli/__init__.py", line 87, in _log_to_file
    logfile.close()
OSError: [Errno 28] No space left on device
! This error indicates that the disk space allocated for logging command executions within the Guestshell environment has been exhausted.
Solution
To resolve the issue of running out of disk space, you need to increase the persist-disk size for the Guestshell environment:
1. Modify the application resource profile to increase the persist-disk size.
Switch(config-app-hosting)# app-resource profile custom
Switch(config-app-hosting-profile)# persist-disk 100
Switch(config-app-hosting-profile)# cpu 800
Switch(config-app-hosting-profile)# memory 256
Switch(config-app-hosting-profile)# end
2. Save the configuration and enable/disable the guestshell.
Switch# write memory
Switch#guestshell disable
Guestshell disabled successfully
Switch#guestshell enable
Interface will be selected if configured in app-hosting
Please wait for completion
guestshell installed successfully
Current state is: DEPLOYED
guestshell activated successfully
Current state is: ACTIVATED
guestshell started successfully
Current state is: RUNNING
Guestshell enabled successfully
Logging Syslog
You can run these commands in guestshell to display the syslog messages :
[guestshell@guestshell ~]$ sudo logger -p 1 "Priority 1"
[guestshell@guestshell ~]$ sudo cat /var/log/messages
Mar 11 02:05:24 localhost systemd[248]: user@0.service: Failed at step PAM spawning /usr/lib/systemd/systemd: Operation not permitted
Mar 11 02:05:24 localhost systemd[1]: user@0.service: Failed with result 'protocol'.
Mar 11 02:05:24 localhost systemd[1]: Failed to start User Manager for UID 0.
Mar 11 02:05:24 localhost systemd[1]: Stopping /run/user/0 mount wrapper...
Mar 11 02:05:24 localhost systemd[1]: run-user-0.mount: Succeeded.
Mar 11 02:05:24 localhost systemd[1]: user-runtime-dir@0.service: Succeeded.
Mar 11 02:05:24 localhost systemd[1]: Stopped /run/user/0 mount wrapper.
Mar 11 02:05:24 localhost root[250]: Priority 1
[guestshell@guestshell ~]$ sudo cat /var/log/secure
Mar 11 02:05:24 localhost systemd[248]: pam_unix(systemd-user:account): expired password for user root (root enforced)
Mar 11 02:05:24 localhost sudo[246]: pam_systemd(sudo:session): Failed to create session: Start job for unit user@0.service failed with 'failed'
Mar 11 02:05:24 localhost sudo[246]: pam_unix(sudo:session): session opened for user root by (uid=0)
Tracelog
You can use app-hosting move appid guestshell log to bootflash:folder_name to rotate the file. This can be used to rotate to a target directory, but this also rotates to traceloguestshell directory.
Switch#app-hosting move appid guestshell log to bootflash:
Successfully moved tracelog to flash:/ioxapploguestshell/iox_R0-0_R0-0.14195_0.20250311023831.bin.gz
Note: IOX guestshell.log is always the active tracelog file under /tmp/rp/trace • When this file reaches 1MB, it is automatically rotated to bootflash:traceloguestshell/ with a timestamp, and a new one is started.
Related Information
- Application Hosting on the Cisco Catalyst 9000 Series Switches White paper
- Cisco Catalyst 9300 Series Switches Hardware Installation Guide
- Programmability Configuration Guide, Cisco IOS XE 17.9.x
- Catalyst 9300 Stackwise System Architecture White Paper
- Cisco bug ID CSCwi63075 - Guestshell is not accessible via CLI after an upgrade to 17.08.01 or later if FIPS mode is enabled
- Technical Support & Documentation - Cisco Systems
Revision History
| Revision | Publish Date | Comments |
|---|---|---|
1.0 |
17-Mar-2025
|
Initial Release |
Contributed by Cisco Engineers
- Christopher Martinez BarriosTechnical Consulting Engineer
 Feedback
Contact Cisco
- Open a Support Case

- (Requires a Cisco Service Contract)