Define QoS Class Mapping on Sx500 Series Stackable Switches
Available Languages
Objectives
Class mapping applies the Access Control List (ACL) rules to Quality of Service (QoS) settings. ACLs and Access Control Elements (ACE) are defined to indicate the traffic which should be permitted into the network and the traffic which should be denied from the network. ACLs are the efficient way to control the traffic within a network. This document explains how to define a class map on a Sx500 Series Stackable Switch.
Note: You have to configure MAC based ACL (Refer the article entitled Configuration of MAC Based ACLs and ACEs on Sx500 Series Stackable Switches for further details) and IP based ACL (Refer the article entitled Configure IPv4-Based ACLs and ACEs on Sx500 Series Stackable Switches and Configure IPv6-Based ACLs and ACEs on Sx500 Series Stackable Switches) prior to configure class mapping.
Applicable Devices
• Sx500 Series Stackable Switches
Software Version
• 1.3.0.62
Define a class map
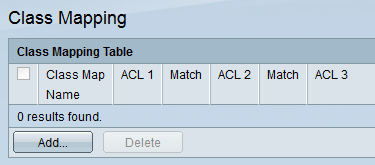
Step 1. Log in to the web configuration utility to choose Quality of Service > QoS Advanced Mode > Class Mapping. The Class Mapping page opens:
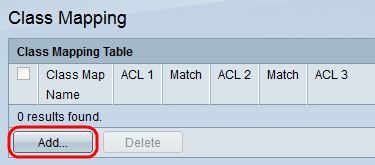
Step 2. Click Add to add class mapping. The Add Class Mapping page opens.
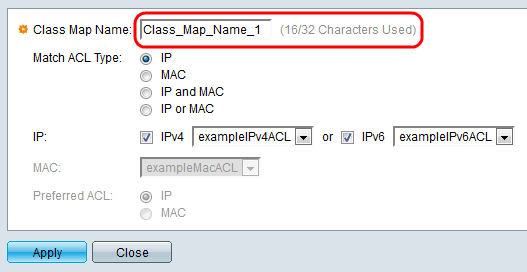
Step 3. At the Class Map Name field, enter the desired name which you want for this mapping.
Step 4. At the Match ACL Type field, choose how a packet must match to ACL defined in the class map. The options are:
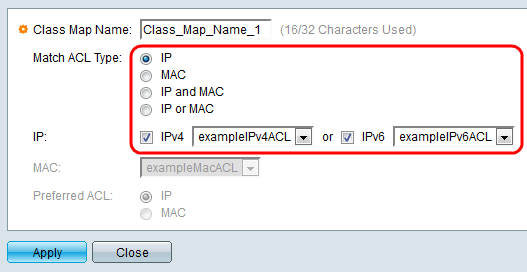
• IP — A packet must match the defined IP based ACL in order to be permitted.
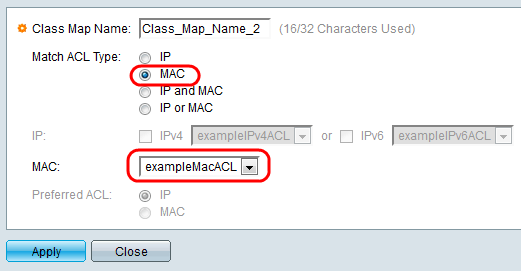
• MAC — A packet must match the defined MAC based ACL in order to be permitted.
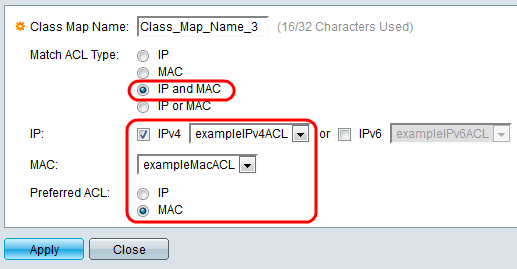
• IP and MAC — A packet must match the IP based ACL and the MAC based ACL in order to be permitted.

• IP or MAC — A packet must match either the IP based ACL or the MAC based ACL in order to be permitted.
Step 5. At the IP field, check either the IPv4 or the IPv6 based on what is configured on the access control for the class map. Choose the desired ACL from the drop down list besides to the value you checked.
Step 6. At the MAC field, choose the desired MAC based ACL from the drop down list for the class map.
Step 7. If you have chosen IP and MAC or IP or MAC in the Step 4, you can prioritize either IP or MAC over one another at the Preferred ACL field. Choose IP radio button if you prefer packets to be matched with IP based ACLs first and then to MAC based ACLs. Otherwise, choose MAC radio button.
Note: To create a new class map, provide the class map name and assign one or two ACL's to the class map . If a class map has two ACL's, you can specify that a frame must match both ACL's, or that it must match either one or both of the ACL's selected. The two ACLs are IP based ACL and MAC based ACL.
Step 8. Click Apply. The running configuration file is updated.
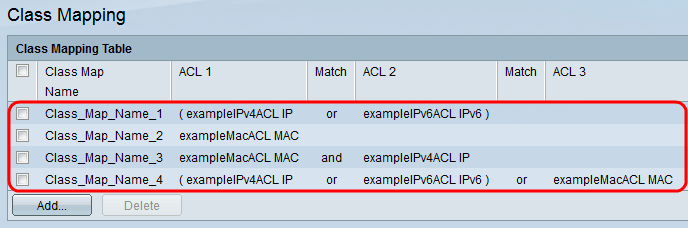
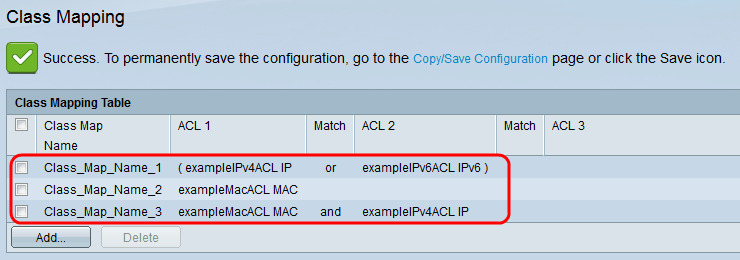
All the class maps are updated in the Class Mapping Table.
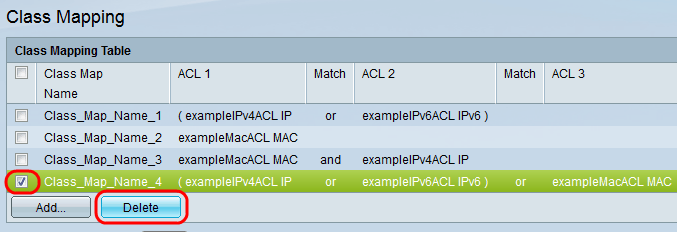
Step 9 (Optional). To delete a class map, check the desired Class Map Name(s) that needs to be removed and click Delete.
The class map is deleted and the changes are saved in the running configuration.
Revision History
| Revision | Publish Date | Comments |
|---|---|---|
1.0 |
11-Dec-2018 |
Initial Release |
 Feedback