Configure Simple Network Management Protocol (SNMP) Engine ID on 300 Series Managed Switches
Available Languages
Objective
Simple Network Management Protocol (SNMP) is an Internet standard protocol used to manage devices on IP networks. SNMP was designed to provide a method that centralizes the management of TCP/IP-based networks. An SNMP engine ID is used to uniquely identify each SNMPv3 entity on a network.300 Series Managed Switches can function as an SNMPv3 entity and therefore need to have an engine ID if you want to utilize the functions provided by SNMP.
This article explains how to configure an SNMP Engine ID on 300 Series Managed Switches.
Note: SNMP is disabled by default and must be turned on before you can utilize the SNMP features of the switch. On the web configuration utility, choose Security > TCP/UDP Services and check if SNMP Services are enabled. For more information, refer to the article View TCP/UDP Service Status on 200/300 Series Managed Switches.
Applicable Devices
• SF/SG 300 Series Managed Switches
Software Version
• 1.3.0.62
Configure SNMP Engine ID
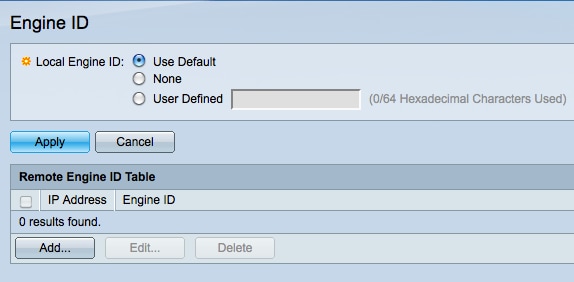
Step 1. Log in to the web configuration utility and choose SNMP > Engine ID. The Engine ID page opens:

Step 2. Click the desired Local Engine ID radio button to define the local engine ID. This is the engine ID of the switch.
• Use Default — The default Engine ID is based on the MAC address of the switch.
• None — No Engine ID is used.
• User Defined — Manually enter the engine ID of the switch. The engine ID needs to be entered in hexadecimal format.
Step 3. Click Apply to save your changes.
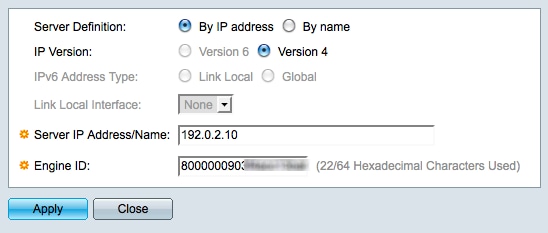
Step 4. Click Add in the Remote Engine ID Table to map the IP address to the engine ID of an SNMP server. The Add Remote Engine ID window appears.

Step 5. Click the radio button that corresponds with the method used to define the SNMP server in the Server Definition field. The server is the device that monitors SNMP data.
• By IP Address — Define the SNMP server with an IP address.
• By Name — Define the SNMP server with a domain name. If you choose this option, skip ahead to Step 9.
Step 6. Click the appropriate radio button to determine which IP version to use to locate the SNMP server in the IP Version field. If you click Version 4, skip ahead to Step 9.
Step 7. Click the appropriate radio button that specifies the address type in the IPv6 Address Type field.
• Link Local — A link local address is a private IP address and is not visible to outside networks.
• Global — A global Unicast IPv6 address is a public IP address and is available from other networks. If you click Global, skip ahead to Step 9.
Step 8. Choose a link local interface from the Link Local Interface drop-down list. Since link local addresses are private, the link local interface is the only source that is able to reach the link local address.
Step 9. Enter the IP address or domain name of the SNMP server to be mapped to the engine ID in the Server IP Address/Name field.
Step 10. Enter the engine ID in hexadecimal format in the Engine ID field. The engine ID should correspond with the same device that the IP address or domain name refers to.
Step 11. Click Apply to save the settings and then click Close to exit the Add Remote Engine ID window. The Remote Engine ID Table should be updated.

Step 12. (Optional) Check the check box of the desired SNMP server and click Edit to change the IP address or Engine ID of the SNMP server.
Step 13. (Optional) Check the check box of the desired SNMP server and click Delete to remove the entry from the Remote Engine ID Table.
Revision History
| Revision | Publish Date | Comments |
|---|---|---|
1.0 |
13-Dec-2018
|
Initial Release |
 Feedback