Configure Storm Control on the 200/300 Series Managed Switches
Available Languages
Objective
When a switch receives any type of frame, the switch makes a copy of the frame and sends it out to all applicable ports; this activity could end in a traffic storm. If traffic storms in a switch are not controlled, then they can bring the switch down and possibly the full functionality of the network. You can enable storm control in your switch, which limits the number of frames that enter the switch. When the threshold value is reached, the port is blocked until the traffic rate drops below the threshold. The port can then resume its normal activities.
The objective of this article is to explain how to configure storm control on the 200/300 Series Managed Switches.
Applicable Devices
• SF/SG 200 and SF/SG 300 Series Managed Switches
Software Version
• 1.3.0.62
Configure Storm Control
This section explains how to configure storm control on the 200/300 Series Managed Switches.
Configure Storm Control on a Single Port
This subsection explains how to configure storm control on a single port.
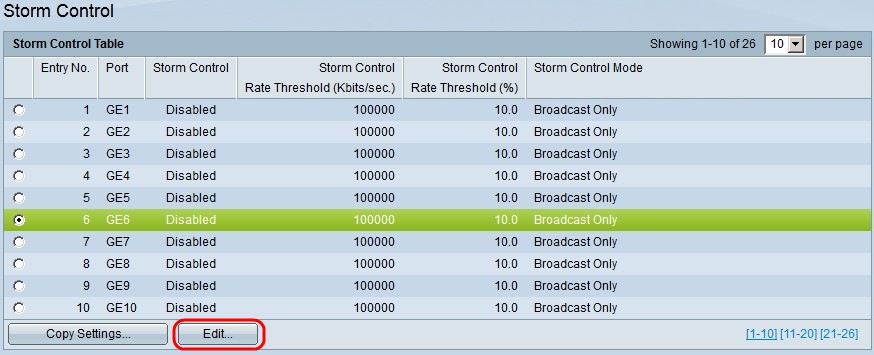
Step 1. Log in to the web configuration utility and choose Security>Storm Control. The Storm Control page opens:

Step 2. Click the radio button for the port on which you wish to enable storm control.
Step 3. Click Edit. The Edit Storm Control window appears.

Step 4. In the Storm Control field, check the Enable check box.
Step 5. In the Storm Control Rate Threshold field, enter the number of frames in kbits/sec that you want the port to handle.
Step 6. In the Storm Control Mode field, click one of the following:
• Unknown Unicast, Multicast & Broadcast — Click this option if you do not know the type of frame the port receives. This option applies the threshold to all incoming frames.
• Multicast & Broadcast — Click this option so the switch only applies the threshold to multicast and broadcast frames.
• Broadcast Only — Click this option so the switch only applies the threshold to broadcast frames.
Step 7. Click Apply.
Storm Control on Multiple Ports
This subsection explains how to apply a storm control configuration on multiple ports.
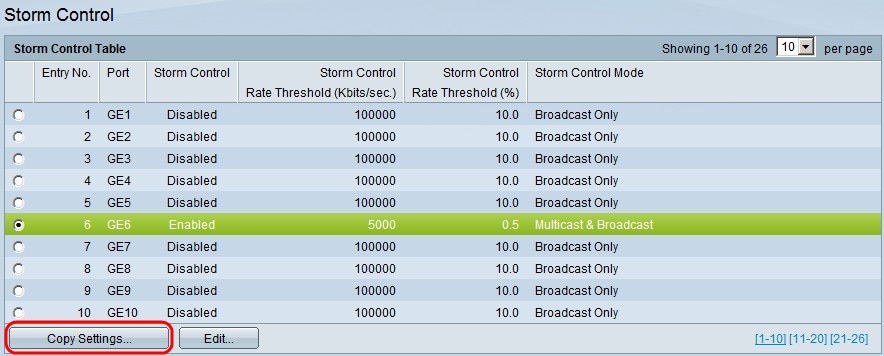
Step 1. Log in to the web configuration utility and choose Security>Storm Control. The Storm Control page opens:

Step 2. Click the port whose configuration you wish to apply to multiple ports.
Step 3. Click Copy Settings. The Copy Settings window appears.

Step 4. In the Copy configuration from entry 6 (GE6) to: field, enter the ports to which you wish to apply the storm control configuration of the previously clicked port. You can enter each port by number or port name (For example: 1, 2, 3 or GE1, GE2, GE8) or you can enter a range of ports by number or by name (For example: 7-10 or GE7-GE10). The ports numbers can be separated by commas.
Step 5. Click Apply.
Revision History
| Revision | Publish Date | Comments |
|---|---|---|
1.0 |
13-Dec-2018
|
Initial Release |
 Feedback